background image

33

Oven data

Brand

Falcon

Model identification

900S

Type of oven

Electric

Mass

kg

137

Number of cavities

1

Right-hand Efficiency

Fuel type

Electric

Cavity type 

*Drop Down Door

Multifunction*

Power - conventional

2.75

Power - forced air convection

3.3

Volume

Litres

114

Energy consumption (electricity) - conventional

kWh / cycle

1.16

Energy consumption (electricity) - forced air convection

kWh / cycle

1.03

Energy efficiency index - conventional

112.8

Energy efficiency index - forced air convection

100.1

Energy class

A

Additional Information

The oven complies with EN 60350-1
Maximum output @ 230V 50Hz

Full

Divided

Fan element

3.31 kW

1.65 kW

Top element

3.49 kW

1.75 kW

Browning element

2.11 kW

1.06 kW

Bottom element

1.38 kW

0.69 kW

Maximum total electrical load at 230 V


(approximate total including hob, oven lights, oven fan, etc.)

14.2 kW

Содержание 1092 Continental Induction G5

Страница 1: ...U110267 04 Falcon 900s Induction USER GUIDE INSTALLATION INSTRUCTIONS ...

Страница 2: ...00 C for a fan oven orgas mark 7 2 Pull the small sprigs off the rosemary branches and set aside with the garlic 3 Using the tip of a paring knife make up to 20 well spaced cuts into the flesh of the lamb about 2 5cm inch deep Divide the rosemary sprigs garlic and anchovies and push down into the cuts Place the leg on a large roasting tin and pour over the oil massaging it all over the joint Seaso...

Страница 3: ...ries 13 3 Cooking tips 14 4 Cooking table 15 5 Cleaning your cooker 16 Hob 16 Control panel and oven doors 17 Ovens 17 Cleaning table 18 6 Troubleshooting 19 7 Installation 21 Dear installer 21 Safety requirements and regulations 21 Provision of ventilation 21 Location of cooker 21 Positioning the cooker 22 8 Moving the cooker 23 9 Electrical connection 25 10 Final checks and fittings 26 Customer ...

Страница 4: ...ii ...

Страница 5: ...NOT store items on the cooking surfaces To avoid overheating DO NOT install the cooker behind a decorative door Accessible parts will become hot during use and will retain heat even after you have stopped cooking Keep babies and children away from the cooker and never wear loose fitting or hanging clothes when using the appliance DO NOT use a steam cleaner on your cooker Always keep combustible ma...

Страница 6: ... it is installed Therefore make sure that the kitchen is well ventilated keep natural ventilation holes open or install a powered cookerhood that vents outside If you have several hotplates burners on or use the cooker for a long time open a window or turn on an extractor fan Maintenance It is recommended that this appliance is serviced annually DO NOT use cooking vessels on the hotplate that over...

Страница 7: ...erference If you are fitted with a pacemaker or implanted insulin pump and are concerned please consult your doctor for medical advice When the hob is in use keep magnetic items away such as credit and debit cards floppy disk calculators etc Take care when touching the marked cooking areas of the hob Use adequately sized pans with flat bottoms that are large enough to cover the surface of the hotp...

Страница 8: ...Should this occur DO NOT attempt to lift the lid off the hotplate this may damage the hob surface Instead carefully slide the lid to the edge of the hob surface and remove DO NOT place anything between the base of the pan and the hob surface e g asbestos mats aluminium foil wok stand Take care NOT to place metallic objects such as knives forks spoons and lids on the hob surface since they can get ...

Страница 9: ... a cutting board DO NOT leave utensils foodstuffs or combustible items on the hob when it is not in use e g tea towels frying pans containing oil DO NOT place plastic or aluminium foil or plastic containers on the hob Always turn the control to the OFF position before removing a pan Avoid heating an empty pan Doing so may damage both the hob and pan Grill glide out grill care When using the grill ...

Страница 10: ...aned with hot soapy water Take care that no water seeps into the appliance Before you remove any of the grill parts for cleaning make sure that they are cool or use oven gloves DO NOT use any abrasive substances on the grill and grill parts DO NOT put the side runners in a dishwasher DO NOT put the burner heads in a dishwasher NEVER use caustic or abrasive cleaners as these will damage the surface...

Страница 11: ...ess steel pans are not suitable for use with an induction hob so please check carefully before purchasing any cookware Pans made of copper aluminium or ceramic are not suitable for use on an induction hob The kind of pan you use and the quantity of food affects the setting required Higher settings are required for larger quantities of food Pots and pans should have thick smooth flat bottoms Fig 2 ...

Страница 12: ...er use switch off the hob element by its control and DO NOT RELY on the pan detector If a cooking area is switched on and there is no pan in place or if the pan is too small for the cooking area then no heat will be generated The symbol will appear on the hob control display this is the pan missing symbol Place a pan of the correct size on the cooking area and the symbol will disappear and cooking...

Страница 13: ...can only be activated when all the cooking zones are switched off To prevent the unwanted use by children the hob can be locked To lock the hob simultaneously turn the two left hand hob controls counter clockwise Fig 2 6 and hold until the symbol appears in the centre of the hob control display Fig 2 7 Note A will flash when locking the hob this is normal Locking the hob will NOT affect the oven i...

Страница 14: ...ning the control knob to a lower setting Overheat function This function identifies when the temperature of the pan rises rapidly and works to maintain a safe level of pan temperature It should not interfere with normal cooking Cookware with bases that become distorted Fig 2 2 when heated may interfere with the operation of the Overheat Function This may result in damage to your cookware or Induct...

Страница 15: ...ocated on the uppermost shelf Fan assisted oven This function operates the fan circulating air heated by the elements at the top and the base of the oven The combination of fan and conventional cooking top and base heat makes this function ideal for cooking large items that need thorough cooking such as a large meat roast It is also possible to bake on two shelves at one time although they will ne...

Страница 16: ...moved This brings into use the elements on the left hand side as well as those on the right when a function is selected All oven functions are available in full and divided forms and shelves are provided for use in both forms n n Warning Take great care when removing the divider not to scratch the inner glass door surface Scratches in the glass can cause stress and may cause the door to fail Remov...

Страница 17: ...ine with the shelf brackets Fig 2 21 Lift and pull the shelf forward Fig 2 22 Refit in the reverse order making sure to push it fully back Oven light Press the button to turn on the oven lights Fig 2 23 If one of the oven lights fail turn off the cooker power supply before you change the bulb See the Troubleshooting section for details on how to change an oven light bulb Storage The bottom drawer ...

Страница 18: ...ase of the pan this is completely normal Cooking with a multi function oven Remember not all modes are suitable for all food types The oven cooking times given are intended for a guide only 3 Cooking tips General oven tips The wire shelves should always be pushed firmly to the back of the oven Baking trays with food cooking on them should be placed level with the front edge of the oven s wire shel...

Страница 19: ...re 2 2 hours Up to 3 hours 80 90 minutes 15 25 minutes 10 15 minutes 20 30 minutes 30 40 minutes 20 30 minutes on a preheated tray 35 45 minutes 10 20 minutes according to size 20 40 minutes according to size 2 3 hours 45 60 minutes 40 45 minutes 2 to 3 hours 20 30 minutes Conventional Oven Temperature C Shelf Position 160 C 200 C 160 C 200 C 160 C 200 C 160 C 200 C 160 C 200 C 160 C 200 C 140 150...

Страница 20: ...e the area surrounding the hot zone with a clean paper towel If a spill other than a sugary substance is on the hot zone do not clean until the unit has completely cooled down and then follow the instructions below Cleaning Burned on Spills If you accidentally melt anything on the surface or if you spill foods with a high sugar content preserves tomato sauce fruit juice etc remove the spill IMMEDI...

Страница 21: ...ar of the two supporting holes and pull outwards Fig 5 2 Note There are specific liners for the left and right hand sides To remove the side panels simply lift the panel and slide forwards Fig 5 3 Replacing the oven linings To replace the liner the cut out section must be at the top of the liner Slide the liner towards the back of the oven cavity When this is in place the shelf supports can be rep...

Страница 22: ...ermarket Sides and plinth Painted surface Hot soapy water soft cloth Splashback rear grille Enamel or stainless steel Hot soapy water soft cloth Cream cleaner with care if necessary Control panel Paint enamel or stainless steel Warm soapy water Do not use abrasive cleaners on lettering Control knobs handles trims Plastic chrome or copper Warm soapy water soft cloth Brass Brass polish Oven Part Fin...

Страница 23: ...he type of pan may also contribute to induction noise The cooling fan The induction hob incorporates a cooling fan This cooling fan is active when either the grill or the oven s are on Under certain conditions the cooling fan may remain active when the grill or oven s are switched off This is normal and the fan will switch off automatically The fascia gets hot when I use the oven If the fascia bec...

Страница 24: ... it round during cooking If two shelves are used check that space has been left for the heat to circulate When a baking tray is put into the oven make sure that it is placed centrally on the shelf Check that the door seal is not damaged and that the door catch is adjusted so that the door is held firmly against the seal A dish of water when placed on the shelf should be the same depth all over For...

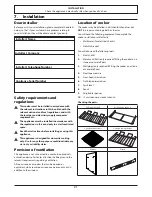
Страница 25: ...arding ventilation All rooms require a window that can be opened or equivalent while some rooms require a permanent vent in addition to the window Location of cooker The cooker may be installed in a kitchen kitchen diner but NOT in a room containing a bath or shower You will need the following equipment to complete the cooker installation satisfactorily Multimeter for electrical checks Stability b...

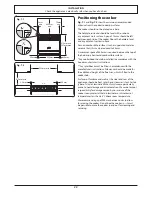
Страница 26: ... is required between the top of the hob and a horizontal combustible surface Any cookerhood should be installed in accordance with the hood manufacturer s instructions Any splashback must be fitted in accordance with the manufacturers instructions Allowance should be made for the additional height of the flue trim which is fitted to the cooker hob Surfaces of furniture and walls at the sides and r...

Страница 27: ...move the rear half of the polystyrene base Lowering the two rear rollers To adjust the height of the rear of the cooker first fit a 13mm spanner or socket wrench onto the hexagonal adjusting nut Fig 8 2 Rotate the nut clockwise to raise counter clockwise to lower Make 10 complete 360 turns clockwise Make sure you lower BOTH REAR ROLLERS Completing the move Unfold the rear edge of the cardboard bas...

Страница 28: ...more to make sure that the electricity cable is not caught or trapped Levelling You are recommended to use a spirit level on a shelf in one of the ovens to check for level Place the cooker in its intended position taking care not to twist it within the gap between the kitchen units as damage may occur to the cooker or the units The front feet and rear rollers can be adjusted to level the cooker To...

Страница 29: ...c power point The total electrical load of the appliance is approximately 3 6kW The cable size used should be suitable for this load and comply with all local requirements Access to the mains terminal is gained by removing the electrical terminal cover box on the back panel Connect the mains cable to the correct terminals for your electrical supply type Fig 9 1 and Fig 9 2 Check that the links are...

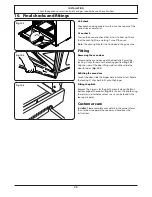
Страница 30: ...the door fully Swivel the locking U clips forward to the locking position Fig 10 1 Grip the sides of the door lift upwards and then slide the door forwards Fig 10 2 Refitting the oven door To refit the door slide the hinges back into their slots Rotate the locking U clips back to fit onto the hinges Fitting the plinth Remove the 3 screws for the plinth mounts along the front bottom edge of the coo...

Страница 31: ...INSTALLATION Check the appliance is electrically safe and gas sound when you have finished 27 To remove the drawer To fit the drawer ...

Страница 32: ...E Hob Display Induction unit Left Front 1 Left Rear 2 Centre 5 Right Rear 3 Right Front 4 6 way connector 6 way connector br br br br br br br br g b b br br Interface board x1 x5 x3 x4 x2 x6 5 4 3 1 2 E Code Colour br Brown b Blue g Green ...

Страница 33: ...element D Right hand top element outer E Right hand top element inner F Right hand fan element G Right hand fan H Cooling fan I Left hand bottom element Code Colour b Blue br Brown bk Black or Orange r Red v Violet w White y Yellow g y Green yellow gr Grey r f Red flag Code Description J Left hand top element outer K Left hand top element inner L Left hand fan element M Left hand fan N Thermostat ...

Страница 34: ... of the plastic clips Fig 12 1 and Fig 12 2 to release the catches holding the drawer to the side runners At the same time pull the drawer forward and away from the side runners Fitting the drawer To fit the drawer pull the side rails fully out Fig 12 3 Carefully move the drawer back between the rails and rest it on the side rails At each side hold the front of the drawer and pull the side rail fo...

Страница 35: ...eight above the hotplate 650mm Hotplate Ratings Max 1 85 kW Boost 3 0 kW Max 1 85 kW Boost 3 0 kW Max 2 3 kW Boost 3 7 kW Max 1 85 kW Boost 3 0 kW Max 1 4 kW Boost 2 2 kW Zone 1 Zone 2 Zone 3 Zone 4 Zone 5 HE 2 Hotplate energy saving tips Oven energy saving tips Use cookware with a flat base Cook meals together if possible Use the correct size cookware Keep the pre heating time short Use cookware ...

Страница 36: ...ergy Consumption ECElectric cooking Wh kg 172 Zone 3 Ø cm 21 5 Heating Technology Energy Consumption ECElectric cooking Wh kg 171 Zone 4 Ø cm 18 5 Heating Technology Energy Consumption ECElectric cooking Wh kg 172 Zone 5 Ø cm 18 5 Heating Technology Energy Consumption ECElectric cooking Wh kg 172 Zone 6 Ø cm Heating Technology Energy Consumption ECElectric cooking Wh kg Energy Consumption ECElectr...

Страница 37: ...Wh cycle 1 16 Energy consumption electricity forced air convection kWh cycle 1 03 Energy efficiency index conventional 112 8 Energy efficiency index forced air convection 100 1 Energy class A Additional Information The oven complies with EN 60350 1 Maximum output 230V 50Hz Full Divided Fan element 3 31 kW 1 65 kW Top element 3 49 kW 1 75 kW Browning element 2 11 kW 1 06 kW Bottom element 1 38 kW 0...

Страница 38: ...rest of this booklet especially the Troubleshooting section first to check that you are using the appliance correctly If you are still having difficulty contact your retailer 14 Warranty After sales service Notes If your appliance is outside the 3 year warranty period our service provider may charge for this visit If you request an engineer to visit and the fault is not the responsibility of the m...

Страница 39: ...35 Notes ...

Страница 40: ...Clarence Street Royal Leamington Spa Warwickshire CV31 2AD England Tel 44 0 800 804 6261 44 0 370 789 5107 E mail consumers falconappliances co uk ...

Отзывы: