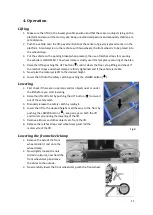
Falco MLP100KE Скачать руководство пользователя страница 13

12 


5.


Maintenance 

-


Check the lift for signs of wear and tear, corrosion and deformations previous to EACH 
use. In case there are signs of any of the above, immediately decommission the lift until 
the defect is repaired/fixed. 

-


Keep the lift clean and remove oil and grease. Regularly lubricate all moving parts of the 
lift. 

-


Check the hydraulic cylinder and piston regularly for signs of corrosion, regularly clean 
exposed parts with a clean cloth which was drenched in oil. 

-


Regularly check the oil level of the lift, when it is too low, add Falco CH32 hydraulic oil, 
NEVER use brake fluid or any other fluids. 

-


When the lift does not entirely function as it should, remove air out of the system. 

-


When the lift is not being used, store it in the lowest position in a dry, covered area. 

6.


Warranty 

1.


The warranty enters into force on the date that is mentioned on the receipt and has a validity 
of twelve months. 

2.


The warranty is not transferable without written permission of your distributor. 

3.


Warranty cannot be claimed without a receipt. 

4.


Warranty only applies when the product is used according to the included manual and is 
used exclusively in the way it was designed for. 

5.


No changes are to be made to the product. 

6.


The warranty does not apply  in case of injudicious use. 

7.


Possible shipping costs are not covered by the warranty. 

8.


Repairs should exclusively be carried out by your supplier. Repair(s) carried out by others will 
result in cancellation of the warranty. 

9.


Repairs that are carried out during the warranty period will not extend the validity of the 
warranty. There will be given a warranty of three months on the repair itself in case the 
regular warranty should expire. 

10.


Potential maintenance of the product, as described in the user manual, should be carried out 
on time. 

11.


For the warranty U can only turn to the outlet where U bought the product. 


Содержание MLP100KE

Страница 1: ...Elektrische motorfietslift 1000kg Electric motorcycle lift 1000kg MLP100KE Montage en gebruiksinstructies Installation and operating instructions...

Страница 2: ...eerste gebruik 5 Ontluchten van het hydraulisch systeem 5 4 Bediening 6 Heffen 6 Zakken 6 Het laten zakken van de voorwielklem 6 5 Onderhoud 7 6 Garantie 7 Onderdelentekening en lijst Parts drawing an...

Страница 3: ...the hydraulic system 10 4 Operation 11 Lifting 11 Lowering 11 Lowering the frontwheel clamp 11 5 Maintenance 12 6 Warranty 12 Onderdelentekening en lijst Parts drawing and list 13 Hydraulisch schema H...

Страница 4: ...oed bewaard en bijgehouden te worden Omdat er in het oog van de kwaliteit constant verbeteringen aan de apparatuur worden doorgevoerd behoudt Falco zich het recht voor om specificaties van de in de ha...

Страница 5: ...op veilige afstand tijdens gebruik 10 Overschrijdt nooit de maximale capaciteit van 1000kg 11 Boor slijp en las nooit aan de motorfietslift 12 Wijzig nooit instellingen van de pomp en of cilinder dit...

Страница 6: ...5 Zet de relingen 11 nu stevig vast op het platform door de bouten 9 stevig vast te draaien en monteer vervolgens twee delen van de wielklem 13 17 op de basis 18 fig 5 6 Monteer vervolgens de oprijpl...

Страница 7: ...afstandsbediening tot de lift op de gewenste hoogte staat 6 Druk nu op de ZAK knop op de afstandsbediening om deze in de vergrendeling te laten zakken Zakken 1 Controleer van tevoren of er geen perso...

Страница 8: ...de datum vermeld op de aankoopnota en heeft een geldigheid van 12 maanden 2 De garantie is niet overdraagbaar zonder een schriftelijke verklaring van toestemming van Uw leverancier 3 Zonder aankoopno...

Страница 9: ...ery lift is supplied with a manual including a declaration of conformity These must be stored and kept up to date properly Because of quality reasons constant improvements are going to be made on the...

Страница 10: ...nd especially children at a safe distance during use of the lift 10 Never exceed the maximum capacity of 1000kg 11 Never drill cut or weld the motorcycle lift 12 Never change the settings of the pump...

Страница 11: ...the wheel clamp 18 between the rails 11 check if there is enough space to slide it in smoothly fig 4 5 Now firmly tighten the bolts 9 of the rails 11 and accordingly mount the two parts of the wheel c...

Страница 12: ...e is stable 5 Now raise the motorcycle lift to the desired height 6 Lower the lift into the safety catch by pushing the LOWER button Lowering 1 First check if there are no persons and or objects near...

Страница 13: ...hat is mentioned on the receipt and has a validity of twelve months 2 The warranty is not transferable without written permission of your distributor 3 Warranty cannot be claimed without a receipt 4 W...

Страница 14: ...13 Onderdelentekening en lijst Parts drawing and list...

Страница 15: ...14...

Страница 16: ...2 8 21 front platform 2 62 bolt 2 M8 14 22 circlips 8 12 63 O ring 1 10 2 23 hinge shaft 2 64 hose 1 24 lock nut 11 M5 65 cable nut 1 M25 25 screw 8 M5 14 66 control case 1 29 axle 1 2 67 power cable...

Страница 17: ...16 Hydraulisch schema Hydraulic scheme 1 Oil tank 2 Mesh 3 Gear pump 4 Motor 5 One way valve 6 Mesh 7 Solenoid valve 8 Restrictor valve 9 Relief valve 10 Restrictor valve 11 Cylinder 12 Pipe...

Страница 18: ...17 Schematische tekening schematic drawing...

Страница 19: ...e Examination legenda Naam gebruiker Name of user Adresgegevens Address data Datum van ingebruikname Date of commissioning Controle Inspection Datum Date In orde Okay Niet in orde ontmanteling Not OK...

Страница 20: ...escription Descrizione Descripci n Motorfietslift Motorcycle lift Merk Brand Marke Marque Marca Marca Falco Waarop deze verklaring betrekking heeft in overeenstemming is met de volgende normen To whic...

Отзывы: