NOPR30SS600
NOPR36SS600
Installation Instructions
Use and Care Information
Instructions d'installation
Utilisez et d'entretienInstrucciones de instalación
Información de uso y cuidado
Nova PRO
Страница 1: ...NOPR30SS600 NOPR36SS600 Installation Instructions Use and Care Information Instructions d installation Utilisez et d entretien Instrucciones de instalaci n Informaci n de uso y cuidado Nova PRO...
Страница 2: ...with your back to an exit Based on Kitchen Firesafety Tips published by NFPA WARNING TO REDUCE THE RISK OF FIRE OR ELECTRIC SHOCK do not use this fan with any solid state speed control device WARNING...
Страница 3: ...uldbeinstalledtominimizebackwardcoldairflowandanonmetal lic thermal break should be installed to minimize conduction of outside temperatures as part of the vent system The damper should be on the cold...
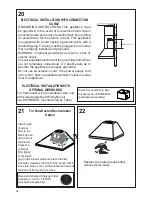
Страница 4: ...or grounding DO NOT ground to a gas pipe DO NOT have a fuse in the neutral or grounding circuit A fuse in the neutral or grounding circuit could result in electrical shock Check with a qualified elect...
Страница 5: ...5 RANGEHOOD DIMENSIONS Min 24 Min 30...
Страница 6: ...2e 3 Screws 1 8 x 1 4 Qty Documentation 1 Instruction Manual Available Accessories Direct Connect Wiring Box sku number WIREBOX Activated Charcoal Filter sku FILTER1LL High Ceiling Chimney Kit Upper a...
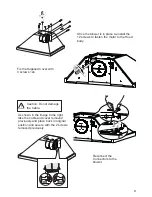
Страница 7: ...equires purchase of Activated Charcoal Accessory Horizontal Vertical 6 I Install Damper that is included with the Hood before connecting to the ductwork Only for Ducted Venting Installation Remove the...
Страница 8: ...8 6 Rear Ducted Venting Options Installation Ducting Methods The Electrical Connector must be removed first before converting the hood to Rear Ducting mode Rear Ducted Venting diagram...
Страница 9: ...using light force on one tab with a flat head screwdriver Remove the 2 screws as shown in the image to the left from the top electrical cover and set aside As shown in the image to the left pull out t...
Страница 10: ...allation the motor needs to be unsecured by first removing the 12 screws as shown Once the screws are removed extract the blower from the body of the Hood and position it so the transition opening is...
Страница 11: ...ood body Reconnect the Connectors to the blower Fix the Supplied Cover with 3 screws 12e As shown in the image to the right take the cable and cover removed previously and place back in original posit...
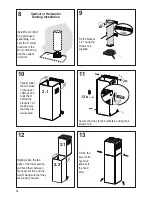
Страница 12: ...al reference lineandmarkthewallatthecentersoftheholesinthebracket Place the other bracket 7 2 1 on the wall as shown below the first bracket at the height of the upper chimney section supplied and ali...
Страница 13: ...re marked insert 2 wall plugs 11 in the holes and fix with 2 screws 5 16 Fix the brackets 7 1 using the 12a screws supplied in the hood body fixing holes as shown Screw the two screws 12d supplied ont...
Страница 14: ...1 using the screws 12a supplied 12 Slightly widen the two sides of the lower section and hook them between the upper section and the wall making sure that they are properly housed Install Roof or Wal...
Страница 15: ...rackets and connect to the Ductless Diverter mak ing sure that they are well seated 15 12a Fix the lower Bracket 7 2 1 with two screws 12a supplied as shown N 4x 12b Secure the sides to the brackets b...
Страница 16: ...groundinginstructions are not completely understood or if doubt exists as to whether the appliance is properly grounded Do not use an extension cord If the power supply cord is too short have a qualif...
Страница 17: ...ctivate the INTENSIVE SPEED which is timed to run for 10 minutes At the end of this time it will automatically return to the speed set before Suitable to deal with maximum levels of cooking fumes If y...
Страница 18: ...e safety knobs provided pull and turn Replacing Activated Charcoal Filter The Activated Charcoal Filters are not washable and cannot be regenerated and should be replaced approximately every 4 months...
Страница 19: ...19 Wiring Diagram...
Страница 20: ...om accident alteration misuse abuse fire flood acts of God improper installation installation not in accordance with electrical or plumbing codes or Faber documentation or use of products not approved...