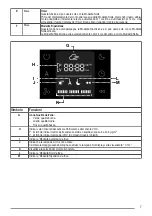
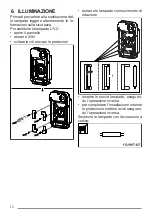
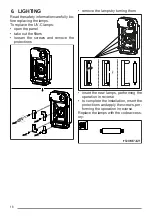
FABER S.p.A. AirHub Portable 113.0666.175 Скачать руководство пользователя страница 18

6. LIGHTING

Read the safety information carefully be-
fore replacing the lamps.
To replace the UV-C lamps:
• open the panel
• take out the filters
• loosen  the  screws  and  remove  the

protections

• remove the lamps by turning them

• insert the new lamps, performing the

operation in reverse

• to complete the installation, insert the

protections and apply the screws, per-
forming the operation in reverse.

Replace the lamps with the code access-
ory:

18

Содержание AirHub Portable 113.0666.175

Страница 1: ...IT LIBRETTO DI USO EN USER MANUAL FBF PH 1020 ...

Страница 2: ...IT 3 EN 11 ...

Страница 3: ...da un tecnico del servizio assi stenza Collegarelaspinaadunapre sa di tipo conforme alle nor mative vigenti e in posizione accessibile AVVERTENZA prima di installare l apparato ri muoverelepellicoledipro tezione Non osservare direttamente con strumenti ottici binocolo lente d ingrandimento Questo apparecchio può es sere utilizzato da bambini di età non inferiore a 8 anni e da persone con ridotte c...

Страница 4: ... sostituire le lampade UV C L uso del dispositivo in modo diversodaquellodescrittonel presente documento o danni alla custodia possono provo care la fuga di radiazioni UV C Le radiazioni UV C possono anche a piccole dosi causare danni ad occhi e pelle Non inserire oggetti di piccole dimensioniattraversolegrate di aerazione Potrebbero danneggiare le ventole e compromettere il funziona mento del dis...

Страница 5: ...cita Usare l apparecchio sempre e soltanto in posizione verti cale Collocare sempre l apparec chio su una superficie stabile piana e livellata Scollegare il cavo quando l unità non è in uso per un pe riodo di tempo prolungato Non utilizzare l apparecchio in ambienti particolarmente umidi bagno cucina ecc Non immergere l apparec chio in acqua o altri liquidi Pulire l apparecchio con un panno umido ...

Страница 6: ...l display si accende e il motore parte alla prima velocità B Breve Modalità Auto Accende spegne la Modalità Auto Il simbolo A si accende spegne La velocità si imposta automaticamente in base alla qualità dell aria C Breve Velocità Incrementa decrementa la velocità del motore dalla prima alla terza Accendendo e spegnendo il purificatore si torna alla velocità precedentemente selezionata D Breve Mod...

Страница 7: ...ne avvia automaticamente ogni 24 ore dal primo avvio la Modalità Notte I G H L J M K Simbolo Funzioni G Icona Qualità dell aria Verde qualità buona Giallo qualità media Rosso qualità bassa H Indica i valori misurati dal sensore Particolato e dal sensore VOC P il simbolo indica il valore delle sostanze solide o liquide sospese in aria in µg m V il simbolo indica il valore dei VOC Composti Organici ...

Страница 8: ...elecomando seguire i 3 step 1 premere il pulsante A1 l icona A2 si accende e il display visualizza la scritta OFF 2 premere il pulsante A3 e il display visualizza lo stato del purificatore per 10 secondi dopo i 10 secondi il display del telecomando si spegne 3 premere il pulsante A1 e il pulsante A3 per spegnere il sia il purificatore che il telecomando Sul display ver rà visualizzata la scritta O...

Страница 9: ...ori Rischio di esplosione o pericolo se la batteria è sostituita con una di tipo er rato Tenere la batteria lontana da tempe rature estreme alte o basse Non tenere la batteria in aree a bassa pressione dell aria L esposizione della batteria ad alte temperature e o bassa pressione può causare esplosione o perdita di liquidi o gas infiammabili 5 PULIZIA E MANUTENZIONE Non utilizzare prodotti o mater...

Страница 10: ...pade UV C aprire il pannello estrarre i filtri svitare le viti e levare le protezioni estrarre le lampade con movimento di rotazione inserire le nuove lampade eseguen do l operazione inversa per completare l installazione inserire le protezioni e mettere le viti eseguen do l operazione inversa Sostituire le lampade con l accessorio a codice 10 ...

Страница 11: ...ING before in stalling the equipment re move the protective film Do not look directly at the light through optical devices bin oculars magnifying glasses This appliance can be used by children aged from 8 years and above and by persons with reduced physical sens ory or mental capabilities or lacking in experience and knowledge if they have been given supervision or instruc tion concerning use of t...

Страница 12: ...s docu ment or damage to the case may result in the escaping of UV C radiations UV C radiations can cause damage to eyes and skin even in small doses Do not insert small objects through the ventilation open ings They may damage the fans and compromise the op eration of the device WARNING Do not insert any object into the open ings of the appliance or into the rotating parts Make sure that the movi...

Страница 13: ...it is not in use for an ex tended period of time Do not use the appliance in particularly humid environ ments bathroom kitchen etc Do not immerse the device in water or other liquids Clean the device with a damp cloth do not use abrasive products or materials To clean the filters see the ap propriate paragraph The most common cause of overheating is the accumula tion of dust or fluff in the appli ...

Страница 14: ... D Short Night Mode It turns the Night Mode on off The symbol L comes on and the motor starts at the first speed The Timer display starts flash ing and by selecting key E it is possible to increase decrease the Night Mode hours Once the time has been chosen the Timer display remains fixed and the countdown begins At the end of the time the symbol L turns off E Short Timer This function can only be...

Страница 15: ...es the value of solid or liquid substances suspended in air in µg m V the symbol indicates the value of VOCs Volatile Organic Compounds I It indicates the active Automatic Mode J It indicates that the UV C lamps are on The symbol flashes when the lamps need to be replaced The display will show CH L K It displays the set motor speed L It indicates the active Night Mode M It indicates the active Rep...

Страница 16: ...ivate the purifier with the remote control follow the 3 steps 1 press button A1 the A2 icon lights up and the display shows OFF 2 press button A3 and the display shows the purifier status for 10 seconds after 10 seconds the re mote control display turns off 3 press button A1 and button A3 to turn off both the purifier and the re mote control OFF will appear on the display To check the operating st...

Страница 17: ...ainers Risk of explosion or danger if battery is replaced with an incorrect type Keep the battery away from extreme high or low temperatures Do not keep the battery in areas with low air pressure Exposing the battery to high temperat ures and or low pressure can cause explosion or leakage of flammable li quids or gases 5 CLEANING AND MAINTENANCE Do not use abrasive products or ma terials Do not us...

Страница 18: ...nel take out the filters loosen the screws and remove the protections remove the lamps by turning them insert the new lamps performing the operation in reverse to complete the installation insert the protections and apply the screws per forming the operation in reverse Replace the lamps with the code access ory 18 ...

Страница 19: ......

Страница 20: ...991 0667 313_02 D000000008315_01 211220 ...

Отзывы: