


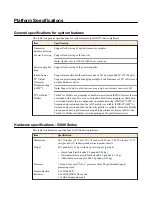


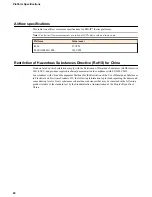


Item
Single power supply
Dual power supply
Typical power draw (AC power; 50% load;
temp 25°C)
110VAC input: 405W
220VAC input: 400W
110VAC input: 415W
220VAC input: 410W
Typical power draw (DC power; 50% load;
temp 25°C)
48VDC input: 400W
48VDC input: 405W
Maximum power draw (AC power)
110VAC input: 520W
240VAC input: 510W
110VAC input: 525W
240VAC input: 520W
Maximum power draw (DC power)
48VDC input: 510W
48VDC input: 510W
Typical heat generated (AC power)
110VAC input: 1385
BTU/hour
220VAC input: 1365
BTU/hour
110VAC input: 1420
BTU/hour
220VAC input: 1400
BTU/hour
Typical heat generated (DC power)
48VDC input: 1365 BTU/
hour
48VDC input: 1745 BTU/
hour
Maximum heat generated (AC power)
1775 BTU/hour
1795 BTU/hour
Maximum heat generated (DC power)
1385 BTU/hour
1745 BTU/hour
Important: Specifications are subject to change without notification.
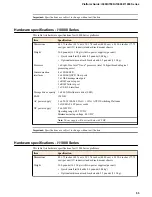
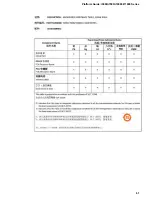
Power specifications - i11000 Series
This table lists power specifications for i11000 Series platforms.
Item
Single power supply
Dual power supply
Idle power draw (AC power)
110VAC input: 340W
220VAC input: 330W
110VAC input: 340W
220VAC input: 330W
Typical power draw (AC power; 50% load;
temp 25°C)
110VAC input: 460W
220VAC input: 440W
110VAC input: 455W
220VAC input: 440W
Maximum power draw (AC power)
110VAC input: 575W
240VAC input: 550W
110VAC input: 570W
240VAC input: 550W
Typical heat generated (AC power)
110VAC input: 1570
BTU/hour
220VAC input: 1505
BTU/hour
110VAC input: 1555
BTU/hour
220VAC input: 1505
BTU/hour
Maximum heat generated (AC power)
1965 BTU/hour
1945 BTU/hour
Important: Specifications are subject to change without notification.
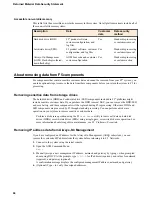
Safety requirements
This equipment complies with these requirements of the Low Voltage Directive 2014/35/EU:
EC Type Examination Certificates: Master Contract 252302
CB Scheme
Platform Specifications
58
Содержание i5000 Series
Страница 1: ...Platform Guide i5000 i7000 i10000 i11000 Series MAN 0633 05...
Страница 2: ......
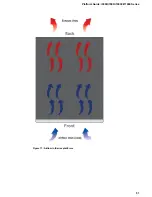
Страница 51: ...Figure 17 Airflow in iSeries platforms Platform Guide i5000 i7000 i10000 i11000 Series 51...
Страница 52: ...Environmental Guidelines 52...
Страница 61: ...Platform Guide i5000 i7000 i10000 i11000 Series 61...
Страница 62: ...Platform Specifications 62...
Страница 64: ...Repackaging Guidelines 64...