background image

ShareLink Pro 500 • SIS Configuration and Control

26

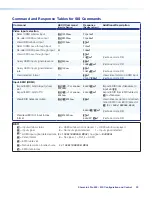
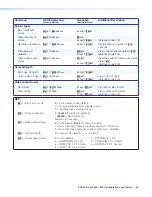
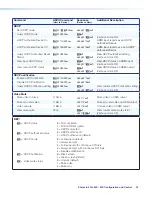
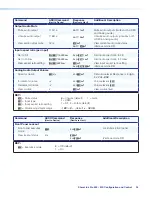
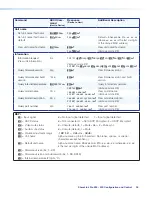
Command and Response Tables Overview

The command and response tables for SIS commands list the commands the device  
recognizes as valid, the responses returned to the host, a description of the command 
function or results of executing the command, and some examples of commands in ASCII.

NOTE:

  Upper and lowercase text can be used interchangeably unless otherwise stated.

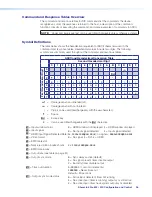
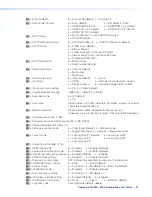
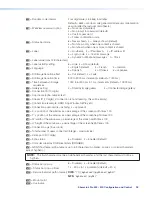
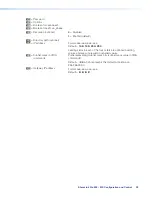
Symbol Definitions

The table below shows the hexadecimal equivalent of ASCII characters used in the 
command and response tables. Hexadecimal values include two digits. The following 
symbols are commonly used throughout the command and response tables.

ASCII and Hexadecimal Conversion Table

Second Hexadecimal Digit

0

1

2

3

4

5

6

7

8

9

A

B

C

D

E

F

First Hexadecimal Digit

0

LF

}

1

E

2

!

#

$

%

&

(

)

*

+

,

-

.

/

3

0

1

2

3

4

5

6

7

8

9

:

;

<

=

>

?

4

@

A

B

C

D

E

F

G

H

I

J

K

L

M

N

O

5

P

Q

R

S

T

U

V

W

X

Y

Z

[

\

]

^

_

6

`

a

b

c

d

e

f

g

h

i

j

k

l

m

n

o

7

p

q

r

s

t

u

v

w

z

y

z

{

|

}

~

]

= Carriage return and line feed (

LF

)

}

= Carriage return with no line feed

| = Pipe (can be used interchangeably with the 

}

 character).

= Space

E

= Escape key

W

= Can be used interchangeably with the 

E

 character.

X!

 = Input window status

0

 = HDMI window not displayed 

1

 = HDMI window displayed

X@

 = Input signal

0

 = No input signal detected 

1

 = Input signal detected

X#

 = HDMI Input Signal Detected Rate (Ex: 

[email protected]

); no signal = 

[email protected]

X$

 = Video format

0

 = No signal, 

1

 = DVI, 

2

 = HDMI

X%

 = EDID table slot

X^

 = Native resolution & refresh rate

Ex: 

[email protected]

X&

 = EDID data in Hex  

X*

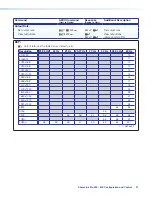
 = Output rate (see table on page 31)

X(

 = Output sync mode

0

 = Sync always active (default) 

1

 = No signal present timer, disable output 

2

 = Inactivity timer, disable output

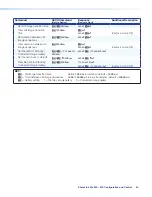
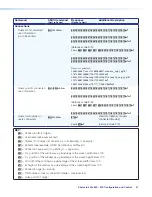
X1)

 = Time out duration

0-999999

 (1 second increments) 

1000000

 = Never times out 

Default = 30 seconds

X1!

 = Output sync mode status

0

 = Active input detected; timer not running 

1

 = No active input; timer is running; output sync still active 

2

 = No active input; timer has expired; output sync disabled

Содержание ShareLink Pro 500

Страница 1: ...User Guide ShareLink Pro 500 Collaboration Systems Wireless and Wired Collaboration Gateway 68 3444 01 Rev A 04 21...

Страница 2: ......

Страница 3: ...PowerCage PURE3 Quantum ShareLink Show Me SoundField SpeedMount SpeedSwitch StudioStation System INTEGRATOR TeamWork TouchLink V Lock VideoLounge VN Matrix VoiceLift WallVault WindoWall XPA XTP XTP Sy...

Страница 4: ...s UTP ou non blind es STP Afin de s assurer de la compatibilit entre FCC Classe A et CE les c bles STP et les connecteurs STP sont n cessaires NOTES This 1st paragraph is for TP ONLY delete for all ot...

Страница 5: ...g notifications are used in this guide ATTENTION Risk of property damage Risque de dommages mat riels NOTE A note draws attention to important information Specifications Availability Product specifica...

Страница 6: ...on 14 Using the Embedded Web Page 15 Viewing a Presentation Using WebView 15 Presenting a Desktop Using WebShare 16 Using the Admin Page 17 Operation Using a Mobile Device 19 Downloading ShareLink Pro...

Страница 7: ...ShareLink Pro 500 Contents vii...

Страница 8: ...ts wired connections from any connected source in the room To support a wide range of environments the ShareLink Pro 500 has collaboration and moderator modes that facilitate both open and restrictive...

Страница 9: ...computer and video resolutions up to 4K Resolutions up to 4096x2160 with 4 4 4 chroma subsampling at 8 bits of color HDCP compliant Ensures display of content protected media on HDMI input and output...

Страница 10: ...n secure environments Set via Extron PCS software Easy setup and commissioning with Extron PCS Product Configuration Software Conveniently configure multiple products using a single software applicati...

Страница 11: ...I input Connect an HDMI source device to this input NOTE For HDMI connections B and C use an Extron LockIt Cable Lacing Bracket to secure the HDMI connector to the device see HDMI Connection on page 6...

Страница 12: ...rwise stated the AC DC adapters are not suitable for use in air handling spaces or in wall cavities Sauf mention contraire les adaptateurs AC DC ne sont pas appropri s pour une utilisation dans les es...

Страница 13: ...be placed over it The screw does not have to be removed 3 Place the LockIt on the screw and against the HDMI connector 3 and then tighten the screw to secure the bracket 4 Loosely place the included t...

Страница 14: ...ded files and configurations NOTE This mode does not affect passwords The Reset LED blinks four times in quick succession during the reset then remains on IP Settings Reset mode 4 Resets the IP settin...

Страница 15: ...put resolution for this mode is 4K 60 Hz D Input LED indicators HDMI Signal LED Lights green when an HDMI signal is detected Decoder Signal LED Lights green when one stream is detected Flashes green w...

Страница 16: ...e to connect to the ShareLink Pro 500 using the software This code can be customized or disabled via the Product Configuration Software PCS 4 Time The time format can be adjusted via PCS NOTE The stan...

Страница 17: ...on your computer 3 Open the wireless networks on your PC and connect to the external WAP Connecting through a Network Hub Switch or Router 1 Ensure that your computer is connected to the network thro...

Страница 18: ...n to run the executable exe file NOTE Windows users If audio configuration is required the ShareLink Pro software displays the notification shown at right Click Yes to allow the ShareLink Pro software...

Страница 19: ...searches for available devices on your network and lists them in the All panel 2 Click the desired ShareLink Pro 500 device see the standby screen for the device name Figure 10 ShareLink Pro Devices...

Страница 20: ...le on your computer Double click the video or image file to present it on the display NOTE The following file formats are supported Image BMP JPG PNG TIFF Video 264 AVI M2T M2TS M4V MKV MOV MP4 MPG SD...

Страница 21: ...the default setting Run Time mode can be disabled via PCS and changed to either of the following modes Full Control No limitations to controls or sharing Moderate Moderator manages access and sharing...

Страница 22: ...a Presentation Using WebView The WebView feature allows audience members to view a presentation on their computers or mobile devices through a web browser The presenter may broadcast the presentation...

Страница 23: ...button on the landing page see figure 14 2 The login page opens as shown below NOTE The Code and Password fields are shown only if they are enabled in PCS 3 Enter a name in the Your name field This na...

Страница 24: ...me admin Default password extron NOTE The factory configured password for this device has been set to the device serial number Passwords are case sensitive Performing a Reset to Factory Defaults see p...

Страница 25: ...LAN port 5 Roles and Permissions Click Edit to change the following passwords NOTE The factory configured password for all accounts have been set to the device serial number Passwords are case sensit...

Страница 26: ...g ShareLink Pro 500 App Follow these steps to download the ShareLink Pro mobile app 1 Ensure that the ShareLink Pro is powered and connected to the network 2 Open the Wi Fi networks list on your devic...

Страница 27: ...nk Pro are wired to the same network 3 Open the ShareLink Pro app and select the desired unit from the list see the standby screen to verify the device hostname and IP address NOTES The ShareLink Pro...

Страница 28: ...ror your device screen on the display device Select Stop Presenting to stop the presentation NOTE For iOS devices follow the on screen instructions for mirroring the device screen or see Using iOS Scr...

Страница 29: ...his option opens a page with two buttons ON and OFF If the display connected to the output of the ShareLink Pro supports CEC the ON and OFF buttons may be used to send out unidirectional Power ON and...

Страница 30: ...t Screen Mirroring see 1 below NOTE Options may look different depending on the iOS version 1 1 The discovered devices list appears as shown at right 4 Select your ShareLink Pro device from the discov...

Страница 31: ...Open ShareLink Pro for iOS mobile app 2 Go to the Manually Added tab shown below and select the icon 1 1 1 3 Enter the IP address or hostname of the ShareLink Pro device that is outside the local subn...

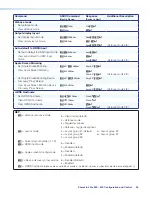
Страница 32: ...t and Device Communication SIS commands consist of one or more characters per field No special characters are required to begin or end a command sequence When the ShareLink Pro determines that a comma...

Страница 33: ...R S T U V W X Y Z _ 6 a b c d e f g h i j k l m n o 7 p q r s t u v w z y z Carriage return and line feed LF Carriage return with no line feed Pipe can be used interchangeably with the character Space...

Страница 34: ...63 characters No blanks spaces or special characters except hyphen X3 Default unit name Alpha numeric name ShareLink Pro xx xx xx where xx xx xx is the last six digits of the unique MAC address X3 Fi...

Страница 35: ...Standby image gallery 2 Connected image gallery X6 Connection ID 10 digits X6 User name apha numeric text X6 Stream ID 10 digits if connection is not streaming this will be empty X6 Content type exam...

Страница 36: ...al X11 IP address Format nnn nnn nnn nnn Default 192 168 254 254 Leading zeros in each of the four octets are optional in setting values and are suppressed in returned values X11 Subnet mask in CISG c...

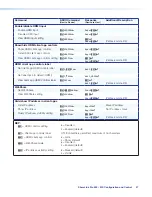
Страница 37: ...on HDMI input Verbose mode 2 3 Input EDID HDMI Import EDID bin to input store slot EIX filename EDID EdidIX Import EDID from filename to input slot X Export EDID bin to PC EEX filename EDID EdidEX Ex...

Страница 38: ...ate1 X View output rate Verbose mode 2 3 KEY X Output rate see the table below default 45 Resolution 23 98 Hz 24 Hz 25 Hz 29 97 Hz 30 Hz 50 Hz 59 94 Hz 60 Hz 640x480 10 800x600 11 1024x768 12 1280x768...

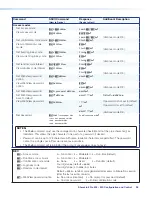
Страница 39: ...dV1 X1 View color bit depth Verbose mode 2 3 Video output format Set format E1 X1 VTPO Vtpo1 X1 Set output video format View setting E1VTPO X1 Vtpo1 X1 View output video format Verbose mode 2 3 KEY X...

Страница 40: ...ification Enable HDCP notification EN1 1HDCP HdcpN1 1 Disable HDCP notification EN1 0HDCP HdcpN1 0 Query HDCP notification setting EN1HDCP X1 HdcpN1 X1 View current HDCP notification setting Verbose m...

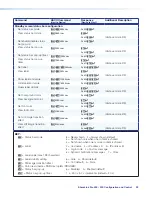
Страница 41: ...Follow View aspect ratio setting EX2 ASPR X2 AsprX2 X2 View input aspect ratio setting Verbose mode 2 3 Analog Audio Output Volume Specify volume X2 V v VolX2 Set volume level Response is 3 digits Ex...

Страница 42: ...internal temperature Verbose mode 2 3 Query model name 1I i model name Inf01 model name View model name Verbose mode 2 3 Query model description 2I i model description Inf02 model desc View model des...

Страница 43: ...een Mirroring Device Discovery Proxy Service EA1 X39 DVRY DvryA1 X39 View Apple Screen Mirroring Device Discovery Proxy Service EA1DVRY X39 DvryA1 X39 Verbose mode 2 3 mDNS Hostname Set mDNS hostname...

Страница 44: ...rols label E1 X4 NI Nmi1 X4 Set label back to default HDMI E1 NI Nmi1 HDMI View client app HDMI controls label E1NI X4 Nmi1 X4 Verbose mode 2 3 WebShare Set WebShare EXX40 SHAR SharXX40 View WebShare...

Страница 45: ...to default If password is set to default Verbose mode 2 3 Set password EPSWD username current password new password new password Pswd username NOTES The PSWD command must use the carriage return chara...

Страница 46: ...OsdlVX4 X5 Verbose mode 2 3 Set background color EKX7 OSDL OsdlKX7 View background color EKOSDL X7 OsdlKX7 Verbose mode 2 3 Set font color ECX7 OSDL OsdlCX7 View font color ECOSDL X7 OsdlCX7 Verbose m...

Страница 47: ...n still image sequences EDSSHW X5 SshwDX5 Verbose mode 2 3 Set file path for Standby Connected Image Gallery EPX5 filepath SSHW SshwPX5 filepath Set file path back to default EPX5 SSHW SshwPX5 View fi...

Страница 48: ...X6 X6 X7 X7 X7 X7 X7 X6 X6 X6 X6 X6 X6 X7 X7 X7 X7 X7 Verbose mode 2 3 SharLX6 X6 X6 X6 X6 X6 X7 X7 X7 X7 X7 X6 X6 X6 X6 X6 X6 X7 X7 X7 X7 X7 Query total number of users connected EKSHAR X7 SharKX7 Vi...

Страница 49: ...client used With echo enabled default characters that are typed into the client window such as PuTTY are echoed in the window along with the SIS response and are also sent to the server With echo disa...

Страница 50: ...iguration tools image captures user logo files and other user supplied HTML files Files used by firmware for internal operations such as saving non volatile settings are not removed Absolute reset ret...

Страница 51: ...at IP control port commands IP setup NOTE Setting any values with the CISG command will change DHCP from on to off Set IP address subnet mask and gateway address E1 X11 X11 X12 CISG Cisg 1 X11 X11 X12...

Страница 52: ...ry structure View file system directory structure EX11 X11 TREE ETREE E0TREE E1 aTREE a a b a b c Connected Connected Thumbnails media nortxe backup shares Standby Standby Thumbnails tmp a Connected m...

Страница 53: ...connected SharKX7 Unsolicited response sent upon detection of the following A new user has connected to the ShareLink Pro A connected user has disconnected from the ShareLink Pro User changes UserChg...

Страница 54: ...guidelines are relevant to the safe installation of this product in a rack Elevated operating ambient temperature If the unit is installed in a closed or multi unit rack assembly the operating ambien...

Страница 55: ...te www extron com go to the Download tab and click Firmware see figure 19 1 Figure 19 Firmware Link on the Download Tab 2 On the Download Center page navigate to ShareLink Pro see figure 20 1 1 1 2 2...

Страница 56: ...d Discovery Required This port is used for discovery of ShareLink Pro devices by software client applications 1231 UDP Inbound Discovery Required This port is used for discovery of ShareLink Pro devic...

Страница 57: ...ht click Speakers Headphones and click Properties 3 Select the Enhancements tab 4 Make sure Dolby Digital Audio is disabled In the Communications tab make sure the setting for When Windows detects com...

Страница 58: ...t the connection using a shorter HDMI cable In PCS go to EDID Minder In the EDID Assignment panel make sure HDMI Pass Through is set to 4K 60 Hz In PCS go to Input Output Config In the Output Configur...

Страница 59: ...oor South Tower 160 Jan Smuts Avenue Rosebank 2196 South Africa This Limited Warranty does not apply if the fault has been caused by misuse improper handling care electrical or mechanical abuse abnorm...

Отзывы: