background image


3-11

MTPX Twisted Pair Matrix Switchers • Operation

PRELIMINAR

Y

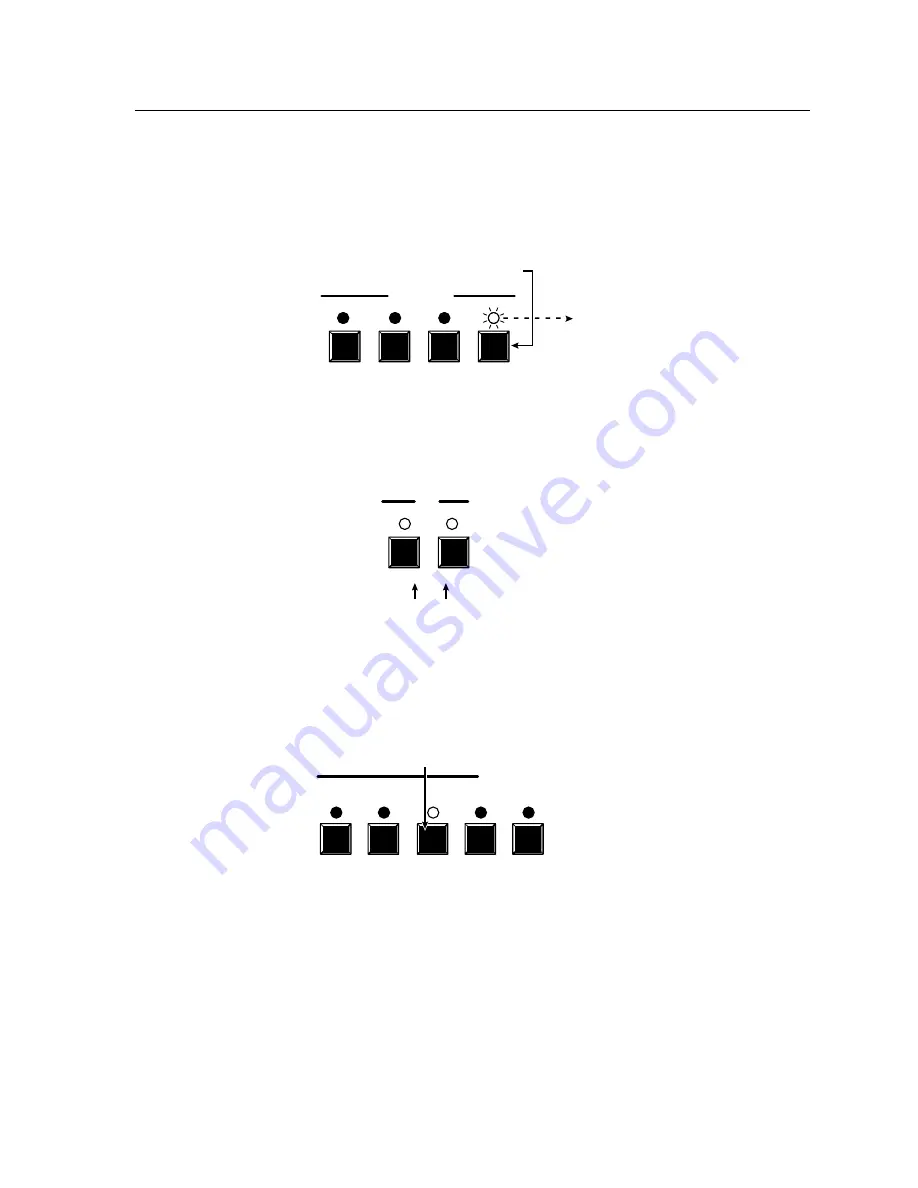
Example 1: Creating a set of video and audio ties

The following example ties input 5 to outputs 3, 4, and 8.  The steps show the front 

panel indications that result from your actions.

N

  This example assumes that there are no ties in the current configuration.

1

Press and release the Esc button (figure 3-4).


ENTER PRESET VIEW

ESC

CONTROL

Press the Esc button to clear all selections.

The LED 
blinks once.

Figure 3-4 — Clear all selections

2

To select video and audio for the tie, if necessary, press and release the Video 

button and the Audio button until both the Video and Audio LEDs light 

(figure 3-5).


VIDEO AUDIO

I/O

Press the Video button to 
toggle on and off.

The LED lights when 
selected.

Press the Audio button 
to toggle on and off.

The LED lights when 
selected.

Figure 3-5 — Select video and audio

3

Press and release the Input 5 button (figure 3-6).


INPUTS 

Press and release
the Input 5 button.

The LED lights. 


Figure 3-6 — Select an input

Содержание MTPX 1616

Страница 1: ...MTPX Series Mini Twisted Pair Matrix Switcher 68 1285 01 Rev C 04 09 ...

Страница 2: ...enden sollten Sie alle Sicherheits und Bedienungsanleitungen genau durchlesen und verstehen Aufbewahren der Anleitungen Die Hinweise zur elektrischen Sicherheit des Produktes sollten Sie aufbewahren damit Sie im Bedarfsfall darauf zurückgreifen können Befolgen der Warnhinweise Befolgen Sie alle Warnhinweise und Anleitungen auf dem Gerät oder in der Benutzerdokumentation Keine Zusatzgeräte Verwende...

Страница 3: ...ection against harmful interference when the equipment is operated in a commercial environment This equipment generates uses and can radiate radio frequency energy and if not installed and used in accordance with the instruction manual may cause harmful interference to radio communications Operation of this equipment in a residential area is likely to cause harmful interference in which case the u...

Страница 4: ......

Страница 5: ...trols and Indicators 3 2 Input and output buttons 3 3 Control buttons 3 5 I O controls 3 7 Front Panel Operations 3 8 Definitions 3 9 Power 3 9 Front panel security lockouts 3 9 Creating a configuration 3 10 Example 1 Creating a set of video and audio ties 3 11 Example 2 Adding a tie to a set of video and audio ties 3 13 Example 3 Removing a tie from a set of video and audio ties 3 15 Viewing a co...

Страница 6: ... 44 Performing an absolute system reset from the rear panel 3 44 Performing a hard reset from the rear panel 3 45 Optimizing the Audio 3 46 Video Adjustments 3 46 Troubleshooting 3 46 Configuration Worksheets 3 47 Worksheet example 1 System equipment 3 47 Worksheet example 2 Daily configuration 3 48 Worksheet example 3 Test configuration 3 49 32 button switchers configuration worksheet 3 51 16 but...

Страница 7: ... 5 10 File menu 5 10 Tools menu 5 11 Audio input Configuration selection 5 12 Preferences menu 5 12 Master Reset selection 5 13 Using Emulation mode 5 14 Using the help system 5 14 Optimizing the Video 5 14 Button Label Generator Program 5 15 Using the Button Label Generator software 5 15 Appendix A Reference Information A 1 Specifications A 2 Part Numbers and Accessories A 5 MTPX matrix switcher ...

Страница 8: ...Table of Contents cont d MTPX Twisted Pair Matrix Switchers Table of Contents iv PRELIMINARY 68 1285 01 C 04 09 All trademarks mentioned in this manual are the properties of their respective owners ...

Страница 9: ...PRELIMINARY MTPX Twisted Pair Matrix Switchers 1 Chapter One Introduction About this Manual About the MTPX Twisted Pair Matrix Switchers Definitions Features ...

Страница 10: ...4 15 16 17 18 19 20 21 22 23 24 25 26 27 28 29 30 31 32 1 2 2 1 3 4 5 6 LOC AL OUT PUT S OUT PUT S INP UTS CON TRO L MO NO AUD IO OUT PUT S AUD IO INP UTS LINK RESE T L R 1 L R 2 L R 3 L R 4 L R 5 L R 6 L R 1 L R 2 L R 3 L R 4 L R 5 L R 6 L R 7 L R 8 US LISTED 1T23 I T E L R INP UT MT P T SV A S V IDE O OU TP UT 12V 0 5a MA X DVD R W R RECOR DING Precision Cinema Progressiv e INP UT RG B PO WE R 1...

Страница 11: ...ween audio inputs The matrix switcher can be remotely controlled via its rear panel RS 232 RS 422 Remote port and its front panel Configuration RS 232 port using either Extron s Windows based Matrix Switchers Control Program or the Simple Instruction Set SIS The SIS is a set of basic ASCII code commands that provide simple control through a control system or PC without programming long obscure str...

Страница 12: ...9 10 11 12 13 14 15 16 17 18 19 20 21 22 23 24 25 26 27 28 29 30 31 32 1 2 3 4 5 6 7 8 9 10 11 12 13 14 15 16 17 18 19 20 21 22 23 24 25 26 27 28 29 30 31 32 1 2 2 1 3 4 5 6 LOCAL OUTPUTS OUTPUTS INPUTS CONTROL MONO AUDIO OUTPUTS AUDIO INPUTS RESET L R 1 L R 2 L R 3 L R 4 L R 5 L R 6 L R 1 L R 2 L R 3 L R 4 L R 5 L R 6 L R 7 L R 8 US LISTED 1T23 I T E 3 2A MAX OUTPUT INPUT AUDIO POWER 12V 5A MAX M...

Страница 13: ...0 120 m 450 135 m 1366 x 768 350 105 m 400 120 m 400 120 m 450 135 m 1440 x 900 250 75 m 300 90 m 350 105 m 400 120 m 1400 x 1050 250 75 m 300 90 m 350 105 m 400 120 m 1600 x 1200 250 75 m 300 90 m 300 90 m 450 135 m 1920 x 1200 250 75 m 300 90 m 300 90 m 400 120 m HDTV 720p 300 90 m 350 105 m 400 120 m 500 150 m HDTV 1080i 250 75 m 300 90 m 300 90 m 400 120 m HDTV 1080p 250 75 m 300 90 m 300 90 m...

Страница 14: ...m 400 120 m 800 245 m 1 000 300 m 640 x 480 350 105 m 400 120 m 700 215 m 750 230 m 800 x 600 350 105 m 400 120 m 550 168 m 650 200 m 1024 x 768 350 105 m 400 120 m 500 150 m 600 185 m 1280 x 960 350 105 m 400 120 m 400 120 m 500 150 m 1280 x 1024 300 90 m 350 105 m 350 105 m 450 135 m 1360 x 765 350 105 m 400 120 m 400 120 m 450 135 m 1365 x 768 350 105 m 400 120 m 400 120 m 450 135 m 1366 x 768 ...

Страница 15: ...ed stereo audio on 3 5 mm 5 pole captive screw terminals Audio input gain attenuation The volume of each audio signal that is input on the 5 pole 3 5 mm direct insertion input connectors can be adjusted so there are no noticeable volume differences between sources You can set the input level of audio gain or attenuation 18 dB to 24 dB via the front panel or via serial port control Audio output vol...

Страница 16: ...sed for selection of global presets Upgradeable firmware The firmware that controls all switcher operations can be upgraded in the field via either of the serial ports without taking the switcher out of service Firmware upgrades are available for download on the Extron Web site www extron com and can be installed using the Windows based control program Labeling The Extron button label software shi...

Страница 17: ...PRELIMINARY MTPX Twisted Pair Matrix Switchers 2 Chapter Two Installation Mounting the Switcher Rear Panel Cabling and Views Front Panel Configuration Port ...

Страница 18: ...rloading Connect the equipment to the supply circuit and consider the effect that circuit overloading might have on overcurrent protection and supply wiring Appropriate consideration of equipment nameplate ratings should be used when addressing this concern 5 Reliable earthing grounding Maintain reliable grounding of rack mounted equipment Pay particular attention to supply connections other than ...

Страница 19: ...el of the MTPX 3232 INPUT SELECT LOCAL RJ 45 LOCAL INPUTS 1 2 3 4 5 6 7 8 9 10 11 12 13 14 15 16 17 18 19 20 21 22 23 24 25 26 27 28 29 30 31 32 1 2 3 4 5 6 7 8 9 10 11 12 13 14 15 16 17 18 19 20 21 22 23 24 25 26 27 28 29 30 31 32 1 2 2 1 3 4 5 6 LOCAL OUTPUTS OUTPUTS INPUTS CONTROL MONO AUDIO OUTPUTS AUDIO INPUTS RESET L R 1 L R 2 L R 3 L R 4 L R 5 L R 6 L R 1 L R 2 L R 3 L R 4 L R 5 L R 6 L R 7...

Страница 20: ...ich MTP models you have Figure 2 4 shows the recommended termination of TP cables in accordance with the TIA EIA T568A or TIA EIA T568B wiring standards You can use either standard with CAT 5 5e 6 or 7 cable but use the same standard on both ends of the cable 5 Pin 1 Red V sync 2 Red V sync 3 RS 232 Green 6 RS 232 Mono audio Mono audio 7 Blue H sync 8 Blue H sync 4 Wire color White green NOTE If y...

Страница 21: ...uma pins For composite video use the G pin and the associated return pin For additional genlocked video signals use the R B and associated return pins c Audio Inputs local audio connectors Connect a balanced or unbalanced stereo audio input to these 3 5 mm 5 pole captive screw connectors Connectors are included with each switcher but you must supply the audio cable See figure 2 5 to wire a connect...

Страница 22: ...Set the DIP switches to the RJ 45 down position to select the MTP input Signal outputs e Outputs MTP connectors Connect the TP inputs of compatible MTP or VTT receivers to these RJ 45 female connectors C Do not connect this device to a computer data or telecommunications network N For best results use a cable length of at least 50 15 m between the TP output connector and the receiver N See the Inp...

Страница 23: ...vel audio See figure 2 7 to properly wire an output connector Use the supplied tie wrap to strap the audio cable to the extended tail of the connector Mono Output L R Do not tin the wires Ring Sleeve s Tip Tip Ring Figure 2 7 Captive screw connector wiring for audio output C Connect the sleeve to ground Gnd Connecting the sleeve to a negative terminal will damage the audio output circuits C The le...

Страница 24: ...nd use the control software N The switcher can support either the RS 232 or RS 422 serial communication protocol and can operate at 9600 19200 38400 or 115200 baud rates See Selecting the rear panel Remote port protocol and baud rate on page 3 42 to configure the RS 232 RS 422 port from the front panel If desired connect an MKP 2000 or MKP 3000 remote control panel to the switcher s RS 232 RS 422 ...

Страница 25: ...s port is independent of the rear panel Remote port and is not affected by changes to the rear panel port s protocol This front panel port s protocol can be changed under SIS command control only See the Command Response table for SIS commands in chapter 4 Programmer s Guide to configure all ports under SIS control N A front panel Configuration port connection and a rear panel Remote port connecti...

Страница 26: ...Installation cont d MTPX Twisted Pair Matrix Switchers Installation 2 10 PRELIMINARY ...

Страница 27: ... Twisted Pair Matrix Switchers 3 Chapter Three Operation Front Panel Controls and Indicators Front Panel Operations Rear Panel Operations Optimizing the Audio Video Adjustments Troubleshooting Configuration Worksheets ...

Страница 28: ...te the input audio level and indicate the output audio volume INPUTS 1 2 3 4 5 6 7 8 9 10 11 12 13 14 15 16 1 2 3 4 5 6 7 8 9 10 11 12 13 14 15 16 OUTPUTS AUDIO VIDEO ENTER PRESET MTPX SERIES MTP MATRIX SWITCHER CONFIG VIEW ESC 6 7 8 9 3 1 3 2 4 5 Figure 3 1 Front panel MTPX 1616 INPUTS 1 2 3 4 5 6 7 8 9 10 11 12 13 14 15 16 17 18 19 20 21 22 23 24 25 26 27 28 29 30 31 32 1 2 3 4 5 6 7 8 9 10 11 1...

Страница 29: ...tput s audio is selected for adjustment Indication inputs Indicate the output volume level Audio RS 232 mutes Action indication Outputs Press and hold to mute the audio or RS 232 output Outputs blink Output audio or RS 232 is muted Input configuration Action indications Toggle between RS 232 or audio as the audio RS 232 input Lit RS 232 Unlit audio N If the switcher has fewer inputs or outputs tha...

Страница 30: ...els can be removed and replaced to insert labels behind the panels To remove a panel insert the Phillips head end of a Tweeker or a small Phillips head screwdriver into the hole in one end of the panel and gently slide the tab at the edge of the panel out of the recess in the switcher housing Input and output labels can be created easily with Extron s button label generator software which ships wi...

Страница 31: ...D The Enter button and LED have three primary functions and three secondary functions Saves changes that you make on the front panel To create a simple configuration Specify video audio or both see I O buttons h and i Press the desired input button a Press the desired output button s b Press the Enter button Indicates that a potential tie has been created but not saved Indicates that a global pres...

Страница 32: ...o level of the selected input See Viewing and adjusting the TP input audio level on page 3 26 Indicates a negative attenuation audio level See Viewing and adjusting the TP input audio level on page 3 26 Decreases the volume of the selected output See Viewing and adjusting the local output volume on page 3 32 With the Enter Preset and Esc buttons selects Serial Port and Audio RS 232 Input Configura...

Страница 33: ...rform a system reset Port configuration Action indication Select RS 232 Blink selected Select RS 422 Blink selected Audio Action indication Select Audio mode Blinks h Video button and LED The Video button and LED have two primary functions and four secondary functions Selects and deselects video for a configuration that is being created or viewed Lights amber to indicate that video is available fo...

Страница 34: ... Lock mode 2 and Lock mode 1 See Setting the front panel locks Executive modes on page 3 40 With the Video button commands the front panel system reset See Performing a system reset from the front panel on page 3 41 Selects the RS 422 protocol for the rear panel Remote port in Serial Port and Audio RS 232 Input Configuration mode and indicates the selection See Selecting the rear panel Remote port...

Страница 35: ... off An error free power up self test sequence leaves the Video LED and the Audio LED on and all other LEDs unlit The current configuration and all presets are saved in non volatile memory When power is applied the most recent configuration is retrieved The previous presets remain intact If an error occurs during the self test the switcher locks up and does not operate If your switcher locks up on...

Страница 36: ... tie 5 Repeat steps 1 through 4 to create additional ties until the desired configuration is complete N Only one video input and one audio input can be tied to an output If a tie is made between an input and an output and the selected output was previously tied to another input the older tie is broken in favor of the newer tie To indicate current ties output LEDs light when an input is selected If...

Страница 37: ...s the Esc button to clear all selections The LED blinks once Figure 3 4 Clear all selections 2 To select video and audio for the tie if necessary press and release the Video button and the Audio button until both the Video and Audio LEDs light figure 3 5 VIDEO AUDIO I O Press the Video button to toggle on and off The LED lights when selected Press the Audio button to toggle on and off The LED ligh...

Страница 38: ...e selected video and audio input will be tied to these outputs The Enter LED blinks to indicate the need to confirm the change Figure 3 7 Select the outputs 5 Press and release the Enter button figure 3 8 ENTER The Enter LED and all input LEDs and output LEDs return to the unlit state Press the Enter button to confirm the configuration change Figure 3 8 Press the Enter button The current configura...

Страница 39: ...lections The LED blinks once Figure 3 10 Clear all selections 2 To select video only for the tie if necessary press and release the Video button and or Audio button figure 3 11 VIDEO AUDIO I O Press the Video button to toggle on and off The LED lights when selected Press the Audio button to toggle on and off The LED is unlit when deselected Figure 3 11 Select video only 3 Press and release the Inp...

Страница 40: ...elect the output 5 Press and release the Enter button figure 3 14 ENTER The Enter LED and all input LEDs and output LEDs return to the unlit state Press the Enter button to confirm the configuration change Figure 3 14 Press the Enter button The current configuration figure 3 15 is now Input 5 video is tied to output 1 output 3 output 4 and output 8 Input 5 audio is tied to output 3 output 4 and ou...

Страница 41: ...16 Clear all selections 2 To select audio only for the tie if necessary press and release the Video button and or Audio button figure 3 17 VIDEO AUDIO I O Press the Video button to toggle on and off The LED is unlit when deselected Press the Audio button to toggle on and off The LED lights when selected Figure 3 17 Select audio only 3 Press and release the Input 5 button figure 3 18 2 3 4 5 6 INPU...

Страница 42: ...d release the Enter button figure 3 20 ENTER The Enter LED and all input LEDs and output LEDs return to the unlit state Press the Enter button to confirm the configuration change Figure 3 20 Press the Enter button The current configuration figure 3 21 is now Video Input 5 video is tied to output 1 output 3 output 4 and output 8 Audio Input 5 audio is tied to output 3 and output 8 Input 5 audio is ...

Страница 43: ...ton for which there are no ties is pushed the output LEDs turn on for all outputs without ties To see all ties of the current configuration press and release each input and output button one at a time with the Video LED and the Audio LED lit In View only mode you can view video and audio video only or audio only ties Pressing and releasing the Video button and the Audio button toggles each on and ...

Страница 44: ...e on and off The LED lights when selected Figure 3 23 Select video and audio 4 Press and release the Input 5 button figure 3 24 3 4 5 6 2 3 4 5 6 7 8 1 OUTPUTS The output buttons for outputs not tied to input 5 are unlit The output buttons for outputs that are tied to Input 5 light Press and release the Input 5 button The LED lights Figure 3 24 Select an input N You can also view a set of ties by ...

Страница 45: ...2 3 1 4 5 OUTPUTS 6 7 8 The output buttons for outputs that are not tied to input 5 are unlit The output buttons for outputs that are tied to input 5 light to indicate video ties audio breakaway Press the Audio button to deselect it The LED is unlit when deselected Press the Video button to select it The LED lights when selected Figure 3 26 Deselect audio and select video to view video only If vid...

Страница 46: ...4 Press and release the View button to return to normal switcher operation N You can mute only the audio or RS 232 outputs not video When you enter View only mode the output LEDs turn on for all outputs without ties Mutes are saved to non volatile memory When power is removed and restored the mute settings are retained Example 5 Muting and unmuting an audio or RS 232 output In the following exampl...

Страница 47: ...perform steps 4 and 5 the actions are ignored 4 Press and hold the Output 3 button button figure 3 30 for approximately 2 seconds until the LED begins to blink The output 3 audio or RS 232 signal is muted 3 4 5 OUTPUTS 3 4 5 OUTPUTS 2 2 The LED blinks to indicate that the audio or RS 232 output is muted Release the button Press and hold the Output 3 button 2 seconds Figure 3 30 Mute the outputs 5 ...

Страница 48: ...atrix Software for more details The current configuration and all presets are stored in non volatile memory When power is removed and restored the current configuration is still active and all presets are retained When a preset is recalled it replaces the current configuration which is lost unless it is also stored as a preset The recalled preset overwrites all of the current configuration ties in...

Страница 49: ...eset LED blinks If you then save the configuration to a lit preset number the configuration data at that preset location will be overwritten Lit Preset Assigned Unlit Preset Unassigned Preset 17 Preset 18 Preset 20 Preset 19 All input and output LEDs with assigned presets light This example shows the action taken on an MTPX 1616 NOTE Figure 3 35 Enter Save Preset mode 3 Press and release the Outpu...

Страница 50: ...ch a preset is recalled to become the current configuration The steps show the front panel indications that result from your actions 1 Press and release the Esc button figure 3 38 ENTER PRESET VIEW ESC CONTROL Press the Esc button to clear all selections The LED blinks once Figure 3 38 Clear all selections 2 Press and release the Preset button figure 3 39 Preset 17 Preset 18 Preset 20 Preset 19 PR...

Страница 51: ...e Enter LED blinks to indicate the need to recall the preset This example shows the action taken on an MTPX 1616 NOTE Figure 3 40 Select the preset 4 Press and release the Enter button figure 3 41 The configuration stored in memory location 17 is now the current configuration and can be viewed in the View only mode see example 4 on page 3 17 ENTER PRESET VIEW ESC CONTROL The Enter and Preset LEDs ...

Страница 52: ...d attenuation 1 Press the Esc button to clear any input LEDs output LEDs or control LEDs that are lit 2 To enter the Audio mode press and hold the Audio button until the LED begins to blink then release the button 3 Press and release an input button for a TP input to select that input The output LEDs display the audio level for the selected input and the Esc and View LEDs display the polarity gain...

Страница 53: ...MINARY 11 10 Output LED dB 9 8 10 12 14 16 18 20 22 7 6 5 4 3 2 1 0 1 2 3 4 5 6 7 8 9 10 11 12 13 14 15 17 15 13 11 24 23 21 19 9 12 4 3 2 7 6 5 1 11 10 9 4 3 2 1 8 7 6 5 16 17 18 8 View Esc 12 on blinking off Audio input level settings 16 button switchers ...

Страница 54: ...12 14 16 18 20 22 7 6 5 4 3 2 1 0 1 2 3 4 5 6 7 8 9 10 11 12 13 14 15 17 15 13 11 24 23 21 19 21 24 16 15 14 19 18 17 13 23 22 21 16 15 14 13 20 19 18 17 16 17 18 20 View Esc 24 on off 11 10 Output LED 9 12 4 3 2 7 6 5 1 11 10 9 4 3 2 1 8 7 6 5 8 12 Audio input level settings 32 button switchers ...

Страница 55: ... audio level being viewed and adjusted The steps show the front panel indications that result from your actions The output LEDs display the audio gain and attenuation by blinking and light subsequent LEDs For 16 button switchers each output LED indicates 1 dB when blinking and 2 dB when lit steadily See the table on page 3 27 For 32 button switchers each output LED indicates 1 dB See the table on ...

Страница 56: ... LEDs display the polarity gain or attenuation Figure 3 45 Select an input and read the audio level Figure 3 46 shows the same level 8 dB as in figure 3 45 but displayed on a 32 output button switcher such as an MTPX 3232 1 2 3 4 5 6 7 8 9 VIEW ESC In this example the output buttons and View and Esc buttons display an audio gain level of 8 dB The output LEDs display the selected input s audio leve...

Страница 57: ... per button push The View and Esc LEDs display the polarity gain or attenuation Lit LED Unlit LED Slow blinking LED Figure 3 47 Adjust the input audio level Figure 3 48 shows the same level 1 dB as in figure 3 47 but displayed on a 32 output button switcher such as a MTPX 3216 1 2 3 4 5 6 7 8 9 VIEW ESC In this example the output buttons and View and Esc buttons display an audio gain level of 1 dB...

Страница 58: ... the higher the volume The fewer LEDs that are lit the lower the volume For a more detailed analysis of decoding the displayed value see Reading the displayed volume on the next page 4 Press and release the Esc and View buttons to increase and decrease the local audio volume by 1 dB per each push of the button Or press and hold the button to change the level at a rate of 3 dB per second until the ...

Страница 59: ...al to the output Push Esc button again 5 5 1 5 7 volume Switchers with 16 input buttons Indicated by the Input 1 LED blinking slowly Switchers with 32 input buttons Indicated by the Input 1 LED lit steadily Push Esc button twice more 7 1 5 1 5 10 volume Switchers with 16 input buttons Indicated by the Input 1 LED lit steadily Switchers with 32 input buttons Indicated by the Input 1 and Input 2 LED...

Страница 60: ... example When lit steadily the Input 3 LED indicates the following depending on the number of input buttons the switcher has Switchers with 16 input buttons 52 dB of attenuation when compared to the Input 3 LED blinking 53 dB to 55 dB of attenuation The blinking Input 4 LED 49 dB to 51 dB of attenuation is at least 2 dB less than the blinking Input 3 LED 53 dB minus 51 dB and at most 6 dB less 55 ...

Страница 61: ...2 52 28 48 26 5 49 25 50 46 31 42 38 37 32 5 43 45 34 44 35 5 43 41 5 39 40 40 38 5 41 37 44 5 33 50 5 46 36 47 5 35 49 34 52 32 29 56 5 55 30 53 5 31 28 24 58 64 62 5 25 61 26 59 5 27 23 65 5 19 15 71 5 67 77 5 22 68 5 21 70 20 76 16 74 5 17 73 18 14 10 79 85 83 5 11 82 12 80 5 13 9 86 5 5 1 92 5 88 98 5 8 89 5 7 91 6 97 2 0 100 95 5 3 94 4 Input LED 24 23 22 21 20 19 18 17 28 27 26 25 32 31 30 2...

Страница 62: ... 3 50 ENTER PRESET VIEW ESC CONTROL Press the Esc button to clear all selections The LED blinks once Figure 3 50 Clear all selections 2 Press and hold the Audio button for approximately 2 seconds figure 3 51 VIDEO AUDIO AUDIO I O The LED blinks to indicate Audio mode Release the button Press and hold the Audio button 2 seconds Figure 3 51 Select Audio mode 3 Press and release the Output 1 button f...

Страница 63: ...e ignored and the Enter Video and Audio LEDs flash 4 Press and release the Esc button once figure 3 54 to increase the volume by 1 5 Press and release the Esc button several more times figure 3 54 to increase the volume by 1 5 per button push Note the input LED indication changes that occur each time the Esc button is pressed and released N You can press and hold the Esc or View button to ramp the...

Страница 64: ...VIDEO AUDIO The Audio LED stops blinking and lights steadily The Video button lights Press the Audio button to exit audio mode All input LEDs and output LEDs return to the unlit state Figure 3 56 Deselect Audio mode Defining the Audio RS 232 wire pair N The audio RS 232 TP input settings RS 232 or audio are protected when front panel Lock mode 2 is selected You can view the settings in Lock mode 2...

Страница 65: ...electing Serial Port and Audio RS 232 Input Configuration mode 2 Release the Control buttons N If front panel Lock mode 2 is selected and you try to perform step 3 the actions are ignored and the Enter Video and Audio LEDs flash See Setting the front panel locks Executive modes on page 3 40 3 To toggle an input s setting between RS 232 and audio press and release that input s button figure 3 58 1 ...

Страница 66: ...te port protocol and baud rate N The switcher is shipped from the factory in Lock mode 2 Selecting Lock mode 2 or toggling between mode 2 and mode 0 N If the switcher is in Lock mode 0 or mode 1 this procedure selects mode 2 If the switcher is in Lock mode 2 this procedure selects mode 0 unlocks the switcher To toggle the lock on and off press and hold the Enter button the Video button and the Aud...

Страница 67: ...wire pair inputs to audio Sets all TP input audio levels to unity gain 0 dB Sets all local output volume levels to 100 0 dB of attenuation N The system reset clears most image and audio adjustments If you want to save these settings use the Windows based Matrix Switchers Control Program and the File Save MATRIX settings as selection before you perform this reset See chapter 5 Matrix Software Reset...

Страница 68: ...ommunications settings as follows 1 To enter Serial Port and Audio RS 232 Input Configuration mode simultaneously press and hold all Control buttons Enter Preset View and Esc figure 3 63 ENTER PRESET VIEW ESC VIDEO AUDIO CONTROL ENTER PRESET VIEW ESC CONTROL I O The flashing Control LED indicates the baud rate as follows Enter 9600 Preset 19200 View 38400 Esc 115200 The flashing I O LED indicates ...

Страница 69: ... the port is set to RS 422 at 38400 baud Blinking LED Lit LED Figure 3 64 RS 232 RS 422 and baud rate selection 4 Press and release an output button to exit the Serial Port and Audio RS 232 Input Configuration mode figure 3 65 ENTER PRESET VIEW ESC VIDEO AUDIO CONTROL I O 5 All Control LEDs return to the unlit state Each I O LED returns to its previous state Press and release an output button Figu...

Страница 70: ...t audio levels to unity gain 0 dB Sets all output volume levels to 100 0 dB of attenuation N System reset does not replace any user installed firmware N The mode 5 reset clears most image and audio adjustments If you want to save these settings use the Windows based Matrix Switchers Control Program and the File Save MATRIX settings as selection before you perform this reset See chapter 5 Matrix So...

Страница 71: ... figure 3 67 Power RESET RESET Press and hold the Reset button while you apply power to the switcher Release the Reset button The switcher flashes the LEDs and then turns them off Continue to hold the Reset button until all input and output LEDs return to unlit and the Video and Audio buttons turn on Figure 3 67 Hard reset N A hard reset returns the switcher to the default factory firmware configu...

Страница 72: ...ing and adjusting the TP input audio level on page 3 26 so that the approximate output level is the same for all selected inputs 5 As necessary adjust the output audio level of each input see Viewing and adjusting the local output volume on page 3 32 Video Adjustments Image adjustments are available via SIS commands and the Windows based control and configuration program See Optimizing the Video i...

Страница 73: ...puts 7 and 9 through 16 are crossed out 1 2 3 4 5 6 7 8 1 2 3 4 5 6 7 8 9 10 11 11 12 13 10 9 Input sources Output destinations Preset Title Video Audio Fill in the preset number and use colors dashes etc to make connecting lines Indicate if the configuration is for video audio or both Classroom 1 VCR USP 405 Audio CD PC 2 RGB 202 PC 1 RGB 202 Weekly status mtg 3 Camera 2 Camera mic Main podium Ma...

Страница 74: ...all FP 1 Main hall FP 2 Podium monitor Sound system 1 Sound system 2 VCR VSC 500 DA 6 Classroom 2 VCR USP 405 Laptop RGB 202 Rack DVD USP 405 VTG 300 Figure 3 69 Worksheet example 2 Daily configuration In this example The image of the presenter from the main podium camera input 1 is Displayed in the main hall output 1 Displayed in the lobby via a distribution amplifier output 8 Tied to the VCR out...

Страница 75: ...audio systems outputs 1 2 4 5 and 8 1 2 3 4 5 6 7 8 1 2 3 4 5 6 7 8 9 10 11 11 12 13 10 9 Input sources Output destinations Preset Title Video Audio Fill in the preset number and use colors dashes etc to make connecting lines Indicate if the configuration is for video audio or both Classroom 1 VCR USP 405 Audio CD PC 2 RGB 202 PC 1 RGB 202 Weekly status mtg 3 Camera 2 Camera mic Main podium Main h...

Страница 76: ...Operation cont d MTPX Twisted Pair Matrix Switchers Operation 3 50 PRELIMINARY ...

Страница 77: ...utput destinations Preset Title Video Audio Fill in the preset number and use colors or dashes etc to make connecting lines Indicate if the configuration is for Video Audio or both 1 2 3 4 5 6 7 8 9 10 11 12 13 14 15 16 26 27 28 29 30 31 32 17 18 19 20 21 22 23 24 25 17 18 19 20 21 22 23 24 25 32 button switchers configuration worksheet ...

Страница 78: ...Operation cont d MTPX Twisted Pair Matrix Switchers Operation 3 52 PRELIMINARY ...

Страница 79: ...ration worksheet 1 2 3 4 5 6 7 8 1 2 3 4 5 6 7 8 9 10 11 11 12 13 14 15 16 10 12 13 14 15 16 9 Input sources Output destinations Preset Title Video Audio Fill in the preset number and use colors or dashes etc to make connecting lines Indicate if the configuration is for video audio or both ...

Страница 80: ...Operation cont d MTPX Twisted Pair Matrix Switchers Operation 3 54 PRELIMINARY ...

Страница 81: ... Pair Matrix Switchers 4 Chapter Four Programmer s Guide Serial Ports Host to Switcher Instructions Switcher Initiated Messages Switcher Error Responses Using the Command Response Tables Command Response Table for SIS Commands ...

Страница 82: ...s are independent of one another A front panel Configuration port connection and a rear panel Remote port connection can both be active at the same time N The switcher can operate at 9600 19200 38400 or 115200 baud rates but Extron recommends leaving these ports at 9600 baud Rear panel Remote port RS 232 Function Pin Function 1 2 3 4 5 6 7 8 9 TX RX Gnd Not used Transmit data Receive data Not used...

Страница 83: ...ther serial port SIS commands consist of one or more characters per command field They do not require any special characters to begin or end the command character sequence Each switcher response to an SIS command ends with a carriage return and a line feed CR LF which signals the end of the response character string A string is one or more characters Switcher Initiated Messages When a local event ...

Страница 84: ...valid it performs the command and sends a response to the host device If the switcher is unable to perform the command because the command is invalid or contains invalid parameters the switcher returns an error response to the host The error response codes are E01 Invalid input channel number too large E10 Invalid command E11 Invalid preset number E12 Invalid output number too large E13 Invalid va...

Страница 85: ...ange 0 64 1 dB step except for 0 to 1 which is 22 dB default 64 0dB See the table on page 4 8 X1 Audio gain 0 24 1 dB step X1 Numeric dB value 18 to 24 45 steps of gain or attenuation Default 0 dB X1 Audio attenuation 1 18 1 dB step X1 Global preset 0 32 0 current configuration X1 Name 12 characters maximum for input output and global preset names Upper and lower case alphanumeric characters and _...

Страница 86: ... 7 video to output 5 Tie input X to output X audio only X X OutX InX Aud Audio breakaway Example 12 4 Out04 In12 Aud Tie input 12 audio to output 4 Quick multiple tie E QX X X X Qik Example E Q3 4 3 5 3 6 Qik Tie input 3 video and audio to output 4 tie input 3 video to output 5 and tie input 3 audio to output 6 Tie input to all outputs V A X InX All Example 5 In05 All Tie input 5 video and audio t...

Страница 87: ... and smaller do not need the local output variable X Matrix sizes 1632 and larger require the variable Set local output polarity matrix size 1616 and smaller EX Opol OpolX Set the horizontal and vertical sync polarity for a local output Example E0Opol Opol00 Set the local output to output negative horizontal and vertical sync Set local output polarity matrix size 1632 and larger EX X Opol OpolX X ...

Страница 88: ...0 59 57 58 56 55 53 54 52 51 49 50 48 5 5 8 5 7 76 0 00 10 11 5 14 5 13 16 17 5 20 5 19 22 23 5 26 5 25 28 47 45 46 44 43 42 29 5 32 5 31 34 35 5 37 dB of attenuation Output volume 39 38 37 35 36 34 33 31 32 30 29 27 28 26 41 5 43 44 5 47 5 46 49 50 5 53 5 52 55 56 5 59 5 58 61 25 23 24 22 21 20 62 5 65 5 64 67 68 5 70 dB of attenuation Output volume 19 17 18 16 15 13 14 12 11 9 10 8 7 5 6 4 71 5 ...

Страница 89: ... or RS 232 audio on Read audio or RS 232 mute X Z X 1 mute on 0 mute off Global audio or RS 232 mute 1 Z Amt1 Mute all audio or RS 232 outputs Global audio or RS 232 unmute 0 Z Amt0 Unmute all audio or RS 232 outputs Names Write global preset name EX1 X1 NG NmgX1 X1 Example E1 Security 1NG Nmg01 Security 1 Name global preset 1 Security 1 Read global preset name EX1 NG X1 Example E2NG Security 2 N ...

Страница 90: ...ber before you directly write a global preset to that number ties that are part of the previous version of the specified preset with the same number can unexpectedly become part of the newly created preset Clear a global preset s ties E X1 P0 SprX1 Clear all ties in preset X1 Directly write a global preset E X1 PX X X X X X X X The tie all tie RGB tie video and tie audio commands are all valid Spr...

Страница 91: ...gain volume mutes presets and DIP switch status View RGB video output tie X X Example 5 12 Input 12 video is tied to output 5 View video output tie X X Example 7 02 Input 2 video is tied to output 7 View audio output tie X X Example 3 06 Input 6 audio is tied to output 3 View output volume X V X1 Example 7V 55 Volume for output 7 is 55 View input gain X G X1 Example 4G 02 Gain for input 4 is 2 dB ...

Страница 92: ... input 8 is tied to outputs 1 2 4 and 5 input 12 is tied to output 3 and input 11 is tied to output 6 No inputs are tied to outputs 7 and 8 View audio global preset configuration EX1 X 2VC X n X n 1 X n 15 Aud Show preset X1 s audio configuration Show the input tied to 16 sequential outputs starting from output X Command description Response description preset starting output StO 2 audio VC input ...

Страница 93: ...from 1 to n n 3 for matrix sizes up to 1616 n 6 for matrix sizes of 1632 and larger X1 indicates whether the input level peaking is within the pre determined threshold for the input tied to output 1 only Serial port configuration Read port parameters E1CP X1 X2 X2 X2 Set mode E1 X2 CY Cpn01 CtyX2 Read mode E1CY X2 N X1 Local input select DIP switch status 0 RJ 45 position 1 local input position X1...

Страница 94: ...are that is running is marked by an asterisk A caret indicates that the firmware has a bad checksum or an invalid load indicates that firmware is not loaded Response description Controller firmware version updated firmware version Example 0q Meaningless data for this switcher model Response Description MTPX firmware version n nn 1 00 1 06 16x16 Series Tue 13 May 2008 00 00 00 GMT 1 00 1 06 16x16 S...

Страница 95: ...PRELIMINARY MTPX Twisted Pair Matrix Switchers 5 Chapter Five Matrix Software Matrix Switchers Control Program Optimizing the Video Button Label Generator Program ...

Страница 96: ...downloaded from the Extron Web site www extron com Installing the software The program is contained on the Extron Software Products Disk Install the software as follows N For full functionality install both of the following programs The Matrix Switchers Control Program The Firmware Loader 1 Insert the disk into the drive The installation program should start automatically If it does not self start...

Страница 97: ...otocol and baud rate in chapter 3 Operation to configure the rear panel port from the front panel Configuration port The port supports RS 232 serial communication protocol only The port can operate at the 9600 19200 38400 or 115200 baud rate but Extron recommends leaving this port at the 9600 baud rate See the Serial port Configuration SIS commands on page 4 13 to configure either port using an SI...

Страница 98: ...te click on the Baud button and double click on the desired baud rate Available rates are 9600 19200 38400 and 115200 The default is 9600 N See Selecting the rear panel Remote port protocol and baud rate in chapter 3 Operation on page 3 42 to identify the current baud rate from the front panel Click OK and proceed to step 3 If you selected Emulate click OK and see Using emulation mode on page 5 14...

Страница 99: ...w figure 5 4 To set up audio in breakaway mode audio and video have different tie configurations uncheck the Follow box figure 5 6 To create a tie drag an input box to one or more output boxes To remove a tie drag the output box to its tied input box or to the trash can For quick display of information on a specific input or output device position the cursor over that device in the control program...

Страница 100: ...gure 5 6 Location of firmware upgrade files 2 Select the appropriate firmware file MTPX Firmware to download and click Download 3 Enter the requested personal information and then click Download to copy the firmware to your computer 4 Click Run twice figure 5 7 on the next page The PC downloads the firmware update from the Extron Web site and starts the Extron Installation Program to extract the f...

Страница 101: ...5 7 MTPX Twisted Pair Matrix Switchers Matrix Software PRELIMINARY 6 4 5 4 Folder where firmware is installed Figure 5 7 Downloading firmware upgrade files ...

Страница 102: ...oader appears figure 5 8 10 11 Figure 5 8 Firmware loading 10 Click Browse The open file window appears 11 Navigate to the folder where you saved the firmware upgrade file Select the file and click Open The Firmware Loader returns to the top C Valid firmware files must have the file extension S19 Any other file extension is not a firmware upgrade N The original factory installed firmware is perman...

Страница 103: ...rmware upgrades using either serial port can take several minutes 14 When the Firmware Loader reports Transfer complete click the Exit button on the Firmware Loader and then again on the port configuration window The Firmware Loader and the Matrix Switchers Control Program exit N The firmware loader utility increases the serial port s baud rate to 115 200 to speed up the upload process Occasionall...

Страница 104: ...s to be saved as a preset Enter the preset number when prompted to do so Delete Allows the current preset to be deleted Changes Take Allows you to save to file any changes made to the displayed configuration Changes Cancel Returns to the previous screen undoing any changes you have made Trash can Drag and drop from an input or output button to the trash can to unmake all ties associated with that ...

Страница 105: ... and allows you to change it The level is expressed as a percentage of the input audio volume that is applied to the output 0 is full attenuation audio is silent 100 is full volume Mute Output settings Displays the Volume and Mute Adjust screen which allows you to mute and unmute individual or all audio or RS 232 outputs and set the volume for the local outputs MTPX configuration settings Displays...

Страница 106: ...racters are invalid in preset names and Show RS 232 strings Displays the ASCII commands that are used by the current configuration You can refer to these for RS 232 programming Initialize Initializes and clears any or all of the following ties presets audio configuration preset names icon names and icons Audio input Configuration selection Displays the audio gain level setting for a single input o...

Страница 107: ... figure 5 5 You can place icons in the boxes Numbers in I O boxes Erases any icons in the I O boxes in the Control Program window and fills each box with the associated input or output number Catch FPC others changes When checked sets the switcher to report all configuration and setting changes to the serial port that turned this selection on These reports allow the Matrix Switchers Control Progra...

Страница 108: ...n Electronics program folder or group double click on the MATRIX Switcher Help icon shown at right From within the Matrix Switcher Control Program click on the Help menu on the main screen From within the Matrix Switcher Control Program press the F1 key Optimizing the Video Most MTP transmitters and the first 25 of the MTPX TP outputs have a pre peaking feature Set these features as follows for th...

Страница 109: ...m under the Download Center tab Click the Software link figure 5 14 and download and install the program onto your computer Figure 5 14 Location of software on the web site N The Button Label Generator software is also included on the Extron Software Products Disk that accompanied the switcher By default the Windows installation creates a C Program Files Extron ButtonLabelGenerator directory and p...

Страница 110: ...ch the button label size for your MTPX switcher 3 Using normal Windows controls you can create and print labels that can be placed in the label windows on the front panel of the switcher 4 Click the Clear All Buttons button and create new labels as many times as necessary to make all of the button labels that you need To access the help program click the Help menu ...

Страница 111: ...PRELIMINARY MTPX Twisted Pair Matrix Switchers A Appendix A Reference Information Specifications Part Numbers and Accessories Button Labels ...

Страница 112: ...GsBs component video bi level and tri level S video composite video Connectors 3 or 6 female 15 pin HD Nominal level 0 7 Vp p for RGB Minimum maximum levels 0 3 V to 1 45 Vp p with no offset at unity gain Impedance 75 ohms Horizontal frequency 15 kHz to 130 kHz Vertical frequency 30 Hz to 150 Hz Return loss 30 dB 5 MHz DC offset max allowable 250 mV Video input main see transmitters output specifi...

Страница 113: ...PX 3232 32 x 32 mono matrix 6 x 8 local Gain local inputs and outputs Unbalanced output 0 dB balanced output 6 dB Frequency response 20 Hz to 20 kHz 1 dB THD Noise 0 15 1 kHz at nominal level S N 70 dB at maximum output unweighted CMRR 43 dB 20 Hz to 20 kHz Audio input local Number signal type 3 or 6 stereo balanced unbalanced Connectors 3 or 6 3 5 mm captive screw connectors 5 pole Impedance 10k ...

Страница 114: ...odels 120 watts Temperature humidity Storage 40 to 158 F 40 to 70 C 10 to 90 noncondensing Operating 32 to 122 F 0 to 50 C 10 to 90 noncondensing Cooling Fan left to right as viewed from the front panel Rack mount Yes Enclosure type Metal Enclosure dimensions 1632 3216 3232 models 5 25 H x 17 0 W x 9 4 D 3U high full rack wide 13 3 cm H x 43 1 cm W x 23 9 cm D Depth excludes connectors Width exclu...

Страница 115: ...ems are included in each order for a MTPX matrix switcher Included parts Replacement part number Tweeker small screwdriver MTPX setup guide 5 pole captive screw audio connectors 7 or 14 depending on the model Extron Software Products disk Matrix Switchers Control Program and Button Label Generator Accessories These items can be ordered separately Adapters power supplies labels Part number MKP 2000...

Страница 116: ... m 26 112 05 VGA M F MD 35 35 10 6 m 26 112 28 VGA M F MD 50 50 15 2 m 26 112 29 VGA M F MD 75 75 22 8 m 26 112 30 VGA M F MD 100 100 30 4 m 26 112 31 Male to female VGA backshell connector cables Part number VGA M F BK 3 3 0 9 m 26 112 35 VGA M F BK 6 6 1 8 m 26 112 36 VGA M F BK 15 15 4 5 m 26 112 37 VGA M F BK 25 25 7 6 m 26 112 38 VGA M F BK 35 35 10 6 m 26 112 27 VGA M F BK 50 50 15 2 m 26 11...

Страница 117: ...238 27 VGA M M BK 25 25 7 6 m 26 238 28 VGA M M BK 35 35 10 6 m 26 238 16 VGA M M BK 50 50 15 2 m 26 238 04 VGA M M BK 75 75 22 8 m 26 238 05 VGA M M BK 100 100 30 4 m 26 238 06 Connectors Connector Part number CAT 6 jack black qty 10 100 476 01 CAT 6 jack red qty 10 100 477 01 CAT 6 jack blue qty 10 100 478 01 CAT 6 jack orange qty 10 100 479 01 CAT 6 jack gray qty 10 100 480 01 CAT 6 jack white ...

Страница 118: ... switcher s label window To remove a panel insert the Phillips head end of a Tweeker or small Phillips head screwdriver into the hole in one end of the panel and gently slide the tab at the edge of the panel out of the recess in the switcher housing Printing Instructions If you print these strips to cut out and use in your switcher Print on 8 1 2 by 11 letter paper in portrait orientation Set page...

Страница 119: ...A 9 MTPX Twisted Pair Matrix Switchers Reference Information PRELIMINARY Figure A 1 Button label blanks 16 button switcher ...

Страница 120: ...Reference Information cont d MTPX Twisted Pair Matrix Switchers Reference Information A 10 PRELIMINARY ...

Страница 121: ...ing Instructions If you print these strips to cut out and use in your switcher Print on 17 by 11 tabloid or ledger paper in landscape orientation Set page scaling to None After printing verify that the printed strips fit behind the panel Your printer configuration may cause the strip to be printed smaller or larger than specified ...

Страница 122: ...MTPX Twisted Pair Matrix Switchers Reference Information A 12 Reference Information PRELIMINARY ...

Страница 123: ... Emirates Dubai This Limited Warranty does not apply if the fault has been caused by misuse improper handling care electrical or mechanical abuse abnormal operating conditions or non Extron authorized modification to the product If it has been determined that the product is defective please call Extron and ask for an Applications Engineer at 714 491 1500 USA 31 33 453 4040 Europe 65 383 4400 Asia ...

Страница 124: ...USA Canada Only 1 919 863 1794 1 919 863 1797 FAX Extron Europe 800 3987 6673 Inside Europe Only 31 33 453 4040 31 33 453 4050 FAX Extron Asia 800 7339 8766 Inside Asia Only 65 6383 4400 65 6383 4664 FAX Extron Japan 81 3 3511 7655 81 3 3511 7656 FAX Extron China 400 883 1568 Inside China Only 86 21 3760 1568 86 21 3760 1566 FAX Extron Middle East 971 4 2991800 971 4 2991880 FAX ...

Отзывы: