background image


DVS 510 Series • Operation

33

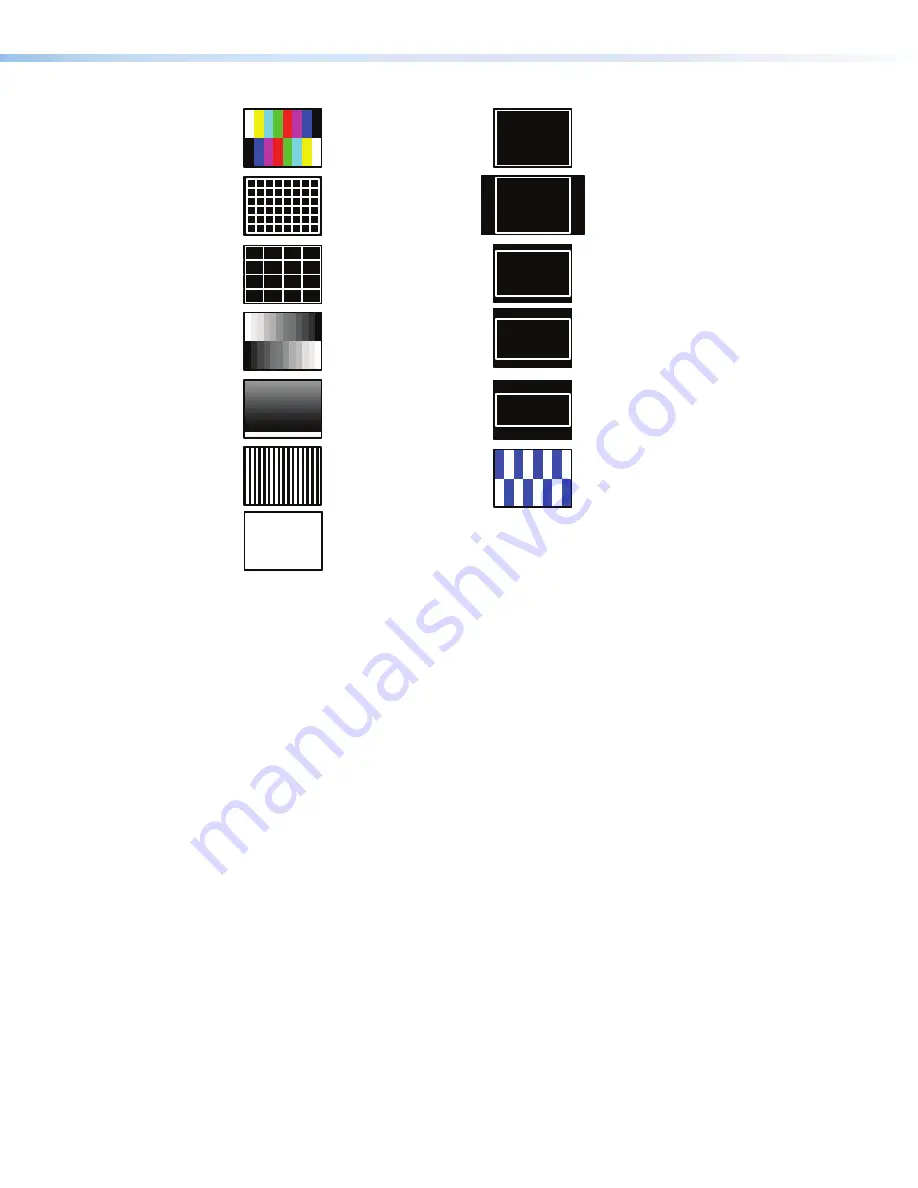
Alt Pixels

4x4 Crosshatch

Crosshatch

Grayscale

Color Bars

Ramp

Crop

1.78 Aspect 

1.85 Aspect 

2.35 Aspect 

1.33 Aspect 

White Field

Blue Mode

Figure 20. 

DVS 510 Series Test Patterns

To select a test pattern:

1. 

From the 

Advanced


Configuration

 menu, press 

NEXT

 until the 

Test


Pattern


submenu is displayed.

2. 

Rotate either 

ADJUST

 knob to select a test pattern. The default is 

Off

 (no test pattern). 

Internal Temp. screen

The 

Internal


Temp.

 screen shows the current internal temperature of the DVS unit in 

degrees Fahrenheit and Celsius. This is an information-only screen and no adjustments can 
be made from it. 

Reset to Factory screen

This screen lets you reset the DVS to the default settings with which it was delivered from 
the factory. To reset the unit:

1. 

From the 

Advanced


Configuration

 menu, press 

NEXT

 until the 

Reset


to


Factory


Press


DETAIL

 screen is displayed. The 

DETAIL

 button under 

Picture


Controls

 begins to blink.

2. 

To initiate the reset, press 

DETAIL

. When the reset is complete, the default cycle is 

displayed.

Содержание DVS 510

Страница 1: ...User Guide DVS 510 Series Scalers and Scan Converters Switching Scalers 68 1290 01 Rev C 09 17...

Страница 2: ...encia 68 290 01 en el sitio Web de Extron www extron com Instructions de s curit Fran ais AVERTISSEMENT Ce pictogramme lorsqu il est utilis sur le produit signale l utilisateur la pr sence l int rieur...

Страница 3: ...Link Key Minder LinkLicense LockIt MediaLink MediaPort NetPA PlenumVault PoleVault PowerCage PURE3 Quantum SoundField SpeedMount SpeedSwitch System INTEGRATOR TeamWork TouchLink V Lock VideoLounge VN...

Страница 4: ...d with shielded I O cables on the peripheral devices Shielded cables must be used to ensure compliance with FCC emissions limits For more information on safety guidelines regulatory compliances EMI EM...

Страница 5: ...esponses mentioned in this guide the character 0 is used for the number zero and O is the capital letter o Computer responses and directory paths that do not have variables are written in the font sho...

Страница 6: ......

Страница 7: ...ands 73 Using the Signal Processing Products Control Program SPPCP 81 Installing the Software 81 Starting the Software 82 Accessing the Help File 83 Updating the Firmware Using SPPCP 84 Introduction 1...

Страница 8: ...es 100 Control Pages 100 User Control Page 101 Memory Input Presets Page 104 PIP Setup Page 106 Reference Information 109 Mounting the DVS 510 Scaler 109 Rack Mounting 109 Tabletop Use 110 Button Labe...

Страница 9: ...mmon high resolution output rate With simultaneous DVI and two analog RGB YUV outputs the DVS 510 can integrate analog and digital video devices and HDCP compliance enables integration of Blu ray Disc...

Страница 10: ...anced and unbalanced audio for each input is provided on 3 5 mm 5 pole captive screw connectors Outputs The DVS 510 has a scaled DVI D video output on a DVI I connector two scaled RGB YUV outputs on 1...

Страница 11: ...to compensate for latency introduced by the video processing Amplifier DVS 510 SA only The DVS 510 SA has a stereo power amplifier with 25 watts rms per channel into 4 or 8 ohms The Class D amplifier...

Страница 12: ...mmands that allow for quick and easy programming via RS 232 or RS 422 Windows based configuration and control software The Signal Processing Products Control Program SPPCP can be used to configure and...

Страница 13: ...A U D I O I N P U T A U D I O O U T P U T 1 L R L R PR EA MP L R LIN E L R 3 L R 5 L R 7 L R 9 L R 2 L R 4 L R 6 L R 8 L R 10 L R 1 3 1 4 2 3 1 4 2 3 1 4 2 2 3 100 LINK ACT COM IR INPUT RELAY TX RX R...

Страница 14: ...ectors in the Video Output panel F and G Connect audio input devices to the appropriate captive screw connectors in the Audio Input panel H Connect audio output devices to the 5 pole Variable J and Fi...

Страница 15: ...t reli la terre lorsque vous effectuez des connexions Les d charges lectrostatiques ESD peuvent endommager l quipement m me si vous ne pouvez pas le sentir le voir ou l entendre O O N N M M L L K K J...

Страница 16: ...onnector pin assignments for DVI and analog source connection Pin Signal Pin Signal Pin Signal 1 TMDS data 2 9 TMDS data 1 17 TMDS data 0 2 TMDS data 2 10 TMDS data 1 18 TMDS data 0 3 TMDS data 11 TMD...

Страница 17: ...I Amplified audio output connector DVS 510 SA only This 4 pole 5 mm captive screw connector enables you to connect a set of speakers or another output device to the DVS 510 SA internal amplifier for...

Страница 18: ...DVS can be accessed and operated from a computer running a standard Internet browser Use a patch cable to connect the DVS to a switch hub or router Use a straight through cable to connect it directly...

Страница 19: ...d Signal ground 6 No connection 7 No connection 8 No connection 9 No connection 5 1 9 6 RS232 Figure 8 Pin Assignments for the RS 232 Port Connecting to the RS 232 CONFIG Port Front Panel The CONFIG p...

Страница 20: ...les d nuder La longueur id ale est de 5 mm 3 16 inches S ils sont trop courts ils peuvent tre tir s facilement m me s ils sont correctement serr s par les borniers vis S ils sont trop longs les c ble...

Страница 21: ...a speaker system see figure 10 for examples Fig 10 Connection examples 8 Ohm Load Stereo R Stereo R Stereo L L R 8 Ohms AMPLIFIED OUTPUTS Stereo L Stereo Connection 8 Ohm Load L R 8 Ohms AMPLIFIED OUT...

Страница 22: ...e Control Front Panel I I H H G G F F E E D D C C B B A A DVS 510 DIGITAL VIDEO SCALER MENU NEXT DETAIL ZOOM PAN BRIGHT CONT COLOR TINT SIZE POSITION PIP ON OFF PIP SWAP CONFIG IR MAX MID MIN 10 1 2 3...

Страница 23: ...submenu on page 30 Input buttons in PIP mode If the picture in picture PIP feature is enabled the input buttons select an input for either the background primary window or the PIP secondary window The...

Страница 24: ...crementally in bottom to top order to indicate the current volume level The Max LED top is red and the others are green see Volume Control on page 40 for details on these controls H CONFIG port This c...

Страница 25: ...perate If this occurs call the Extron S3 Sales Technical Support Hotline see the rear cover for contact information in your area When power is first applied to the DVS the LCD panel displays Initializ...

Страница 26: ...efault the PIP image is one fourth the size of the main window and is positioned in the lower right corner of the display NOTE The size of the PIP window can be set in the menu system see Enabling PIP...

Страница 27: ...help file the web pages see PIP Setup Page on page 106 or using the IR remote control see Using the Optional IR 904 Remote Control on page 44 Changing the PIP Input To change the input for the PIP wi...

Страница 28: ...epeatedly pressing the MENU button until the desired menu name is displayed 3 When the desired menu appears on the LCD screen press the NEXT button repeatedly to cycle through the submenus for the sel...

Страница 29: ...on Power On Input Configuration 2 sec Menu Menu Menu 30 sec View Comm Setting Menu 30 sec 30 sec Default Cycle 2 sec Menu Next Exit Menu Press NEXT Menu 30 sec User Presets 30 sec 30 sec Menu Extron D...

Страница 30: ...User Presets Menu Saving or recalling a user preset 1 Press the MENU button until User Presets is displayed in the LCD window 2 Press the NEXT button until the desired submenu name is displayed Recal...

Страница 31: ...ing Next Next Input 5 Film Detect Off Next Film Detect Turn Film Detection on or off Input 5 RGB Input video type For inputs 5 6 7 and 9 select an available signal format RGB Default YUVp HDTV RGBcvS...

Страница 32: ...the horizontal knob to adjust the resolution and the vertical ADJUST knob to select a refresh rate inputs 5 6 8 and 10 only 5 To save the input configuration press MENU once or NEXT repeatedly to retu...

Страница 33: ...tection on and off for the selected input The default is Off Vertical Start Position The distance in pixels from the top edge of the total video display area for the selected input to the top edge of...

Страница 34: ...fresh 60 Hz Output Type RGBHV Sync Polarity H V Next Next Next Input Configuration Menu Resolution Refresh Rate Select the output resolution and refresh rate See the table on the next page for availab...

Страница 35: ...refresh rate of 60 Hz is applied when the DVS switches to a different resolution except for 576p for which it defaults to 50 Hz Output Type submenu Rotate either the horizontal or the vertical ADJUST...

Страница 36: ...or Off On Automatically reduces audio level to prevent clipping Off default Treble Set the treble level Range 12 through 12 Default 0 This submenu appears only on the DVS 510 SA Audio Delay On Audio D...

Страница 37: ...t pattern view the DVS internal temperature and initiate a reset of the scaler to factory defaults Figure 19 shows a flow diagram of the Advanced Configuration menu and submenus and the adjustments th...

Страница 38: ...r the connected input see Auto Memories submenu Auto Image is useful in applications in which a variety of input sources are likely to be encountered such as on a lectern or podium where guest laptops...

Страница 39: ...ow the input signal at each rate is displayed with its native aspect ratio default setting In fill mode if you want an aspect ratio adjustment for a single input rate you can set up the correct size a...

Страница 40: ...ce focus resolution contrast grayscale and aspect ratio see figure 20 on the next page Off default White Field Color Bars Crop Crosshatch 1 33 Aspect 4x4 Crosshatch 1 78 Aspect Grayscale 1 85 Aspect R...

Страница 41: ...ternal Temp screen The Internal Temp screen shows the current internal temperature of the DVS unit in degrees Fahrenheit and Celsius This is an information only screen and no adjustments can be made f...

Страница 42: ...ext Next IP Address View unit IP address Gateway Address 000 000 000 000 Gateway Address View gateway IP address DHCP Mode View Dynamic Host Configuration Protocol DHCP On Off status Subnet Mask 255 2...

Страница 43: ...bnet Mask 255 255 000 000 Select an octet Increase or decrease the selected number Range 000 through 255 each octet Default 255 255 000 000 Set the Subnet Mask 2 Sec Figure 22 Edit Comm Settings Menu...

Страница 44: ...s the IP address The default subnet mask is 255 255 000 000 To change the subnet mask 1 Press NEXT repeatedly until the Set Subnet Mask screen is displayed 2 Rotate the horizontal ADJUST knob to chang...

Страница 45: ...sting the Picture Controls To adjust the picture controls for the currently selected input 1 Press the button for the input that you want to adjust If you want to adjust the PIP window press the PIP O...

Страница 46: ...al Contrast Vertical DETAIL Detail nnn Adjust image sharpness and noise reduction 000 127 Default 064 Either Position H Center V nnnn nnnn Position image relative to display center Range 2048 2048 Def...

Страница 47: ...s Each input should be switched into the DVS configured then saved as a preset for recall by a control system when that input is sent from the matrix switcher to any of the 10 DVS inputs If an input p...

Страница 48: ...ng Volume Adjustment Volume adjustment can be made from the front panel at any time during scaler operation Volume LEDs To the right of the VOLUME knob are three LEDs that indicate the volume level se...

Страница 49: ...ting The rear panel has a recessed RESET button that initiates various levels of resets To select different reset levels use a pointed stylus or small Philips screwdriver to press and hold the button...

Страница 50: ...shooting Reset All IP Settings 4 Hold in the RESET button for about 6 seconds until the Power LED blinks twice once at 3 seconds and again at 6 seconds Then release and press RESET momentarily for les...

Страница 51: ...67 in the Command and Response Table for DVS 510 SIS Commands Additional Features The following features are available via one or more of the following SIS commands the Signal Processing Products Con...

Страница 52: ...The optional hand held IR 904 Remote Control provides a convenient means of remotely performing many of the functions that are also available through the front panel SIS commands the Windows based co...

Страница 53: ...teries in the IR 904 Remote Control Install two AAA batteries in the IR 904 Remote Control as shown below Figure 26 Installing Batteries in the IR 904 Remote Control Buttons on the IR 904 Remote Contr...

Страница 54: ...e same functions as the horizontal and vertical ADJUST knobs on the front panel that is enabling you to select parameters and adjust them To adjust a picture control using the remote control buttons 1...

Страница 55: ...l until the desired appearance is achieved 1 1 2 2 3 3 4 4 5 5 6 6 COLOR CONT DETAIL IMAGE ADJUSTMENTS TINT BRIGHT FREEZE Figure 28 IR 904 Image Adjustment Buttons 1 COLOR buttons Adjust the color int...

Страница 56: ...l Ports The DVS supports RS 232 and RS 422 serial communication protocols and can operate at 9600 19200 38400 or 115200 baud rates See Edit Comm Settings Menu on page 34 to configure this port using t...

Страница 57: ...ars below the copyright message 2 If the scaler is password protected enter the appropriate administrator or user password 3 If the password is accepted the scaler responds with Login User or Login Ad...

Страница 58: ...h Login Administrator or Login User depending on the password that was entered If the passwords are the same for both the administrator and the user the unit defaults to administrator privileges In X...

Страница 59: ...te that needs to be sent For example a comma would be shown as 2C Telnet Web Browser Escape Hex 1B W must not be encoded Carriage Return Hex 0D Pipe Character must not be encoded When SIS commands are...

Страница 60: ...as E Escape W For URL encoded commands has the same function as E 14 24 27 28 Superscripts indicate the error message displayed if the command is entered incorrectly or with invalid parameters see Er...

Страница 61: ...X1 Internal temperature in degrees Celsius X1 Input preset name 16 characters maximum ASCII characters 23 through 126 only X1 Picture adjustment 0 through 127 X1 H and V position Value based on the cu...

Страница 62: ...8 1024 x 768 19 20 21 1024 x 852 22 23 24 1024 x 1024 25 26 27 1280 x 768 28 29 30 1280 x 800 31 32 33 1280 x 1024 34 35 36 1360 x 765 37 38 39 1360 x 768 40 41 42 1365 x 768 43 44 45 1365 x 1024 49 5...

Страница 63: ...lt for RGB and DVI A true Auto Image is executed on SMPTE inputs 1 2 5 default for YUVp HDTV An Auto Image command snaps to a 2 5 table 2 5 0 default for composite S video YUVi and RGBcvS An Auto Imag...

Страница 64: ...or attenuation level Unit response can be positive or negative X5 Audio treble and bass Range 0 through 16 in 1 5 dB increments 12 dB through 12 dB 0 12 dB 8 0 dB default 16 12 dB X5 PIP Audio source...

Страница 65: ...type of input X Input EDID Inputs 5 6 8 and 10 only DVI and VGA Specify an EDID value E A X X2 EDID Edid A X X2 Set the EDID resolution and refresh rate for input X to X2 View EDID data E A X EDID X2...

Страница 66: ...X PHAS Phas X X Adjust the pixel phase value to X Increment value E PHAS Phas X X Increase the pixel phase Decrement value E PHAS Phas X X Decrease the pixel phase View pixel phase E PHAS X Show the...

Страница 67: ...sync 2B Vmt2 Mute the video and sync on all outputs Unmute video and sync 0B Vmt0 Disable all mutes View mute status B X4 View mute status X4 Picture Controls Color available for NTSC composite and S...

Страница 68: ...on the current output resolution Specific value E X1 HCTR Hctr X X1 Set the horizontal centering to X1 Increment up E HCTR Hctr X X1 Shift the displayed window right Increment down E HCTR Hctr X X1 S...

Страница 69: ...X1 Set the horizontal pan value to X1 Right E HPAN Hpan X X1 Set the value to pan to the right Left E HPAN Hpan X X1 Set the value to pan to the left View horizontal pan value E HPAN X1 View the horiz...

Страница 70: ...1 minute then mute the output video and sync View setting E PSAV X4 View the current power save mode Picture in Picture PIP PIP on E X PIP Pip X Enable picture in picture with input X as the PIP inpu...

Страница 71: ...io level by 1 dB View G X5 View the current audio level Audio Bass global Set the bass level X5 Bas X5 Set the global bass level to X5 Example 10 Bas 010 Set the bass level to 3 dB Increment bass Bas...

Страница 72: ...ut View mute status Z X1 Show the mute status For X1 0 mute off 1 mute on Audio Delay Enable audio delay E 1 ADLY Adly 1 Enable audio delay to compensate for the time needed to process the input signa...

Страница 73: ...atically recall the previous settings for the incoming signal default Disable E 0 AMEM Amem 0 Disable auto memories Input presets must be manually recalled to configure the input View setting E AMEM X...

Страница 74: ...X X3 Show overscan status for input type X HDCP Notification Enable HDCP notification E N 1 HDCP Hdcp N 1 Enable HDCP notification default A full screen green signal and an on screen message are displ...

Страница 75: ...ud X Pip X Typ X Std X1 View the following device information Vid video input Aud audio input Pip PIP input Typ video signal type Std video standard X1 Query firmware version Q n nn View the current f...

Страница 76: ...l settings to factory defaults E ZXXX Zpx Reset all settings and adjustments to the factory default settings Absolute system reset E ZQQQ Zpq Reset all settings and adjustments to the factory defaults...

Страница 77: ...ces on page 51 X Input selection 1 through 10 X1 On and off 0 Off or disable 1 On or enable X7 Port number 01 99 represented as two ASCII characters with leading zero if required X7 Command data secti...

Страница 78: ...ed values Factory default IP address 192 168 254 254 Default broadcast IP address 255 255 255 255 X8 Time in 10 ms increments to wait for characters to arrive at a serial port before terminating the c...

Страница 79: ...s 1 Use Send data string parameters if they exist default 2 Use Configure receive timeout command parameters instead X9 Baud rate 9600 default 19200 38400 or 115200 X9 Parity Only the first letter is...

Страница 80: ...bination of the model name and the last three pairs of the unit MAC address Example DVS 510 SA 05 62 3D X11 Security level of connection 0 Anonymous 01 10 Extended security levels 11 User 12 Administr...

Страница 81: ...low control E X7 CF X10 X10 Configure receive timeout24 E X7 X8 X8 X9 X9 CE Cpn X7 Cce X8 X8 X9 X9 CE NOTES X8 Time in tens of milliseconds that the DVS will wait for receipt of the first response cha...

Страница 82: ...efault24 E CN Ipn X11 Reset DVS name to its factory default name X11 X11 consists of the model name and the last three pairs of the MAC address Example E CN Ipn DVS 510 SA 05 62 3D Set time and date24...

Страница 83: ...ress nnn nnn nnn nnn Leading zeros in the octets are optional View IP address E CI X8 Leading zeros are suppressed in returned values View hardware MAC address E CH X8 In verbose mode Iph X8 X8 hardwa...

Страница 84: ...ew verbose mode E CV X9 Set broadcast mode E X12 X8 Bmd X12 X8 Set broadcast mode to default address E X12 EB Bmd X12 X8 Clear broadcast mode E 0EB Bmd000 X8 View broadcast mode E EB Bmd X12 X8 Set br...

Страница 85: ...moved also View user password E CU X10 Reset clear user password E CU Ipu Clear or remove the user password Query session security level E CK X11 In verbose mode Pvl X11 Remap Port Destinations Set Te...

Страница 86: ...ectory Return to root directory E CJ Dir Go up one directory E CJ Dir path directory View current directory E CJ path directory File Commands Erase user supplied Web page or file24 28 E filenameEF Del...

Страница 87: ...is not intended for the DVS the Upl response is followed by Fwm firmware mismatch Retrieve file from user flash memory24 28 E filename SF Responds with 4 bytes of file size plus raw unprocessed data i...

Страница 88: ...FE Evt X10 X10 X10 string NOTES F must be capitalized to read and write strings to event buffer memory The response to the Write String command is padded with leading zeros for X10 and X10 X10 5 digi...

Страница 89: ...ware The control software is compatible with Windows 98 Windows NT Windows 2000 Windows XP Windows 7 and higher Updates can be downloaded from www extron com NOTE The control program requires approxim...

Страница 90: ...desktop double click the icon The Select Connection Type window appears 2 Select either the TCP IP tab for an IP connection or the RS232 tab for a serial connection For an IP connection In the IP Addr...

Страница 91: ...gure 32 and the software is ready for operation Figure 32 Signal Processing Products Control Program Main Window Accessing the Help File For instructions on using the SPPCP software see the control pr...

Страница 92: ...tab b On the Download Center page click the Firmware link on the left sidebar menu c On the list of available firmware files locate the DVS 510 and click the Download link at right 3 Enter your login...

Страница 93: ...ware files must have the file extension s19 A file with any other extension is not a firmware upgrade for this product and could cause the DVS to stop functioning Les fichiers firmware valides doivent...

Страница 94: ...r the update The Total Progress panel displays a status bar with Uploading above it In the Devices panel the Progress column displays an incrementing percentage and the Status column displays Uploadin...

Страница 95: ...caler is unstable try turning off the proxy server in your Web browser To do this in Microsoft Internet Explorer click Tools Internet Options Connections LAN Settings clear the Use a proxy server chec...

Страница 96: ...ecks several possibilities in the following order and then responds accordingly a If the address includes a specific file name such as 10 13 156 10 file_name html the scaler downloads that HTML page b...

Страница 97: ...page that the scaler downloads when connected You can access the System Status page from other pages by clicking the Status tab Figure 35 System Status Page The System Status Web page updates itself...

Страница 98: ...es can be accessed by clicking the appropriate link on the left sidebar menu See IP Addressing on page 114 for basic information about IP addresses and subnetting Figure 36 System Settings Page On pas...

Страница 99: ...s encoded in the scaler flash memory Valid IP addresses consist of four octets one two or three digit numeric sub fields separated by periods Each octet can be numbered from 000 through 255 Leading ze...

Страница 100: ...menu is selected in figure 37 or Click the Local Date Time button to set the date and time to your local settings 2 From the Zone menu select your time zone The selection displayed in the Zone field...

Страница 101: ...tains drop down menus that enable you to select various parameters for all or some of the inputs The following menus are provided Input Select the analog signal type RGB YUVp HDTV RGBcvS or YUVi for i...

Страница 102: ...Hz 1024x852 60 Hz 1360x765 75 Hz 1400x1050 50 Hz 720p 60 Hz 2040x1080 30 Hz 1024x852 75 Hz 1360x768 50 Hz 1400x1050 60 Hz 1080i 50 Hz 2040x1080 50 Hz 1024x1024 50 Hz 1360x768 60 Hz 1680x1050 50 Hz 10...

Страница 103: ...settings based on the incoming signal from the connected input When the same input signal is detected again these image settings are recalled from memory and applied Switch Effect Select the effect th...

Страница 104: ...in Password field enter the same password to confirm it 3 If you want to assign a user password enter it in the User Password and Re enter User Password fields NOTE An administrator password must be c...

Страница 105: ...n Web page select the Download tab b On the Download Center page click the Firmware link on the left sidebar menu c On the list of available firmware files locate the DVS 510 and click the Download li...

Страница 106: ...r avec n importe quelle autre extension n est pas une mise jour de firmware pour cet appareil et l appareil pourrait arr ter de fonctionner NOTES The original factory installed firmware is permanently...

Страница 107: ...our scaler Uploading Files Files to be uploaded to the DVS must contain only valid alphanumeric characters and underscores NOTE The following characters are invalid or not recommended in file names an...

Страница 108: ...e following tasks on the File Management page Open a file Click on the name of the file in the Files column Delete a file Click the Delete button at the right end of the line that contains the file yo...

Страница 109: ...he User Control page simulates elements of the DVS 510 front panel and also includes other features such as picture control mute and freeze options Auto Image film mode detection aspect ratio selectio...

Страница 110: ...he remaining signal type Configuring the audio In the Audio panel you can configure the audio signal by adjusting the following controls Mute Click this button to mute and unmute the audio When audio...

Страница 111: ...t rate Color Adjust the intensity of the colors in the image At the lowest adjustment all colors appear as shades of gray The range is 000 through 127 the default is 064 Tint Change the appearance of...

Страница 112: ...nput Presets Page On the Presets page you can save and recall user memory and input presets Figure 45 Memory Input Presets Page User memory presets User presets save the current set of image parameter...

Страница 113: ...e DVS 510 to expand the number of input video sources Each input should be switched into the DVS configured then saved as a preset for recall by a control system when that input is sent from the switc...

Страница 114: ...iguration and Control 106 PIP Setup Page Use the PIP Setup page to configure the picture in picture window Figure 46 PIP Setup Page On this screen you can specify the parameters described on the next...

Страница 115: ...put button If your selection is valid PIP mode is enabled and the PIP On Off button on the front panel lights NOTE Based on the currently selected main input the buttons for inputs with the wrong type...

Страница 116: ...default is 064 Contrast Increase or decrease the range of image light and dark values in the image The range is 000 through 127 the default is 064 Detail Filter Adjust the sharpness of the image in th...

Страница 117: ...ed for safe operation of the equipment is not compromised Mechanical loading Mount the equipment in the rack so that uneven mechanical loading does not create a hazardous condition Circuit overloading...

Страница 118: ...abels If desired print the page and cut the labels out write button information in each button area as desired and insert them behind the transparent button caps You can also create labels using the B...

Страница 119: ...two piece button here at the corner Pry the two pieces apart Diffuser Plunger Base Button Label Clear Lens Notch Figure 48 Replacing a Button Label Creating Labels Using the Button Label Generator The...

Страница 120: ...selected button by using any of the tools provided on the Button Label Generator window Some of the edits you can make are Enter text and select the font text size and text color from the drop down m...

Страница 121: ...DVS 510 Series Reference Information 113 Blank Button Labels...

Страница 122: ...191 255 255 254 NNN NNN HHH HHH Class C 192 0 0 1 to 223 255 255 254 NNN NNN NNN HHH Choosing IP Addresses If the computer and the DVS are directly connected or connected via their own independent net...

Страница 123: ...ress being used Class Name Subnet Mask Class A 255 0 0 0 Class B 255 255 0 0 Class C 255 255 255 0 See Subnetting a Primer on page 118 for more information Pinging for the IP Address To access the DVS...

Страница 124: ...isplay that the computer returns is similar to the Ping response shown in figure 50 except that when you enter a the Pinging mail line reports the web IP address instead of the numeric IP address rega...

Страница 125: ...e password at the prompt Connection to the scaler via Ethernet can be password protected There are two levels of password administrator and user Administrator A person logged on as an administrator ha...

Страница 126: ...ting for SIS communication with the scaler The Telnet set crlf command forces Telnet to transmit carriage return and line feed characters when Enter is pressed However if crlf is set the SIS link with...

Страница 127: ...et 255 255 0 0 Typical Subnet Mask Octets 255 indicates that this octet will be compared between two IP addresses 0 indicates that this octet will not be compared between two IP addresses Figure 52 Su...

Страница 128: ...pe Hanzeboulevard 10 3825 PH Amersfoort The Netherlands China Extron China 686 Ronghua Road Songjiang District Shanghai 201611 China Asia Extron Asia Pte Ltd 135 Joo Seng Road 04 01 PM Industrial Bldg...

Отзывы: