Anleitung
Vers. 1.1 / 19.09.18
Manual
7 Port USB 3.1 (Gen1) Metal HUB with
15KV ESD Surge Protection
EX
-
1197HMS
7 Port USB 3.1 (Gen1) Metall HUB mit
15KV ESD Überspannungsschutz
Страница 1: ...Anleitung Vers 1 1 19 09 18 Manual 7 Port USB 3 1 Gen1 Metal HUB with 15KV ESD Surge Protection EX 1197HMS 7 Port USB 3 1 Gen1 Metall HUB mit 15KV ESD berspannungsschutz...
Страница 2: ...6 Reinigung 8 7 Technische Daten 9 8 Technische Zeichnung 9 1 Description 10 2 Extent of Delivery 10 3 Layout Connections Jumper Settings 11 13 3 1 Layout 11 3 2 Connections 11 12 3 3 Jumper Settings...
Страница 3: ...zlich ist der EX 1197HMS mit einem 15KV ESD berspannungs schutz ausgestattet Der EX 1197HMS unterst tzt die Norm IP30 Im Lieferumfang ist das DIN Rail Kit f r die Installation auf einer Tragschiene en...
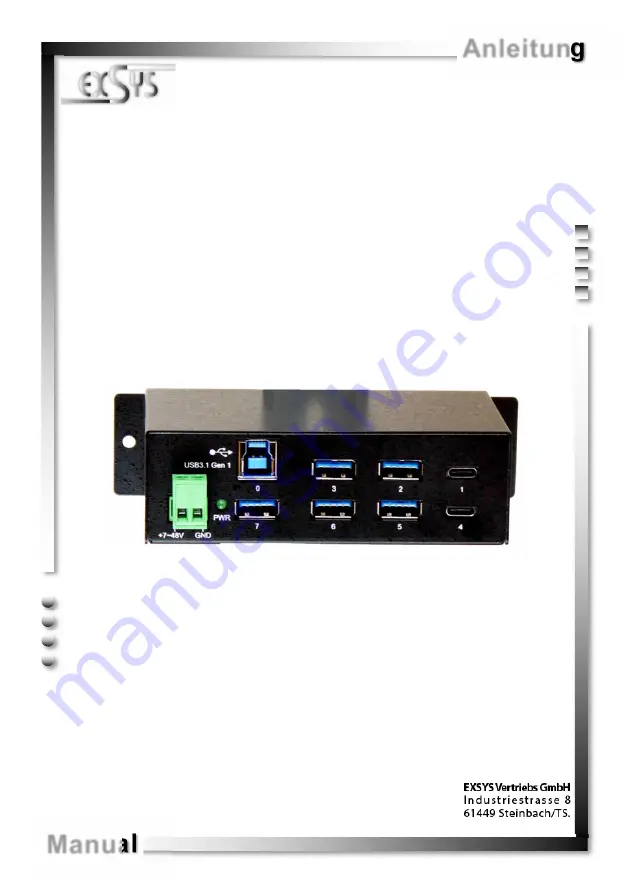
Страница 4: ...hts Reserved 3 2 Anschl sse 7V 48V T Block 7V 48V GND Ground ACHTUNG Schlie en Sie niemals Strom an Ground an dadurch kann Ihre Hardware zerst rt werden 2x USB 3 1 Gen1 Downstream C Buchse 5x USB 3 1...
Страница 5: ...pelbelegung der Pins kann der USB Typ C Stecker beidseitig in die Buchse gesteckt werden Achtung Stecker niemals umgekehrt oder mit Gewalt einstecken USB 3 1 Gen1 A Buchse StdB_SSTX StdB_SSTX GND_DRAI...
Страница 6: ...ird mit der Einstellung Self Power ausgeliefert Sie haben aber die M glichkeit die EX 1197HMS mit Bus Power zu versorgen Daf r m ssen Sie zu erst das Geh use mit den zwei Schrauben auf den Seiten ffne...
Страница 7: ...ms 1 Installieren Sie die EX 1197HMS an die Wand oder mit dem mitgelieferten DIN Rail Kit auf einer Tragschiene 2 Verbinden Sie das mitgelieferte USB 3 1 Gen1 Kabel mit dem USB 3 0 3 1 Gen1 Upstream B...
Страница 8: ...en Ger te Manager Jetzt m ssten Sie unter USB Controller folgen de Eintr ge sehen Sind diese oder hnliche Eintr ge vorhanden ist der USB Hub richtig installiert Zur Reinigung des Ger tes verwenden Sie...
Страница 9: ...s Anschl sse 5x USB 3 1 Gen1 A Buchse 2x USB 3 1 Gen1 C Buchse 1x USB 3 1 Gen1 B Buchse 1x Terminal Block 7 48V Hardwaresystem USB 1 1 2 0 3 0 3 1 Betriebssystem Alle Betriebssysteme Betriebstemperat...
Страница 10: ...transfer on each single port The EX 1197HMS sup port the Self Powered and Bus Powered mode In addition the EX 1197HMS is equipped with an 15KV ESD surge protection The EX 1197HMS is IP30 compliant Th...
Страница 11: ...onnections Jumper Settings 3 2 Connections 7V 48V T Block 7V 48V GND Ground ATTENTION Never connect power to GND it will destroy your Hardware 2x USB 3 1 Gen1 Downstream C Port 5x USB 3 1 Gen1 Downstr...
Страница 12: ...assignment of the pins the USB Type C plug can be plugged into the port on both sides Attention Never plug in with force or in wrong direction USB 3 1 Gen1 A Port StdB_SSTX StdB_SSTX GND_DRAIN VCC St...
Страница 13: ...You also have the possibility the EX 1197HMS to supply Bus Power For this you open the case with the two screws on both sides Then you must set the jumper JP1 from DIS Disable to ENA Enable See the f...
Страница 14: ...your computer s reference manual whenever in doubt 1 Install the EX 1197HMS to the wall or to a DIN Rail if required 2 Connect the USB 3 1 Gen1 cable with the USB 3 0 3 1 Gen1 Upstream B Port at the E...
Страница 15: ...s CHECK INSTALLED DRIVER Open the Device manager Now you should see at USB Controller the following new entry s If you see this or a similar information the device is installed correctly For cleaning...
Страница 16: ...2x USB 3 1 Gen1 C Port 1x USB 3 1 Gen1 B Port 1x Terminal Block 7 48V Hardware System USB 1 1 2 0 3 0 3 1 Operating System All Operating Systems Operating Temperature 32 F to 131 Fahrenheit Storage Te...