Anleitung
Vers. 1.0 / 22.02.18
Manual
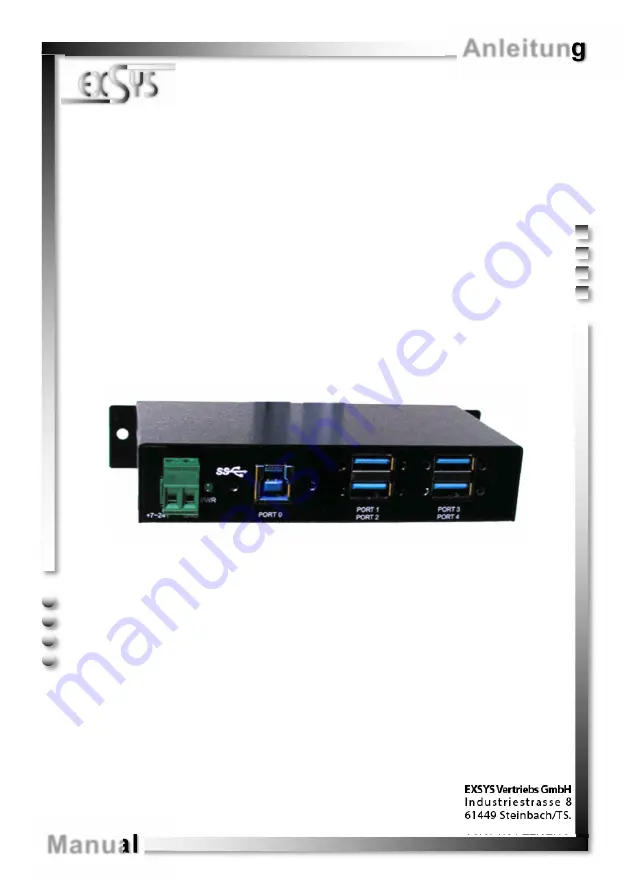
4 Port USB 3.1 (Gen1) Metal HUB with
15KV ESD Surge Protection
for DIN
-
Rail
EX
1185HMVS
4 Port USB 3.1 (Gen1) Metall HUB mit
15KV ESD Überspannungsschutz
für Trägerschiene
Страница 1: ...Anleitung Vers 1 0 22 02 18 Manual 4 Port USB 3 1 Gen1 Metal HUB with 15KV ESD Surge Protection for DIN Rail EX 1185HMVS 4 Port USB 3 1 Gen1 Metall HUB mit 15KV ESD Überspannungsschutz für Trägerschiene ...
Страница 2: ...n 6 6 Reinigung 6 7 Technische Daten 7 8 Technische Zeichnung 7 1 Description 8 2 Extent of Delivery 8 3 Layout Connections Jumper Settings 9 10 3 1 Layout 9 3 2 Connections 9 10 3 3 Jumper Settings 10 4 Hardware Installation 11 5 Driver Installation 11 6 Cleaning 11 7 Technical Information 12 8 Technical Drawing 12 Inhaltsverzeichnis Index Copyright 2018 by EXSYS Vertriebs GmbH All Rights Reserve...
Страница 3: ...it s Er unterstützt den Self Powered und Bus Powered Modus Zusätzlich ist der EX 1185HMVS mit einem 15KV ESD Überspannungsschutz ausgestattet Der EX 1185HMVS unterstützt die Norm IP30 Im Lieferumfang ist das DIN Rail Kit für die Installation auf eine Trägerschiene ent halten Das DIN Rail Kit wird mit vier Schrauben auf der Rückseite festgeschraubt Merkmale Kompatibel zu USB 1 1 2 0 3 0 3 1 Bis zu ...
Страница 4: ...yright 2018 by EXSYS Vertriebs GmbH All Rights Reserved 3 2 Anschlüsse 7V 24V T Block 7V 24V GND Ground ACHTUNG Schließen Sie niemals Strom an Ground an dadurch kann Ihre Hardware zerstört werden 1x USB 3 1 Gen1 Upstream B Buchse Achtung Stecker niemals umgekehrt oder mit Gewalt einstecken USB 3 1 Gen1 A Buchse StdB_SSTX StdB_SSTX GND_DRAIN VCC StdB_SSTX StdB_SSTX D D GND ...
Страница 5: ...cken Die EX 1185HMVS wird mit der Einstellung Self Power ausgeliefert Sie haben aber die Möglichkeit die EX 1185HMVS mit Bus Power zu versorgen Dafür müssen Sie zu erst das Gehäuse mit den vier Schrauben auf den Seiten öffnen Nun müssen Sie den Jumper JP1 von DIS Disable auf ENA Enable setzen Siehe nachfolgende Abbil dung Achtung Den Jumper JP2 bitte nicht umsetzen da dieser ausschließlich von der...
Страница 6: ...ose 3 Verbinden Sie nun das andere Ende A Stecker des mitgelieferten USB Kabels mit der A Buchse an Ihrem PC 5 Treiber Installation Alle Betriebssysteme Nach Abschluss der Hardwareinstallation erkennt das Betriebssystem den EX 1185HMVS automatisch und installiert diesen ÜBERPRÜFEN DES INSTALLIERTEN TREIBER Öffnen Sie den Geräte Manager Jetzt müssten Sie unter USB Controller folgen de Einträge sehe...
Страница 7: ...fer Rate 5Gbit s Anschlüsse 4x USB 3 1 Gen1 A Buchse 1x USB 3 1 Gen1 B Buchse 1x Terminal Block 7 24V Hardwaresystem USB 1 1 2 0 3 0 3 1 Betriebssystem Alle Betriebssysteme Betriebstemperatur 0 bis 55 Celsius Lagertemperatur 20 bis 85 Celsius Rel Luftfeuchtigkeit 5 bis 95 Stromversorgung 7 bis 24 Volt Abmessung 142 50 x 26 30 x 65 18 mm Gewicht 400g ...
Страница 8: ...each single port The EX 1185HMVS support the Self Powered and Bus Powered mode In addition the EX 1185HMVS is equipped with an 15KV ESD surge protection The EX 1185HMVS is IP30 compliant The DIN Rail Kit is included in the extent of delivery for installation in a 19 Rack The DIN Rail kit will be tightened with four screwed on the back of the EX 1185HMVS Features Compatible for USB 1 1 2 0 3 0 3 1 ...
Страница 9: ... Settings Power LED 7 24V T Block for optional external Power Supply 3 2 Connections 7V 24V T Block 7V 24V GND Ground ATTENTION Never connect power to GND it will destroy your Hardware 1x USB 3 1 Gen1 Upstream B Port Attention Never plug in with force or in wrong direction USB 3 1 Gen1 A Port StdB_SSTX StdB_SSTX GND_DRAIN VCC StdB_SSTX StdB_SSTX D D GND ...
Страница 10: ...in with force or in wrong direction The EX 1185HMVS comes with the setting Self Power You also have the possibility the EX 1185HMVS to supply Bus Power For this you open the case with the four screws on both sides Then you must set the jumper JP1 from DIS Disable to ENA Enable See the following picture Attention Please do not change Jumper JP2 because this will only be used by pro duction for test...
Страница 11: ... from the USB cable A Plug to the A Port at your PC 5 Driver Installation All Operating Systems After the hardware installation the OS will recognize the device automatically and install the drivers CHECK INSTALLED DRIVER Open the Device manager Now you should see at USB Controller the following new entry s If you see this or a similar information the device is installed correctly For cleaning ple...
Страница 12: ... Gen1 A Port 1x USB 3 1 Gen1 B Port 1x Terminal Block 7 24V Hardware System USB 1 1 2 0 3 0 3 1 Operating System All Operating Systems Operating Temperature 32 F to 131 Fahrenheit Storage Temperature 40 F to 185 Fahrenheit Rel Humidity 5 to 95 Power 7 to 24 Volt Size 142 50 x 26 30 x 65 18 mm Weight 400g 7 Technical Information 8 Technical Drawing ...