background image

A

UGUST

 2005

E

XABYTE

 221L 

AND

 221L-FC L

IBRARIES

175

E

NVIRONMENTAL

 S

PECIFICATIONS

P

ARTICULATE

 C

ONTAMINATION

 L

IMITS

The ambient operating environment for the library should not exceed the 

particulate counts specified for the tape drives. For more information, refer to 

the LTO Ultrium tape drive documentation available from IBM Corporation.
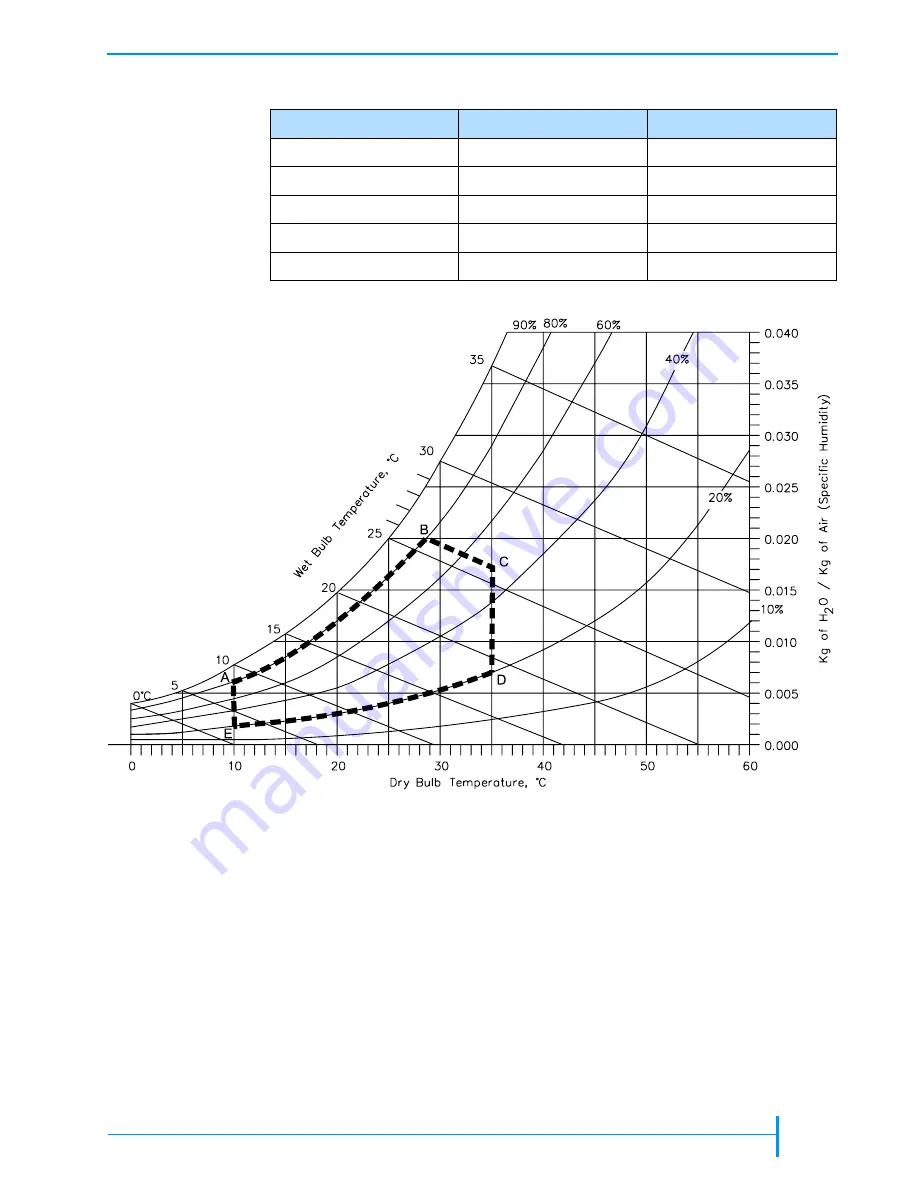
Table A-6

Temperature and humidity points for psychrometric chart

Point

Dry Bulb Temperature

Relative Humidity

A

10

°


C

80%

B

29

°


C

80%

C

35

°


C

50%

D

35

°


C

20%

E

10

°


C

20%

Figure A-1

Temperature and humidity ranges for library operation

Содержание 221L

Страница 1: ...1014258 B EXABYTE 221L AND 221L FC LIBRARIES PRODUCT MANUAL...

Страница 2: ...rks or registered trademarks of their respective owners PART NUMBER REVISION HISTORY 1014258 Revision B NOTE The most current information about this product is available at Exabyte s web site www exab...

Страница 3: ...will be required to correct the interference at his own expense Shielded cables are required for this device to comply with FCC Rules Use shielded cables when connecting this device to others INDUSTR...

Страница 4: ...SA 80301 303 442 4333 World Wide Web www exabyte com To obtain technical support Exabyte Technical Support www exabyte com products hardwarewarranty cfm To order supplies and accessories Exabyte Sales...

Страница 5: ...lling Cartridges 14 Connecting the Library to SCSI 221L 18 Connecting the Library to Fibre Channel 221L FC 20 Connecting the Library to Ethernet Optional 22 Powering On the Library 24 Verifying the Ha...

Страница 6: ...to Find Instructions 88 Accessing the Remote Management Utility 89 Setting Configuration Options 91 Unlocking the Entry Exit Port Door and Front Door 108 Viewing Interface Library and Tape Drive Infor...

Страница 7: ...169 Size and Weight 170 Performance Specifications 170 Power Specifications 172 Environmental Specifications 174 Shipping Specifications 177 Safety and Regulatory Agency Compliance 178 B B B B Write...

Страница 8: ...viii PRODUCT MANUAL 1014258 Notes...

Страница 9: ...ing cartridge 16 Figure 2 7 Installing cartridges in a magazine 17 Figure 2 8 Installing a magazine in the library 17 Figure 2 9 Location of library and tape drive SCSI connectors 19 Figure 2 10 Cabli...

Страница 10: ...gure 6 8 Remote management utility Change FTP User Name page 96 Figure 6 9 Remote management utility Change FTP Password page 97 Figure 6 10 Remote management utility Serial Interface Configuration pa...

Страница 11: ...128 Figure 6 40 Remote management utility Scan Labels Diagnostics page 130 Figure 6 41 Remote management utility Pick Put Diagnostics page 130 Figure 6 42 Remote management utility Axis Diagnostics pa...

Страница 12: ...Strapping the shipping carton to the pallet 168 A A A A Library Specifications Figure A 1 Temperature and humidity ranges for library operation 175 B B B B Write Once Read Many WORM Capability Figure...

Страница 13: ...operator panel to set library options If you want to use the library s Remote Management utility to set configuration options refer to Chapter 6 Using the Remote Management Utility for instructions f...

Страница 14: ...information about the WORM capability of the LTO 3 tape drive RELATED PUBLICATIONS The following publications provide additional information about the library Exabyte 221L and 221L FC Libraries Exabyt...

Страница 15: ...PH X3 230 1994 ANSI Information Technology Fibre Channel 2nd Generation Physical and Signaling Standard FC PH 2 X3 303 1998 ANSI Information Technology Fibre Channel Arbitrated Loop FC AL X3 272 1996...

Страница 16: ...ormation or suggestions about the topic or procedure being discussed Important Read text marked by the Important icon for information that will help you complete a procedure or avoid extra steps Cauti...

Страница 17: ...nd feature Exabyte s patented award winning ExaBiotics LIBRARY FEATURES The Exabyte 221L and 221L FC libraries include the following features Storage for up to 21 data cartridges Cartridges are stored...

Страница 18: ...native Fibre Channel interface allows seamless integration into data intensive storage area network SAN environments Standalone or rack mount capability The library is designed to operate as a standa...

Страница 19: ...drive status and information Set or change library configuration options Unlock the door Lock and unlock the entry exit port Run demonstration programs and test library operations Reset the library an...

Страница 20: ...laser beam exposure the door is secured by a solenoid activated electronic locking system The library will not operate when the door is unlocked INTERNAL COMPONENTS Figure 1 2 shows the internal compo...

Страница 21: ...d information from bar code labels on the cartridges into its cartridge inventory A library application can use the inventory information to locate and move specific cartridges Cartridge magazines The...

Страница 22: ...of the magazine inside the library Fixed Cartridge Slots The library contains seven fixed cartridge slots located to the left of the tape drive s If desired you can configure the fixed cartridge slot...

Страница 23: ...el components 221L Figure 1 6 Back panel components 221L FC Power entry module 9 pin serial port System fan Library SCSI connectors Tape drive fan Drive carrier Tape drive SCSI connectors Ethernet por...

Страница 24: ...drive s or on a separate bus Library Fibre Channel Connector 221L FC The 221L FC library has one integrated dual LC optical fiber connector for connection to a Fibre Channel network The library can b...

Страница 25: ...ost of the following steps Unpacking the library Obtaining accessories and equipment Preparing for installation Installing the library in a rack Installing a second tape drive Preparing and installing...

Страница 26: ...he library s door at the top and pull it open as shown in Figure 2 1 3 3 3 3 From inside the door remove the magazine on the left side by grasping the handle shown in Figure 2 2 and pulling the magazi...

Страница 27: ...an two devices on the bus To determine the bus length a a a a Add together the lengths of all external SCSI cables on the bus b b b b Add 23 centimeters 9 inches for the internal cable length used by...

Страница 28: ...de Labels Sample bar code labels are included with the library If you want to prepare your own labels refer to the Exabyte Bar Code Label Specification for LTO Ultrium Cartridges on the documentation...

Страница 29: ...ill connect to which device see page 18 for guidelines Obtain the required SCSI cables and terminators for these connections For Fibre Channel configurations plan the Fibre Channel connections and mak...

Страница 30: ...tape drive and Ultrium 3 data cartridges with the Ultrium 3 tape drive PREPARING CARTRIDGES 1 1 1 1 If desired you can affix bar code labels to the cartridges Position each label in the indented area...

Страница 31: ...d pulling straight out as shown in Figure 2 4 3 3 3 3 Install cartridges into the fixed slots with the write protect switches down and facing out as shown in Figure 2 5 Note If your software license l...

Страница 32: ...also set the Max Addressable Slot option see page 48 to less than 21 slots place the cleaning cartridge in the highest addressable slot For example if you configure the library to use 14 slots place t...

Страница 33: ...nt guides are up as shown in Figure 2 8 and the alignment grooves are down 3 3 3 3 Close the library s door Figure 2 7 Installing cartridges in a magazine A 0 0 1 0 L 1 0 A 0 0 1 0 L 1 0 A 0 0 1 0 L 1...

Страница 34: ...ed SCSI devices Although single ended SCSI is compatible with LVD Ultra2 and Ultra3 Ultra160 SCSI Exabyte does not support single ended devices on the SCSI buses attached to the library or its tape dr...

Страница 35: ...3 3 3 Connect a SCSI cable to the host and to one of the library s SCSI connectors shown in Figure 2 9 4 4 4 4 Connect other SCSI cables as necessary depending on your bus configuration If the library...

Страница 36: ...the back panel of the 221L FC The library has one integrated dual single channel LC optical fiber connector Port A which is used to connect the library to a single loop on a Fibre Channel network Eac...

Страница 37: ...Figure 2 12 2 2 2 2 Attach an optical cable from the hub or switch to the library s optical fiber connector see Figure 2 13 The connectors are keyed to ensure that the cable is attached in the correc...

Страница 38: ...y monitor and manage library operation create diagnostic listings and upgrade library firmware You can use the library s built in Remote Management utility and a standard web browser to remotely confi...

Страница 39: ...until you hear it snap into place The Ethernet port is located on the back of the library as shown in Figure 2 15 2 2 2 2 Connect the other end of the cable to the network or directly to the server y...

Страница 40: ...change the voltage setting 4 4 4 4 Make sure the library s door is closed 5 5 5 5 Push the power switch on the back of the library to the on position the I is pressed The library performs its power on...

Страница 41: ...fixed cartridge slots Drive 2 is located directly to the right of Drive 1 If the library powered on as described continue with library configuration in Chapter 3 If the library did not power on as des...

Страница 42: ...26 PRODUCT MANUAL 1014258 CHAPTER 2 INSTALLING THE LIBRARY NOTES...

Страница 43: ...ary s web based Remote Management utility to access configuration options If you plan to use the Remote Management utility refer to Chapter 6 for information about accessing the utility and instructio...

Страница 44: ...ys Use the operator keys described in Table 3 1 to perform the following actions OVERVIEW OF LIBRARY MENUS To access the library s menus press MENU on the keypad The first menu to appear is Cartridge...

Страница 45: ...ement Self Test Cycle Entry Exit Lock Cycle Pick Put Cycle Reach Cycle X Axis Cycle Wrist Cycle Solenoid Park and Unlock for Shipping Lock Unlock Entry Exit Port SCSI Sequent1 Sequent2 Remote LCD Cons...

Страница 46: ...to specify how the library functions when it operates in sequential mode Ethernet Menu Displays the current network addressing method IP address SNMP recipient address subnet mask gateway address and...

Страница 47: ...Loop ID is unavailable soft addressing Override Drive WWN You can specify whether the tape drives use the world wide names WWNs set by their manufacturer or WWNs generated by the library Overriding th...

Страница 48: ...atically scan all bar code labels whenever the door is opened and closed or the library is powered on By default this option is turned off Setting Bar Code Scanning Options on page 46 Verify Barcode C...

Страница 49: ...row keys to move the screen arrow across columns To change the ID use the up and down arrow keys to scroll through values 7 7 7 7 When you have set all the SCSI IDs press ENTER to save your changes Th...

Страница 50: ...e 37 During Fibre Channel loop initialization each device on the loop is assigned a unique Loop ID between 0 and 125 00h and 7Dh You can request specific Loop IDs by specifying values through the oper...

Страница 51: ...Drive 2 is located directly to the right of Drive 1 The second line of the Fibre Menu may include one of the codes listed in Table 3 4 instead of a Loop ID 3 3 3 3 Press ENTER Press the down arrow key...

Страница 52: ...ke effect Note Unless you turn on the Require Hard ID option see the following section changing the Loop ID of the library or a tape drive does not guarantee that the selected Loop ID will be used dur...

Страница 53: ...the Override Drive WWN option 1 1 1 1 If the security option has been enabled disable it see page 50 2 2 2 2 Press MENU to display the menus Press the down arrow key until Config Menu appears then pre...

Страница 54: ...pient IP address If you are using a network based library monitor management application other than the library s Remote Management utility you may need to identify the library s SNMP settings to the...

Страница 55: ...t M e n u S 0 0 0 1 E t h e r n e t C o n f i g u r a t i o n N e t w o r k A d d r e s s S t a t i c Table 3 5 Ethernet address configuration options Ethernet Address Option Description Network addr...

Страница 56: ...FTP user name and password To view the Ethernet security screens 1 1 1 1 If the security option has been enabled disable it see page 50 2 2 2 2 Press MENU to display the menus Press the down arrow ke...

Страница 57: ...2 Press MENU to display the menus Press the down arrow key until Ethernet Menu appears 3 3 3 3 Press ENTER Press the down arrow key until Ethernet Security appears R e a d P u b l i c Table 3 6 Ethern...

Страница 58: ...ers press ENTER to save your changes The FTP User screen displays the new user name 7 7 7 7 To change the FTP password press the down arrow key until the FTP PW screen appears Exabyte is the default F...

Страница 59: ...1 1 1 If the security option has been enabled disable it see page 50 2 2 2 2 Press MENU to display the menus or return to the top of the menu selections Press the down arrow key until SCSI Menu 221L...

Страница 60: ...ting the cleaning slot Setting the number of cleaning cycles Enabling the Autoclean option Activating the Cleaning Slot Activating the Clean Slot option designates the right most fixed cartridge slot...

Страница 61: ...n to set the number of cleaning cycles that remain After completing a cleaning cycle the library automatically decreases the Cleaning Tape Cycles Left counter by one Note Refer to the information prov...

Страница 62: ...displays a message on the Status screen that reminds you to replace the cleaning tape SETTING BAR CODE SCANNING OPTIONS If you are using bar code labels with your cartridges you can set options that d...

Страница 63: ...ther your bar code labels contain checksum characters by contacting your vendor or by following these steps a a a a Count the number of black bars on the label The number will be a multiple of 5 b b b...

Страница 64: ...efault the library will not allow any commands with source or destination element addresses greater than that number To set the Max Addressable Slot option 1 1 1 1 If the security option has been enab...

Страница 65: ...e security the following activities are prevented Changing the robot control mode Changing configuration settings except baud rate Changing the SCSI Menu options Changing the Fibre Menu options Changi...

Страница 66: ...press ENTER A prompt similar to the one below appears 4 4 4 4 Press ENTER to accept the new password The Security screen then displays LCD Password Note Once enabled security remains in effect through...

Страница 67: ...e page 69 for instructions Note These hardware exercises require changing the control mode to LCD as described on page 54 When you complete the exercises be sure to change the library s control mode b...

Страница 68: ...52 PRODUCT MANUAL 1014258 CHAPTER 3 CONFIGURING THE LIBRARY NOTES...

Страница 69: ...r is closed The library is in the proper control mode SCSI is the standard operating mode see page 54 You can monitor library operation by viewing the operator panel or by using the library s Remote M...

Страница 70: ...nstructs the robot to pick all cartridges sequentially from the first cartridge in the magazines through the last cartridge in the fixed slots or the last data cartridge slot specified by the Max Addr...

Страница 71: ...dges and tape drive s by opening the library s door Opening the Door To open the library s door 1 1 1 1 If the security option has been enabled disable it see page 50 2 2 2 2 Press the UNLOCK DOOR but...

Страница 72: ...gazines 1 1 1 1 Remove each magazine by grasping the handle and pulling straight out as shown in Figure 4 2 2 2 2 2 If desired replace cartridges in the magazines see page 17 Figure 4 1 Opening the li...

Страница 73: ...ement utility or through your library application This section explains how to use the operator panel to operate the entry exit port Refer to Chapter 6 for information about using the Remote Managemen...

Страница 74: ...ons on using the Move Cartridge command see page 71 For the element numbering scheme see page 69 The entry exit port is element number 81 4 4 4 4 Press MENU to display the menus then press the up arro...

Страница 75: ...tch facing out as shown in Figure 4 6 8 8 8 8 Press the top and bottom buttons on the entry exit port caddy then insert the caddy back into the entry exit port as shown in Figure 4 7 Make sure the car...

Страница 76: ...a sequential mode from the Robot Mode screen see page 54 you choose whether the library uses tape drive 1 Sequent1 mode or tape drive 2 Sequent2 mode the library does not use both tape drives when op...

Страница 77: ...Library Restarts Before restarting the library performs the following actions 1 1 1 1 If the robot was moving a cartridge it finishes the move This includes inserting the cartridge into the tape driv...

Страница 78: ...rs The Sequential Mode screen shows the current settings for the Loop option L the Restart option R and the Next Cartridge option N 3 3 3 3 Press ENTER The Loop Option screen appears This screen shows...

Страница 79: ...will not release the door until it has completed a cartridge move or load already in progress Certain applications may also prevent the door from being opened Do not remove a cartridge from the tape...

Страница 80: ...ing cartridge stored in the library Refer to your software documentation for information about setting up this option USING THE CLEAN DRIVE OPTION Before using the Clean Drive option make sure that A...

Страница 81: ...s complete in several minutes The robot picks the cleaning cartridge from the tape drive and replaces it in its slot 7 7 7 7 Confirm that the cleaning completed successfully by looking at the operator...

Страница 82: ...rary is performing a cartridge move operation when it is reset it completes the move operation before it performs the power on self test Resetting a tape drive causes the drive to perform its power on...

Страница 83: ...either eject the cartridge by using the operator panel or by opening the library s door and pressing the tape drive s unload button EJECTING A CARTRIDGE USING THE OPERATOR PANEL To eject a cartridge...

Страница 84: ...on the right side 3 3 3 3 Press the unload button on the drive s faceplate as shown by the arrow in Figure 4 8 C o n f i r m U n l o a d R e a d y T a p e Caution Discharge static electricity from you...

Страница 85: ...through the Console interface program For information about the Remote Management utility see Chapter 6 For information about Console see page 143 USING ELEMENT INDEXES Elements are the physical locat...

Страница 86: ...ge the robot mode to LCD see page 54 3 3 3 3 Make sure there is at least one cartridge present and one empty slot before you begin the test 4 4 4 4 Press MENU to display the menus Press the down arrow...

Страница 87: ...u can also be used to troubleshoot library hardware problems Refer to the diagram on page 69 for the element indexes These numbers correspond to library components and are necessary for some commands...

Страница 88: ...in front of a tape drive fixed cartridge slot magazine slot or entry exit port Specify the destination element for the robot Self Test The robot does the following Moves from its current position to...

Страница 89: ...on See page 14 for information about setting the write protect switch Keep the storage location as free of airborne particulates as possible To eliminate obvious sources of particulates do not permit...

Страница 90: ...74 PRODUCT MANUAL 1014258 CHAPTER 4 OPERATING THE LIBRARY NOTES...

Страница 91: ...and report back on various settings and event results This chapter explains how to view the following Library code version and serial number Fibre Channel information 221L FC Statistics Sensor readin...

Страница 92: ...and the library Each ID is a two digit hexadecimal number In the following example Drive 1 is 01 Drive 2 is 02 and the library is set to 00 Note Drive 1 is the tape drive closest to the fixed cartridg...

Страница 93: ...until the World Wide Names screen appears The World Wide Names screen allows you to view but not change the world wide names WWN for the library and each tape drive 5 5 5 5 Press ENTER to display the...

Страница 94: ...shown in the example below 4 4 4 4 To display additional Statistics screens press the down arrow Table 5 2 describes the information in the System Statistics screens L i b r a r y I n f o r m a t i o...

Страница 95: ...r a r y I n f o r m a t i o n S y s t e m S e n s o r s D o o r L o c k e d 1 Table 5 3 Information available on the System Sensors screens System Sensor Description Door Locked The door is locked 1 o...

Страница 96: ...Def Inq Vend ID appears 3 3 3 3 Press the down arrow key to display Def Inq Prod ID Wrist Back The robot wrist position is toward the back of the library 1 or not 0 Wrist Front The robot wrist positi...

Страница 97: ...tion can aid in troubleshooting library problems To view the cartridge inventory 1 1 1 1 Press MENU to display the menus The Cartridge Inventory screen appears 2 2 2 2 Press ENTER to display the first...

Страница 98: ...element index number assignments Type Indicates the type of element Cartridge slot Tape drive Robot Entry exit port EEP Warning Displays 0 if there are no failures or errors associated with this eleme...

Страница 99: ...e element if it is reserved Reserve ID Displays the ID that the element is reserved under This is a number assigned by a host when the reservation was made If there is no reservation the Reservation I...

Страница 100: ...through the status screens Table 5 5 describes the information in the Drive Status fields D r i v e M e n u L T O I B M D r i v e 1 M e n u L T O I B M D r i v e 1 S t a t u s R e a d y T a p e O u t...

Страница 101: ...not installed 0 or is installed 1 Access Indicates if the drive is not present or there is a tape inside the drive 0 or the drive is present and there is no tape inside the drive 1 Occupied Indicates...

Страница 102: ...86 PRODUCT MANUAL 1014258 CHAPTER 5 VIEWING LIBRARY INFORMATION NOTES...

Страница 103: ...oss an Ethernet network You can access the Remote Management utility using a standard web browser This chapter explains how to access the Remote Management utility and how to set configuration options...

Страница 104: ...92 page 93 page 94 page 98 Set configuration options Emulation mode Bar code scanning Maximum number of addressable slots Sequential mode operation Override tape drive WWNs Door LCD security Remote m...

Страница 105: ...of the library s IP address 4 4 4 4 Launch your web browser and enter the library s IP address in the following format http IP address Run the self test Position the robot to an element Park the robo...

Страница 106: ...button that you can click to update the information on the page An option for automatically refreshing the page is also available To use this option check the Automatically refresh library status box...

Страница 107: ...abyte e logo takes you to Exabyte s web site at www exabyte com SETTING CONFIGURATION OPTIONS Click on Configure at the top of the page to view the Configure page Figure 6 2 shows an example of the Co...

Страница 108: ...e remote manager password see page 105 4 4 4 4 Click on the radio button for the new control mode 5 5 5 5 Click on the Change button The new control mode takes effect CONFIGURING THE INTERFACES From t...

Страница 109: ...e library drive 1 and drive 2 as desired 6 6 6 6 Check or uncheck the Enable parity box 7 7 7 7 Click on the Change button The changes take effect Configuring the Fibre Channel Interface 221L FC For t...

Страница 110: ...Network Ethernet Interface For the library s network interface you can set up the network addresses specify the SNMP trap recipient address and change the FTP user name and password See page 38 for i...

Страница 111: ...addressing 8 8 8 8 If you selected Static addressing enter values for the IP address and Subnet mask as desired 9 9 9 9 Click on the Change button The changes take effect Setting the SNMP Trap Recipie...

Страница 112: ...takes effect Changing the FTP User Name and Password To change the FTP user name 1 1 1 1 Click on Configure at the top of the page 2 2 2 2 Click on Configure the interfaces 3 3 3 3 Click on Configure...

Страница 113: ...ure at the top of the page 2 2 2 2 Click on Configure the interfaces 3 3 3 3 Click on Configure the network interface 4 4 4 4 Click on Configure FTP 5 5 5 5 Click on Change the FTP password A page sim...

Страница 114: ...ure the interfaces 3 3 3 3 Click on Configure the serial interface A page similar to Figure 6 10 appears 4 4 4 4 If necessary enter the remote manager password see page 105 5 5 5 5 Click the radio but...

Страница 115: ...page similar to Figure 6 11 appears 4 4 4 4 If necessary enter the remote manager password see page 105 5 5 5 5 Select the new emulation mode from the pulldown menu 6 6 6 6 Click on the Change button...

Страница 116: ...n By default this option is disabled See page 47 for more information about this option To enable or disable the bar code scanning options 1 1 1 1 Click on Configure at the top of the page 2 2 2 2 Cli...

Страница 117: ...more information about this option To set the maximum number of available slots 1 1 1 1 Click on Configure at the top of the page 2 2 2 2 Click on Configure the library 3 3 3 3 Click on Configure lib...

Страница 118: ...tion about sequential operation and the sequential mode options To set sequential mode options 1 1 1 1 Click on Configure at the top of the page 2 2 2 2 Click on Configure the library 3 3 3 3 Click on...

Страница 119: ...e page 2 2 2 2 Click on Configure the library 3 3 3 3 Click on Configure library system A page similar to Figure 6 15 appears 4 4 4 4 Check the Override Drive WWN box 5 5 5 5 Click on the Change butto...

Страница 120: ...n Configure the library 3 3 3 3 Click on Configure library Door LCD security A page similar to Figure 6 16 appears 4 4 4 4 If necessary enter the remote manager password see page 105 5 5 5 5 Enter a n...

Страница 121: ...utility you can set up a password that users must enter in the utility before changing configuration options Note If you set a remote manager password the password applies only to activities that coul...

Страница 122: ...fect Disabling the Remote Manager Password To disable the remote manager password 1 1 1 1 Click on Configure at the top of the page 2 2 2 2 Click on Configure the library 3 3 3 3 Click on Configure li...

Страница 123: ...ure 6 20 appears This page indicates the current slot designated for a cleaning cartridge the number of cleaning cycles remaining for the cleaning cartridge if present and whether the Autoclean option...

Страница 124: ...ain how to unlock lock the entry exit port door and unlock the front door from the Remote Management utility See page 57 for information about how to use the entry exit port to add and remove cartridg...

Страница 125: ...To unlock the door 1 1 1 1 Set the library s control mode to Remote see page 92 2 2 2 2 Click on Access at the top of the page 3 3 3 3 Click on Unlock the library s front door A page similar to Figur...

Страница 126: ...boot code version firmware version and serial number From this page you can make the following selections Interface information View SCSI Fibre Channel and network interface information Library inform...

Страница 127: ...o a MODE SENSE command issued by the application software For information about the MODE SENSE command refer to the Exabyte 110L 215 221L and 430 SCSI Reference For each parameter the following values...

Страница 128: ...port slot The Count value indicates the number of slots in the entry exit port Drive The element address of the first tape drive The Count value indicates the number of tape drives in the library Robo...

Страница 129: ...ON You can view the following information for the library Statistics View library system statistics bar code label scanning statistics cartridge storage element statistics and tape drive statistics Se...

Страница 130: ...y Statistics page Table 6 2 Library system statistics Statistic Description Total Cycles The number of times the robot has picked a cartridge and placed it in a slot or tape drive Total Pick Retries T...

Страница 131: ...cartridge the magazine slots fixed slots tape drives entry exit port and robot To view storage element statistics 1 1 1 1 Click on Info at the top of the page 2 2 2 2 Click on Library information 3 3...

Страница 132: ...d Description Element The index number of the element for which the information is being displayed See page 69 for element index number assignments Total Puts The number of times the library placed a...

Страница 133: ...r readings 1 1 1 1 Click on Info at the top of the page 2 2 2 2 Click on Library information Figure 6 30 Remote management utility Tape Drive Statistics page Table 6 5 Tape drive statistics Field Desc...

Страница 134: ...he robot 1 or the robot is empty 0 Reach Position The robot fingers are closed 1 or open 2 Magazine 1 Present The right side magazine is installed 1 or removed 0 Magazine 2 Present The left side magaz...

Страница 135: ...ck on Library information Drive Bay 1 Occupied There is a drive or drive blank installed in the drive bay 1 or the drive bay is empty 0 Note Bay 1 is located next to the fixed slots Drive Bay 2 Occupi...

Страница 136: ...ield Description Element The index of the element for which the information is being displayed See page 69 for element index number assignments P Present The tape drive or magazine is installed 1 or n...

Страница 137: ...bar code scan was successful or displays an error condition 60 The bar code scanner could not read the bar code label because there was no label on the cartridge 62 The bar code scanner could not rea...

Страница 138: ...story page Table 6 8 Library history information Field Description Index The number of the event within the history buffer The range is 0 the most recent event through 599 The most recent event is dis...

Страница 139: ...ape drive closest to the fixed cartridge slots D2 is located to the right of D1 Serial Number The tape drive s serial number WWN The tape drive s world wide name applicable only to Fibre Channel tape...

Страница 140: ...ry in a continuous demo mode where the robot randomly moves cartridges between slots Run individual library commands Issue commands to run the library s self test position the robot to specific locati...

Страница 141: ...ox IES is Initialize Element Status the SCSI command that performs a cartridge inventory Specify how often you want a cartridge inventory performed in the IES frequency box 8 8 8 8 Click on the Start...

Страница 142: ...ary Self Test To run the library s self test 1 1 1 1 Set the library s control mode to Remote see page 92 2 2 2 2 Click on Maintenance at the top of the page 3 3 3 3 Click on Run individual library co...

Страница 143: ...age 3 3 3 3 Click on Run individual library commands 4 4 4 4 Click on Park robot 5 5 5 5 Click on the Park button Homing the Robot To move the robot to its home position 1 1 1 1 Set the library s cont...

Страница 144: ...s original control mode Moving a Cartridge To move a cartridge 1 1 1 1 Set the library s control mode to Remote see page 92 2 2 2 2 Click on Maintenance at the top of the page 3 3 3 3 Click on Run ind...

Страница 145: ...it in the same location Continuously cycle an axis The robot moves on the specified axis X axis robot moves right and left Wrist robot rotates from front to back and Picker the robot s cartridge gripp...

Страница 146: ...uously Picking and Placing a Cartridge To test cartridge picking and placing 1 1 1 1 Set the library s control mode to Remote see page 92 2 2 2 2 Click on Maintenance at the top of the page 3 3 3 3 Cl...

Страница 147: ...Click on Perform library diagnostic tests 4 4 4 4 Click on Continuously cycle an axis A page similar to Figure 6 42 appears 5 5 5 5 Click on the radio button next to the axis you want to test 6 6 6 6...

Страница 148: ...drive by inserting a cleaning cartridge into the drive and removing the cartridge when the cleaning is finished Unload a tape drive Unloads a cartridge from the tape drive Cleaning a Tape Drive If a...

Страница 149: ...is finished the robot returns the cleaning tape to its slot 7 7 7 7 When finished return the library to its original control mode Unloading a Tape Drive Under normal circumstances cartridges are autom...

Страница 150: ...BRARY ELEMENTS Under normal operating conditions you do not need to calibrate the library However if a problem occurs you may be asked by Exabyte Technical Support personnel to calibrate the library a...

Страница 151: ...its original control mode Calibrating a Tape Drive To calibrate a tape drive 1 1 1 1 Set the library s control mode to Remote see page 92 2 2 2 2 Click on Maintenance at the top of the page 3 3 3 3 Cl...

Страница 152: ...nd any loaded tape to the beginning Resetting the Library To reset the library 1 1 1 1 Click on Maintenance at the top of the page 2 2 2 2 Click on Reset the library and or tape drives 3 3 3 3 Click o...

Страница 153: ...3 Click on Reset a tape drive A page similar to Figure 6 48 appears 4 4 4 4 If necessary enter the remote manager password see page 105 5 5 5 5 Click on the radio button next to the tape drive you wa...

Страница 154: ...138 PRODUCT MANUAL 1014258 CHAPTER 6 USING THE REMOTE MANAGEMENT UTILITY NOTES...

Страница 155: ...nto the library without a drive carrier PREPARING FOR REPLACEMENT 1 1 1 1 Obtain a 2 Phillips screwdriver 2 2 2 2 Ensure that the environment is free of conditions that could cause electrostatic disch...

Страница 156: ...e skip to Removing the Tape Drive on page 141 1 1 1 1 From the back panel use a 2 Phillips screwdriver to release the captive screw that secures the service access cover to the library see Figure 7 1...

Страница 157: ...rom the back of the tape drive you are replacing The connectors for the tape drives are accessible from the back panel see Figure 7 2 2 2 2 2 From the back panel use a 2 Phillips screwdriver to releas...

Страница 158: ...an additional tape drive refer to page 18 for information about connecting to SCSI or page 20 for information about connecting to Fibre Channel 4 4 4 4 Reconnect the power cord and power on the librar...

Страница 159: ...clean the operator panel use wipes or cleaners appropriate for LCD screens or computer monitors USING TOUCH UP PAINT ON THE HOUSING A paint kit is available for touching up nicks and scratches on the...

Страница 160: ...LIBRARY S CONSOLE INTERFACE To access Console you must have the following A host computer that uses an RS232 serial port A straight through 9 pin serial cable not a null modem cable Terminal emulation...

Страница 161: ...the baud rate of the host computer then press ENTER Accessing Console using HyperTerminal Note These instructions assume you are using HyperTerminal a communications package available with Microsoft...

Страница 162: ...marks Uncheck the boxes if necessary f f f f Click OK in the ASCII Setup screen g g g g Click OK again in the Properties screen 6 6 6 6 The Console program should now appear in HyperTerminal s main wi...

Страница 163: ...L 215 221L and 430 SCSI Reference 4 4 4 4 From Console type flash and press Enter This displays the Flash screen as shown in Figure 7 7 5 5 5 5 In the Flash screen type loadimage and press Enter 6 6 6...

Страница 164: ...an use a different terminal emulation software package To create a diagnostic listing via Console 1 1 1 1 Access Console by following the steps on page 144 2 2 2 2 Type dump and press Enter 3 3 3 3 Se...

Страница 165: ...gh hole RJ 45 shielded Ethernet connector To access the library s FTP interface 1 1 1 1 Connect the Ethernet cable as described on page 22 and set Ethernet configuration options as described on page 3...

Страница 166: ...you report a problem to Exabyte Technical Support you may be asked to create a library diagnostic listing also called a dump via FTP A diagnostic listing is created when you use an FTP utility to send...

Страница 167: ...ics over the library s SCSI bus Refer to the readme file provided with the program for installation instructions Refer to the program s online help for instructions on performing upgrades and diagnost...

Страница 168: ...152 PRODUCT MANUAL 1014258 CHAPTER 7 MAINTENANCE NOTES...

Страница 169: ...that the SCSI IDs you selected for the tape drive s and library are not the same as the ID used by any other SCSI device on that bus including the SCSI adapter card Refer to page 32 for information a...

Страница 170: ...nator from that device Compatibility Make sure that your tape drive s and library are compatible with the adapter card and application software you plan to use Visit Exabyte s web site at www exabyte...

Страница 171: ...ays you must install a service access cover see page 139 Robot operation You can use the selections in the Command Menu and the Demo Menu see page 69 to determine if the robot is functioning properly...

Страница 172: ...orage ibm com For detailed information about SCSI error conditions refer to the Exabyte 110L 215 221L and 430 SCSI Reference Table 8 1 lists the library error codes in numerical order Caution Most lib...

Страница 173: ...remove the magazines Look for anything that might be obstructing the gripper or the robot s path along the reach axis Make sure the library and tape drive s are not being used by any host then reset...

Страница 174: ...e wrist axis 43 Wrist back sensor failed The library could not determine the position of the robot on the wrist axis 60 No label The bar code scanner could not read the bar code label because there wa...

Страница 175: ...y any host then reset the library see page 66 If the error persists contact your service provider You may be asked to supply a diagnostic listing you may need new firmware 77 Interface disabled The li...

Страница 176: ...l axis Make sure the library and tape drive s are not being used by any host then reset the library see page 66 If there are no obstructions and the error persists the robot or a tape drive may need t...

Страница 177: ...mo mode Open the door and insert at least one cartridge in a magazine 198 Robot full before command The robot all slots and all drives contain a cartridge when an Initialize Element Status command was...

Страница 178: ...stalled or the wrong card is installed 214 Invalid Slot Config The Maximum Number of Slots is set to 1 and the last slot is configured as a cleaning slot Change the Max Addressable Slot to a value gre...

Страница 179: ...e library for shipping 1 1 1 1 Before powering off the library select Park and Unlock for Shipping from the operator keypad The robot moves to the correct position to accommodate the packing materials...

Страница 180: ...T 20 TORX driver to remove the three screws that secure the retention bracket to the rack shelf as shown in Figure 9 1 2 2 2 2 From the back slide the library off of the rack shelf as shown in Figure...

Страница 181: ...b Place the robot s shipping brace inside the magazine so it is centered vertically and horizontally as shown in Figure 9 3 Figure 9 2 Removing the library from the rack Caution To avoid damaging the...

Страница 182: ...en place the antistatic bag over the library as shown in Figure 9 4 4 4 4 4 Place the two top cushions on the library as shown in Figure 9 4 Use the alignment holes in the packing pieces as a guide 5...

Страница 183: ...7 7 7 7 Fold the side flaps up and place the carton over the library as shown in Figure 9 4 8 8 8 8 Insert the four plastic clips into the openings in the sides of the carton and press the tabs into...

Страница 184: ...he entire box as shown in Figure 9 6 10 10 10 10 Place the shipping label on the box 11 11 11 11 Secure the box to the wooden pallet using banding material as shown in Figure 9 7 Figure 9 6 Sliding th...

Страница 185: ...ications Shipping specifications Safety and regulatory agency compliance STORAGE CAPACITY The maximum storage capacity of the library depends on the type and number of cartridges installed as shown in...

Страница 186: ...n their specifications For more information about tape drive performance specifications refer to the LTO Ultrium tape drive documentation available from IBM Corporation Table A 2 Dimensions and weight...

Страница 187: ...a self test each time the door is opened and closed During a self test the library Engages the solenoid latch on the door Moves the robot to the home position Performs a complete cartridge inventory I...

Страница 188: ...RELIABILITY The mean cycles between failures MCBF for the library s robot is 1 000 000 cycles This value does not include failures attributable to a tape drive data cartridges or the data cartridge ma...

Страница 189: ...tor on one end and an IEC 320 C13 female connector on the other end The cordage is CENELEC HD 21 The power cord is VDE approved Requirements for International 220 VAC Power Cord If you plan to use the...

Страница 190: ...20 C per hour 1 F per minute max 36 F per hour 1 C per minute max 20 C per hour 2 F per minute max 36 F per hour Relative Humidity 20 to 80 Non condensing 10 to 90 Non condensing 10 to 90 Non condens...

Страница 191: ...the particulate counts specified for the tape drives For more information refer to the LTO Ultrium tape drive documentation available from IBM Corporation Table A 6 Temperature and humidity points for...

Страница 192: ...tic noise limits Operating Mode LpA a a LpA is the average A weighted sound pressure level over the following frequency range 5 Hz to 12 5 KHz The library is powered on and idle 48 dBA The library is...

Страница 193: ...cedure 1D Swept Sine Applied During Non Operatione and Operatingf 5 to 500 to 5 Hz a A 0 3 G rms random vibration spectrum is applied to the vertical axis for a minimum of 20 minutes per axis b A 1 06...

Страница 194: ...luding Electrical Business Equipment CSA Standard C22 2 No 950 95 Safety of Information Technology Equipment including Electrical Business Equipment IEC 950 EN 60950 Safety of Information Technology E...

Страница 195: ...0 1995 3rd Edition TUV Approval for the GS mark in compliance with EN 60950 2nd Edition 1991 including Amendments 1 1992 2 1993 3 1995 4 1996 RADIATED AND CONDUCTED RADIO FREQUENCY EMISSIONS EMI The l...

Страница 196: ...es with EN 61000 4 3 1996 and ENV 50204 1995 Electromagnetic Compatibility EMC Part 4 Testing and Measurement Techniques Part 3 Radiated Radio Frequency Immunity The library will continue to operate w...

Страница 197: ...ns Immunity The library will continue to operate without error after being exposed to a 30 voltage dip for 500 ms The library will be self recoverable or can be restored by the operator after being ex...

Страница 198: ...182 PRODUCT MANUAL 1014258 APPENDIX A LIBRARY SPECIFICATIONS NOTES...

Страница 199: ...t is not available on the LTO 2 or LTO 1 tape drives No physical hardware changes are required to make the tape drive compatible with the WORM feature however appropriate WORM capable drive firmware m...

Страница 200: ...ation from the cartridge memory CM module in the cartridge If it does not match a media Error Code 7 7 7 7 will post on the LTO 3 drive s single character display SCD Inserting a WORM tape cartridge i...

Страница 201: ...oad the updated firmware by visiting the download page on the Exabyte web site at www exabyte com downloads Note Refer to Upgrading Library Firmware and Creating Diagnostic Listings on page 143 for in...

Страница 202: ...ect Table B 3 ASC ASCQ error codes for a Medium Error SK 3 with WORM media ASC ASCQ Description 04h 10h Logical Unit Not Ready Auxiliary Memory Not Accessible 11h 12h Auxiliary Memory Read Error 30h 0...

Страница 203: ...can option 46 location 4 setting Verify Barcode Checksums option 47 Baud Rate setting for library 145 bus See SCSI bus C caddy See entry exit port capacity of the library 169 cartridge See also WORM m...

Страница 204: ...security 49 to 51 SNMP 40 to 41 using operator panel keys 28 using the remote management utility 87 to 137 Console control mode 54 Console interface connecting to 144 to 146 description 143 using to c...

Страница 205: ...via Console 147 to 148 upgrading via FTP 150 viewing code level 75 WORM requirements 185 fixed cartridge slots description 6 location 4 flash code See firmware front panel components 3 to 4 FTP connec...

Страница 206: ...55 to 57 operating environment specifications 174 operation accessing magazines 56 cleaning tape drives 63 to 65 closing door 57 ejecting cartridges manually 67 to 69 issuing library commands 71 to 7...

Страница 207: ...ents 11 connecting library to 18 to 19 length restrictions 18 terminator requirements 11 SCSI cables connecting 18 to 20 requirements 11 SCSI connectors description 8 location 7 SCSI control mode 54 S...

Страница 208: ...5 Technical Support iv termination SCSI installing terminators 19 requirements 11 transfer rate 170 troubleshooting 153 to 162 U unload button location 68 using to eject cartridges 68 unlocking the do...

Отзывы: