Evolution 009-0001 Скачать руководство пользователя страница 16

16

www.evolutionpowertools.com

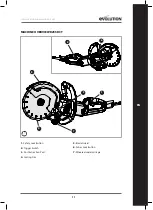
ADJUSTABLE BLADE GUARD

(R300 DCT+ and R300 DCT)

The blade guard on these machines is adjustable. It should be 

positioned to provide the operator with the best combination 

of personal protection and visibility of the cutting line.

Note: Machines R255 DCT and R230 DCT are equipped with 

fixed blade guards.

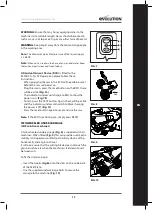
To adjust the Blade Guard:

WARNING:

 Disconnect the machine from the power supply 

before repositioning the blade guard.

•    Operate the blade guard locking system by pulling the  

     locking pin upwards.  (Fig. 4)

•     Rotate the blade guard to the optimum position using the      

     blade guard rotation handle. (Fig. 5)

•    Release the locking pin. 

•    Check the security of the blade guard.

DUST SUPPRESSION SYSTEM

(Machine R300 DCT+)

R300 DCT+ is fitted with a dust suppression system. This system 

will deliver a jet of water at equal pressure and volume to both 

sides of the blade.

Note: R300 DCT is pre- prepared and can be retro fitted with 

the dust suppression system. Contact your supplier or access 

the Evolution Helpline for further details.

To use the dust suppression system:

•    Connect a hose from a water supply to the saw, the water  

     supply could be a mains water tap or an Evolution Water      

    Bottle system.

•   Push the hose connector (Fig. 6a) on to the Water Valve  

    hose  adaptor (Fig. 6b) there will be a click and the hose     

    connector will be secured.

•   Once connected to the water supply pressurise the water  

     either by pumping the bottle or turning on the mains tap.   

•    Open the water valve to feed water to the blade. The rate  

      of flow can be adjusted by the water valve on the saw.  

     (Fig. 6c)

•    After finishing the cut, switch off the machine, turn the     

      water valve (3) off to stop flow of water to the blade.

•    Disconnect the saw from the water supply by pushing back      

     the hose connector release collar.

Note:


Adjust the system so that just enough water is supplied 

to adequately suppress the dust created by the cutting process. 

FIG. 4

FIG. 5

FIG. 6c

ON

OFF

•  Ensure that the machines arbor and the blade flanges 

are clean and free from any dust or debris.

•  Ensure that the direction of rotation marked on the 

blade matches the direction of rotation marked on the 

machines guard.

•  Install blade flange (a) on the inner side of the blade. 

(Fig. 1)

•  Install the blade with reference to the direction of 

rotation arrows.

•  Install the outer blade flange (b) and washer (c) then 

insert the arbor bolt (c) into the machines arbor. (Fig. 1) 

FIG. 6a & b

(a)

(b)

Содержание 009-0001

Страница 1: ...02X 009 0003 009 0003X 009 0004 009 0004X 009 0006 009 0006X 010 0001 010 0001X 010 0002 010 0002X 010 0003 010 0003X 010 0004 010 0004X 010 0006 010 0006X 012 0001 012 0001X 012 0002 012 0002X 012 00...

Страница 2: ...will within the guarantee period and from the original date of purchase repair or replace any goods found to be defective in materials or workmanship This guarantee is void if the tool being returned...

Страница 3: ...010 0002 010 0003 010 0006 010 0001X 010 0002X 010 0003X 010 0006X 012 0001 012 0002 012 0003 012 0006 012 0001X 012 0002X 012 0003X 012 0006X 012 0001A 012 0002A 012 0003A 012 0006A 012 0001AX 012 0...

Страница 4: ...ns of use taking account of all parts of the operating cycle such as the times the tool is switched off when it is running idle in addition to trigger time LABELS SYMBOLS WARNING Do not operate this m...

Страница 5: ...ing loss Inhalation of dust particles from the workpiece Electric shock when touching uninsulated electrical components If the instructions contained in this manual are not followed other residual ris...

Страница 6: ...nd safer at a rate for which it was designed b Do not use the power tool if the switch does not turn it on or off Any power tool that cannot be controlled with the switch is dangerous and must be repa...

Страница 7: ...m Position the cord clear of the spinning accessory If you lose control the cord may be cut or snagged and your hand or arm may be pulled into the spinning wheel n Never lay the power tool down until...

Страница 8: ...the risk of exposure As some materials can produce dust that may be hazardous to your health we recommend the use of an approved face mask with replaceable filters when using this machine You should...

Страница 9: ...Safety Hat may be compulsory on some construction sites to protect the operator from potential overhead dangers 4 1 GETTING STARTED UNPACKING Caution This packaging contains sharp objects Take care wh...

Страница 10: ...www evolutionpowertools com MACHINE OVERVIEW R230DCT 1 Safety Lock Button 2 Trigger Switch 3 Dust Extraction Port 4 Cutting Disc 5 Blade Guard 6 Arbor Lock Button 7 Wheeled undercarriage 5 4 6 7 3 2...

Страница 11: ...www evolutionpowertools com EN MACHINE OVERVIEW R255DCT 1 Safety Lock Button 2 Trigger Switch 3 Dust Extraction Port 4 Cutting Disc 5 Blade Guard 6 Arbor Lock Button 7 Wheeled undercarriage 1 3 7 4 5...

Страница 12: ...evolutionpowertools com MACHINE OVERVIEW R300DCT 1 Safety Lock Button 2 Trigger Switch 3 Dust Extraction Port 4 Cutting Disc 5 Adjustable Blade Guard 6 Arbor Lock Button 7 Wheeled undercarriage 1 3 7...

Страница 13: ...powertools com EN MACHINE OVERVIEW R300DCT 1 Safety Lock Button 2 Trigger Switch 3 Dust Extraction Port 4 Cutting Disc 5 Adjustable Blade Guard 6 Arbor Lock Button 7 Wheeled undercarriage 8 Water feed...

Страница 14: ...d reduces operator fatigue Front and rear handles electrically insulated from the machines metal parts Dust extraction capability Quality rubber sheathed power cable Reinforced Steel Skid Plate Remova...

Страница 15: ...e flange b and insert the arbor bolt c into the machines arbor for your appropriate machine Fig 1 All Machines Press the arbor lock to lock the machines arbor Fig 2 Tighten the arbor bolt using the su...

Страница 16: ...Note R300 DCT is pre prepared and can be retro fitted with the dust suppression system Contact your supplier or access the Evolution Helpline for further details To use the dust suppression system Co...

Страница 17: ...Fig 7a The indicator window will change to RED to show the power is on Fig 7b To test press the TEST button Again there will be a click and the indicator window will switch to black showing the power...

Страница 18: ...he dust extraction machine should be attached to the dust extraction port of the Blade Guard Remove the rubber cap from the dust extraction port Fig 13 and safely store it for future reinstallation Pu...

Страница 19: ...operators use the equipment safely and efficiently PRE CUTTING CHECKS Ensure that the power supply matches the requirements specified on the machines rating plate Ensure that the machines trigger swit...

Страница 20: ...pre marked cutting line Do not cut a depth greater than 50mm 2 Fig 17 If a cut of greater than 50 mm 2 is required make several passes Cut smoothly allowing the machine to do the work without forcing...

Страница 21: ...will allow access to the inside of the blade guard Any build up of debris etc can be removed using a blunt non metallic scrapper or similar tool not supplied WARNING Do not attempt to clean the machin...

Страница 22: ...Evolution 300mm 12 R300DCT Electric Disc Cutter Brand Name Evolution Build Voltage 110V 50Hz 220 240V 50Hz Input 110V 1600 2000W 230 240V 2400W 2000W The technical documentation required to demonstra...

Страница 23: ...23 www evolutionpowertools com EN Notes...

Страница 24: ...del periodo de garant a y desde la fecha original de compra cualquier producto con defectos materiales o de fabricaci n Esta garant a ser nula si la herramienta devuelta se ha usado sin seguir las rec...

Страница 25: ...01 010 0002 010 0003 010 0006 010 0001X 010 0002X 010 0003X 010 0006X 012 0001 012 0002 012 0003 012 0006 012 0001X 012 0002X 012 0003X 012 0006X 012 0001A 012 0002A 012 0003A 012 0006A 012 0001AX 012...

Страница 26: ...na el tiempo que est en reposo o ralent adem s del tiempo que est funcionando de forma continua y el tiempo del disparador ETIQUETAS Y S MBOLOS ADVERTENCIA no utilice la m quina si faltan las etiqueta...

Страница 27: ...rte corte o traumatismo Riesgo de incendio por chispas que salen volando Da os auditivos si no se lleva protecci n ac stica adecuada p rdida de audici n Inhalaci n de part culas de polvo de la pieza d...

Страница 28: ...cidental Compruebe que el interruptor est en la posici n off apagado antes de conectar la herramienta a la fuente de alimentaci n o a las bater as o de coger o transportar la herramienta El hecho de t...

Страница 29: ...en hacer a icos e Utilice siempre bridas de sujeci n no da adas que tengan el di metro correcto para el disco seleccionado Las bridas de sujeci n adecuadas soportan el disco y reducen as la posibilida...

Страница 30: ...omando las precauciones adecuadas que se indican a continuaci n a Mantenga un agarre firme de la herramienta el ctrica y coloque el cuerpo y el brazo de manera que pueda resistir las fuerzas del contr...

Страница 31: ...bloqueo del husillo mientras la m quina est en funcionamiento Se podr an producir da os graves en la m quina y podr a darse una situaci n potencialmente peligrosa para el operario Utilice nicamente ho...

Страница 32: ...bien que la m quina est en buenas condiciones y que cuenta con todos los accesorios especificados en este manual Aseg rese tambi n de que todos los accesorios est n completos Si falta alguna pieza la...

Страница 33: ...ES DESCRIPCI N GENERAL DE LA M QUINA R230DCT 1 Bot n de bloqueo de seguridad 2 Gatillo interruptor 3 Canal de extracci n de polvo 4 Disco de corte 5 Protecci n de la hoja 6 Bot n del seguro del eje 7...

Страница 34: ...DESCRIPCI N GENERAL DE LA M QUINA R255DCT 1 Bot n de bloqueo de seguridad 2 Gatillo interruptor 3 Canal de extracci n de polvo 4 Disco de corte 5 Protecci n de la hoja 6 Bot n del seguro del eje 7 Ch...

Страница 35: ...SCRIPCI N GENERAL DE LA M QUINA R300DCT 1 Bot n de bloqueo de seguridad 2 Gatillo interruptor 3 Canal de extracci n de polvo 4 Disco de corte 5 Protecci n de la hoja ajustable 6 Bot n del seguro del e...

Страница 36: ...RAL DE LA M QUINA R300DCT 1 Bot n de bloqueo de seguridad 2 Gatillo interruptor 3 Canal de extracci n de polvo 4 Disco de corte 5 Protecci n de la hoja ajustable 6 Bot n del seguro del eje 7 Chasis co...

Страница 37: ...r aumenta la comodidad y reduce el cansancio del operario Mango frontal y trasero aislados el ctricamente de las piezas met licas de la m quina Capacidad de extracci n de polvo Cable el ctrico recubie...

Страница 38: ...introduzca el perno del eje c en el eje de la m quina para la m quina correspondiente Fig 1 Todas las m quinas Presione el bloqueo del eje para bloquear el eje de la m quina Fig 2 Apriete el perno de...

Страница 39: ...rado anteriormente y se puede modernizar con el sistema de eliminaci n de polvo Consulte a con su proveedor o llame al n mero de asistencia de Evolution para disponer de m s informaci n Utilizar el si...

Страница 40: ...iente residual y escuchar un clic Fig 7a La ventana indicadora cambiar a ROJO para mostrar que la corriente est encendida Fig 7b Para probarlo pulse el bot n TEST De nuevo se oir un clic y la ventana...

Страница 41: ...de polvo se debe unir al orificio de extracci n de polvo en la protecci n de la hoja Retire el tap n de goma del orificio de extracci n de polvo Fig 13 y gu rdelo en un lugar seguro para volver a col...

Страница 42: ...ios a usar el equipo de una forma segura y eficaz COMPROBACIONES ANTES DEL CORTE Aseg rese de que el suministro el ctrico coincide con los requisitos especificados en la placa de caracter sticas de la...

Страница 43: ...a l nea de corte marcada previamente No corte a una profundidad superior a 50 mm 2 Fig 17 Si se necesita un corte de m s de 50 mm 2 h galo en varias veces Corte con suavidad dejando que la m quina hag...

Страница 44: ...permite acceder al interior de la protecci n de la hoja Cualquier acumulaci n de residuos etc se puede eliminar usando un rascador romo no met lico o una herramienta similar no suministrada ADVERTENC...

Страница 45: ...e 300 mm 12 R300DCT de Evolution Cortadora de disco el ctrica de 300 mm 12 R300DCT de Evolution Marca comercial Evolution Build Voltaje 110V 50Hz 220 240V 50Hz Entrada 110V 1600 2000W 230 240V 2400W 2...

Страница 46: ...d achat d origine Evolution Power Tools r parera ou remplacera toute marchandise pr sentant un d faut de mat riau ou de fabrication Cette garantie ne s applique pas si la machine renvoy e a t utilis e...

Страница 47: ...0006 010 0001X 010 0002X 010 0003X 010 0006X 012 0001 012 0002 012 0003 012 0006 012 0001X 012 0002X 012 0003X 012 0006X 012 0001A 012 0002A 012 0003A 012 0006A 012 0001AX 012 0002AX 012 0003AX 012 0...

Страница 48: ...til est mis l arr t lorsqu il tourne au ralenti en plus du d clenchement TIQUETTES ET SYMBOLES AVERTISSEMENT N utilisez pas cette machine s il manque des tiquettes d avertissement et ou d instruction...

Страница 49: ...de la coupe coupure ou blessure contondante Risque d incendie par projection d tincelles Dommages auditifs en cas de non port d une protection auditive efficace perte auditive Inhalation de particules...

Страница 50: ...s crous avant de mettre l outil en marche Un outil ou une cl laiss sur une pi ce rotative d un outil lectrique pourrait causer de graves dommages corporels e Ne travaillez pas bout de bras Gardez touj...

Страница 51: ...te de contr le i N utilisez pas de disques endommag s Avant chaque utilisation v rifiez que les disques ne comportent aucun clat ni aucune fissure Si l outil lectrique ou le disque tombe v rifiez qu i...

Страница 52: ...bois ou de disque diamant segment dont l espace p riph rique est sup rieur 10 mm ni de lame de scie dents De telles lames provoquent souvent un effet de recul et une perte de contr le f Ne bloquez pas...

Страница 53: ...esse maximale atteinte N exercez pas une force excessive Exercer une force excessive entra ne une surcharge du moteur et diminue l efficacit et la dur e de vie de l appareil Coupez toujours le b ton l...

Страница 54: ...au long de la p riode de garantie Jetez l emballage d une mani re responsable pour l environnement Si possible recyclez le Ne laissez pas les enfants jouer avec des sacs plastiques vides en raison du...

Страница 55: ...FR PR SENTATION DE LA MACHINE R230DCT 1 Interrupteur de s curit 2 Interrupteur g chette 3 Port d aspiration des poussi res 4 Disque de coupe 5 Carter de lame 6 Bouton de blocage de l arbre 7 Train de...

Страница 56: ...m PR SENTATION DE LA MACHINE R255DCT 1 Interrupteur de s curit 2 Interrupteur g chette 3 Port d aspiration des poussi res 4 Disque de coupe 5 Carter de lame 6 Bouton de blocage de l arbre 7 Train de r...

Страница 57: ...PR SENTATION DE LA MACHINE R300DCT 1 Interrupteur de s curit 2 Interrupteur g chette 3 Port d aspiration des poussi res 4 Disque de coupe 5 Prot ge lame r glable 6 Bouton de blocage de l arbre 7 Train...

Страница 58: ...DE LA MACHINE R300DCT 1 Interrupteur de s curit 2 Interrupteur g chette 3 Port d aspiration des poussi res 4 Disque de coupe 5 Prot ge lame r glable 6 Bouton de blocage de l arbre 7 Train de roulement...

Страница 59: ...r duit la fatigue de l op rateur Poign es avant et arri re isol es lectriquement des pi ces m talliques de la machine Capacit d extraction de poussi re C ble d alimentation gain de caoutchouc de qual...

Страница 60: ...dans l arbre de la machine pour votre machine appropri e Fig 1 Pour toutes les machines Appuyez sur le bouton de blocage de l arbre pour verrouiller l arbre des machines Fig 2 Serrez le boulon de l a...

Страница 61: ...t pr pr par et peut tre r tro quip du syst me de suppression de poussi re Contactez votre fournisseur ou acc dez la ligne d assistance Evolution pour obtenir de plus amples d tails Pour utiliser le sy...

Страница 62: ...icateur passera au ROUGE pour indiquer que l appareil est sous tension Fig 7b Pour effectuer un test pressez le bouton TEST Encore une fois un clic se produira et la fen tre de l indicateur passera au...

Страница 63: ...iration des poussi res du prot ge lame Retirez le capuchon en caoutchouc du port d aspiration des poussi res Fig 13 et rangez le dans un endroit s r pour pouvoir le r installer plus tard Poussez le tu...

Страница 64: ...er l quipement en toute s curit et efficacement V RIFICATIONS AVANT D EFFECTUER DES COUPES Assurez vous que la source d alimentation est conforme aux normes mentionn es sur la plaque signal tique de l...

Страница 65: ...couper une profondeur sup rieure 50 mm 2 effectuez plusieurs passages Coupez en douceur de sorte que la machine fonctionne sans qu il soit n cessaire d exercer une force excessive sur la lame AVERTISS...

Страница 66: ...lation de d bris etc peut tre limin e l aide d un grattoir non m tallique mouss ou d un outil similaire non fourni AVERTISSEMENT Ne tentez pas de nettoyer la machine en ins rant des objets pointus dan...

Страница 67: ...0DCT Evolution Nom du fabricant Evolution Build Tension 110V 50Hz 220 240V 50Hz Entr e 110V 1600 2000W 230 240V 2400W 2000W La documentation technique requise pour prouver que le produit est conforme...

Страница 68: ...er Tools SAS 61 Avenue Lafontaine 33560 Carbon Blanc Bordeaux T 33 0 5 57 30 61 89 UK Evolution Power Tools Ltd Venture One Longacre Close Holbrook Industrial Estate Sheffield S20 3FR T 0114 251 1022...

Отзывы: