7880IPG-NAT Series
High Density Network Address Translator
Page - 8
Revision 2.1
2.3.
HARDWARE INSTALLATION
The 7880IPG-NAT is designed to operate with its own control port using a web browser such as
Chrome or Fire Fox.
To successfully install the 7880IPG-NAT, you will require the following:
1. Unused IP address on the network
2. Evertz serial cable
Before handling the card it is important to minimize the potential effects of static electricity. It is
therefore recommended that an ESD strap be worn.
Locate on the chassis two adjacent vacant slots. Unpack the 7880IPG-NAT and separate the rear
panel from the main card. Locate on the rear of the rack the two slots and remove the blanking panels.
Insert the rear panel into the back of the chassis and secure using the four screws provided.
Before inserting the front card, connect the serial cable to the board using the rainbow coloured serial
cable provided. Now insert the 7880IPG-NAT card into the corresponding front slots ensuring the card
lines up with the slot runners on the bottom and the top of the chassis. Push the card
firmly
into the
slot ensuring that when it mates with the rear card it has been firmly pushed into a seated position. Do
not connect any cables to the rear plate (failure to do this could cause unwanted network issues) until
the initial configuration has been completed.
Ensure that the device is powered up and the top green LED is on (LED 1) at the front of the card.
Connect the device via the COM port.
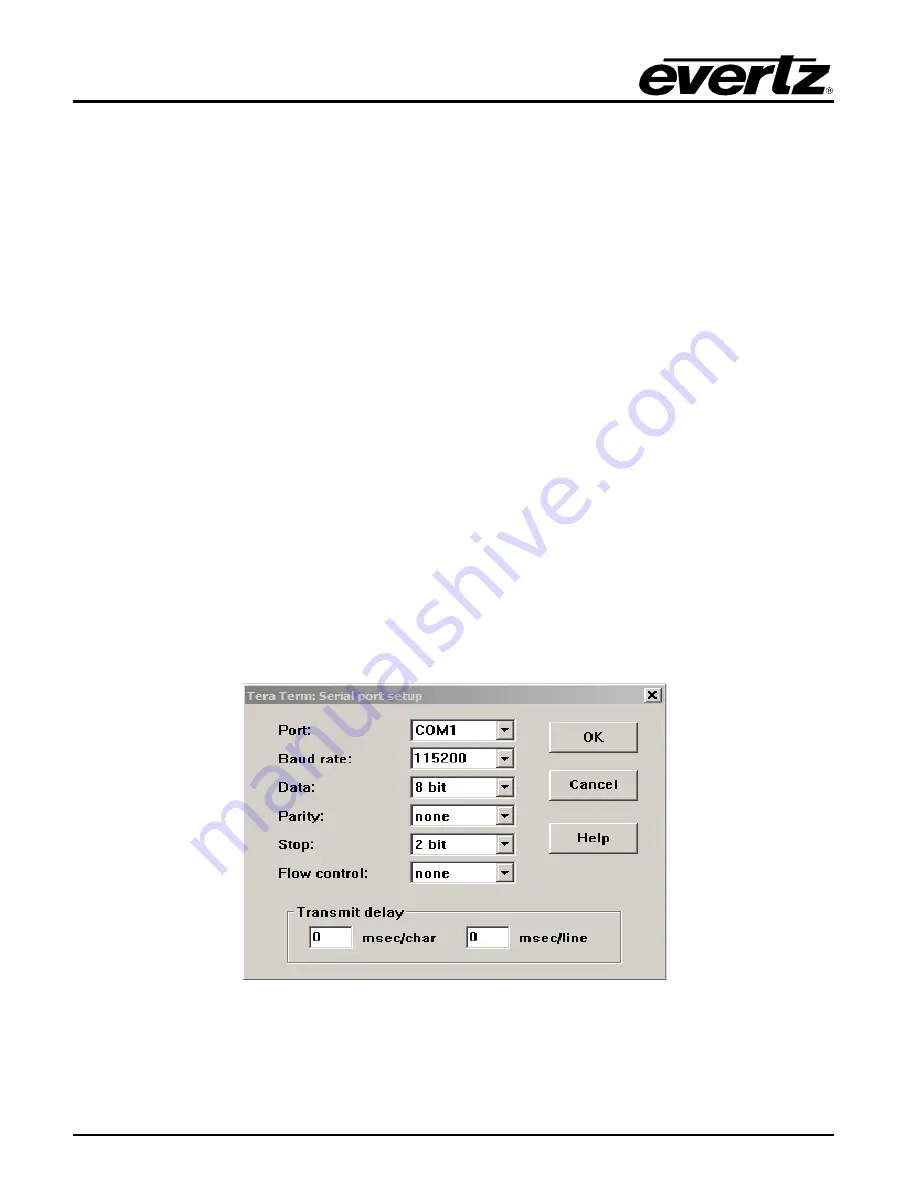
Open TeraTerm (if using Windows XP or older open Hyper Terminal) to make the required changes to
the IP address on the card. Set the TeraTerm serial port settings to following:
Figure 2-3: COM Port – Serial Port Settings
Click OK to apply these settings and press return. The session should respond with the 7880IPG-NAT
Main Menu as shown in Figure 2-4. A prompt will ask for a login name and password. Enter “
customer
”
for both prompts.
Содержание 7880IPG-NAT Series
Страница 2: ...This page left intentionally blank ...


