background image

8.2 SEARCH PLAYBACK

(1) Segment Search Playback

Press the SEARCH key to enter the Search menu.

SEARCH  MENU

BY   SEGMENT  LIST
BY   ALARM   LIST
BY   DATA   TIME

Press the                  keys to move the cursor to BY SEGMENT LIST and press ENTER key to 
select file search.    

SEGMENT  SEARCH

1       
2
3

Playing Back

SEARCH

Press the                  keys to move the cursor to the segment you want to playback. Press 
Enter to select the segment.
When the selection list is full, turn the jog dial  clockwise to select next page list for search 
other list. 
After the starting time is confirmed, press Enter to start playing back.

35

Alarm
Timer
Timer

2002/04/24    19/03/29
2002/04/25    12/30/30 
2002/05/20    12/00/00

Alarm:ALARM RECORD
Timer: TIMER RECORD

Содержание EDSR100M

Страница 1: ...SR100M INSTRUCTION MANUAL Mobile Digital Single Channel Recorder About this manual Before installing and using this unit please read this Manual carefully Be sure to keep it handy for later reference V1 0 ...

Страница 2: ...and improve its products All specifications are therefore subject to change without notice Safety Warning Note This is a class A product In a domestic environment this product may cause radio interference In which case the user may be required to take adequate measures Note This equipment has been tested and found to comply with the limits for a Class A digital device The changes or modifications ...

Страница 3: ...try to operate it in wet areas Do take immediate action if the appliance becomes wet Turn the power off and refer servicing to qualified service personnel Moisture may damage the appliance and also cause electric shock Do not use strong or abrasive detergents when cleaning the appliance body Use a dry cloth to clean the appliance when it is dirty When the dirt is hard to remove use a mild detergen...

Страница 4: ... power cord is the main power disconnect for all units External Power Supplies Use only the recommended power supplies Power supplies must comply with the requirement of the latest version of IEC 60065 CNS 13439 Substitutions may damage the unit or cause a fire or shock hazard DC12 24V Power Cords DC12 24V power cords Warning Electrostatic sensitive device Use proper CMOS MOSFET handing precaution...

Страница 5: ... a bath tub wash bowl kitchen sink or laundry tub in a wet basement near a swimming pool in an unprotected outdoor installation or any area which is classified as a wet location Servicing Do not attempt to service this unit yourself as opening or removing covers may expose you to dangerous voltage or other hazards Refer all servicing to qualified service personnel Power Cord Protection Power suppl...

Страница 6: ...mps During installation it is important to note that the power supply for the DVR should be directly connected to the vehicle battery Utilize a 5 10 amp fuse and only qualified power material designed specifically for the vehicle for best results Never connect the unit directly to the power source as a high voltage surge may damage both the DVR and the vehicle The EP2026A is equipped with electron...

Страница 7: ...is subject to high vibration That is subject to high sunlight levels That is subject to drenched of the rain Where passengers can interfere with unit Next to a heater duct As following table lists recommended location options Location Convenient operation Easy to install Low vibration Good air flow Bottom of glove box horizontal mount Bottom of passenger seat next to the driver Underneath bulkhead...

Страница 8: ...Passenger seat underneath Possible Installation Locations Inside the Automobile Vehicle TOYOTA CAMRY Car engine Vehicle battery 12V or 24V DVR Fuse 5A or 10A Key start Spilt filter Car body On Off switch Vehicle body Show the wiring on the wiring harness that connects to the electrical system Quick Install Guide ...

Страница 9: ...ting option Glove box inside or underneath Car engine Vehicle battery 24V DVR Fuse 5A Key start Spilt filter Car body On Off switch Vehicle body Show the wiring on the wiring harness that connects to the electrical system Possible Installation Locations Inside the Automobile Vehicle Quick Install Guide ...

Страница 10: ...amera and observe the image Make any adjustment necessary Installing the Camera and Monitor The DVR is typically connected to one camera installed inside the car For installation procedure refer to the guide that came with the camera you purchased The Monitor power supply connect from the Automotive adapter cigarette plug Monitor and cameras must be purchased separately LCD Monitor LCD Monitor Qui...

Страница 11: ...erface Interface The DVR can be mounted horizontally suspend or support mounted Support Suspend Show all the possible ways to mount the DVR Use the two Z brackets supplied to mount it in any ways shown Quick Install Guide ...

Страница 12: ...Quick Install Guide Installing the Hard Drive As following are the figure for the 3 5 and 2 5 HDD Figure shows 3 5 HDD Figure shows 2 5 HDD ...

Страница 13: ... 18 6 5 Alarm Record Setting Menu 20 6 6 Buzzer Setting Menu 25 6 7 Archive Setting Menu 26 6 8 RS232 RS485 Setting Menu 27 7 Recording 31 7 1 Instant Recording 31 7 2 Alarm Recording 32 8 Playback 33 8 1 Normal Playback 33 8 2 Search Playback 35 9 Copy 38 9 1 Still Image Copy 38 9 2 Copy to Movie File 39 10 Interface Specifications 41 10 1 Transmission setting 41 10 2 Remote Control Protocol 42 1...

Страница 14: ...able quality Audio recording capability Programmed with various time lapse speeds Data can be stored in Compact Flash Card Operation status record log The EDSR100M is the industry s first full featured digital video recorder designed specifically for use in mobile applications Superior image quality and ease of use combined with the ability to withstand high levels of vibration and humidity make t...

Страница 15: ...SC PAL Recording Rate Continuous Time lapse recording Schedule or Event Recording Recording Mode 3 5 IDE type Hot swappable Hard Disk Storage Yes Event Log Yes Video Loss Detection Full PIP Quad and 2x2 zoom for Live and Playback Video Display 1 alarm output Alarm Output 1 alarm input Alarm Input Yes Built in CompactFlash card slot CompactFlash Memory 720x484 NTSC 720x576 PAL Recording Resolution ...

Страница 16: ...ess this key to enter Setup menu STOP Press this key to stop recording and play back PAUSE Press this key to pause the playback picture SEARCH Press this key to enter the Search Playback Menu 10 9 11 12 13 15 14 REC Press this key to start recording COPY Press this key to start copy still picture or video stream into Compact Flash card REV PLAY Reverse Play Back PLAY Play Back KEY Left Right Butto...

Страница 17: ...he Jog dial can stop forward backward the picture In Menu mode turn the Jog dial can change menu page forward rewind 19 17 18 20 21 22 Compact Flash Card Slot Insert a Compact Flash Card Hard Disk Tray Hard Disk holder for HDD LEDs LEDs for system active power and ALARM access Remote Control IR Remote receiver HDD KEY Protect HDD without steal Record 002HR Disk 120 GB 0 4 2003 04 2410 41 00 Displa...

Страница 18: ...back Audio is enabled then the output of SW2 will be connected to Playback Audio When Playback Audio is disabled then there is no audio output MUTE When Audio Out is enabled and machine is in Recording or Standby mode the Audio IN is loop through to Audio Out connector When Audio Out is enabled and machine is in Playback mode then the Audio Out playback audio AUDIO 5 4 9 2 Operation of SW1 Operati...

Страница 19: ...n other modes the Video from multiplexer main monitor will be loop through to the Monitor Out MONITOR 3 5 Back Panel Connections 6 Internal circuit 4 MONITOR Video output BNC connector connected to main monitor ALM OUTPUT Normal Close Alarm output In normal condition this terminal is shorted to the terminal of ALM COM In alarm status it is open between ALM NC and ALM COM terminals ALM INPUT Normal...

Страница 20: ...RS232 RS232 connector Connect D Sub 9 pins connector to RS232 ports for remote control 8 Back Panel Connections 7 RS485 RS485 connector Cascade multi Digital Video Recorder 9 10 FAN Cooling FAN ...

Страница 21: ...n Monitor 2 Audio Out The camera audio output is connected to the audio input terminal at the rear panel 3 System Main Monitor Output The main monitor is connected to the VIDEO OUT 1 BNC connector System Connection 1 2 3 8 Note Please set the Multiplexer item to OFF NORMAL RECORD SETTING MENU 4 System Connection ...

Страница 22: ...iplexer Main Monitor Output This connects to the MUX MAIN MONITORIN IN connector at the rear panel 4 System Main Monitor Out Connect the MAIN MONITOR OUTPUT connector to the main monitor System Connection 9 4 2 Multiplexer Connection Main Monitor Multiplexer 3 2 1 4 VCR IN VCR OUT MAIN MONITOR OUTPUT Note Please set the Multiplexer item to ON NORMAL RECORD SETTING MENU ...

Страница 23: ...is connects to the VIDEO OUTPUT connector at the rear panel 3 Quad Main Monitor Out This connects to the MUX Main connector at the rear panel 4 System Main Monitor Output Connect the MAIN MONITOR OUTPUT connector to the main monitor System Connection 1 2 3 VCR IN VCR OUT MAIN MONITOR OUTPUT 4 10 Note Please set the Multiplexer item to ON NORMAL RECORD SETTING MENU ...

Страница 24: ...deo Out to Video Recorder This connects to the VIDEO INPUT connector at the rear panel 2 System Main Monitor Output Connect the MAIN MONITOR connector to the main monitor System Connection Quad VIDEO OUT 1 11 2 Note Please set the Multiplexer item to OFF NORMAL RECORD SETTING MENU ...

Страница 25: ...put and video audio out The detail connection is described in SYSTEM CONNECTION 3 Switch Power On The POWER LED lights if power is normal 4 Press MENU key to enter SET UP MENU Once inside the main menu you will find there are nine set up pages as below MENU 5 Turn the jog dial clockwise or counterclockwise to change set up page 1 CLOCK LANGUAGE SETTING MENU 2 DAYLIGHT SAVE SETTING MENU 3 TIMER SET...

Страница 26: ...TIPLEXER DISK FULL 002 STANDARD OFF REWRITE ALARM OPERATION RECORDING SPEED RECORDING QUALITY ALARM IN TYPE ALARM RESET TYPE ALARM DURATION TIME PRE ALARM OPERATION RECORDING SPEED ALARM RECORD SETTING MENU See page 20 NO NO OFF 888888 12 NO NO NO NO ON 002 HR STANDARD N O N O 05 SECS ON 002 HR PICTURESIZE TIMESTAMP TIME STAMP POS WATER MARK WATER MARK POS BUZZER SETTING MENU See page 22 SYSTEM SE...
Страница 27: ...nt time Hour 00 23 Minute 00 59 Second 00 59 3 MENU LANGUAGE ENGLISH CLOCK LANGUAGE SETTING MENU DATE TIME MENU LANGUAGE 2003 04 24 TUE 13 01 02 ENGLISH 6 1 CLOCK LANGUAGE SETTING MENU Left Right Button Press or to move the cursor to the left or right Up Down Button Press or to change the value VERSION 1 0 2003 05 26 ...

Страница 28: ...t 2 START ON 1ST Use the arrows to set the present week 1ST 2ST 3ST 4ST SUN Use the arrow to set the present date Thursday Sunday Friday Tuesday Monday Wednesday Saturday JAN Use the arrow to set the present month Sunday February March January April May June December November October September August July FROM 00 00 TO 00 00 Use the arrow to set the start time value LAST Left Right Button Press or...

Страница 29: ...23 59 002 HR STANDARD OFF SUN 00 00 23 59 002 HR STANDARD OFF SUN 00 00 23 59 002 HR STANDARD OFF SUN 00 00 23 59 002 HR STANDARD OFF SUN 00 00 23 59 002 HR STANDARD OFF The monitored image can be recorded automatically by setting the start and end times in TIMER SET SETTING MENU we can set the schedule to record for a whole week 1 WEEK This selects the day for the timer Records each day s schedul...

Страница 30: ...PEED FORMAT is set to IPS the recording speed can be set from 1 60 1 50 NTSC PAL IPS 5 QUALITY Picture Quality There are six quality levels for recording 6 SET Set ON when using timer recording Set OFF when not using timer recording LOWER LOW BASIC STANDARD HIGH SUPERIOR 15 KB 20 KB 25 KB 30 KB 35 KB 40 KB 17 ...

Страница 31: ... NORMAL RECORDING MENU we define 1 SPEED Recording Speed The user can select the record ing speed from 2 3 NSC PAL HR to 960 HR 2 QUALITY Picture Quality There are six quality levels for recording LOWER LOW BASIC STANDARD HIGH SUPERIOR 15 KB 20 KB 25 KB 30 KB 35 KB 40 KB 6 4 NORMAL RECORD SETTING MENU ...

Страница 32: ...ut when the recorder is not in MENU mode OFF The main monitor output is similar to the video out connector 4 Disk Full STOP When the disk is full the machine will STOP recording REWRITE When the disk is full the current video will OVERWRITE the exis ting video from the beginning of HDD MENU 19 Left Right Button Press or to move the cursor to the left or right Up Down Button Press or to change the ...

Страница 33: ...in recording speed is 960 HR 3 RECORDING QUALITY Select the Recording picture quality when alarm occurs LOWER LOW BASIC STANDARD HIGH SUPERIOR MENU 20 ALARM RECORD SETTING MENU ALARM OPERATION RECORDING SPEED RECORDING QUALITY ALARM IN TYPE ALARM RESET TYPE ALARM DURATION TIME PRE ALARM OPERATION RECORDING SPEED ON 003 HR STANDARD N O N O 05 SECS ON 003 HR 15 KB 20 KB 25 KB 30 KB 35 KB 40 KB 6 5 A...

Страница 34: ...d in the pre alarm period The max recording speed is 2 3 NTSC PAL HR The min recording speed is 960 HR 9 PRE ALARM TIME The duration of pre alarm recording period In 2 3 hour Real Time recording mode the duration of pre alarm is about five seconds Notice If the alarm occurs when it is in standby mode or in normal recording mode the recording quality will be the same as the normal recording quality...

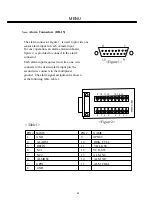
Страница 35: ...e sensor alarm input for each camera input For easy operation an alarm extension board figure 2 is provided to connect to the alarm connector Each alarm input requires two wires one wire connects to the desired alarm input pin the second wire connects to the multiplexer ground The alarm signal assignment is shown at the following table table 1 9 15 1 8 Figure 1 Table 1 Figure 2 PSR1D0080 A 8 7 6 5...

Страница 36: ... and 12 8 2 1 15 9 COIL RELAY To external equipment 23 a Alarm out To external equipment 8 2 1 9 COIL RELAY There are two ways to do the alarm out connection To external equipment 8 2 1 15 9 COIL RELAY Normally open connection use pin 13 and 14 ...

Страница 37: ...ed input Normally Open If the alarm input is selected as Normally Open input then the N O input is opened normally and shorted to the ground means an alarm happens Normally Close If the alarm input is selected as Normally Close input then the N C input is shored to the ground normally and opened input means an alarm happens c Alarm in and alarm reset There is 1 alarm sensor in for 1 channel and 1 ...

Страница 38: ...M IN ON the buzzer will sound when the alarm occurs 3 RECORD IN ON the buzzer will sound when Record IN signal is applied on the Record IN terminal 4 DISK FULL ON the buzzer will sound when disk is near full 99 7 5 VIDEO LOSS ON the buzzer will sound when the video loses 6 TIMER ON the buzzer will sound when timer record occurs MENU 25 ENABLE ON ON ON ON ON 6 6 BUZZER SETTING MENU Left Right Butto...

Страница 39: ... 3 TIME STAMP POS BOTTOM The time stamp will show on the bottom TOP The time stamp will show on the top 4 WATER MARK ON Shows a water mark on the picture when copying image to CF card OFF This erases the water mark on the picture when copy image to CF card 5 WATER MARK POS BOTTOM Water mark will show on the bottom TOP Water mark will show on the top 6 MULTIPLEXER Multi brand of multiplexer for use...

Страница 40: ...hrough the RS232 RS485 port on the device 1200 baud 2400 baud 4800 baud 9600 baud 19200 baud and 3840 baud The default setting from the factory is 9600 baud 4 PARITY Select parity lever NONE ODE EVEN 5 DATA BIT Select data bit 8 or 7 6 STOP BIT Select stop bit 1 or 2 27 RS232 RS485 SETTING MENU 6 8 RS232 RS485 SETTING MENU RS232 RS485 RS232 RS485 ID BAUD RATE PARITY DATA BIT STOP BIT In the RS232 ...

Страница 41: ...ix digits long and can be a digit from 1 to 8 Once you have activated the password whenever you press the LOCK button for unlock the system will ask you to enter the password Therefore be sure to make a note of the password 28 SYSTEM SETTING MENU PLAY WITH AUDIO 1 PLAY WITH AUDIO 2 PASSWORD ENABLE PASSWORD FIELD CODE LINE DISK RENEW SYSTEM UPDATE LOAD DEFAULT CF RENEW FAT16 NO NO OFF 888888 12 NO ...

Страница 42: ...update system The Reading Program will be shown on the screen during the process The Success will be shown on the screen after system update Notice After the system is updated successfully be sure reboot the system 4 FIELD CODE LINE When the system is connected to the Multiplexer it is used to adjust the field code of the Multiplexer The values 00 20 The default value is 13 it is suitable for most...

Страница 43: ...ard YES will format CF card 7 LOAD DEFAULT LOAD DEFAULT NO YES Press NO to load default and Exit LOAD DEFAULT NO YES Press YES to load default value Left Right Press or to move the cursor to the left or right Up Down Press or to change the value CF RENEW NO YES CF RENEW NO YES ...

Страница 44: ...utton light up in the operating display Video out Press Stop key to stop recording Stop key can be activated only in recording mode When the HDD is full the machine will Stop recording automatically or Overwrite from the beginning of the HDD It depends on the setting in HDD setting Press Record key to start the recording immediately Recording REC STOP RECORD 002 HR 31 ...

Страница 45: ...stant or timer recording ALARM IN TYPE Select the type of alarm in input to be Normal Close N C or Normal Open N O ALARM RESET TYPE Select the type of alarm reset input to be Normal Close N C or Normal Open N O ALARM DURATION TIME Alarm duration from 5 seconds to NON STOP PRE ALARM OPERATION ON Enables pre alarm recording OFF Disables pre alarm recording RECORDING SPEED Set the recoding speed in p...

Страница 46: ... key to stop playing back 3 Fast Forward Reverse Playback Press the PLAY key to start playing back Turn the shuttle dial clockwise and fast forward playback starts The speed will be shown on the LCD at the right upper corner of the screen 2 4 6 8 16 32 600X Turn the shuttle dial counterclockwise and fast reverse playback starts The speed will be shown on the LCD 2 4 6 8 16 32 600X Playing Back REV...

Страница 47: ...e Field feed speed will increase if the jog dial is turned quickly PAUSE 34 4 Slow Forward Reverse Playback Press PAUSE key to freeze the playing back picture Turn the shuttle clockwise and slow forward playback starts The speed will show on the LCD at the corner of the screen 1 2 1 4 1 6 1 8 1 10 1 16 1 32 Turn the shuttle counterclockwise and slow reverse playback starts The speed will show on t...

Страница 48: ... SEGMENT SEARCH 1 2 3 Playing Back SEARCH Press the keys to move the cursor to the segment you want to playback Press Enter to select the segment When the selection list is full turn the jog dial clockwise to select next page list for search other list After the starting time is confirmed press Enter to start playing back 35 Alarm Timer Timer 2002 04 24 19 03 29 2002 04 25 12 30 30 2002 05 20 12 0...

Страница 49: ...o select the alarm image to be played back When the selection list is full turn the jog dial clockwise to select next page for search other list The alarm image will be played back from the pre alarm period and stop at the end of alarm duration SEARCH SEARCH MENU BY SEGMENT LIST BY ALARM LIST BY DATE TIME 2002 04 24 19 03 29 2002 04 25 12 30 30 2002 05 20 12 00 00 Alarm Timer Timer 36 Alarm PRE AL...

Страница 50: ...AR MM DD HH MM SS 2002 04 24 19 03 35 SEARCH Notice If there is no image stored in the date time specified then the machine will start playing back from the nearest set time automatically Press the keys to move the cursor Press the keys to increase decrease the data Press Enter and the playback starts from the date time set in the menu SEARCH MENU BY SEGMENT LIST BY ALARM LIST BY DATE TIME 37 ...

Страница 51: ...or counterclockwise to move to your desired image of choice PAUSE Press the PLAY key to start playing back PLAY COPY While the image to be displayed as your desired image of choice press the COPY key The Copying will be shown on the screen during the process The Success will be shown on the screen after file copied Notice Copied images are stored as a single picture Copied files are saved as JPG f...

Страница 52: ...ess the PLAY key to start playing back PLAY PLAY Press PLAY key to continue Copy Movie File COPY TO MOVIE FILE Press COPY Press PLAY Press PAUSE Press SEARCH Press STOP To Step Copy To Continue Copy To Stop Continue To End Copy To End Play 9 2 COPY TO MOVIE FILE ...

Страница 53: ... to end play STOP Notice Copied images are stored as a movie picture Copied files are saved as MOV file Use QuickTime to play the retrieved MOV files You may download QuickTime at www apple com The playback version for QuickTime is free SEARCH Press SEARCH key to end copy ...

Страница 54: ...T CONNECTED 9 NOT CONNECTED Digital Video Recorder HOST 1 5 3 9 2 8 4 7 6 D SUB 9 pin connector specifications 41 This Digital Single Channel Recorder may be controlled by a computer or a terminal via the standard D SUB 9 pin RS 232 connector There are 6 different speeds that can be used to transmit instruction or information through the RS232 RS485 port on the device 1200 baud 2400 baud 4800 baud...

Страница 55: ...x85 length 0x00 Receiver ID high byte 0x05 Receiver ID low byte 0x4B OPcode key 0x08 DATA1 Rec keycode 0x5D checksum Example2 A packet that send PAUSE key to Digital Video Recorder ID 4999 0x85 length 0x27 Receiver ID high byte 0x07 Receiver ID low byte 0x4B OPcode key 0x0C DATA1 Pause keycode 0x0A checksum Example3 A packet that send PLAY key to all Digital Video Recorder broadcast 0x85 length 0x...

Страница 56: ...mal 14bit binary value Hbyte Lbyte Receiver ID Digital Video Recorder 0 0000000 0000000 00 00 ID 0 1 0000000 0000001 00 01 ID 1 2 0000000 0000010 00 02 ID 2 126 0000000 1111110 00 7e ID 126 127 0000000 1111111 00 7f ID 127 128 0000001 0000000 01 00 ID 128 129 0000001 0000001 01 01 ID 129 255 0000001 1111111 01 7f ID 255 256 0000010 0000000 02 00 ID 256 511 0000011 1111111 03 7f ID 511 16382 111111...

Страница 57: ...0B key PLAY 0x0C key PAUSE 0x0D key SEARCH 0x0E key COPY 0x0F key DISPALY 0x10 key SHUTTLE x2 0x11 key SHUTTLE x4 0x12 key SHUTTLE x6 0x13 key SHUTTLE x8 0x14 key SHUTTLE x16 0x15 key SHUTTLE x32 0x16 key SHUTTLE x600 0x17 key SHUTTLE x2 0x18 key SHUTTLE x4 0x19 key SHUTTLE x6 0x1a key SHUTTLE x8 0x1b key SHUTTLE x16 0x1c key SHUTTLE x32 0x1d key SHUTTLE x600 0x1e key JOG 0x1f key JOG 2 5 Checksum...

Страница 58: ...accessory to enhance the handy operations of digital video recorder Figure 1 You can do all the settings and operations by the remote controller The effective distance is up to 10 meters without any obstacles The keypad functions are as same as the front panel of the digital video recorder ...

Страница 59: ...949H 4462H 3569H 2974H 2549H 2231H 720 0 166 8924H 6693H 5354H 4462H 3824H 3346H 960 0 125 11851H 8888H 7111H 5925H 5079H 4444H PICTURE QUALITY LOWER LOW BASIC STANDARD HIGH SUPERIOR PAL system storage 80GB Recording Recording Speed Rate Hour field Sec 3 50 29H 22H 17H 14H 12H 11H 6 16 667 88H 66H 53H 44H 38H 33H 12 10 148H 111H 88H 74H 63H 55H 24 5 556 266H 200H 160H 133H 114H 100H 48 2 941 503H ...

Страница 60: ...6H 66H 12 10 296H 222H 177H 148H 127H 111H 24 5 556 533H 400H 320H 266H 228H 200H 48 2 941 1007H 755H 604H 503H 431H 377H 72 2 1481H 1111H 888H 740H 634H 555H 96 1 515 1955H 1466H 1173H 977H 838H 733H 168 0 877 3378H 2533H 2027H 1689H 1447H 1266H 480 0 311 9527H 7145H 5716H 4763H 4083H 3572H 720 0 207 14313H 10735H 8588H 7156H 6134H 5367H 960 0 156 18993H 14245H 11396H 9496H 8140H 7122H PICTURE QU...

Страница 61: ...OCK key the system will ask for the password If you enter a correct password the locked keys will be released LOCK LOCK Press LOCK key during record mode then all the keys on the front panel will be locked Password must be Enable on System Setting Menu 48 ...

Страница 62: ...e 1 888 383 6287 or 1 888 EV FOCUS Japan Office 1809 WBG Marive East 18F 2 6 Nakase Mihama ku Chiba city 261 7118 Japan TEL 81 43 212 8188 FAX 81 43 297 0081 Beijing Office Room 609 Technology Trade Building Shandgdi Information Industry Base HaidianDistrict Beijing China TEL 86 10 62971096 FAX 86 10 62971432 European Office Albert Einstein Strasse 1 D 46446 Emmerich German TEL 49 2822 9394 0 FAX ...

Отзывы: