Studio Pro 14
Installation and Operating Manual
North American Model
Jan 2019
Page
4
of
10
Studio Pro 14 Features
Dual Access Design
The Studio Pro 14 features a Dual Access Design. The Dual Access Design simply means you have the choice of entering the chamber through
the Top or through the Front.
Top entry offers many unique advantages. Top entry allows for the use of forming tools that require a vertical approach. It also offers easy
placement of large ware such as slumping molds and forms. The hinged lid, with its built-in venting allows for excellent ventilation
opportunities.
Front entry offers its own unique advantages. Front entry grants wide open access to the kiln floor. This wide open access is excellent for ware
placement, particularly for ware that cannot be moved once positioned. The gentle, hinged action brings the chamber back down with precision
and confidence. Front entry also makes possible the use of forming tools that require a horizontal approach.
Built-In Lid Vent
Venting the lid of the Studio Pro 14 is easy and convenient with its built-in lid vent system. The lid vent is attached to the front of the lid and
offers two venting positions: 1” and 2”. To vent, simply lift the lid slightly and position the vent catch on the vent bracket located on the
chamber wall. It’s that simple and that convenient.
Wide and Sturdy Handles
We've fitted the Studio Pro 14 with two wonderfully wide and sturdy bar handles. These corner mounted handles are placed well away from
the kiln for easy, gloved hand operation. You'll enjoy using them.
Bench Top or Floor Placement
The Studio Pro 14 is designed to be used either on a counter/bench top or placed within the included stand. The choice is yours. Regardless of
your choice of use, the supporting surface (what the kiln is sitting on, on your counter/bench or on your floor) must be made only of a non-
combustible material.
Kiln Setup and Placement
Kiln Location
Place your Studio Pro 14 in a location that offers a level, non combustible surface. The Studio Pro 14 should be placed no closer than 12” from
any wall or 48” from any ceiling surface in all opened and closed positions. All flammable and combustible materials should be removed from
the kiln area. Enjoy your kiln safely.
The Studio Pro 14 is designed to be placed either on a counter/bench top or within the included stand. If you choose to place the kiln directly
on a counter or bench top, the counter or bench top must be strong enough to support the weight of the kiln along with any shelving and ware
to be fired. Please note again that the surface on which the kiln is placed should be made of a non-combustible material.
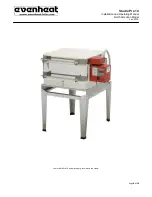
If you choose to place the Studio Pro within the provided stand the location must be strong enough to support the weight of the kiln along with
any shelving and ware to be fired. Please note again that the surface on which the kiln stand is placed should be made of a non-combustible
material.

