background image


Even-

GLO™ Series GA301                                         


Page 36


Oct. 4, 2018 


Installation Instructions(Models GA301-M, GA301-MP) 

Position / Move the Heater 


1.  Ensure Wheels are properly connected to the Bottom Base. 

2. 

Move the Heater


by handling ONLY the Pole

. It may take two people to 

manoeuvre the Heater safely depending on the size / strength of the 
person(s).  

3.  Tip the Heater backwards at an angle to / overtop of the wheels until Base no 

longer touches the ground.  Wheel Heater to the desired new location and 
return Base to ground.  Ensure Heater is on level ground and stable in new 
location. 

4.  If the Heater is going to be operated at the new location, the 

Start-Up 

Procedure

 must be completed.


Содержание GA 301

Страница 1: ...or maintenance can cause injury or property damage Read the installation operating and maintenance instructions thoroughly before installing or servicing this equipment FOR YOUR SAFETY Do not store o...

Страница 2: ...GA301 T 11 Hanging Model GA301 H 12 Floor Mount Portable Models GA301 M GA301 MP 13 CLEARANCE TO COMBUSTIBLES 13 INSTALLATION CODE REQUIREMENTS 15 POWER GAS SPECIFICATIONS 16 ASSEMBLY INSTALLATION INS...

Страница 3: ...injury hazard Certain materials when stored under this heater are subjected to radiant heat can soften distort or otherwise be damaged special care should be taken of plastic materials Appliance surf...

Страница 4: ...Even GLO Series GA301 Page 4 Oct 4 2018 Pre installation Overview What You Will Receive evenGLO GA301 Models U T...

Страница 5: ...Even GLO Series GA301 Page 5 Oct 4 2018 Pre installation Overview What You Will Receive evenGLO GA301 Model MP...

Страница 6: ...ts DESCRIPTION PART EG065 12 HOSE KIT EG066 15 HOSE KIT NG REGULATOR QD SOCKET NG REGULATOR MOUNTING BRACKET w CLOSE NIPPLE X 12 NG SUPPLY HOSE X 15 NG SUPPLY HOSE NG Regulator will be secured in posi...

Страница 7: ...Lock Washer x4 EH072 5 16 18 Brass Nylon Insert Lock Nut x4 EH088 5 16 Allen Key x1 MODEL GA301 M EH001 Top Reflector to Support Arms Blue Tape EH027 1 4 20 x 1 2 S S Carriage Bolt x4 CH143 1 4 S S Fl...

Страница 8: ...Even GLO Series GA301 Page 8 Oct 4 2018 Pre installation Overview Mounting Plate Hole Pattern Full size 0 42 6 30...

Страница 9: ...nstruct a concrete base for floor mounted model for GA301 U GA301 T only 3 Gas supply line that is installed to the Gas and Electric Supply according to the National Fuel Gas Code ANSI Z 223 1 NFPA 54...

Страница 10: ...nterlocked fan Refer to the National Fuel Gas Code ANSI Z 223 1 NFPA 54 in the US and CAN CGA B149 1 and B149 2 Installation Codes in Canada Safety Requirements 1 Never locate the heater directly belo...

Страница 11: ...Even GLO Series GA301 Page 11 Oct 4 2018 Specifications Details Equipment Dimensions Floor mount models Model GA301 Model GA301 T...

Страница 12: ...Even GLO Series GA301 Page 12 Oct 4 2018 Specifications Details Hanging model GA301 H 39 50 47 98 17 95 1 13 46 81 6 Feet Minimum Clearance Below...

Страница 13: ...Even GLO Series GA301 Page 13 Oct 4 2018 Specifications Details Portable model GA301 M GA301 MP Model GA301 M Model GA301 MP Pole Hole Configuration...

Страница 14: ...e taken with placement of plastic or vinyl in the proximity of the heater as they tend to distort and soften at these temperatures The INSTALLER is responsible to ensure that building materials with a...

Страница 15: ...or Canada CAN CGA B149 1 and B149 2 National Gas and Propane Installation Code latest editions Appliance must be electrically grounded in accordance with local codes or in their absence the National E...

Страница 16: ...al 53 000 btuh Gas Supply Pressure Natural Gas Minimum 6 5 W C Maximum 14 0 W C The appliance and its individual shutoff valve must be disconnected from the gas supply piping system during any pressur...

Страница 17: ...heels to Bottom Base a Flip Over Base b Line up holes and press Carriage Bolt through Wheel Bracket and Bottom Base Place Lock Washer over threads of Carriage Bolt and hand tighten Nut c Tighten Nut w...

Страница 18: ...ion dot with the Bottom Base indication dot Slide bottom housing into place as shown c Unplug the quick disconnect from the one side of the supply hose and feed hose through the inside of the bottom h...

Страница 19: ...Housing Assembly down Pole b Place Pole Neck in Pole Line up the 4 holes place Button Socket Cap Screws into holes and place Internal S S Lock Washer over threads inside Pole and hand tighten Nylon In...

Страница 20: ...4 2018 Portable Models GA301M GA301MP Secure Heater Head to Pole Neck a Place Heater Head on Pole Neck and line up the holes b Hand tighten the 4 Button Socket Cap Screw into weld nuts on Heater Head...

Страница 21: ...Reflector to Heater Head a Peel plastic off 39 Top Reflector b Place Top Reflector onto Heater Head and line up 4 holes to 4 Arms of Heater Head Place S S Carriage Bolt through Arm and Top Reflector c...

Страница 22: ...th of 12 and having a 12 diameter If forming concrete cast in place appropriate passage for gas and control wires Use minimum 3 8 x 5 90 lag bolts or equivalent to mount heater base to the concrete ba...

Страница 23: ...e wires and gas hose are arranged as illustrated Feed a pull wire through the pole to assist in pulling the three power wires into the pole and through the junction box Firmly tape the pull wire to th...

Страница 24: ...Even GLO Series GA301 Page 24 Oct 4 2018 Floor Mount Models GA301 U GA301 T c Secure burner head to pole with three 10 screws provided...

Страница 25: ...01 Page 25 Oct 4 2018 Floor Mount Models GA301 U GA301 T d Push the gas connection into the slot buy slightly pushing on the gas line through the electrical box The gas fitting should be positioned as...

Страница 26: ...GLO Series GA301 Page 26 Oct 4 2018 Floor Mount Models GA301 U GA301 T e Place gas connection cover onto the fitting and install the nut to fasten the cover assuring the nut is properly seated See be...

Страница 27: ...27 Oct 4 2018 Floor Mount Models GA301 U GA301 T f Install reflector using the four carriage bolts nuts and washers provided g Connect gas supply and electric power following all local codes Pressure...

Страница 28: ...align elbow to point at a right angle to heater door opening C After inserting heater assembly into frame base connect the Swivel Fitting on the opposite end of the gas hose to the Flared Elbow The pi...

Страница 29: ...Even GLO Series GA301 Page 29 Oct 4 2018 Hanging Model GA301H 1 Assemble 4 gusset plates to the base as illustrated Use 5 16 carriage bolts with washers and nuts...

Страница 30: ...01 Page 30 Oct 4 2018 Hanging Model GA301H 2 Assemble angular arms to the base 3 Assemble vertical arm to angular arm using two gusset plates and 5 16 carriage bolts with nuts and washers Repeat this...

Страница 31: ...unt the heater base assembly to the ceiling in the desired location keeping in mind clearance to combustibles Use minimum 6 14 x1 5 wood screws Caution To prevent possible head injury provide pedestri...

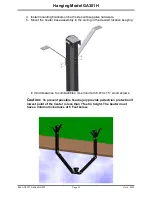
Страница 32: ...Series GA301 Page 32 Oct 4 2018 Hanging Model GA301H 6 Install heater assembly into the base assembly allowing the gas line and wires through the bottom Use three 8 32 type F to secure heater head to...

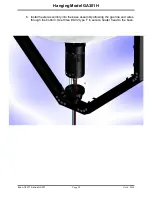
Страница 33: ...Even GLO Series GA301 Page 33 Oct 4 2018 Hanging Model GA301H 7 Feed the gas line and control wires through either side of the assembly...

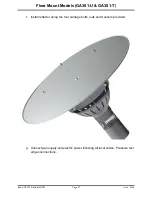
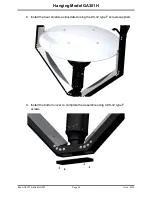
Страница 34: ...eries GA301 Page 34 Oct 4 2018 Hanging Model GA301H 8 Install the heat shields as illustrated using the 8 32 type F screws supplied 9 Install the bottom cover to complete the assemble using 4 8 32 typ...

Страница 35: ...4 2018 Hanging Model GA301H 10 Installation of reflector support brackets 1 2 1 After putting on heat shields screw reflector brackets to frame upright 2 Secure reflector by screwing the reflector to...

Страница 36: ...take two people to manoeuvre the Heater safely depending on the size strength of the person s 3 Tip the Heater backwards at an angle to overtop of the wheels until Base no longer touches the ground Wh...

Страница 37: ...t with the connecting hole s of the Base Bracket is maintained Table A Methods for Securing Heater to Floor Ground Floor Ground Type Foundation Fastener Type Size Mounting Method Summary Floor Ground...

Страница 38: ...off power to electronic control 2 For longer periods of shut down also close manual gas supply valve Lighting instructions for models GA301 M GA301 MP 1 Open manual gas supply valve ensure gas supply...

Страница 39: ...tronic control module will time begin the ignition period in 3 seconds 4 The gas valve will open and ignition spark will commence and continue for 20 sec 5 If flame starts and is detected flame will c...

Страница 40: ...ghting Shutdown Instructions Shut down instructions for models GA301 M GA301 MP 1 Turn the ignition knob clockwise into the OFF position to turn off the gas flow and extinguish the burner flame 2 For...

Страница 41: ...ly in heater post and all connections for gas leaks Troubleshooting instructions for models GA301 GA301 H GA301 T No Gas Supply at Burner Ensure manual shut off valve is in proper position Ensure ther...

Страница 42: ...n or wear or if the hose is damaged the hose assembly must be replaced prior to the appliance being put into operation 5 Keep the ventilation opening s free and clear from debris and cobwebs 6 Visuall...

Страница 43: ...racks in ceramic insulators or excessive corrosion 4 Inspect condition of high tension lead to spark rod Troubleshooting instructions for models GA301 M GA301 MP 1 No gas supply at burner Ensure manua...

Страница 44: ...Cleaning Stainless Steel 1 Handle stainless steel with clean gloves or cloths to guard against stains of finger marks 2 Avoid the use of oily rags or greasy cloths when wiping the surface 3 Do routin...

Страница 45: ...d using a Glass Cleaner Or gentle rubbing with a paste of Soda Ash sodium carbonate and water applied with a soft cloth Cleaning should always be followed by rinsing with CLEAN HOT WATER and drying wi...

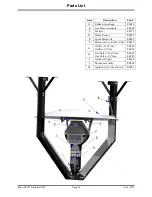
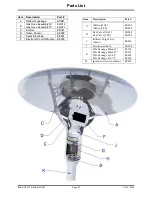
Страница 46: ...41 B Gas Hose Assembly EG004 C Emitter ES011 D Flame Sensor EE002 E Spark Electrode EE001 F Electronic Control Module EE009 G Orifice NAT Gas Orifice LP Gas EG002 EG022 H Gas Valve NAT Gas Gas Valve L...

Страница 47: ...ame Sensor EE002 E Spark Electrode EE001 F Electronic Control Module EE009 Item Description Part G Orifice NAT Orifice LPG EG002 EG022 H Gas Valve NAT Gas Valve LPG EG001 EG023 I Indicator Light not s...

Страница 48: ...ch EE034 1 11 Main Base ES168 1 14 Gas Valve EG036 1 13 Electronic Igniter EE028 1 16 Pilot Burner EE032 1 15 Current Interrupter EG038 1 18 Breakaway Pilot Nut KG015 2 17 Thermocouple EE038 1 20 Regu...

Страница 49: ...Even GLO Series GA301 Page 49 Oct 4 2018 Parts List...

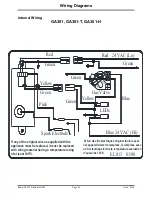
Страница 50: ...t be replaced with wiring material having a temperature rating of at least 105 C Si l un des fils lectriques original fournis avec cet appareil doit etre remplac le remplace avec un fil lectrique fait...

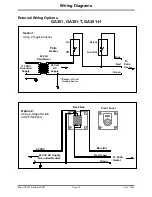
Страница 51: ...t AC Supply Hi on Low On To Patio Heater Blue Red Green Ensure A Good Ground Source 24 Volt Transformer 115 VAC Grounded Supply Option 1 Using 2 Toggle Switches Option 2 Using 2 Stage Switch SRP P N E...

Страница 52: ...Even GLO Series GA301 Page 52 Oct 4 2018 Internal Wiring GA301 M GA301 MP...

Страница 53: ...ger of the original warranty or a period of 12 months from the date of purchase In no event shall the Manufacturer be liable for incidental expense or consequential damages of any kind This warranty d...

Отзывы: