background image

00066709.DOC, Version 1.1

21/23

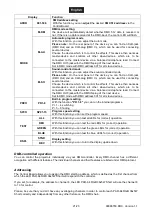
Display

Function

ADDR

001-506

DMX address setting

With this function, you can 

adjust 

the desired 

DMX 512 address

 via the

Control Board.

M-DM

DMX mode setting

the device will automatically detect whether DMX 512 data is received or
not. If there is no data received at the DMX-input, the control LED will flash.

M-AU

Automatic program mode

With this function, you can adjust the Auto mode.

Please note:

 On the rear panel of the device you can find an XLR-jack

(DMX Out) and an XLR-plug (DMX In), which can be used for connecting
several devices.
Choose the device which is to control the effects. This device then works as
master-device and controls all other slave-devices, which are to be
connected to the master-device via a balanced microphone lead. Connect
the DMX OUT-jack with the DMX IN-plug of the next device.
Set to DMX mode with DMX address 001 for all slave-devices.

MODE

M-SO

Sound-controlled mode

With this function, you can adjust the sound-controlled mode.

Please note:

 On the rear panel of the device you can find an XLR-jack

(DMX Out) and an XLR-plug (DMX In), which can be used for connecting
several devices.
Choose the device which is to control the effects. This device then works as
master-device and controls all other slave-devices, which are to be
connected to the master-device via a balanced microphone lead. Connect
the DMX OUT-jack with the DMX IN-plug of the next device.
Set to DMX mode with DMX address 001 for all slave-devices.

PRCO

PR1-8

Built-in program setting

With the function 

"PR. 1-8"

 you can run the internal programs.

Pr. 1 – 4 switching
Pr. 5 – 8 fading

SPCO

SP01-15

Program speed setting

With this function you can set the program speed.

ALL

With this function you can test all LEDs for (correct) operation.

RED

With this function you can test the red LEDs for (correct) operation.

GREEN

With this function you can test the green LEDs for (correct) operation.

TEST

BLUE

With this function you can test the blue LEDs for (correct) operation.

STND

DSPL

REV

Display setting

With this function you can to turn the display upside down.

DMX-controlled operation

You can control the projectors individually via your DMX-controller. Every DMX-channel has a different
occupation with different features. The individual channels and their features are listed under DMX-protocol.

Addressing

The Control Board allows you to assign the DMX starting address, which is defined as the first channel from
which the LED PAR-64 RGB 36x5W Short will respond to the controller.

If you set, for example, the address to channel 6, the LED PAR-64 RGB 36x5W Short will use the channel 6
to 10 for control.

Please, be sure that you don’t have any overlapping channels in order to control each PAR-64 RGB 36x5W
Short correctly and independently from any other fixture on the DMX-chain.

Содержание LED PAR-64 RGB 36x5W Short Spots

Страница 1: ...Copyright Nachdruck verboten Reproduction prohibited F r weiteren Gebrauch aufbewahren Keep this manual for future needs BEDIENUNGSANLEITUNG USER MANUAL LED PAR 64 RGB 36x5W Short Spots...

Страница 2: ...INTRODUCTION 14 Delivery includes 14 SAFETY INSTRUCTIONS 14 OPERATING DETERMINATIONS 16 DESCRIPTION 17 Features 17 Overview 17 INSTALLATION 17 Overhead rigging 17 Connection with the mains 19 DMX512...

Страница 3: ...tergeben sich die letzte Version der Anleitung im Internet herunter laden EINF HRUNG Wir freuen uns dass Sie sich f r einen EUROLITE LED PAR 64 RGB 36x5W Short entschieden haben Wenn Sie nachfolgende...

Страница 4: ...n Sie darauf dass die Netzleitung nicht gequetscht oder durch scharfe Kanten besch digt werden kann berpr fen Sie das Ger t und die Netzleitung in regelm igen Abst nden auf Besch digungen Werden Verl...

Страница 5: ...t kann die Isolation reduzieren und zu t dlichen Stromschl gen f hren Beim Einsatz von Nebelger ten ist zu beachten dass das Ger t nie direkt dem Nebelstrahl ausgesetzt ist und mindestens 0 5 m von ei...

Страница 6: ...r t anders verwendet als in dieser Bedienungsanleitung beschrieben kann dies zu Sch den am Produkt f hren und der Garantieanspruch erlischt Au erdem ist jede andere Verwendung mit Gefahren wie z B Kur...

Страница 7: ...en Sachkundigen gepr ft werden Vorgehensweise Das Ger t sollte idealerweise au erhalb des Aufenthaltsbereiches von Personen installiert werden WICHTIG BERKOPFMONTAGE ERFORDERT EIN HOHES MA AN ERFAHRUN...

Страница 8: ...Ein Sicherungsseil das einmal der Belastung durch Absturz ausgesetzt war oder besch digt ist darf nicht mehr als Sicherungsseil eingesetzt werden Stellen Sie den Neigungswinkel ber den H ngeb gel ein...

Страница 9: ...el tet ist Aufbau einer seriellen DMX Kette Schlie en Sie den DMX Ausgang des ersten Ger tes der Kette an den DMX Eingang des n chsten Ger tes an Verbinden Sie immer einen Ausgang mit dem Eingang des...

Страница 10: ...LED PAR 64 RGB 36x5W Short l sst sich im Stand Alone Betrieb ohne Controller einsetzen Trennen Sie dazu den LED PAR 64 RGB 36x5W Short vom Controller und rufen Sie das vorprogrammierte Programm auf Bi...

Страница 11: ...itung in die DMX Out Buchse und verbinden Sie die Leitung mit dem DMX In Stecker des n chsten Ger tes Stellen Sie bei allen Slave Ger ten den DMX Mode mit DMX Startadresse auf 001 ein PRCO PR1 8 Einst...

Страница 12: ...nicht Wenn Daten empfangen werden leuchtet die Kontroll LED permanent Werden keine Daten empfangen leuchtet die Kontroll LED nicht Dies ist der Fall wenn kein 3 poliges XLR Kabel DMX Signalkabel vom C...

Страница 13: ...n die Anschlussleitung dieses Ger tes besch digt wird muss sie durch den autorisierten Fachhandel ersetzt werden um Gef hrdungen zu vermeiden Sollten Sie noch weitere Fragen haben steht Ihnen Ihr Fach...

Страница 14: ...Thank you for having chosen a EUROLITE LED PAR 64 RGB 36x5W Short If you follow the instructions given in this manual we are sure that you will enjoy this device for a long period of time Delivery inc...

Страница 15: ...rom time to time If extension cords are used make sure that the core diameter is sufficient for the required power consumption of the device All warnings concerning the power cords are also valid for...

Страница 16: ...with an ambient temperature of 45 C This device must only be operated in an altitude between 20 and 2000 m over NN Never use the device during thunderstorms Over voltage could destroy the device Alwa...

Страница 17: ...erating buttons Ready for connection via power cord with safety plug Silver or black housing available Overview 1 DMX Controllamp 2 Microphone 3 Rotary control 4 DMX In 5 DMX Out 6 LED screen with ope...

Страница 18: ...g the safety of a possible installation do NOT install the device Before rigging make sure that the installation area can hold a minimum point load of 10 times the device s weight DANGER OF FIRE When...

Страница 19: ...nce with the IEC standards The electric installation must be equipped with a Residual Current Device RCD with a maximum fault current of 30 mA Lighting effects must not be connected to dimming packs D...

Страница 20: ...jack and an XLR plug which can be used for connecting several devices Choose the device which is to control the effects This device then works as master device and controls all other slave devices whi...

Страница 21: ...to the master device via a balanced microphone lead Connect the DMX OUT jack with the DMX IN plug of the next device Set to DMX mode with DMX address 001 for all slave devices PRCO PR1 8 Built in pro...

Страница 22: ...received at the DMX input the control LED will be off This situation can occur if the 3 PIN XLR plug cable with DMX signal from controller is not connected with the input of the device the controller...

Страница 23: ...to be replaced by authorized dealers only in order to avoid hazards Should you have further questions please contact your dealer TECHNICAL SPECIFICATIONS Power supply 230 V AC 50 Hz Power consumption...

Отзывы: