


DMX-E01L
Touch Panel
Function Description
Dimension(mm)
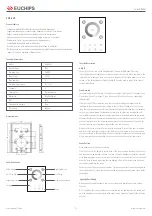
Panel Description
Technical Parameters
Product Feature
1/3
User’s manual: 2019-9
www.euchips.com
Model
DMX-E01L
Input Voltage
5VDC
Dimming Type
Input Power
Area number
Working Temperature
Channels
Packing Size
N.W
DMX512
3-3.5W
4
200g
Transmission Distance
300m
RF Function
Support
0
˫
~+50
˫
4
171x145x48(mm)
Dimension
140x106x11(mm)
·Compliance with DMX512 (1990) International Standard Agreement
·Supporting independent or synchronous brightness control for four regions
·Support real-time adjustment of brightness and color temperature
·High sensitivity glass touch button and adjusting ring, more fine control
·Using glass material, fashionable and beautiful appearance
·Compatible with any DMX lamp or DMX driver
·It can be installed in the wall body, suitable for all kinds of wall boxes.
·The saved scene saves the new scene again, and the original saved scene will be overwritten.
·Support RF function, dimming, calling scene, etc.
In the closed state, click on the "switch button" to open the DMX panel. The lamp
controlled by the panel lights up according to the last closed state. When you click on the
"switch button" in the open state, you can close the panel. All the lights under control are
turned off. The switch indicator light is slightly lit. It can be used to indicate the switch
position in darkness.
This panel supports 4 DMX zones, 1 channel for each zone, that is, zone 1 is channel 1, zone
2 is channel 2, zone 3 is channel 3, zone 4 is channel 4. Each area has a corresponding
indicator light.
Click the zone1/2/3/4 area button to select the corresponding area respectively. The
luminaire in the area will light up according to the last turn off brightness. At the same
time, the corresponding area selection indicator will light up, indicating that the luminaire
in the area can be dimmed. The luminance of lamps in this area can be adjusted and
controlled by touching the luminance adjustment ring in the middle, while the luminance
of lamps in other areas remains unchanged. Click to select another area button to switch
areas. At this time the effect of lamps and lanterns of other area does not change. Only
the selected area has a light indicating that the area can be edited.
When a certain area is selected, click the area icon again to turn off the light in the area
and turn off the area light. Long press the button of a certain area for 2 seconds, then 4
areas are selected at the same time, and 4 areas indicator lights are on at the same time.
At this time, synchronous operation can be carried out on 4 areas at the same time.
After a region or all regions are selected.
Click the Scene1/2/3/4 button to invoke each of the four scenarios saved by the user. Only
one scenario can be invoked at a time. In scene call mode, brightness cannot be adjusted.
After dimming lamps in one or more areas, long press the scene button for 3 seconds and
hear the "di-di-di" sound, indicating that the lighting effect in the current area has been
successfully saved into the scene.
Each area can hold 4 user-defined scenarios. The new scene effect can be saved again on
the scene button of a scene that has been saved (note: the previously saved scene will be
overwritten).
When you need to edit luminance, you can use this panel's powerful real-time editing
function.
Note: only when the corresponding area is selected can the lighting effect be edited, and
only the brightness can be adjusted in the scene mode. Operation "guide for the selection
of areas.
Night light mode
All Selection
On-Off Switch
Brightness Plus
Group
Touch Ring
Brightness Reduction
Scene
ON/OFF
Area Dimming
Scene Setting
Lighting Effect Editing


