10
Echo TimeClock Configuration Manual
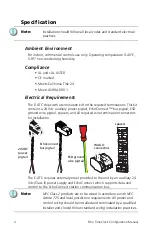
Step 1:
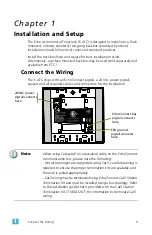
Pull all required wiring into the installed backbox. As
needed, pull an additional ESD ground wire (required only
when the station is not installed in grounded metal
conduit).
Step 2:
Terminate and connect station ESD ground.
a:
Locate the ESD ground wire pigtail and one WAGO cage
clamp connector from the termination kit.
b:
Strip 3/8” (9-10mm) of insulation from the ends of the
installed incoming ground wire and remove the pre-
stripped end from the pigtail wire.
c:
Use the provided WAGO connector to connect the ESD
ground wire pigtail and the incoming ground. For
stations using grounded metal conduit, connect the
ground pigtail to the metal backbox ground location.
• Using one WAGO connector, open the terminal levers
and insert the installed ESD ground wire into one
terminal and the green/yellow lead from the pigtail
into another, then close the levers securely onto the
wires.
d:
Install the ESD ground wire pigtail Faston connector to
the spade terminal on the station electronics.
Step 3:
Terminate and connect EchoConnect wires. EchoConnect is
topology free, you may install the wires in any combination
of bus, star, loop, or home-run.
a:
Locate the EchoConnect bus pigtail (black and white wire
pair) and two WAGO cage clamp connectors from the
termination kit.
b:
Strip 3/8” (9-10mm) from the ends of the installed
control wires and remove the pre-stripped ends from
each EchoConnect pigtail wire.
c:
Use the provided WAGO connectors to connect the
power pigtail and the installed control wires.
• Using one WAGO connector, open the terminal levers
and insert the installed (typically black) Belden 8471
control wire into one terminal and the black lead from
the Echoconnect bus pigtail into another, then close
the levers securely onto the wires.
• Repeat for the installed (typically white) Belden 8471
control wire and the remaining white lead from the
EchoConnect bus pigtail using a new WAGO
connector.
d:
Install the two position connector from the EchoConnect
bus pigtail to the mating receptacle on the station
electronics.
Содержание E-ATC
Страница 35: ......


