MAGPRO16 Addressable Fire Alarm Panel – Installation and Programming Manual
31
7.2.8 Arranging Zones in Groups
The zones in MAGPRO16 addressable fire alarm panel can be organized for operation in separate groups. The
maximum number of the permissible groups is 16. By default all zones are not associated to a group number
– value 0
is set.
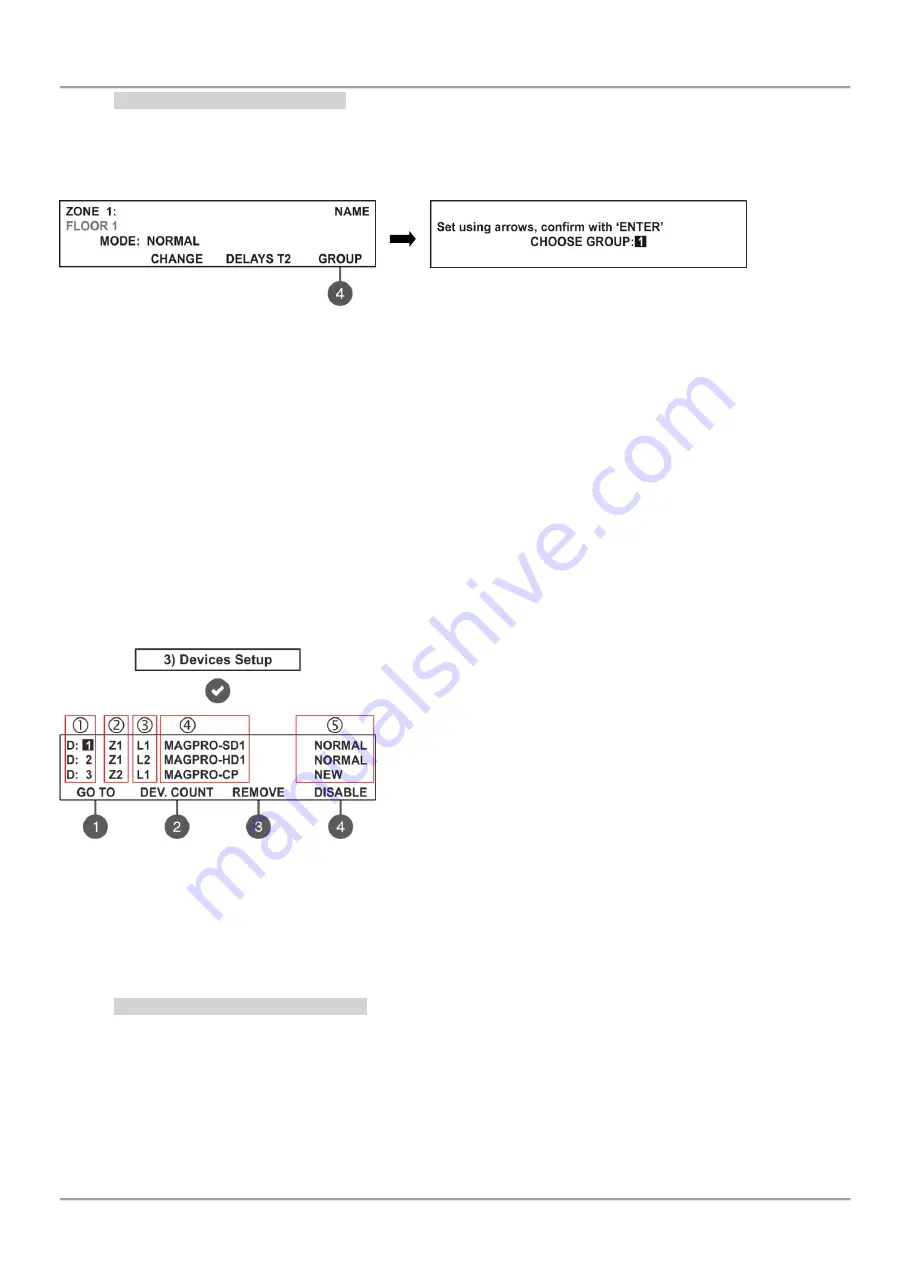
To enter in the submenu for group setting, press button (4) GROUP from the zone parameters programming screen.
In the field
CHOOSE GROUP
set the number of the group from 1 to 16.
To increase the value press ‘up arrow’ button
and to decrease it
– the ‘down arrow’ button. The set group number is confirmed with ENTER button.
Exit to the main screen of ZONES menu is realized with CANCEL button.
7.3. Devices Setup Menus
This menu allows the installer to review and change the status of every device. Up to 250 devices per loop are
available for settings (up to 500 when using second loop in the MAGPRO16
panel). In the ‘DEVICES SETUP’ menus
the installer can save new devices found in the system, to remove or disable them. The parameters and settings may
differ according the device type. The currently edited device address is blinking. The menu is accessible from levels 2
and 3.
From the main screen of DEVICES SETUP menu, the User can review detailed information for all connected devices in
the system configuration.
Example for the screen display after entering the menu:
The screen is divided in the following sections:
1
–
Address of the device.
2
–
Zone number.
3
–
Loop number.
4
–
System name of the device according its type.
5
–
The current status of the device:
NEW
– The device is new in the system. To save it press
button (3) SAVE
– see item 7.3.2.
NORMAL
– The device is in normal operation mode.
FAULT
– The device is not responding. To delete it press (3)
REMOVE
– see item 7.3.3.
WRONG TYPE
– The type of the device is different from the
previously saved one.
DISABLED
– The device is disabled.
FIRE
– The device is in fire mode.
NONE
– No device at the address.
The address number of the currently editing device is blinking. Additional submenus are available through the
functional digit buttons.
7.3.1 Submenus for General Setting
From the main screen of DEVICES SETUP menu use the functional buttons for submenus: (1) GO TO and (2) DEV.
COUNT.
Submenu (1) GO TO
allows quick access to a device address in the respective loop number. The currently editable
value is blinking. Use up and down arrows to select device address. Use the left and right arrows to switch over the
editable fields. Confirm
with ‘ENTER’.
Submenu (2) DEV. COUNT
allows the User to check the total number of the devices connected to the system
configuration. The exit to the main screen of DEVICE SETUP menu is with pressing ENTER or CANCEL button.


