

Escient
6640 Intech Blvd., Indianapolis, Indiana 46278
Phone: 800-372-4368 Press "3” For Support
Hours: Monday - Friday 9:00am - 7pm EST
Fax: 317-616-6790
www.escient.com
Email: [email protected]
Document Number: M42002-01A2
August 2006
Digital Media Manager
MX-752 & AVX-552
Quick Setup
1. Unpack Your New FireBall Media Manager
• Unpack the FireBall, cables, and accessories (save the box).
• Install the included batteries into the remote.
• Make note of the serial number (located on the back).
SERIAL NUMBER: ___________________________________________________
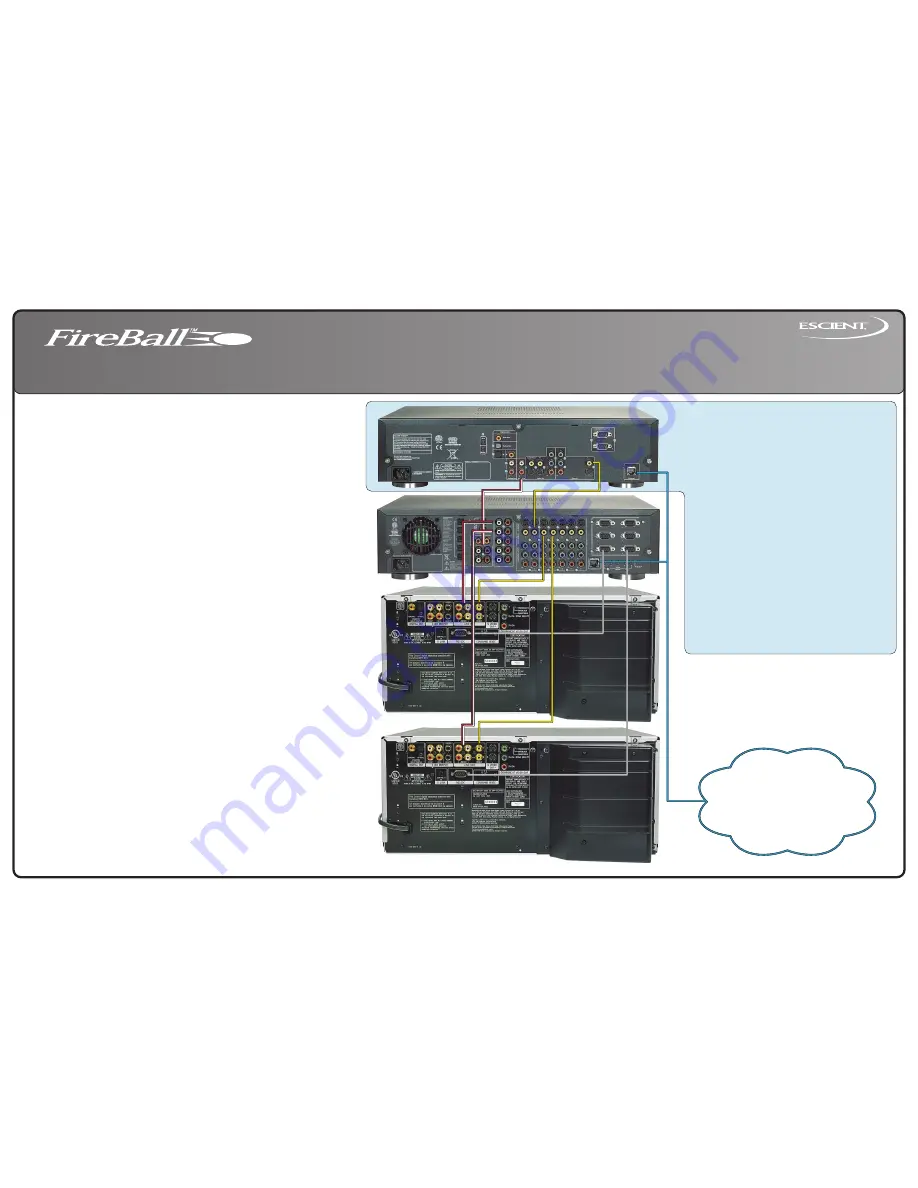
2. Connect FireBall to your Home Theater
A)
Locate the included composite video and analog audio cables.
B)
Connect FireBall to the "DVD" or other available A/V input on your receiver or TV
(not shown).
Note:
You may use optional s-video or component video cables and optional digital audio
cables for the best picture and sound quality. Contact your Escient dealer for more information.
3. Connect Changers to your FireBall
A)
Locate the composite video and analog audio cables included with your changer.
B)
Connect the composite video output from the first changer to the VIDEO IN COMPOSITE 1
on FireBall.
C)
Connect the analog audio cables from the first changer to the ANALOG AUDIO IN 1 on
FireBall.
D)
Locate the included RS-232 serial cable.
E)
Connect the RS-232 serial cable from the first changer to COMMUNICATION PORT 1 on
FireBall.
F)
Repeat steps
A-E
for each additional changer using video, audio, amd COM ports number
2 - 5 on FireBall.
Note:
You may use optional s-video or component video cables and optional digital audio
cables for the best picture and sound quality. Contact your Escient dealer for more information.
4. Connect FireBall to the Internet
Note:
FireBall requires an Internet connection to identify the discs in the front panel drive and
connected changers, to play Internet radio stations, and for general system maintenance.
• If you have a broadband (cable, DSL, ISDN) Internet Service Provider, connect the
included ethernet cable from FireBall's ethernet jack to your ethernet network.
• If you have a Dialup Internet Service Provider, you’ll need to configure Internet connection
sharing on a PC to the phoneline.
Note:
You may need to purchase additional network hardware such as a "router”.
Please contact your Escient dealer for more information.
5. Power Up!
• Plug each changer into an AC outlet.
• Plug FireBall into an AC outlet.
• The Standby LED on the front of the FireBall will begin to flash RED during the
power on cycle. When the LED turns solid RED, the FireBall is ready for use.
• Press the power button on the front panel or on the remote control. The LED
will turn solid BLUE and video will be displayed on the TV when the unit is on.
Note:
You may have to press the "FB1" button on the remote to configure it to control FireBall.
Also be sure the TV and receiver are turned on and set to the correct FireBall input.
6. Quick Start
• Use the remote control and follow the on-screen instructions.
Internet /
home network
OPTIONAL 2ND MOVIES ZONE
(FireBall Zone Player Required)
Note:
The supported Zone Player automatically
switches between the Escient Movies Guide and the
direct DVD input from the multi-zone Media Manager,
therefore you are required to run direct video and
audio cables from the zone 2 outputs of the
multi-zone Media Manager to the Zone Player.
A)
To watch DVD movies in a second zone using the
MP-200, connect a composite video cable from
VIDEO OUT COMPOSITE 2 on the Media
Manager to the COMPOSITE VIDEO IN on the
Zone Player
B)
Connect an analog audio cable from ANALOG
AUDIO OUT 2 on the Media Manager to ANALOG
AUDIO IN on the Zone Player
C)
Connect the included Ethernet cable to your home
network.
Note:
You may use optional s-video or component
video cables and optional digital audio cables for the
best picture and sound quality. Contact your Escient
dealer for more information.You must use the same
types of video connections from the Media Manager
to the Zone Player and from the Zone Player to your
TV or A/V Receiver.
Zone Player
Media Manager
Changer 1
Changer 2