


Models 110X, 210X, 310X, 360X, 410X
Safety and operating instructions
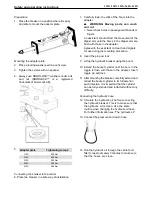
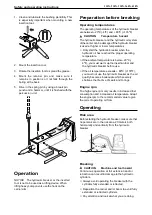
Checking and reducing the gas pressure
1. Always use the gas hose (C) and the pressure
gauge (D) when checking the gas pressure.
2. Connect the gas hose to the pressure gauge.
3. Remove the plug from the charge valve (G).
4. Press the nozzle of the gas hose into the charge
valve and read the pressure.
5. Reduce the pressure by repeatedly inserting and
removing the nozzle.
NOTICE
Only the nozzle may be used to reduce
the pressure. Never use pins, screwdrivers etc. as
these can damage the charge valve.
Every second hour
Regularly lubricate the insertion tool, the tool
retainer and the bushings.
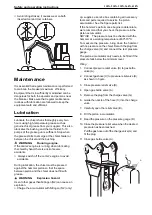
Lubricating with a grease gun
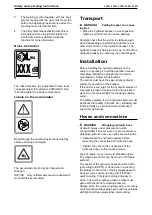
WARNING
Hot insertion tool during
operation and a period of time after use.
►
Avoid contact with the insertion tool.
WARNING
Hot hydraulic breaker
during operation and a period of time after
use.
►
Avoid contact with the hydraulic breaker.
CAUTION
Skin eczema
Grease can cause eczema when it comes in contact
with the skin.
►
Avoid getting grease on your hands. Wash
thoroughly after contact.
1. Press the insertion tool against the piston so
that the space between the piston and the
insertion tool does not fill with grease.
2. Lubricate the insertion tool's shank plentifully
while pressing the insertion tool against the
surface to avoid filling the cavity with grease. If
the cavity is filled with grease when the hydraulic
breaker is started, the lower seals may be
damaged.
When the insertion tool shank is exposed to high
pressure and high temperatures a standard type of
grease will melt and run. To avoid this always use a
genuine insertion tool grease from your supplier.
Central lubrication system
We recommend central lubrication
carrier,
grease is pumped continuously from a lubrication
container on the carrier to the breaker when the
breaker is activated. This increases the life of the tool
bushings and insertion tools considerably.
Every day
◆
Check the tool retainer and split pin.
◆
Check that hoses, couplings and accumulator are
in a good condition.
◆
Check that bolts and connections are free from
damage and properly tightened. See tightening
torques in the spare parts list.
Содержание 110X
Страница 1: ...Safety and operating instructions Hydraulic breakers Models 110X 210X 310X 360X 410X ...
Страница 4: ...110X 210X 310X 360X 410X Safety and operating instructions ...
Страница 25: ...Models 110X 210X 310X 360X 410X ...
Страница 27: ...NEW STYLE HYDRAULIC BREAKER PARTSINFORMATION ...
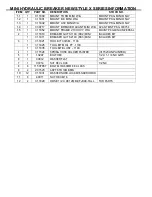
Страница 29: ...MINI HYDRAULIC BREAKER NEW STYLE X SERIESINFORMATION ...
Страница 30: ...NOTES ...
Страница 31: ...NOTES ...
Страница 32: ...2012 05 No 9800 1050 01b Copyright ERSKINE ATTACHMENTS LLC ...