background image

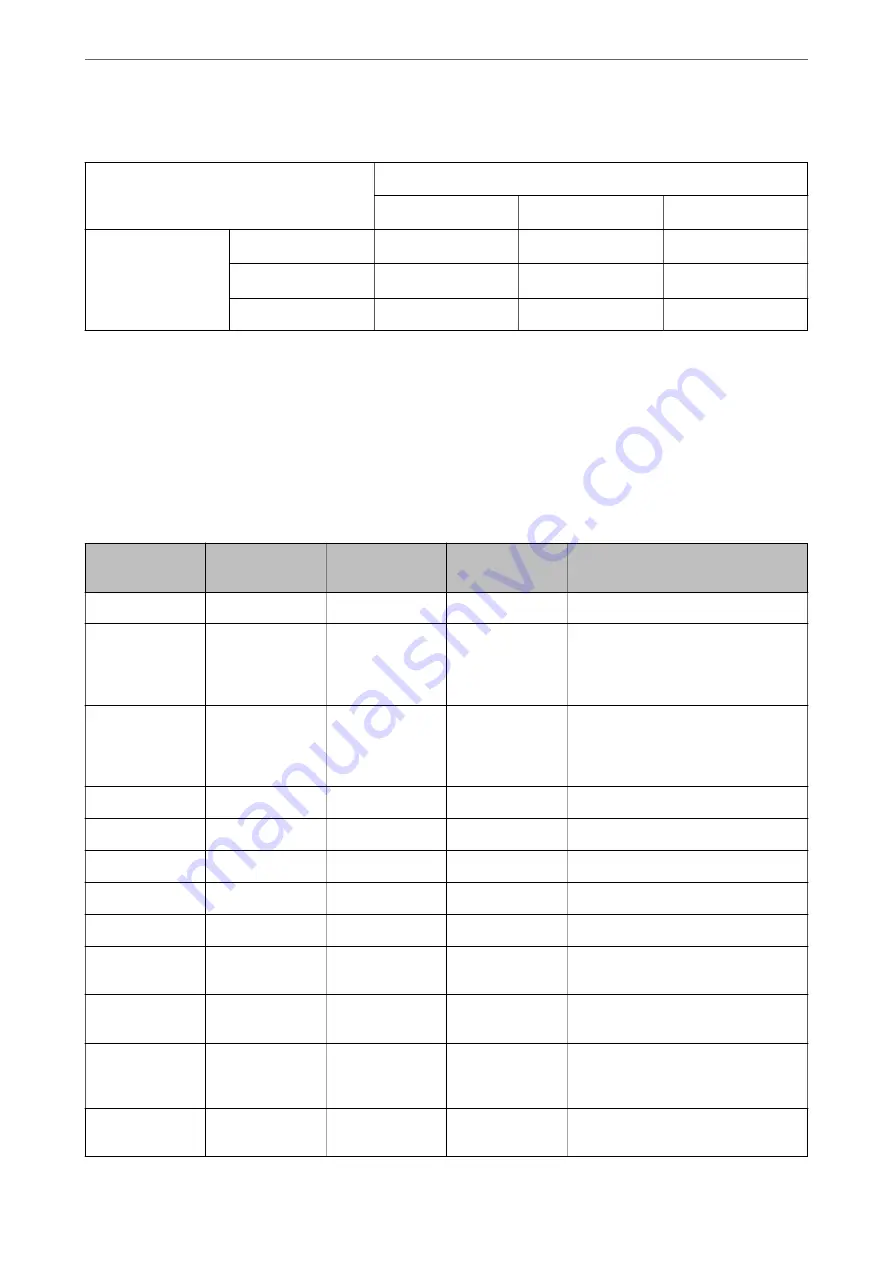
Combination of Local Address(Printer) and Remote Address(Host) on Group Policy

Setting of Local Address(Printer)

IPv4

IPv6

*2

Any addresses

*3

Setting of Remote
Address(Host)

IPv4

*1

IPv6

*1*2

Blank

*1If 

IPsec

 is selected for 

Access Control

, you cannot specify in a prefix length.

*2If 

IPsec

 is selected for 

Access Control

, you can select a link-local address (fe80::) but group policy will be disabled.

*3Except IPv6 link local addresses.

References of Service Name on Group Policy

Note:

Unavailable services are displayed but cannot be selected.

Service Name

Protocol type

Local port

number

Remote port

number

Features controlled

Any

All services

ENPC

UDP

3289

Any port

Searching for a printer from
applications such as Epson Device
Admin, a printer driver and the a
scanner driver

SNMP

UDP

161

Any port

Acquiring and configuring of MIB from
applications such as Epson Device
Admin, the Epson printer driver and
the Epson scanner driver

LPR

TCP

515

Any port

Forwarding LPR data

RAW (Port9100)

TCP

9100

Any port

Forwarding RAW data

IPP/IPPS

TCP

631

Any port

Forwarding data of IPP/IPPS printing

WSD

TCP

Any port

5357

Controlling WSD

WS-Discovery

UDP

3702

Any port

Searching for a printer from WSD

Network Scan

TCP

1865

Any port

Forwarding scan data from the
scanning software

Network Push
Scan

TCP

Any port

2968

Acquiring job information of push
scanning from the scanning software

Network Push
Scan Discovery

UDP

2968

Any port

Searching for a computer when push
scanning from the scanning software
is executed

FTP Data (Local)

TCP

20

Any port

FTP server (forwarding data of FTP
printing)

Administrator Information

>

Advanced Security Settings

>

Encrypted Communication Using IPsec/IP Filtering

550

Содержание WorkForce Pro WF-C879R

Страница 1: ...User s Guide Printing Copying Scanning Faxing Fax Capable Printers Only Maintaining the Printer Solving Problems NPD6339 06 EN ...

Страница 2: ...l 29 Home Screen Configuration 30 Guide to the Network Icon 31 Menu Screen Configuration 32 Job Status Screen Configuration 33 Reserve Job 33 Entering Characters 34 Viewing Animations 34 Loading Paper Paper Handling Precautions 37 Paper Size and Type Settings 38 List of Paper Type 38 List of Detected Paper Sizes 39 Loading Paper 39 Loading Envelopes 40 Loading Pre punched Paper 40 Loading Long Pap...

Страница 3: ...n Menu Options for Scanning to an Email 117 Scanning Originals to a Computer 119 Scanning Originals to a Memory Device 120 Basic Menu Options for Scanning to a Memory Device 120 Advanced Menu Options for Scanning to a Memory Device 121 Scanning Originals to the Cloud 122 Basic Menu Options for Scanning to the Cloud 123 Advanced Menu Options for Scanning to the Cloud 123 Scanning Using WSD 124 Sett...

Страница 4: ...4 197 Solving Problems The Printer Does Not Work as Expected 204 The Printer Does Not Turn On or Off 204 Power Turns Off Automatically 204 Paper Does Not Feed or Eject Correctly 205 Cannot Print 210 Cannot Start Scanning 228 Cannot Send or Receive Faxes 240 Error Code is Displayed on the Status Menu 256 Cannot Operate the Printer as Expected 261 A Message is Displayed on the LCD Screen 267 Paper G...

Страница 5: ...led 345 Solving Problems 345 Specifications for Optional Super G3 G3 Multi Fax Board 346 Ethernet Board 10 100 1000 Base T Ethernet 346 Function List when Using an Additional Network 346 Installing an Ethernet Board 348 Settings when Using an Additional Network 349 Solving Problems when Using an Additional Network 354 Menu Options for Network Settings When Using an Additional Network 355 Product I...

Страница 6: ... Restricting Available Features 517 Disabling the External Interface 519 Making Settings for Processing Saved Data 520 Monitoring a Remote Printer 521 Backing Up the Settings 524 Advanced Security Settings 525 Security Settings and Prevention of Danger 525 Making Settings for Password Encryption 526 Controlling Using Protocols 528 Using a Digital Certificate 533 SSL TLS Communication with the Prin...

Страница 7: ...Guide to This Manual Introduction to the Manuals 8 Searching for Information 8 Printing Only the Pages You Need 9 About This Manual 9 Trademarks 11 Copyright 12 ...

Страница 8: ... on network settings when using the printer on a network and on solving problems You can obtain the latest versions of the above manuals with the following methods Paper manual Visit the Epson Europe support website at http www epson eu support or the Epson worldwide support website at http support epson net Digital manual To view the Web manual visit the following website enter the product name a...

Страница 9: ... in the File menu and then specify the pages you want to print in Pages in Pages to Print To specify a series of pages enter a hyphen between the start page and the end page Example 20 25 To specify pages that are not in series divide the pages with commas Example 5 10 15 About This Manual This section explains the meaning of marks and symbols notes on descriptions and operating system reference i...

Страница 10: ...r 2019 Windows Server 2016 Windows Server 2012 R2 Windows Server 2012 Windows Server 2008 R2 Windows Server 2008 Windows Server 2003 R2 and Windows Server 2003 refer to the following operating systems Additionally Windows is used to refer to all versions Microsoft Windows 10 operating system Microsoft Windows 8 1 operating system Microsoft Windows 8 operating system Microsoft Windows 7 operating s...

Страница 11: ... of DENSO WAVE INCORPORATED in Japan and other countries The SuperSpeed USB Trident Logo is a registered trademark of USB Implementers Forum Inc Microsoft Windows Windows Server and Windows Vista are registered trademarks of Microsoft Corporation Apple Mac macOS OS X Bonjour ColorSync Safari AirPrint iPad iPhone iPod touch iTunes TrueType and iBeacon are trademarks of Apple Inc registered in the U...

Страница 12: ... INCIDENTAL SPECIAL EXEMPLARY OR CONSEQUENTIAL DAMAGES INCLUDING BUT NOT LIMITED TO PROCUREMENT OF SUBSTITUTE GOODS OR SERVICES LOSS OF USE DATA OR PROFITS OR BUSINESS INTERRUPTION HOWEVER CAUSED AND ON ANY THEORY OF LIABILITY WHETHER IN CONTRACT STRICT LIABILITY OR TORT INCLUDING NEGLIGENCE OR OTHERWISE ARISING IN ANY WAY OUT OF THE USE OF THIS SOFTWARE EVEN IF ADVISED OF THE POSSIBILITY OF SUCH ...

Страница 13: ...orporation and its affiliates shall not be liable for any damages or problems arising from the use of any options or any consumable products other than those designated as Original Epson Products or Epson Approved Products by Seiko Epson Corporation Seiko Epson Corporation shall not be held liable for any damage resulting from electromagnetic interference that occurs from the use of any interface ...

Страница 14: ...Important Instructions Safety Instructions 15 Printer Advisories and Warnings 16 Notes on the Administrator Password 18 Protecting Your Personal Information 19 ...

Страница 15: ...ct change in performance Do not adjust controls that are not covered by the operating instructions Place the printer near a wall outlet where the plug can be easily unplugged Do not place or store the printer outdoors near excessive dirt or dust water heat sources or in locations subject to shocks vibrations high temperature or humidity Take care not to spill liquid on the printer and not to handl...

Страница 16: ...uts fraying crimping and kinking Do not place objects on top of the power supply cords and do not allow the power supply cords to be stepped on or run over Be particularly careful to keep all the power supply cords straight at the ends and the points where they enter and leave the transformer If you use an extension cord with the printer make sure that the total ampere rating of the devices plugge...

Страница 17: ...any way Only use a dry soft cloth for cleaning Do not use liquid or chemical cleaners The exterior cover of the touchscreen could break if it receives a heavy impact Contact your dealer if the panel surface chips or cracks and do not touch or attempt to remove the broken pieces Press the touchscreen gently with your finger Do not press force or operate with your nails Do not use sharp objects such...

Страница 18: ...s the one shown The position where the label is attached depends on the product such as the side where the cover is opened the back or the bottom The following illustration is an example of the label attachment position on the side of the printer where the cover opens If both labels 1 and 2 are attached the value next to PASSWORD written on the label in 1 is the default value In this example the d...

Страница 19: ...ttings Menu on page 510 Initializing the Administrator Password You can return the administrator password to the default settings from the administrator settings menu If you have forgotten your password and cannot return to the default settings you need to contact Epson Support to request service Related Information Configuring the Administrator Password from the Control Panel on page 508 Configur...

Страница 20: ...riple Overwrite The Overwrite or Triple Overwrite function overwrites any invalid data in the memory which can take some time to process Settings General Settings System Administration Clear Internal Memory Data PDL Font Macro and Working Area Important Instructions Protecting Your Personal Information 20 ...

Страница 21: ...Part Names and Functions Front 22 Rear 26 ...

Страница 22: ...D Output guide Holds the ejected paper E Output tray Holds the ejected paper When you start printing paper larger than A4 size this tray is ejected automatically To store the tray push it in manually F Document holder Holds the manuals G Front cover A Open when removing jammed paper inside the printer H Cleaning cloth holder Holds the cleaning cloth I Cleaning cloth Use to clean the glass surface ...

Страница 23: ...ion is installed See related information for more details D Paper cassette 3 C3 E Paper cassette 4 C4 F Printer stand Place the printer on this to prevent it from falling The stand has casters allowing you to easily move the printer Use when this option is installed See related information for more details G Edge guide Feeds the paper straight into the printer Slide to the edges of the paper Part ...

Страница 24: ...an place the originals that are not fed from the ADF such as envelopes or thick books C ADF Automatic Document Feeder cover F Open when removing jammed originals in the ADF D ADF edge guide Feeds originals straight into the printer Slide to the edge of the originals E ADF input tray Feeds originals automatically F Stopper Prevents the ejected originals from falling from the ADF output tray G ADF o...

Страница 25: ...closed D Edge guide Feeds the paper straight into the printer Slide to the edges of the paper E Feeder guard Prevents foreign substance from entering the printer Usually keep this guard closed F Edge guide Feeds the paper straight into the printer Slide to the edges of the paper Related Information List of Optional Items on page 320 Part Names and Functions Front 25 ...

Страница 26: ...on of the optional items cImportant Note the insertion direction when using a USB 1 0 to 2 0 cable otherwise the printer may be damaged A EXT port Connects external phone devices B LINE port Connects a phone line Part Names and Functions Rear 26 ...

Страница 27: ...d paper G Duplexing unit D2 Remove when removing jammed paper H Maintenance box Collects a very small amount of surplus ink during cleaning or printing I LAN port Connects a LAN cable J USB port Connects a USB cable K Service USB port USB port for future use Do not remove the sticker Related Information List of Optional Items on page 320 Part Names and Functions Rear 27 ...

Страница 28: ...Guide to the Control Panel Control Panel 29 Home Screen Configuration 30 Menu Screen Configuration 32 Job Status Screen Configuration 33 Entering Characters 34 Viewing Animations 34 ...

Страница 29: ...Status menu You can check the printer s status and job history The error light on the left flashes or turns on when an error occurs The data light on the right flashes when the printer is processing data It turns on when there are queued jobs K Displays the Paper Setting screen You can select the paper size and paper type settings for each paper source L Stops the current operation M Displays menu...

Страница 30: ...his feature is enabled the noise made by printer operations is reduced but print speed may slow down However noises may not be reduced depending on the selected paper type and print quality Indicates that Mute is set for the printer D Enters the printer into sleep mode E Indicates that the user restriction feature is enabled Select this icon to log in to the printer You need to select a user name ...

Страница 31: ...anding by Tap to display the type of jobs arrival timer user names and so on as a list The number displayed indicates the number of jobs that are standing by I Scrolls the screen to the right Guide to the Network Icon The printer is not connected to a wired Ethernet network or unset it The printer is connected to a wired Ethernet network The printer is not connected to a wireless Wi Fi network The...

Страница 32: ...ault is displayed on the item Grayed out items are not available Select the item to check why it is unavailable If any problems occur is displayed on the item Select the icon to check how to solve the problem D Starts operations using the current settings Items vary depending on the menu Presets Displays the preset list You can register current setting as a preset or load registered presets Copies...

Страница 33: ...he printer Select the error from the list to display the error message When you are using the additional interface slot you can switch tabs to display the status of the optional item See related information for more details Related Information List of Optional Items on page 320 Error Code is Displayed on the Status Menu on page 256 Reserve Job You can reserve jobs during copying or printing when y...

Страница 34: ...er type You can enter numbers and symbols You can enter letters E Enters frequently used email domain addresses or URLs by simply selecting the item F Enters a space G Enters character H Deletes a character to the left Viewing Animations You can view animations of operating instructions such as loading paper or removing jammed paper on the LCD screen Select Displays the help screen Select How To a...

Страница 35: ... Select How To at the bottom of the operation screen Displays the context sensitive animation Note that the animation depends on the printer model Guide to the Control Panel Viewing Animations 35 ...

Страница 36: ...Loading Paper Paper Handling Precautions 37 Paper Size and Type Settings 38 Loading Paper 39 ...

Страница 37: ... feed problems may occur frequently for manual 2 sided printing when printing on one side of pre printed paper Reduce the number of sheets to half or less or load one sheet of paper at a time if paper jams continue Do not use short grain paper with a width of less than 105 mm Make sure you are using long grain paper If you are not sure what type of paper you are using check the paper packaging or ...

Страница 38: ...gister frequently used user defined sizes in Settings General Settings Printer Settings Paper Source Settings User Defined Paper Size List To select a user defined size as the paper size set Paper Size Auto Detect to Off List of Paper Type To obtain optimum printing results select the paper type that suits the paper Media Name Media Type Control Panel Printer Driver PostScript Printer Driver Epson...

Страница 39: ...Detect the following paper sizes are detected automatically when they are loaded in the paper cassette A6 B6 A5 Half letter B5 A4 Letter B4 Legal A3 11 17 in Similar paper sizes such as A4 and Letter may not be detected correctly If Half letter Letter Legal and Leger sizes are detected as A5 A4 B4 and A3 sizes press the button and then set the correct size If the sizes cannot be automatically dete...

Страница 40: ... edge guides to the edges of the envelopes Loading Pre punched Paper Load a single sheet of pre punched paper in the paper tray Adjust the print position of your file to avoid printing over the holes Automatic 2 sided printing is not available for pre punched paper Loading Paper Loading Paper Loading Pre punched Paper 40 ...

Страница 41: ...o Off and then select User Defined as the paper size setting Long paper cannot be held in the output tray Prepare a box and so on to make sure that paper does not fall on the floor Do not touch paper that is being fed or ejected It could injure your hand or cause print quality to decline Loading Paper Loading Paper Loading Long Papers 41 ...

Страница 42: ...Placing Originals Placing Originals 43 Detecting the Original Size Automatically 45 Originals that are not Supported by the ADF 45 ...

Страница 43: ...matically detected or the result of copying or scanning may become white Do not apply too much force to the scanner glass Otherwise it may be damaged Do not press with too much force on the original If you press with too much force blurring smudges and spots may occur If the original has marks from folding or wrinkles smooth them out and then place them on the scanner glass Images may be blurred a...

Страница 44: ...ls above the line just under the triangle symbol inside the ADFedge guide Do not add originals while scanning Note You can place originals smaller than A4 size with the long edge facing toward the ADF Some sizes may not be automatically detected In this situation manually select the size of the originals Related Information Originals that are not Supported by the ADF on page 45 Detecting the Origi...

Страница 45: ...ollowing originals may not be detected correctly If the sizes are not detected set the size manually on the control panel Originals that are torn folded wrinkled or curled if the originals are curled flatten the curl before placing the originals Originals with a lot of binder holes OHPs translucent originals or glossy originals Related Information Original Size Auto Detection Option on page 379 Or...

Страница 46: ...clips etc Originals that have stickers or labels stuck to them Originals that are cut irregularly or not right angled Originals that are bound OHPs thermal transfer paper or carbon backs Placing Originals Originals that are not Supported by the ADF 46 ...

Страница 47: ...Inserting and Removing a Memory Device Inserting an External USB Device 48 Removing an External USB Device 48 Sharing Data on a Memory Device 49 ...

Страница 48: ...formation Memory Device Specifications on page 416 Removing an External USB Device Remove the external USB device cImportant If you remove the external USB device while operating the printer the data on the external USB device may be lost Inserting and Removing a Memory Device Removing an External USB Device 48 ...

Страница 49: ...u connected the printer to the network without using the software disc or Web Installer map an external interface USB port as a network drive Open Run and enter a printer name XXXXX or a printer s IP address XXX XXX XXX XXX to Open Right click a device icon displayed to assign the network The network drive appears in Computer or My Computer Mac OS Select a corresponding device icon The data on the...

Страница 50: ...Printing Printing Documents 51 Printing on Envelopes 95 Printing Photos 95 Printing Web Pages 98 Printing Using a Cloud Service 98 ...

Страница 51: ...ter administrator for assistance Printing Using Easy Settings Note Operations may differ depending on the application See the application s help for details 1 Load paper in the printer Loading Paper on page 39 2 Open the file you want to print 3 Select Print or Print Setup from the File menu 4 Select your printer Printing Printing Documents Printing from a Computer Windows 51 ...

Страница 52: ...Print Preview a preview window is displayed To change the settings click Cancel and then repeat the procedure from step 3 If you want to cancel printing on your computer right click on your printer in Devices and Printers Printer or in Printers and Faxes Click See what s printing right click on the job you want to cancel and then select Cancel However you cannot cancel a print job from the compute...

Страница 53: ... tab are also reset to their defaults Print Preview Displays a preview of your document before printing Job Arranger Lite Job Arranger Lite allows you to combine several files created by different applications and print them as a single print job Paper Source Select the paper source from which the paper is fed Select Auto Select to automatically select the paper source selected in the print settin...

Страница 54: ...ides higher quality printing but the printing speed may be slower Paper Source Information Displays the paper information set for each paper source Orientation Select the orientation you want to use to print Color Select whether to print in color or in monochrome 2 Sided Printing Allows you to perform 2 sided printing Settings You can specify the binding edge and the binding margins When printing ...

Страница 55: ...ts Job Type Select Confidential Job to set a password to protect confidential documents when printing If you use this feature the print data is stored in the printer and can only be printed after the password has been entered using the printer s control panel Click Confidential Job Settings to change the settings Color Correction Automatic Adjusts the tone of images automatically Custom Allows you...

Страница 56: ...ndow Here you can confirm the status of the printer and the consumables You need to install EPSON Status Monitor 3 to enable this feature You can download it from the Epson website Monitoring Preferences Allows you to make settings for items on the EPSON Status Monitor 3 window You need to install EPSON Status Monitor 3 to enable this feature You can download it from the Epson website Extended Set...

Страница 57: ...ptions tab set each item such as Document Size and Paper Type 2 Click Add Remove Presets in Printing Presets 3 Enter a Name and if necessary enter a comment 4 Click Save Note To delete an added preset click Add Remove Presets select the preset name you want to delete from the list and then delete it Main Tab on page 53 More Options Tab on page 55 5 Click Print The next time you want to print using...

Страница 58: ...lick Settings make the appropriate settings and then click OK 3 Click Print Density make the appropriate settings and then click OK When setting Print Density you can adjust print density according to the document type Note This setting is not available when you select manual 2 sided printing Printing may be slow depending on the combination of options selected for Select Document Type in the Prin...

Страница 59: ...t the method of 2 Sided Printing on the Main tab 2 On the printer driver s Settings select Booklet 3 Click OK Center Binding Use this method when printing a small number of pages that can be stacked and easily folded in half Side Binding Use this method when printing one sheet four pages at a time folding each in half and then putting them together in one volume 4 Click Print Density make the appr...

Страница 60: ...r 1 On the printer driver s Main tab select 2 Up 4 Up 6 Up 8 Up 9 Up or 16 Up as the Multi Page setting 2 Click Layout Order make the appropriate settings and then click OK 3 Set the other items on the Main and More Options tabs as necessary and then click OK Main Tab on page 53 More Options Tab on page 55 4 Click Print Related Information Loading Paper on page 39 Printing Using Easy Settings on p...

Страница 61: ...ut Paper Select the paper size you loaded in the printer Fit to Page is automatically selected Note Click Center to print the reduced image in the middle of the paper 2 Set the other items on the Main and More Options tabs as necessary and then click OK Main Tab on page 53 More Options Tab on page 55 3 Click Print Related Information Loading Paper on page 39 Printing Using Easy Settings on page 51...

Страница 62: ...t Zoom to and then enter a percentage 4 Set the other items on the Main and More Options tabs as necessary and then click OK Main Tab on page 53 More Options Tab on page 55 5 Click Print Related Information Loading Paper on page 39 Printing Using Easy Settings on page 51 Printing One Image on Multiple Sheets for Enlargement Creating a Poster This feature allows you to print one image on multiple s...

Страница 63: ... on the Main and More Options tabs as necessary and then click OK Main Tab on page 53 More Options Tab on page 55 4 Click Print Related Information Loading Paper on page 39 Printing Using Easy Settings on page 51 Making Posters Using Overlapping Alignment Marks Here is an example of how to make a poster when 2x2 Poster is selected and Overlapping Alignment Marks is selected in Print Cutting Guides...

Страница 64: ...he vertical blue line through the center of the top and bottom cross marks 2 Place the edge of Sheet 1 on top of Sheet 2 and align the cross marks then temporarily tape the two sheets together from the back Printing Printing Documents Printing from a Computer Windows 64 ...

Страница 65: ...ed line through the alignment markers this time the line to the left of the cross marks 4 Tape the sheets together from the back 5 Repeat steps 1 to 4 to tape Sheet 3 and Sheet 4 together Printing Printing Documents Printing from a Computer Windows 65 ...

Страница 66: ...ne through the center of the left and right side cross marks 7 Place the edge of Sheet 1 and Sheet 2 on top of Sheet 3 and Sheet 4 and align the cross marks and then temporarily tape them together from the back Printing Printing Documents Printing from a Computer Windows 66 ...

Страница 67: ...heets in two along the horizontal red line through the alignment markers this time the line above the cross marks 9 Tape the sheets together from the back Printing Printing Documents Printing from a Computer Windows 67 ...

Страница 68: ...der and Footer You can print information such as a user name and printing date in headers or footers 1 On the printer driver s More Options tab click Watermark Features and then select the Header Footer checkbox Printing Printing Documents Printing from a Computer Windows 68 ...

Страница 69: ...pattern on your printouts When printing the letters themselves are not printed and the entire print is screen toned lightly The hidden letters appear when photocopied to easily distinguish the original from the copies Anti Copy Pattern is available under the following conditions Paper Type Plain paper Copy paper Letterhead Recycled Color Preprinted High Quality Plain Paper or Thick paper 1 Quality...

Страница 70: ...tions tab select Confidential Job as the Job Type and then enter a password 2 Set the other items on the Main and More Options tabs as necessary and then click OK Main Tab on page 53 More Options Tab on page 55 3 Click Print 4 To print the job select Confidential Job on the home screen of the printer s control panel Select the job you want to print and then enter the password Related Information L...

Страница 71: ... can edit the page layout 5 Click Print from the File menu to start printing Note If you close the Job Arranger Lite window before adding all the print data to the Print Project the print job you are currently working on is canceled Click Save from the File menu to save the current job The extension of the saved files is ecl To open a Print Project click Job Arranger Lite on the printer driver s M...

Страница 72: ...hese settings Print quality may decrease in photos and other images when using Color Universal Print settings Printing is slower when using Color Universal Print settings Related Information Loading Paper on page 39 Printing Using Easy Settings on page 51 Adjusting the Print Color You can adjust the colors used in the print job These adjustments are not applied to the original data PhotoEnhance pr...

Страница 73: ... page 55 3 Click Print Related Information Loading Paper on page 39 Printing Using Easy Settings on page 51 Printing to Emphasize Thin Lines You can thicken thin lines that are too thin to print 1 On the printer driver s More Options tab click Image Options in the Color Correction setting 2 Select Emphasize Thin Lines 3 Set the other items on the Main and More Options tabs as necessary and then cl...

Страница 74: ...eblurring may not always be possible depending on the circumstances 1 On the printer driver s Maintenance tab click Extended Settings and then select Barcode mode 2 Set the other items on the Main and More Options tabs as necessary and then click OK Main Tab on page 53 More Options Tab on page 55 3 Click Print Related Information Loading Paper on page 39 Printing Using Easy Settings on page 51 Pri...

Страница 75: ...n Available Paper and Capacities on page 358 Loading Paper on page 39 List of Paper Type on page 38 Paper Quality Tab on page 76 Layout Tab on page 76 Menu Options for the PostScript Printer Driver Open the print window on an application select the printer and then access the printer driver window Note Menus vary depending on the option you selected Printing Printing Documents Printing a Document ...

Страница 76: ... in the printer s Auto Select Settings Color Select the color for your print job Layout Tab Orientation Select the orientation you want to use to print Print on Both Sides Allows you to perform 2 sided printing Page Order Select to print from the top or the last page If you select Back to Front the pages are stacked in the correct order based on page number after printing Page Format Pages per She...

Страница 77: ...t Select the paper size and number of copies Paper Size Select the paper size on which you want to print Copies Set the number of copies you want to print Graphic Set the following menu items Print Quality Select the pint quality you want to use for printing Image Color Management Select the ICM method or intent Scaling Allows you to reduce or enlarge the document TrueType Font Sets the font subst...

Страница 78: ...ensity Rotate by 180º Rotates the data 180 degrees before printing Printing from a Computer Mac OS Printing Using Easy Settings Note Operations and screens differ depending on the application See the application s help for details 1 Load paper in the printer Loading Paper on page 39 2 Open the file you want to print 3 Select Print from the File menu or another command to access the print dialog If...

Страница 79: ...en add the printer again See the following to add a printer Adding the Printer for Mac OS Only on page 186 6 Change the settings as necessary See the menu options for the printer driver for details 7 Click Print Note If you want to cancel printing on your computer click the printer icon in the Dock Select the job you want to cancel and then do one of the following However you cannot cancel a print...

Страница 80: ...e orientation Rotates pages 180 degrees before printing Select this item when printing on paper such as envelopes that are loaded in fixed direction in the printer Flip horizontally Inverts an image to print as it would appear in a mirror Menu Options for Color Matching ColorSync EPSON Color Controls Select the method for color adjustment These options adjusts colors between the printer and the co...

Страница 81: ...n which you print If you select Auto Select plain papers printing is performed from the paper source for which the paper type is set to the following in the printer s settings plain papers Preprinted Letterhead Color Recycled High quality plain paper However paper cannot be fed from a paper source for which the paper source is set to off in the printer s Auto Select Settings Print Quality Select t...

Страница 82: ...ngs on the printer driver you can print easily by selecting the preset from the list 1 Set each item such as Print Settings and Layout Paper Size Media Type and so on 2 Click Presets to save the current settings as a preset 3 Click OK Note To delete an added preset click Presets Show Presets select the preset name you want to delete from the list and then delete it 4 Click Print The next time you ...

Страница 83: ... type of original in Document Type Note Printing may be slow depending on the Document Type setting If you are printing high density data such as photos or graphs select Text Photos or Text Graphics as the Document Type setting If scuffing occurs or the image bleeds through to the reverse side adjust the print density and ink drying time by clicking the arrow mark next to Adjustments 4 Set the oth...

Страница 84: ...Layout Direction page order and Border Menu Options for Layout on page 80 3 Set the other items as necessary 4 Click Print Related Information Loading Paper on page 39 Printing Using Easy Settings on page 78 Printing to Fit the Paper Size Select the paper size you loaded in the printer as the Destination Paper Size setting Printing Printing Documents Printing from a Computer Mac OS 84 ...

Страница 85: ...ific percentage Note Operations differ depending on the application See the application s help for details 1 Do one of the following Select Print from the File menu of the application Click Page Setup and then select your printer in Format For Select the size of the data to be printed from Paper Size enter a percentage in Scale and then click OK Select Page Setup from the File menu of the applicat...

Страница 86: ...e image the color may change unexpectedly If the image is out of focus the tone may be unnatural If the color is changed or becomes unnatural print in a mode other than PhotoEnhance 1 Select Color Matching from the pop up menu and then select EPSON Color Controls 2 Select Color Options from the pop up menu and then select one of the available options 3 Click the arrow next to Advanced Settings and...

Страница 87: ...Select the paper size you loaded in the printer Orientation Select the orientation you set in the application 5 Select Paper Feed from the pop up menu and then select the paper source in which you loaded the paper Printing Printing Documents Printing Using a PostScript Printer Driver Mac OS X 87 ...

Страница 88: ...eature Sets setting and then select the type of paper you loaded as the MediaType setting 7 Select Color as the Feature Sets setting and then select the setting for Color Mode 8 Click Print Printing Printing Documents Printing Using a PostScript Printer Driver Mac OS X 88 ...

Страница 89: ... the order in which the pages will be printed Border Prints a border around the pages Two Sided Allows you to perform 2 sided printing Reverse page orientation Rotates pages 180 degrees before printing Flip horizontally Inverts the image so that it prints as it would appear in a mirror Menu Options for Color Matching ColorSync In Printer Select the method for color adjustment These options adjusts...

Страница 90: ...matically First Page From Remaining From You can also select the paper source for page Menu Options for Cover Page Print Cover Page Select whether or not to print a cover page When you want to add a back cover select After document Cover Page Type Select the contents of the cover page Menu Options for Printer Features Feature Sets Quality MediaType Select the type of paper on which you print If yo...

Страница 91: ...u can print PDF files from a memory device connected to the printer 1 Connect the memory device to the printer s external interface USB port Inserting an External USB Device on page 48 2 Select Memory Device on the home screen 3 Select PDF 4 Select the file and then proceed to the next screen 5 Tap x PDF Settings You can make print settings for PDF format files on your memory devices Display order...

Страница 92: ...t your printer and your smart device using Wi Fi Direct Connecting a Smart Device and Printer Directly Wi Fi Direct on page 300 2 If Epson iPrint is not installed install it Installing Epson iPrint on page 370 3 Start Epson iPrint 4 Tap Document on the home screen 5 Tap the location of the document you want to print 6 Select the document and then tap Next 7 Tap Print Printing Documents Using AirPr...

Страница 93: ...stablished iOS on page 226 Printing Documents from Smart Devices Android You can print documents from a smart device such as a smartphone or tablet Printing Documents Using Epson iPrint Note Operations may differ depending on the device 1 Connect your printer and your smart device using Wi Fi Direct Connecting a Smart Device and Printer Directly Wi Fi Direct on page 300 2 If Epson iPrint is not in...

Страница 94: ...d device select Printing and then enable Epson Print Enabler 4 From an Android application such as Chrome tap the menu icon and print whatever is on the screen Note If you do not see your printer tap All Printers and select your printer Printing Using Mopria Print Service Mopria Print Service enables instant wireless printing from Android smart phones or tablets 1 Install Mopria Print Service from...

Страница 95: ...nt Printing on Envelopes from a Computer Mac OS 1 Load envelopes in the printer Loading Envelopes on page 40 2 Open the file you want to print 3 Select Print from the File menu or another command to access the print dialog 4 Select the size as the Paper Size setting 5 Select Print Settings from the pop up menu 6 Select Envelope as the Media Type setting 7 Set the other items as necessary 8 Click P...

Страница 96: ...ically If the aspect ratio of the image data and the paper size is different the image is automatically enlarged or reduced so that the short sides match the short sides of the paper The long side of the image is cropped if it extends beyond the long side of the paper This feature may not work for panorama photos Quality Select Best for higher quality printing but the printing speed may be slower ...

Страница 97: ...out the Multi TIFF file 1 up is for printing one page per sheet 20 up is for printing 20 pages on one sheet Index is for making index printing with information Fit Frame Select On to crop the photo to fit into the selected photo layout automatically If the aspect ratio of the image data and the paper size is different the image is automatically enlarged or reduced so that the short sides match the...

Страница 98: ...it Installing Epson iPrint on page 370 3 Open the web page you want to print in your web browser app 4 Tap Share from the menu of the web browser application 5 Select iPrint 6 Tap Print Printing Using a Cloud Service By using Epson Connect service available on the Internet you can print from your smart phone tablet PC or laptop anytime and practically anywhere To use this service you need to regis...

Страница 99: ...red driver supported by Remote Print Driver When printing using a printer in a remote location you can print by changing the printer on the usual applications window See the Epson Connect web portal for details on how to setup or print https www epsonconnect com http www epsonconnect eu Europe only Registering to Epson Connect Service from the Control Panel Follow the steps below to register the p...

Страница 100: ...Copying Available Copying Methods 101 Basic Menu Options for Copying 106 Advanced Menu Options for Copying 108 ...

Страница 101: ...copy the originals of fixed size or custom size by color or monochrome 1 Place the originals Placing Originals on page 43 2 Select Copy on the home screen 3 Select the Basic Settings tab and then select Auto or Color B W 4 Tap x Copying on 2 Sides Copy multiple originals on both sides of the paper Copying Available Copying Methods Copying on 2 Sides 101 ...

Страница 102: ...he Basic Settings tab select 2 Sided and then select 2 2 Sided or 1 2 Sided 4 Specify other settings such as the original orientation and the binding position 5 Tap x Copying by Enlarging or Reducing You can copy originals at a specified magnification 1 Place the originals Placing Originals on page 43 2 Select Copy on the home screen 3 Select the Basic Settings tab and then select Reduce Enlarge 4...

Страница 103: ...ion Readable Direction Left Direction cImportant If you want to copy originals that are not supported by the ADF use the scanner glass Originals that are not Supported by the ADF on page 45 Note You can also place the originals on the scanner glass Placing Originals on page 43 2 Select Copy on the home screen Copying Available Copying Methods Copying Multiple Originals onto One Sheet 103 ...

Страница 104: ...n page 43 2 Select Copy on the home screen 3 Select the Advanced tab and then select Finishing Collate Page Order 4 Tap x Copying Originals Using Good Quality You can copy originals without shadows and punched holes 1 Place the originals Placing Originals on page 43 2 Select Copy on the home screen 3 Select the Advanced tab and then enable Remove Shadow or Remove Punch Holes or adjust the image qu...

Страница 105: ...nd then enable the setting 4 Specify the Orientation Original 5 Tap x Copying Books Copies two facing pages of a book and so on onto separate sheets of paper 1 Place the original on the scanner glass Placing Originals on page 43 2 Select Copy on the home screen 3 Select the Advanced tab select Book 2 Pages and then enable the setting 4 Specify Scan Order 5 Tap x Copying Available Copying Methods C...

Страница 106: ...er Recycled paper Thick paper Envelope Epson Bright White Ink Jet Paper Epson Business Paper 1 Place the originals Placing Originals on page 43 2 Select Copy on the home screen 3 Select the Basic Settings tab and then select Original Type Barcode 4 Tap x Basic Menu Options for Copying Note The items may not be available depending on other settings you made Color Mode Select whether to copy in colo...

Страница 107: ...When Auto is selected a suitable size is fed automatically depending on the auto detected original size and the specified magnification ratio Reduce Enlarge Configures the magnification ratio of the enlargement or reduction Tap the value and specify the magnification used to enlarge or reduce the original within a range of 25 to 400 Auto Detects the scan area and automatically enlarges or reduces ...

Страница 108: ...f two sheets of paper Select the orientation of your original and the binding position of the original Advanced Menu Options for Copying Note The items may not be available depending on other settings you made Multi Page Select the copy layout Single Page Copies a single sided original onto a single sheet 2 up Copies two single sided originals onto a single sheet in 2 up layout Select the layout o...

Страница 109: ...originals as shown below Orientation Original Select the orientation of your original Book 2 Pages Copies two facing pages of a booklet onto separate sheets of paper Select which page of a booklet to scan Continuous Scanning You can place a large number of originals in the ADF in batches and scan them as a single scaninng job Image Quality Adjust image settings Contrast Adjust the difference betwe...

Страница 110: ... original Reduce to Fit Paper Copies the scanned image at a smaller size than the Reduce Enlarge value to fit within the paper size If the Reduce Enlarge value is larger than the paper size data may be printed beyond the edges of the paper Remove Shadow Removes shadows that appear around copies when copying thick paper or that appear in the center of copies when copying a booklet Remove Punch Hole...

Страница 111: ...g Originals to a Network Folder 112 Scanning Originals to an Email 116 Scanning Originals to a Computer 119 Scanning Originals to a Memory Device 120 Scanning Originals to the Cloud 122 Scanning Using WSD 124 Scanning Originals to a Smart Device 126 ...

Страница 112: ... Service You can send scanned images from the printer s control panel to cloud services that have been registered in advance Scanning Originals to the Cloud on page 122 Scanning Using WSD You can save the scanned image to a computer connected to the printer using WSD feature Scanning Using WSD on page 124 Scanning Directly from Smart Devices You can save scanned images directly to a smart device s...

Страница 113: ... a preset 5 Tap x Destination Menu Options for Scanning to a Folder Keyboard Open the Edit Location screen Enter the folder path and set each item on the screen Edit Location Enter the folder path and set each item on the screen Communication Mode Select the communication mode for the folder Location Required Enter a folder path in which to save the scanned image Selecting the Browse searches a fo...

Страница 114: ...on Ratio Select how much to compress the scanned image PDF Settings When you have selected PDF as the save format setting use these settings to protect PDF files To create a PDF file that requires a password when opening set Document Open Password To create a PDF file that requires a password when printing or editing set Permissions Password Resolution Select the scanning resolution 2 Sided Scan b...

Страница 115: ...he shadows of the binding margin of the booklet Remove Punch Holes Remove the punch holes that appear in the scanned image You can specify the area to erase the punch holes by entering a value in the box on the right Erasing Position Select the position to remove the punch holes Orientation Original Select the orientation of the original Continuous Scan ADF You can place a large number of original...

Страница 116: ...sses and groups If groups is included in recipients you can select up to 200 individual addresses in total taking addresses in the groups into account Select the address box at the top of the screen to display the list of selected addresses Select to display or print the sending history or change the email server settings 4 Select Scan Settings and then check settings such as the save format and c...

Страница 117: ...protect PDF files To create a PDF file that requires a password when opening set Document Open Password To create a PDF file that requires a password when printing or editing set Permissions Password Resolution Select the scanning resolution 2 Sided Scan both sides of the original Orientation Original Select the orientation of the original Binding Original Select the binding direction of the origi...

Страница 118: ... scanned image You can specify the area to erase the punch holes by entering a value in the box on the right Erasing Position Select the position to remove the punch holes Orientation Original Select the orientation of the original Continuous Scan ADF You can place a large number of originals in the ADF in batches and scan them as a single scanning job Subject Enter a subject for the email in alph...

Страница 119: ...top Settings Control Panel Programs Programs and Features Windows 7 Click the start button and then select Control Panel Programs Programs and Features Mac OS Select Go Applications Epson Software Connect the printer and the computer over a network If you are using Windows Server make the settings on the control panel 1 Place the originals Placing Originals on page 43 2 Select Scan Computer on the...

Страница 120: ... 3 Select Scan Memory Device on the control panel 4 Make the scan settings Basic Menu Options for Scanning to a Memory Device on page 120 Advanced Menu Options for Scanning to a Memory Device on page 121 Note Select to save your settings as a preset 5 Tap x Basic Menu Options for Scanning to a Memory Device Note The items may not be available depending on other settings you made B W Color Select w...

Страница 121: ...on Original Select the orientation of the original Original Type Select the type of your original Advanced Menu Options for Scanning to a Memory Device Note The items may not be available depending on other settings you made Orientation Original Select the orientation of the original Mixed Size Originals You can place the following combination of sizes in the ADF at the same time A3 and A4 B4 and ...

Страница 122: ... Name Filename Prefix Enter a prefix for the name of the images in alphanumeric characters and symbols Add Date Add the date to the file name Add Time Add the time to the file name Scanning Originals to the Cloud Before using this feature make settings using Epson Connect See the following Epson Connect portal website for details https www epsonconnect com http www epsonconnect eu Europe only 1 Pl...

Страница 123: ... of the original Orientation Original Select the orientation of the original Binding Original Select the binding direction of the original Scan Area Select the scan area To scan at the maximum area of the scanner glass select Max Area Orientation Original Select the orientation of the original Advanced Menu Options for Scanning to the Cloud Note The items may not be available depending on other se...

Страница 124: ... single scanning job Scanning Using WSD Note This feature is only available for computers running Windows 10 Windows 8 1 Windows 8 Windows 7 Windows Vista If you are using Windows 7 Windows Vista you need to setup your computer in advance using this feature Setting Up a WSD Port on page 124 1 Place the originals Placing Originals on page 43 2 Select Scan WSD on the control panel 3 Select a compute...

Страница 125: ...k Uninstall and start again if the Uninstall screen is displayed Note The printer name you set on the network and model name EPSON XXXXXX XX XXXX are displayed on the network screen You can check the printer s name set on the network from the printer s control panel or by printing a network status sheet 4 Click Your device is ready to use Scanning Scanning Using WSD Setting Up a WSD Port 125 ...

Страница 126: ...scanning install Epson iPrint on your smart device Epson iPrint screens are subject to change without notice Epson iPrint contents may vary depending on the product 1 Place the originals Placing Originals on page 43 2 Start Epson iPrint 3 Tap Scan on the home screen 4 Tap Scan Note You can set the scan settings Tap the icon at the top right of the screen Scanning starts 5 Check the scanned image a...

Страница 127: ... Displays the screen where you can print scanned images 6 Finally follow the on screen instructions Scanning Scanning Originals to a Smart Device 127 ...

Страница 128: ...f this Printer s Fax Features 129 Sending Faxes Using the Printer 134 Receiving Faxes on the Printer 142 Menu Options for Faxing 148 Menu Options for Fax Box 152 Checking the Status or Logs for Fax Jobs 159 Sending a Fax from a Computer 161 Receiving Faxes on a Computer 166 ...

Страница 129: ...oard on page 340 If your organization has a printer administrator contact your administrator to check the status or conditions of the connection and settings Related Information Report Settings on page 398 Overview of this Printer s Fax Features Feature Sending Faxes Sending Methods Sending automatically When you scan an original by tapping x Send the printer dials the recipients and sends the fax...

Страница 130: ...Fax Send Settings on page 149 Backup Error Report on page 398 Configuring a Mail Server on page 452 Feature Receiving Faxes Receive Mode There are two options in Receive Mode for receiving incoming faxes Manual Mainly for phoning but also for faxing Usage of Manual Mode on page 143 Auto Only for faxing external phone device is not required Mainly for faxing and sometimes phoning Usage of Auto Mode...

Страница 131: ... to the inbox or a confidential box an external memory an email a folder or another fax when specific conditions are met If you save in the inbox or a confidential box you can check the contents on the screen Conditional Save Forward on page 393 Conditional Save Forward list on page 151 Feature PC FAX Send Receive Windows Mac OS PC FAX Send You can send faxes from a computer PC to FAX Function on ...

Страница 132: ...t Report Settings on page 398 Fax Send Settings on page 149 Transmission Log on page 151 Fax Report on page 151 Feature Status or Logs for Fax Jobs You can check the fax jobs in progress or check the job history Checking the Status or Logs for Fax Jobs on page 159 Faxing Fax Capable Printers Only Overview of this Printer s Fax Features Feature Status or Logs for 132 ...

Страница 133: ...ox feature You can set a password for each box Feature Security when Sending and Receiving Faxes on page 133 Feature Security when Sending and Receiving Faxes You can use many security features such as Direct Dialing Restrictions to prevent sending to the wrong destination or Backup Data Auto Clear to prevent information leakage You can set a password for each fax box in the printer Security Setti...

Страница 134: ...l panel Note When sending a fax in monochrome you can preview the scanned image on the LCD screen before sending You can reserve up to 50 monochrome fax jobs even while the phone line is in use for a voice call sending another fax or receiving a fax You can check or cancel reserved fax jobs from 1 Place the originals You can send up to 200 pages in one transmission however depending on the remaini...

Страница 135: ... the beginning of the fax number Note If you cannot manually enter a fax number Direct Dialing Restrictions in Security Settings is set to On Select fax recipients from the contacts list or the sent fax history Selecting recipients from the contacts list Select Contacts and select recipients you want to send If the recipient you want to send to has not been registered in Contacts yet tap to regist...

Страница 136: ... or enlarges Moves to the previous or the next page Note When Direct Send is enabled you cannot preview When the preview screen is left untouched for the time set in Settings General Settings Fax Settings Send Settings Fax Preview Display Time the fax is sent automatically 6 Select Start Sending Otherwise select Cancel Note The image quality of a sent fax may be different from what you previewed d...

Страница 137: ...n page 148 4 When you hear a fax tone tap x and then hang up the handset Note When a number is dialed using the connected telephone it takes longer to send a fax because the printer performs scanning and sending simultaneously While sending the fax you cannot use the other features Sending Faxes on Demand Using Polling Send Bulletin Board Box If you store a monochrome document in the printer in ad...

Страница 138: ...hand Follow the steps below to register the box 1 Select Fax Box Polling Send Board from the home screen 2 Select one of the boxes named Unregistered Bulletin Board Note If a password entry screen is displayed enter the password 3 Make settings for the items on the screen Enter a name in Name Required Enter a subaddress in Subaddress SEP Enter a password in Password PWD 4 Make the appropriate sett...

Страница 139: ...emory Therefore sending a lot of pages may cause the printer to run out of memory and stop sending the fax You can avoid this by enabling the Direct Send feature however it takes longer to send the fax because the printer performs scanning and sending simultaneously You can use this feature when there is only one recipient Accessing the Menu You can find the menu on the printer s control panel bel...

Страница 140: ...l sizes If you place different sized originals in the ADF all of the originals are sent at the largest size among them To send originals at their original sizes do not place originals with mixed sizes 1 Place the first batch of originals at the same size 2 Select Fax on the home screen 3 Specify the recipient 4 Select the Fax Settings tab and then tap Continuous Scan ADF to set this to On You can ...

Страница 141: ...ments Multiple Times Related Information Storing a Fax Without Specifying a Recipient Store Fax Data on page 141 Sending Faxes Using the Stored Document Feature on page 142 Storing a Fax Without Specifying a Recipient Store Fax Data Since you can send faxes using documents stored in the printer you can save the time spent scanning documents when you need to send the same document frequently You ca...

Страница 142: ...o 3 Specify the recipient 4 Select the Fax Settings tab and then make settings such as the sending method as necessary Fax Settings on page 148 5 Tap x to send the fax Related Information Stored Documents on page 154 Checking the Status or Logs for Fax Jobs on page 159 Receiving Faxes on the Printer If the printer is connected to the phone line and basic settings have been completed using the Fax ...

Страница 143: ...e faxes by simply entering the Start Code When the telephone rings pick up the handset When you hear a fax tone baud dial the two digit Start Code and then hang up the handset If you do not know the start code ask the administrator Related Information Remote Receive on page 389 Usage of Auto Mode This mode allows you to use the line for the following uses Using the line for faxing only external te...

Страница 144: ...Rings to Answer Otherwise the answering machine cannot receive voice calls to record voice messages For details on setting up the answering machine see the manual supplied with the answering machine Receiving Faxes by Making a Phone Call You can receive a fax stored on another fax machine by dialing the fax number Related Information Receiving Faxes After Confirming the Sender s Status on page 144...

Страница 145: ...Tap Close and then tap Close again 6 Enter the fax number Note If you cannot manually enter a fax number Direct Dialing Restrictions in Security Settings is set to On Select fax recipients from the contacts list or the sent fax history 7 Tap x Related Information Polling Receive on page 151 Receiving Faxes from a Board with a Subaddress SEP and Password PWD Polling Receive By dialing to a sender y...

Страница 146: ...the printer s screen You can print only the faxes you want to print or delete unnecessary faxes Saving and or Forwarding Received Faxes to Destinations Other than the Printer The following can be set as destinations Computer PC FAX reception External memory device Email address Shared folder on a network Another fax machine Note The fax data is saved as PDF or TIFF format Color documents cannot be...

Страница 147: ...o Receive Faxes on page 494 1 Select Fax Box on the home screen Note When there are received faxes that have not been read the number of unread documents is displayed on the on the home screen 2 Select Inbox Confidential 3 Select the inbox or the confidential box you want to view 4 If the inbox or the confidential box has been password protected enter the inbox password the confidential box passwo...

Страница 148: ... enter a fax number Contacts Select a recipient from the contacts list You can also add or edit a contact Recent Select a recipient from the sent fax history You can also add the recipient to the contacts list Fax Settings Select the menus on the control panel as described below Fax Fax Settings Quick Operation Button Assigning up to three frequently used items such as Transmission Log and Origina...

Страница 149: ...e size and orientation of the original you placed on the scanner glass Color Mode Select whether to scan in color or in monochrome Fax Send Settings Direct Send Sends a monochrome fax while scanning the originals Since scanned originals are not stored temporarily in the printer s memory even when sending a large volume of pages you can avoid printer errors due to a lack of memory Note that sending...

Страница 150: ...from Your Phone Number Destination List and None Notify Send Result Sends a notification after you send a fax Transmission Report Prints a transmission report after you send the fax Print on Error prints a report only when an error occurs When Attach Fax image to report has been set in Settings General Settings Fax Settings Report Settings faxes with errors are also printed with the report Backup ...

Страница 151: ...and you call the sender s fax number you can receive documents from the sender s fax machine See the related information below for details on how to receive faxes using Polling Receive When you leave the Fax menu the setting returns to Off default Polling Send Board When this is set to On by selecting the polling send box or a bulletin board box you can scan and store documents to the box you sele...

Страница 152: ...he Status or Logs for Fax Jobs on page 159 Checking the Fax Job History on page 160 Menu Options for Fax Box Inbox Confidential You can find Inbox Confidential in Fax Box on the home screen Inbox and Confidential Boxes List Inbox and confidential boxes are in Fax Box Inbox Confidential You can save up to 200 documents in the inbox and the confidential box in total You can use one Inbox and registe...

Страница 153: ...only when there are stored faxes in the box Saves all faxes to external memory devices in the box Selecting On in Delete When Complete deletes all documents when saving is complete Delete All Reads This is displayed when there are already fax documents that have been read in the box Deletes all read faxes in the box Delete All Unreads This is displayed when there are unread fax documents in the bo...

Страница 154: ... page 160 Stored Documents You can find Stored Documents in Fax Box on the home screen You can store up to 200 pages of a single document in monochrome and up to 10 documents in the box This allows you to save time spent scanning documents when you need to send the same document frequently Note You may not be able to save 10 documents depending on the usage conditions such as the size of saved doc...

Страница 155: ...mory devices in the box Selecting On in Delete When Complete deletes all documents when saving is complete Delete All This is displayed only when there are stored faxes in the box Deletes all faxes in the box Settings Box Open Password You can set a password or change it Related Information Sending the Same Documents Multiple Times on page 141 Checking the Fax Job History on page 160 Polling Send ...

Страница 156: ...play the icons Preview menu Save to Memory Device Forward Email Forward Network Folder Send Fax When the message Delete When Complete is displayed select On to delete faxes after completing processes such as Save to Memory Device or Forward Email Menu Delete Document This item is displayed only when there is a stored document in the box Deletes the document stored in the box Settings Box Open Pass...

Страница 157: ...open the box Delete Document After Sending Setting this to On deletes the document in the box when the next request from a recipient to send the document Polling Send is completed Notify Send Result When Email Notifications is set to On the printer sends a notification to the Recipient when a request to send the document Polling Send is completed Related Information Each Registered Bulletin Board ...

Страница 158: ...end Fax When the message Delete When Complete is displayed select On to delete faxes after completing processes such as Save to Memory Device or Forward Email Menu Delete Document This item is displayed only when there is a stored document in the box Deletes the document stored in the box Settings Box Open Password You can set a password or change it Delete Document After Sending Setting this to O...

Страница 159: ...al box Saving in an external memory device There are received documents that have not been saved in the device because there is no device containing a folder specifically created to save received documents connected to the printer or for other reasons Saving on a computer There are received documents that have not been saved on the computer because the computer is in sleep mode or for other reason...

Страница 160: ...t saved yet When the jobs are set to be saved Not forwarded yet When the jobs are set to be forwarded Outgoing fax jobs that have failed to be sent If you have enabled Save Failure Data Follow the steps below to display the check screen 1 Tap Job Status on the home screen 2 Tap the Job Status tab and then tap Active 3 Select the job you want to check Related Information Displaying Information when...

Страница 161: ...ility and the printer s PC FAX driver has been installed before using this feature Application for Configuring Fax Operations and Sending Faxes FAX Utility on page 373 Application for Sending Faxes PC FAX Driver on page 373 If the FAX Utility is not installed install the FAX Utility using the EPSON Software Updater application for updating software Related Information Enabling Sending Faxes from a...

Страница 162: ... select Add documents to send checkbox The screen for adding documents is displayed when you click Next in step 10 7 Select Attach a cover sheet checkbox if necessary 8 Specify a recipient Selecting a recipient name fax number and so on from PC FAX Phone Book If the recipient is saved in the phone book do the steps below A Click the PC FAX Phone Book tab B Select the recipient from the list and cl...

Страница 163: ...n page 344 Transmission mode Select how the printer transmits the document Memory Trans Sends a fax by storing the data temporarily in the printer s memory If you want to send a fax to multiple recipients or from multiple computers at the same time select this item Direct Trans Sends a fax without storing the data temporarily in the printer s memory If you want to send a large volume of monochrome...

Страница 164: ...Once transmission starts a window displaying the transmission status appears Note To stop transmitting select the data and click Cancel You can also cancel using the printer s control panel If an error occurs during transmission the Communication error window appears Check the error information and retransmit The Fax Status Monitor screen the screen mentioned above where you can check the transmis...

Страница 165: ...e Type is set to PBX and the access code has been set to use hash instead of entering the exact prefix code enter hash For details see Line Type in Basic Settings from Related Information link below Selecting a recipient name fax number and so on from the phone book If the recipient is saved in the phone book click Select the recipient from the list and then click Add OK If your fax connection lin...

Страница 166: ...ttings Receive Mode The computer set to receive faxes should always be on Received documents are saved in the printer s memory temporarily before the documents are saved on the computer If you turn off the computer the printer s memory might become full as it cannot send the documents to the computer The number of documents that have been temporarily saved to the printer s memory are displayed on ...

Страница 167: ... Check the notification screen displayed on your computer screen Note The notification screen disappears if no operation is performed for a given length of time You can change the notification settings such as the display time 2 Click anywhere in the notification screen except for the button The Receiving Fax Record screen is displayed 3 Check the date and the sender in the list and then open the ...

Страница 168: ...ng naming format YYYYMMDDHHMMSS_xxxxxxxxxx_nnnnn Year Month Day Hour Minute Second_sender s number Information sent from the sender is displayed as the sender s number This number may not be displayed depending on the sender Canceling the Feature that Saves Incoming Faxes to the Computer You can cancel saving faxes to the computer by using the FAX Utility For details see Basic Operations in the FA...

Страница 169: ... for Paper Cassette 170 Improving Print Copy Scan and Fax Quality 171 Saving Power 182 Installing or Uninstalling Applications Separately 182 Moving and Transporting the Printer 190 Replacing Maintenance Rollers in Paper Cassette 1 192 Replacing Maintenance Rollers in Paper Cassette 2 to 4 197 ...

Страница 170: ...puter For Windows users note that you need to install EPSON Status Monitor 3 to enable this feature You can continue printing while the ink low message is displayed Replace the ink supply units when required Related Information Guide to Windows Printer Driver on page 367 Guide to Mac OS Printer Driver on page 368 It is Time to Replace Ink Supply Units on page 269 It is Time to Replace the Maintena...

Страница 171: ...1 Select Settings on the home screen 2 Select Maintenance Print Quality Adjustment 3 Follow the on screen instructions to check the printer to improve print quality If a message is displayed recommending that you clean the print head perform print head cleaning 4 Follow the on screen instructions to print the patterns for print head alignment and then align the print head This pattern allows you t...

Страница 172: ... consumes ink and should not be performed more than necessary When ink is low you may not be able to clean the print head If print quality has not improved after repeating nozzle check and head cleaning 4 times wait for at least 6 hours without printing and then run the nozzle check again and repeat the head cleaning if necessary We recommend turning off the printer by using the P button If print ...

Страница 173: ...at least 6 hours without printing and then run the nozzle check again and repeat the head cleaning if necessary We recommend turning off the printer by using the P button If print quality has still not improved run Power Cleaning Related Information Running Power Cleaning Control Panel on page 174 Running Power Cleaning The Power Cleaning feature may improve print quality in the following cases Wh...

Страница 174: ...inted pattern If quality still does not improve contact Epson support Related Information Checking and Cleaning the Print Head on page 172 Preventing nozzle clogging Always use the power button when turning the printer on and off Check that the power light is off before you disconnect the power cord The ink itself can dry out if it is not covered Just like placing a cap on a fountain pen or an oil...

Страница 175: ...t Settings on the home screen 3 Select Maintenance Paper Guide Cleaning 4 Select the paper source and then follow the on screen instructions to clean the paper path Note Repeat this procedure until the paper is not smeared with ink If the printouts are still smeared clean the other paper sources Cleaning the Scanner Glass When the copies or scanned images are smeared clean the scanner glass Cautio...

Страница 176: ...ver 2 Take the cleaning cloth from the cleaning cloth holder 3 Use the cleaning cloth to clean the surface of the scanner glass Maintaining the Printer Improving Print Copy Scan and Fax Quality Cleaning the Scanner Glass 176 ...

Страница 177: ... of the glass A damaged glass surface can decrease the scan quality 4 Return the cleaning cloth to the cleaning cloth holder 5 Close the document cover Cleaning the ADF When the copied or scanned images from the ADF are smeared or the originals do not feed in the ADF correctly clean the ADF cImportant Never use alcohol or thinner to clean the printer These chemicals can damage the printer Maintain...

Страница 178: ...oth to clean the roller and the interior of the ADF cImportant Using a dry cloth may damage the surface of the roller Use the ADF after the roller has dried Maintaining the Printer Improving Print Copy Scan and Fax Quality Cleaning the ADF 178 ...

Страница 179: ... ADF cover Press the lever until it clicks 4 Open the document cover 5 Take the cleaning cloth from the cleaning cloth holder Maintaining the Printer Improving Print Copy Scan and Fax Quality Cleaning the ADF 179 ...

Страница 180: ...ss cleaner and a soft cloth to remove it Wipe off all remaining liquid Do not press the glass surface too hard Be careful not to scratch or damage the surface of the glass A damaged glass surface can decrease the scan quality 7 Return the cleaning cloth to the cleaning cloth holder 8 Close the document cover Maintaining the Printer Improving Print Copy Scan and Fax Quality Cleaning the ADF 180 ...

Страница 181: ... type you loaded in the printer 6 Follow the on screen instructions to align the print head This pattern aligns if you see horizontal banding at regular intervals Find and enter the number for the least separated and overlapping pattern Note When you print the paper that can be adjusted the quality select Auto Select plain papers on Paper Type for printer driver so adjustment value is automaticall...

Страница 182: ...ower Off If Inactive or Power Off If Disconnected and then make settings Select Sleep Timer or Power Off Timer and then make settings Related Information Power Off Settings on page 378 Installing or Uninstalling Applications Separately Connect your computer to the network and install the latest version of applications from the website Log in to your computer as an administrator Enter the administr...

Страница 183: ...er operating systems you cannot use Epson Software Updater Download the latest applications from the Epson website Related Information Application for Updating Software and Firmware Epson Software Updater on page 377 Uninstalling Applications on page 186 Checking if a genuine Epson printer driver is installed Windows You can check if a genuine Epson printer driver is installed on your computer by ...

Страница 184: ...P Windows Server 2003 R2 Windows Server 2003 From the File menu select Server Properties Click the Driver tab If your printer name is displayed in the list a genuine Epson printer driver is installed on your computer Related Information Installing the Applications Separately on page 182 Checking if a genuine Epson printer driver is installed Mac OS You can check if a genuine Epson printer driver i...

Страница 185: ...ocess from one of the following options Use the software disc supplied with the printer Insert the software disc into the computer access the following folder path and then run SETUP64 EXE or SETUP EXE Driver PostScript WINX64 or WINX86 SETUP SETUP64 EXE or SETUP EXE Use the website Access your printer page from the following website download the PostScript printer driver and then run the executio...

Страница 186: ...hen select the active connection method to confirm the printer s IP address Adding the Printer for Mac OS Only 1 Select System Preferences from the Apple menu Printers Scanners or Print Scan Print Fax 2 Click and then select Add Other Printer or Scanner 3 Select your printer and then select your printer from the Use 4 Click Add Note If your printer is not listed check that it is correctly connecte...

Страница 187: ...obs Delete or wait to be printed the jobs before uninstalling 6 Uninstall the applications Windows 10 Windows 8 1 Windows 8 Windows 7 Windows Vista Windows Server 2019 Windows Server 2016 Windows Server 2012 R2 Windows Server 2012 Windows Server 2008 R2 Windows Server 2008 Click Uninstall Change or Uninstall Windows XP Windows Server 2003 R2 Windows Server 2003 Click Change Remove or Remove Note I...

Страница 188: ...pplications and firmware 1 Make sure that the printer and the computer are connected and the computer is connected to the internet 2 Start EPSON Software Updater and update the applications or the firmware cImportant Do not turn off the computer or the printer until the update is complete otherwise the printer may malfunction Note If you cannot find the application you want to update in the list y...

Страница 189: ...dating Firmware Using Web Config When the printer can connect to the Internet you can update the firmware from Web Config 1 Access Web Config and select the Device Management tab Firmware Update 2 Click Start and then follow the on screen instructions The firmware confirmation starts and the firmware information is displayed if the updated firmware exists Note You can also update the firmware usin...

Страница 190: ...t more than 10 degrees otherwise the printer may fall Moving the Printer Caution Do not attach the output tray to the ADF as it is unstable If the printer moves unexpectedly while it is being moved you may be injured 1 Turn off the printer by pressing the P button 2 Make sure the power light turns off and then unplug the power cord cImportant Unplug the power cord when the power light is off Other...

Страница 191: ...See Related Information if you are installing any optional items Related Information Moving the Printer While the Printer Stand is Attached on page 328 Moving the Printer While the Paper Cassette Units are Attached on page 336 Transporting the Printer Follow the steps for moving the printer and then pack the printer in its box using the protective materials Maintaining the Printer Moving and Trans...

Страница 192: ...f print quality has declined the next time you print clean and align the print head Related Information Moving the Printer on page 190 Checking and Cleaning the Print Head on page 172 Aligning Ruled Lines on page 174 Replacing Maintenance Rollers in Paper Cassette 1 There are two places for replacing the maintenance rollers on the back of the printer two rollers and on the paper cassette one rolle...

Страница 193: ...e ones for paper cassette 1 If you attach the wrong rollers the printer may not feed the paper Be careful not to stain the surface of the maintenance rollers If dust collects on the surface of the maintenance rollers clean the rollers by using a soft and moist cloth Using a dry cloth may damage the surface of the rollers 3 Pull out paper cassette 1 4 Turn the printer around and open rear cover 1 M...

Страница 194: ...l out rear cover 2 6 Remove the cover inside the back of the printer 7 Slide out the two used maintenance rollers and remove them Maintaining the Printer Replacing Maintenance Rollers in Paper Cassette 1 194 ...

Страница 195: ...k into place Note Insert the maintenance rollers by rolling them so that you can insert them smoothly 9 Reattach the cover inside the back of the printer 10 Insert rear cover 2 Maintaining the Printer Replacing Maintenance Rollers in Paper Cassette 1 195 ...

Страница 196: ... Release the lever of the paper cassette 13 Slide the maintenance roller toward the lever and then remove them by taking the shaft out of the holder Maintaining the Printer Replacing Maintenance Rollers in Paper Cassette 1 196 ...

Страница 197: ...ance Maintenance Roller Information Reset Maintenance Roller Counter and then select the paper cassette in which you replaced the maintenance rollers Related Information Maintenance Rollers Codes on page 365 Replacing Maintenance Rollers in Paper Cassette 2 to 4 There are two places for replacing the maintenance rollers on the back of the printer two rollers and on the paper cassette one roller Ma...

Страница 198: ...the maintenance rollers and make sure the maintenance rollers are the ones for paper cassette 2 to 4 If you attach the wrong rollers the printer may not feed the paper Be careful not to stain the surface of the maintenance rollers If the dust collects on the surface of the maintenance rollers clean the rollers by using a soft and moist cloth Using a dry cloth may damage the surface of the rollers ...

Страница 199: ...lace the rollers 4 Turn the printer around and then open the printer s rear cover 5 Remove the screws by a screwdriver and remove the cover on the rear of inside the printer Maintaining the Printer Replacing Maintenance Rollers in Paper Cassette 2 to 4 199 ...

Страница 200: ...rt two new maintenance rollers until they click into place Note Insert the maintenance rollers by rolling them so that you can insert them smoothly 8 Fasten the screws to reattach the cover Maintaining the Printer Replacing Maintenance Rollers in Paper Cassette 2 to 4 200 ...

Страница 201: ... cover 10 Release the lever 11 Slide the maintenance roller toward the lever and then remove them by taking the shaft out of the holder Maintaining the Printer Replacing Maintenance Rollers in Paper Cassette 2 to 4 201 ...

Страница 202: ...t 13 Lock the lever 14 Insert the paper cassette 15 Turn on the printer select Settings Maintenance Maintenance Roller Information Reset Maintenance Roller Counter and then select the paper cassette in which you replaced the maintenance rollers Related Information Maintenance Rollers Codes on page 365 Maintaining the Printer Replacing Maintenance Rollers in Paper Cassette 2 to 4 202 ...

Страница 203: ...Message is Displayed on the LCD Screen 267 Paper Gets Jammed 268 It is Time to Replace Ink Supply Units 269 It is Time to Replace the Maintenance Box 271 Printing Copying Scanning and Faxing Quality is Poor 272 Cannot Solve Problem After Trying All Solutions 291 ...

Страница 204: ...vent the print head from drying out turn the printer back on and turn it off by pressing the P button Printer Turns Off During Use The overcurrent protection function was activated Solutions Unplug and plug in the power cord and then turn the printer back on If the problem cannot be cleared contact Epson support Power Turns Off Automatically The Power Off Settings or Power Off Timer feature is ena...

Страница 205: ...vailable Paper Types on page 364 Paper handling is inappropriate Solutions Follow paper handling precautions Paper Handling Precautions on page 37 Too many sheets are loaded in the printer Solutions Do not load more than the maximum number of sheets specified for the paper For plain paper do not load above the line indicated by the triangle symbol on the edge guide Available Paper and Capacities o...

Страница 206: ... on page 364 Paper handling is inappropriate Solutions Follow paper handling precautions Paper Handling Precautions on page 37 The paper is loaded incorrectly Solutions Load paper in the correct direction and slide the edge guide against the edge of the paper Loading Paper on page 39 The paper settings on the printer are incorrect Solutions Make sure the paper size and paper type settings match th...

Страница 207: ...utions Load new paper Static electricity is causing sheets of paper to stick to each other Solutions Fan the paper before loading If the paper still does not feed load one sheet of paper at a time Too many sheets are loaded in the printer Solutions Do not load more than the maximum number of sheets specified for the paper For plain paper do not load above the line indicated by the triangle symbol ...

Страница 208: ...stalled correctly Paper Out Error Occurs Paper is not loaded in the center of the paper tray Solutions When a paper out error occurs although paper is loaded in the paper tray reload paper in the center of the paper tray Original Does Not Feed in the ADF The following causes can be considered Originals that are not supported by the ADF are being used Solutions Use originals supported by the ADF AD...

Страница 209: ... are not detected Solutions On the screen for copy or scan or fax check that the ADF icon is on If it is off place the originals again Paper is Not Stacked in Order The lever on the right side of the output tray has not been pulled Solutions If you pull the lever on the right side of the output tray the problem may be improved but the holding capacity will be reduced Solving Problems The Printer D...

Страница 210: ... the connection status for the computer and the printer You need to install EPSON Status Monitor 3 to enable this feature You can download it from the Epson website 1 Access the printer driver Windows 10 Windows Server 2019 Windows Server 2016 Click on the start button and then select Windows System Control Panel View devices and printers in Hardware and Sound Right click on your printer or press ...

Страница 211: ...ce and then printer Move the printer and computer or smart device closer to the wireless router to help with radio wave communication and then try to make network settings again Devices cannot receive signals from the wireless router because they are too far apart Solutions After moving the computer or the smart device and the printer closer to the wireless router turn off the wireless router and ...

Страница 212: ...ubnet mask assigned to the printer Restart the wireless router or reset the network settings for the printer Re setting the Network Connection on page 294 There is a problem with the network settings on the computer Solutions Try accessing any website from your computer to make sure that your computer s network settings are correct If you cannot access any website there is a problem on the compute...

Страница 213: ... on a Web Browser on page 374 7 Select the Network Settings tab Wired LAN 8 Select OFF for IEEE 802 3az 9 Click Next 10 Click OK 11 Remove the Ethernet cable connected to the computer and the printer 12 If you disabled IEEE802 3az for the computer in step 2 enable it 13 Connect the Ethernet cables that you removed in step 1 to the computer and the printer If the problem still occurs devices other ...

Страница 214: ...XXXXX is installed If a genuine Epson printer driver is not installed the available functions are limited We recommend using a genuine Epson printer driver If you are printing a large data size image the computer may run out of memory Print the image at a lower resolution or a smaller size If you have tried all of the solutions and have not solved the problem try uninstalling and then reinstalling...

Страница 215: ...e default printer Solutions Right click the printer icon in Control Panel View devices and printers or Printers Printers and Faxes and click Set as default printer Note If there are multiple printer icons see the following to select the correct printer Example USB connection EPSON XXXX Series Network connection EPSON XXXX Series network If you install the printer driver multiple times copies of th...

Страница 216: ...indows if a large number of jobs are sent the printer may not print Select Print directly to the printer on the Advanced tab in the printer properties Suddenly the Printer Cannot Print over a Network Connection The problem could be one of the following issues The network environment has been changed Solutions When you have changed the network environment such as the wireless router or provider try...

Страница 217: ... a Network Connection Report on page 311 There is a problem with the network settings on the computer Solutions Try accessing any website from your computer to make sure that your computer s network settings are correct If you cannot access any website there is a problem on the computer Check the network connection of the computer See the documentation provided with the computer for details There ...

Страница 218: ...N XXXX Series copy 1 are created right click the copied driver icon and then click Remove Device The printer port is not set correctly Solutions Click Print Queue on the printer driver s Maintenance tab Make sure the printer port is set correctly as shown below in Property Port from the Printer menu USB connection USBXXX Network connection EpsonNet Print Port If you cannot change the port select R...

Страница 219: ...rformed Cannot Print Even Though a Connection has been Established Mac OS on page 222 Cannot connect to a Network The problem could be one of the following issues Something is wrong with the network devices for Wi Fi connection Solutions Turn off the devices you want to connect to the network Wait for about 10 seconds and then turn on the devices in the following order wireless router computer or ...

Страница 220: ...d the computer or smart device even if they are connected to the same network disable the privacy separator on the wireless router See the manual provided with the wireless router for details The IP address is incorrectly assigned Solutions If the IP address assigned to the printer is 169 254 XXX XXX and the subnet mask is 255 255 0 0 the IP address may not be assigned correctly Select Settings Ge...

Страница 221: ...rnet the following problems may occur depending on the hub or router that you are using Connection becomes unstable the printer is connected and disconnected again and again Cannot connect to the printer The communication speed becomes slow Follow the steps below to disable IEEE802 3az for the printer and then connect 1 Remove the Ethernet cable connected to the computer and the printer 2 When IEE...

Страница 222: ...the USB cable The printer is connected to a SuperSpeed USB port Solutions If you connect the printer to a SuperSpeed USB port using a USB 2 0 cable a communication error may occur on some computers In this case re connect the printer using one of the following methods Use a USB 3 0 cable Connect to a Hi Speed USB port on the computer Connect to a SuperSpeed USB port other than the port that genera...

Страница 223: ...inistrator Printer Does Not Print While Using PostScript Printer Driver Mac OS The Printing Language setting needs to be changed Solutions Set the Printing Language setting to Auto or PS on the control panel Suddenly the Printer Cannot Print over a Network Connection The problem could be one of the following issues The network environment has been changed Solutions When you have changed the networ...

Страница 224: ...on of the computer See the documentation provided with the computer for details Cannot Print from Smart Device Make sure the smart device and the printer are connected correctly The cause and solution to the problem differ depending on whether or not they are connected Checking the Connection Status Use Epson iPrint to check the connection status for the smart device and the printer See the follow...

Страница 225: ...uter or smart device closer to the wireless router to help with radio wave communication and then try to make network settings again Devices cannot receive signals from the wireless router because they are too far apart Solutions After moving the computer or the smart device and the printer closer to the wireless router turn off the wireless router and then turn it back on When changing the wirele...

Страница 226: ...ngs Network Settings Advanced on the printer s control panel and then check the IP address and the subnet mask assigned to the printer Restart the wireless router or reset the network settings for the printer Re setting the Network Connection on page 294 There is a problem with the network settings on the smart device Solutions Try accessing any website from your smart device to make sure that you...

Страница 227: ...94 Something is wrong with the network devices for Wi Fi connection Solutions Turn off the devices you want to connect to the network Wait for about 10 seconds and then turn on the devices in the following order wireless router computer or smart device and then printer Move the printer and computer or smart device closer to the wireless router to help with radio wave communication and then try to ...

Страница 228: ...n select Windows System Control Panel View devices and printers in Hardware and Sound Right click on your printer or press and hold it and then select Printing preferences Windows 8 1 Windows 8 Windows Server 2012 R2 Windows Server 2012 Select Desktop Settings Control Panel View devices and printers in Hardware and Sound Right click on your printer or press and hold it and then select Printing pre...

Страница 229: ...rk settings again Devices cannot receive signals from the wireless router because they are too far apart Solutions After moving the computer or the smart device and the printer closer to the wireless router turn off the wireless router and then turn it back on When changing the wireless router the settings do not match the new router Solutions Make the connection settings again so that they match ...

Страница 230: ...t mask assigned to the printer Restart the wireless router or reset the network settings for the printer Re setting the Network Connection on page 294 There is a problem with the network settings on the computer Solutions Try accessing any website from your computer to make sure that your computer s network settings are correct If you cannot access any website there is a problem on the computer Ch...

Страница 231: ...onfig on a Web Browser on page 374 7 Select the Network Settings tab Wired LAN 8 Select OFF for IEEE 802 3az 9 Click Next 10 Click OK 11 Remove the Ethernet cable connected to the computer and the printer 12 If you disabled IEEE802 3az for the computer in step 2 enable it 13 Connect the Ethernet cables that you removed in step 1 to the computer and the printer If the problem still occurs devices o...

Страница 232: ...ending on whether or not they are connected Checking the Connection Status Use EPSON Status Monitor to check the connection status for the computer and the printer 1 Select System Preferences from the Apple menu Printers Scanners or Print Scan Print Fax and then select the printer 2 Click Options Supplies Utility Open Printer Utility 3 Click EPSON Status Monitor When the remaining ink levels are d...

Страница 233: ...because they are too far apart Solutions After moving the computer or the smart device and the printer closer to the wireless router turn off the wireless router and then turn it back on When changing the wireless router the settings do not match the new router Solutions Make the connection settings again so that they match the new wireless router When Replacing the Wireless Router on page 294 The...

Страница 234: ... the subnet mask assigned to the printer Restart the wireless router or reset the network settings for the printer Re setting the Network Connection on page 294 There is a problem with the network settings on the computer Solutions Try accessing any website from your computer to make sure that your computer s network settings are correct If you cannot access any website there is a problem on the c...

Страница 235: ...ter is enabled disable it See the documentation provided with the computer for details 3 Connect the computer and the printer with an Ethernet cable directly 4 On the printer print a network connection report Printing a Network Connection Report on page 311 5 Check the printer s IP address on the network connection report 6 On the computer access Web Config Launch a Web browser and then enter the ...

Страница 236: ...USB port other than the port that generated the communication error Cannot Scan Even Though a Connection has been Correctly Established Mac OS Scanning at a high resolution over a network Try scanning at a lower resolution Cannot Start Scanning from Smart Device Make sure the smart device and the printer are connected correctly The cause and solution to the problem differ depending on whether or n...

Страница 237: ...evices you want to connect to the network Wait for about 10 seconds and then turn on the devices in the following order wireless router computer or smart device and then printer Move the printer and computer or smart device closer to the wireless router to help with radio wave communication and then try to make network settings again Devices cannot receive signals from the wireless router because ...

Страница 238: ...router for details The IP address is incorrectly assigned Solutions If the IP address assigned to the printer is 169 254 XXX XXX and the subnet mask is 255 255 0 0 the IP address may not be assigned correctly Select Settings General Settings Network Settings Advanced on the printer s control panel and then check the IP address and the subnet mask assigned to the printer Restart the wireless router...

Страница 239: ... about the DNS settings The computer name and the IP address may differ when the management table of the DNS server is not updated Contact your DNS server administrator Authentication error Check the authentication method authenticated account and authenticated password Make sure the user name and the password are correct on the computer and the contacts on the printer Also make sure that the pass...

Страница 240: ...lder The file name is already in use Rename the file and scan again Writing the file Write a new file Scanned file s are too large Only XX page s have been sent Check if the destination has enough space Saving the Scanned Images Takes a Long Time It takes a long time for the name resolution to correspond to the Domain Name and the IP Address Solutions Check the following points Make sure the DNS s...

Страница 241: ... jack to see if the printer can send a fax If it works the problem may be caused by the DSL filter Contact your DSL provider Cannot Send Faxes The following causes can be considered The connection line is set to PSTN in a facility where a private branch exchange PBX is being used Solutions Select PBX in Settings General Settings Fax Settings Basic Settings Line Type on the control panel Sending fa...

Страница 242: ...hine is not capable of receiving faxes using the subaddress feature Solutions When sending faxes using the subaddress feature ask the recipient if their fax machine is capable of receiving faxes using the subaddress feature The subaddress and password are wrong Solutions When sending faxes using the subaddress feature check that the subaddress and password are correct Check with the recipient that...

Страница 243: ...t to Manual while an external phone device is connected to the printer Solutions If an external phone device is connected to the printer and is sharing a phone line with the printer select Settings General Settings Fax Settings Basic Settings and then set Receive Mode to Auto The available memory of the inbox and the confidential box is not enough Solutions 200 received documents have been saved i...

Страница 244: ...eader information are blocked when this setting is enabled Cannot Receive Faxes When Optional Fax Boards Installed Sender attempted to send a fax to a line port set to Sending Only Solutions Tell the sender the fax number for the line port for which Transmission Setting By Line is set to Sending and Receiving or Receiving Only You can access Transmission Setting By Line by selecting Settings Gener...

Страница 245: ...s not enough free space in the device Solutions Delete unnecessary data from the device to increase the amount of free space Or connect another device that has enough free space The memory device is write protected Solutions Disable write protection on the memory device Faxes Are Sent at the Wrong Size The following causes can be considered The recipient s fax machine does not support A3 size Solu...

Страница 246: ... that contains A3 paper has been set to A3 and that the paper source is set for use with the fax feature Select Settings General Settings Printer Settings Paper Source Settings Auto Select Settings Fax and then check the enabled paper source s A3 is not selected in Receiving Paper Size Solutions Select Settings General Settings Fax Settings Basic Settings Receiving Paper Size and then check that A...

Страница 247: ...ct Control Panel View devices and printers in Hardware and Sound Right click on your printer and select Printing preferences 2 Click the Maintenance tab 3 Click EPSON Status Monitor 3 When the remaining ink levels are displayed a connection has been successfully established between the computer and the printer Check the following if a connection has not been established The printer is not recogniz...

Страница 248: ...er When Replacing the Wireless Router on page 294 The SSIDs connected from the computer or smart device and computer are different Solutions When you are using multiple wireless routers at the same time or the wireless router has multiple SSIDs and devices are connected to different SSIDs you cannot connect to the wireless router Connect the computer or smart device to the same SSID as the printer...

Страница 249: ...r has been connected by Ethernet using devices that support IEEE802 3az Energy Efficient Ethernet Solutions When you connect the printer by Ethernet using devices that support IEEE802 3az Energy Efficient Ethernet the following problems may occur depending on the hub or router that you are using Connection becomes unstable the printer is connected and disconnected again and again Cannot connect to...

Страница 250: ...ub Solutions If you are using a USB hub try to connect the printer directly to the computer There is a problem with the USB cable or the USB inlet Solutions If the USB cable cannot be recognized change the port or change the USB cable The printer is connected to a SuperSpeed USB port Solutions If you connect the printer to a SuperSpeed USB port using a USB 2 0 cable a communication error may occur...

Страница 251: ...ontrol Panel Printers in Hardware and Sound Windows XP Click the start button and select Settings Control Panel Printers and Other Hardware Printers and Faxes User authentication failed when a fax is sent from a computer Solutions Set the user name and password in the printer driver When sending a fax from a computer when the security function that restrict users from using the printer s fax funct...

Страница 252: ... is wrong with the network devices for Wi Fi connection Solutions Turn off the devices you want to connect to the network Wait for about 10 seconds and then turn on the devices in the following order wireless router computer or smart device and then printer Move the printer and computer or smart device closer to the wireless router to help with radio wave communication and then try to make network...

Страница 253: ...reless router for details The IP address is incorrectly assigned Solutions If the IP address assigned to the printer is 169 254 XXX XXX and the subnet mask is 255 255 0 0 the IP address may not be assigned correctly Select Settings General Settings Network Settings Advanced on the printer s control panel and then check the IP address and the subnet mask assigned to the printer Restart the wireless...

Страница 254: ...puter and the printer with an Ethernet cable directly 4 On the printer print a network connection report Printing a Network Connection Report on page 311 5 Check the printer s IP address on the network connection report 6 On the computer access Web Config Launch a Web browser and then enter the printer s IP address Running Web Config on a Web Browser on page 374 7 Select the Network Settings tab W...

Страница 255: ...considered The software is not installed Solutions Make sure that the PC FAX driver have been installed on the computer The PC FAX driver is installed with FAX Utility Follow the steps below to check if it is installed Select System Preferences from the Apple menu Printers Scanners or Print Scan Print Fax and then make sure the printer fax is displayed The printer fax is displayed as FAX XXXX USB ...

Страница 256: ...int job 102 Collated printing has failed due to a lack of available memory Select Settings General Settings System Administration Clear Internal Memory Data PDL Font Macro and Working Area and then clear the fonts and the macros that you have downloaded Try the methods below to reduce the size of the print job If you do not want to use these methods try printing one copy at a time Lower the print ...

Страница 257: ...ed when the printer was turned off 109 The received fax was already deleted 110 The job was printed on one side only because the paper loaded does not support double sided printing If you want to perform 2 sided printing load paper that supports 2 sided printing 111 Available memory is running low Try the methods below to reduce the size of the print job Lower the print quality and the resolution ...

Страница 258: ...you can resend a fax from Job Status in Job Status 301 There is not enough storage space available to save the data in the memory device Increase the storage space in the memory device Reduce the number of documents Lower the scanning resolution or increase the compression ratio to reduce the size of the scanned image 302 The memory device is write protected Disable write protection on the memory ...

Страница 259: ...has occurred Make sure that the signing certificate setting is correct Make sure that the printer s time setting is correct 321 A DNS error has occurred Select Settings General Settings Network Settings Advanced TCP IP and then check the DNS settings Check the DNS settings for the server the computer or the access point 322 An authentication error has occurred Check the Location settings 323 A com...

Страница 260: ...rinter is connected to the network Make sure that Document Capture Pro is installed on the computer 350 An FTPS HTTPS certificate error has occurred Make sure that the date time and time difference settings are correct Run Web Config and then update the root certificate Run Web Config and then import or update the CA certificate If the error cannot be cleared set the certificate verification to of...

Страница 261: ...int 422 An authentication error has occurred Select Settings General Settings Fax Settings Receive Settings Save Forward Settings and then check the settings of the folder selected in Save Forward Destination 423 A communication error has occurred Print a network connection report to check if the printer is connected to the network Select Settings General Settings Fax Settings Receive Settings Sav...

Страница 262: ...s or Driver Select On as the Bidirectional Printing setting Quiet Mode is enabled Solutions Disable Quiet Mode The printing speed slows down when the printer is running in Quiet Mode Control panel Select on the home screen and then select Off Windows Select Off as the Quiet Mode setting on the printer driver s More Options tab Mac OS Select System Preferences from the Apple menu Printers Scanners ...

Страница 263: ...nning Speed Is Slow Scanning at a high resolution Solutions Try scanning at a lower resolution LCD Screen Gets Dark The printer is in sleep mode Solutions Tap anywhere on the LCD screen to return it to its former state Touch Screen Does Not Respond The following causes can be considered A protective sheet has been stuck on the touch screen Solutions If you stick a protective sheet on the touch scr...

Страница 264: ...e covers of the printer are open Solutions Close the covers if you have opened them during printing Memory Device Is not Recognized The memory device is set to disabled Solutions On the control panel select Settings General Settings Printer Settings Memory Device Interface and the enable the memory device Cannot Save Data to a Memory Device The following causes can be considered The memory device ...

Страница 265: ...e power is left off for a long time the clock may show the wrong time Set the date and the time correctly in Settings General Settings Basic Settings Date Time Settings on the control panel The Root Certificate Needs to be Updated The root certificate has expired Solutions Run Web Config and then update the root certificate Cannot Cancel Printing from a Computer Running Mac OS X v10 6 8 There is a...

Страница 266: ...onnected Telephone The phone cable is not connected correctly Solutions Connect the telephone to the EXT port on the printer and pick up the receiver If you cannot hear a dial tone through the receiver connect the phone cable correctly Answering Machine Cannot Answer Voice Calls The printer s Rings to Answer setting is set to less than the number of rings for your answering machine Solutions Selec...

Страница 267: ... cassette units uninstall them by following the reverse steps to installation Unsupported Paper Cassette Units have been installed Turn the power off and uninstall For details see your documentation Unsupported paper cassette units have been installed Uninstall them by following the reverse steps to installation Cannot print because XX is out of order You can print from another cassette Turn the p...

Страница 268: ...ory device to the printer The combination of the IP address and the subnet mask is invalid See your documentation for more details Enter the correct IP address or default gateway Contact your network administrator for assistance To use cloud services update the root certificate from the Epson Web Config utility Run Web Config and then update the root certificate Check that the printer driver is in...

Страница 269: ... Paper Handling Precautions on page 37 Load paper in the correct direction and slide the edge guide against the edge of the paper Loading Paper on page 39 Do not load more than the maximum number of sheets specified for paper Load one sheet of paper at a time if you have loaded several sheets of paper Make sure the paper size and paper type settings match the actual paper size and paper type loade...

Страница 270: ...ly units This printer uses ink supply units equipped with a green chip that monitors information such as the amount of remaining ink for each ink supply unit This means that even if the ink supply unit is removed from the printer before it is expended you can still use the ink supply unit after reinserting it back into the printer To ensure you receive premium print quality and to help protect you...

Страница 271: ... printing Do not remove the film on the top of the box otherwise ink may leak Do not tilt the used maintenance box until after it is sealed in the plastic bag otherwise ink may leak Keep the maintenance box out of direct sunlight Do not replace the maintenance box during printing otherwise ink may leak Do not reuse a maintenance box which has been removed and left detached for a long period Ink in...

Страница 272: ...y is Poor Print Quality is Poor Color Missing Banding or Unexpected Colors Appear in Printout The print head nozzles may be clogged Solutions Use the Print Quality Adjustment feature If you have not used the printer for a long time the print head nozzles may be clogged and ink drops may not be discharged Adjusting the Print Quality on page 171 Colored Banding Appears at Intervals of Approximately ...

Страница 273: ...ity on the Advanced tab in print settings Windows Select High from Quality on the printer driver s Main tab Mac OS Select Fine as Print Quality from the print dialog s Print Settings menu Blurry Prints Vertical Banding or Misalignment The following causes can be considered The print head position is out of alignment Solutions Align the print head using the Print Quality Adjustment feature Adjustin...

Страница 274: ...ect Off as the Bidirectional Printing setting Printouts are Blank or Only Some Lines are Printed The print head nozzles may be clogged Solutions Try Power Cleaning Running Power Cleaning on page 173 The print settings and the paper size loaded in the printer are different Solutions Change the print settings according to the paper size loaded in the paper cassette Load paper in the paper cassette t...

Страница 275: ...hen printing on thick paper the print head is close to the printing surface and the paper may be scuffed In this case enable the reduce scuff setting If you enable this setting print quality may decline or printing may slow down Control panel Select Settings General Settings Printer Settings and then enable Thick Paper Windows Click Extended Settings on the printer driver s Maintenance tab and the...

Страница 276: ... on 2 Sides on page 83 Printed Photos are Sticky The print was made on the wrong side of the photo paper Solutions Make sure you are printing on the printable side When printing on the wrong side of the photo paper you need to clean the paper path Cleaning the Paper Path for Ink Smears on page 175 Images or Photos are Printed in Unexpected Colors The following causes can be considered The print he...

Страница 277: ...ot work use any color correction method other than PhotoEnhance in Color Management JPEG Settings on page 96 Adjusting the Print Color on page 72 The Position Size or Margins of the Printout Are Incorrect The following causes can be considered The paper is loaded incorrectly Solutions Load paper in the correct direction and slide the edge guide against the edge of the paper Loading Paper on page 3...

Страница 278: ...he Hibernate mode or the Sleep mode while printing Pages of garbled text may be printed next time you start the computer You are using the printer driver for a different printer Solutions Make sure that the printer driver you are using is for this printer Check the printer name on the top of the printer driver window The Printed Image Is Inverted The image is set to invert horizontally in the prin...

Страница 279: ...r Does Not Print Correctly While Using PostScript Printer Driver The following causes can be considered There is a problem with the data Solutions If the file is created in an application that allows you to change the data format such as Adobe Photoshop make sure that the settings in the application match the settings in the printer driver EPS files made in binary format may not be printed correct...

Страница 280: ...Print Quality Adjustment feature If you have not used the printer for a long time the print head nozzles may be clogged and ink drops may not be discharged Adjusting the Print Quality on page 171 Colored Banding Appears at Intervals of Approximately 3 3 cm The following causes can be considered The paper type setting does not match the paper loaded Solutions Select the appropriate paper type setti...

Страница 281: ...gh speed printing the print head prints while moving in both directions and vertical lines may be misaligned Disabling this setting may slow down printing speed but improve print quality Select Settings General Settings Printer Settings and then disable Bidirectional on the control panel The originals are folded or wrinkled Solutions When using the ADF Do not place the originals on in ADF Place th...

Страница 282: ...o the printer at the same time Solutions See the following to prevent multiple sheets of paper being fed into the printer at the same time Several Sheets of Paper are Fed at a Time on page 207 Paper Is Smeared or Scuffed The following causes can be considered Paper is loaded incorrectly Solutions When horizontal banding perpendicular to the printing direction appears or the top or bottom of the pa...

Страница 283: ...r on the control panel If you enable this setting copy quality may decline or may slow down The Position Size or Margins of the Copies are Incorrect The following causes can be considered The paper is loaded incorrectly Solutions Load paper in the correct direction and slide the edge guide against the edge of the paper Loading Paper on page 39 The originals are not placed correctly Solutions Make ...

Страница 284: ...iate paper size setting Uneven Colors Smears Dots or Straight Lines Appear in the Copied Image The following causes can be considered The paper path is dirty Solutions Load and eject paper without printing to clean the paper path Cleaning the Paper Path for Ink Smears on page 175 There is dust or dirt on the originals or the scanner glass Solutions Remove any dust or dirt that adheres to the origi...

Страница 285: ... as a magazine or a catalog a dotted moiré pattern appears Solutions Change the reduce and enlarge setting If a moiré pattern still appears place the original at a slightly different angle Basic Menu Options for Copying on page 106 An Image of the Reverse Side of the Original Appears in the Copied Image The following causes can be considered When scanning thin originals images on the back may be s...

Страница 286: ... glass Cleaning the Scanner Glass on page 175 The original was pressed with too much force Solutions If you press with too much force blurring smudges and spots may occur Do not press with too much force on the original or the document cover Placing Originals on page 43 Straight Lines Appear when Scanning from ADF There is dust or dirt on the ADF or originals Solutions Clean the ADF and remove any...

Страница 287: ...e edge of the scanner glass Placing Originals on page 43 There is dust or dirt on the scanner glass Solutions When scanning from the control panel and selecting auto scan area cropping function remove any trash or dirt from the scanner glass and document cover If there is any trash or dirt around the original the scanning range expands to include it Cannot Solve Problems in the Scanned Image Check...

Страница 288: ...e install Epson Scan 2 Installing or Uninstalling Applications Separately on page 182 The Quality of the Sent Fax is Poor Quality of the Sent Fax is Poor The following causes can be considered There is dust or dirt on the originals or the scanner glass Solutions Remove any dust or dirt that adheres to the originals and clean the scanner glass Cleaning the Scanner Glass on page 175 The original was...

Страница 289: ... of the sender s fax machine set the following before sending a fax Select Fax Fax Settings and then make the Resolution setting to set the highest quality image Select Fax Fax Settings and then enable Direct Send Note that if you set Resolution to Super Fine or Ultra Fine but you send the fax without enabling Direct Send the fax may be sent at a lower resolution ECM setting is disabled Solutions ...

Страница 290: ...setting Received Fax Quality is Poor The Image Quality of Received Faxes is Poor The following causes can be considered ECM setting is disabled Solutions Select Settings General Settings Fax Settings Basic Settings and enable the ECM setting on the control panel This may clear errors that occur due to connection problems Note that the speed of sending and receiving faxes may be slower than when EC...

Страница 291: ...hen the ink supply unit is reinstalled a message asking you to replace the ink supply unit may be displayed depending on the amount of ink remaining Use the Print Quality Adjustment feature Adjusting the Print Quality on page 171 Check that you are using genuine Epson ink supply units Try to use genuine Epson ink supply units This product is designed to adjust colors based on the use of genuine Ep...

Страница 292: ...puter or Devices Connecting to a Printer that has been Connected to the Network 293 Re setting the Network Connection 294 Connecting a Smart Device and Printer Directly Wi Fi Direct 300 Checking the Network Connection Status 310 ...

Страница 293: ...ollowing website and then enter the product name Go to Setup and then start setting up https epson sn Setting up using the software disc only for the models that come with a software disc and users with Windows computers with disc drives Insert the software disc into the computer and then follow the on screen instructions Selecting the Printer Follow the on screen instructions until the following ...

Страница 294: ...n you replace the wireless router make settings for the connection between the computer or the smart device and the printer You need to make these settings if you change your Internet service provider and so on Making Settings for Connecting to the Computer We recommend using the installer to connect the printer to a computer You can run the installer using one of the following methods Setting up ...

Страница 295: ...mart device To use the printer from a smart device set up from the following website Access to the website from the smart device that you want to connect to the printer http epson sn Setup When Changing the Computer When changing the computer make connection settings between the computer and the printer Making Settings for Connecting to the Computer We recommend using the installer to connect the ...

Страница 296: ...etwork Connection from Wi Fi to Ethernet Follow the steps below to change from a Wi Fi connection to an Ethernet connection 1 Select Settings on the home screen 2 Select General Settings Network Settings Wired LAN Setup 3 Follow the on screen instructions Changing from USB to a Network Connection Using the installer and re set up in a different connection method Setting up from the website Access ...

Страница 297: ...ct Your Operation screen and then click Next Select the network connection that you want to use Connect via wireless network Wi Fi or Connect via wired LAN Ethernet and then click Next Follow the on screen instructions Adding or Replacing the Computer or Devices Re setting the Network Connection Changing t 297 ...

Страница 298: ...network by entering the information necessary to connect to a wireless router from the printer s control panel To set up using this method you need the SSID and password for a wireless router Note If you are using an wireless router with its default settings the SSID and password are on the label If you do not know the SSID and password contact the person who set up the wireless router or see the ...

Страница 299: ... set up by using this method The wireless router is compatible with WPS Wi Fi Protected Setup The current Wi Fi connection was established by pressing a button on the wireless router Note If you cannot find the button or you are setting up using the software see the documentation provided with the wireless router 1 Tap on the home screen 2 Select Router 3 Tap Start Setup If the network connection ...

Страница 300: ...tus for the printer after setup is complete see the related information link below for details Note See the documentation provided with your wireless router for details on entering a PIN code Related Information Checking the Network Connection Status on page 310 Connecting a Smart Device and Printer Directly Wi Fi Direct Wi Fi Direct Simple AP allows you to connect a smart device directly to the p...

Страница 301: ...ditions are required to use this function If your environment does not match these conditions you can connect by selecting Other OS Devices See the related information link below for details on connecting iOS 11 or later Using the standard camera application to scan the QR code Epson iPrint version 7 0 or later Epson printing app such as Epson iPrint is used to print from a smart device Install Ep...

Страница 302: ...e Use the Camera app for iOS 11 or later You cannot connect to the printer using the Camera app for iOS 10 or earlier Also you cannot connect using an app for scanning QR codes If you cannot connect select Other Methods on the printer s control panel See the related information link below for details on connecting Adding or Replacing the Computer or Devices Connecting a Smart Device and Printer Di...

Страница 303: ...anel select Next 9 On the iPhone iPad or iPod touch start Epson printing app Examples of Epson printing apps 10 On the Epson printing app screen tap Printer is not selected 11 Select the printer that you want to connect to Adding or Replacing the Computer or Devices Connecting a Smart Device and Printer Directly Wi 303 ...

Страница 304: ...s method allows you to connect the printer directly to your Android device without a wireless router The following conditions are required to use this function Android 4 4 or later Epson iPrint version 7 0 or later Epson iPrint is used to print from a smart device Install Epson iPrint on the smart device in advance Note You only need to make these settings for the printer and the smart device that...

Страница 305: ...oid device If printers are not displayed connect by selecting Other OS Devices See the related information link below for connecting 8 When the device connection approval screen is displayed select Approve 9 On the printer s control panel select Complete For smart devices that have been connected to the printer before select the network name SSID on the smart device s Wi Fi screen to connect them ...

Страница 306: ...ut a wireless router Note You only need to make these settings for the printer and the smart device that you want to connect to once Unless you disable Wi Fi Direct or restore the network settings to their defaults you do not need to make these settings again 1 Tap on the home screen 2 Tap Wi Fi Direct 3 Tap Start Setup 4 Tap Other OS Devices The Network Name SSID and Password for Wi Fi Direct for...

Страница 307: ... screen select the SSID shown on the printer s control panel and then enter the password 6 On the printer s control panel select Next Adding or Replacing the Computer or Devices Connecting a Smart Device and Printer Directly Wi 307 ...

Страница 308: ...r s control panel to select the printer 10 On the printer s control panel select Complete For smart devices that have been connected to the printer before select the network name SSID on the smart device s Wi Fi screen to connect them again Related Information Application for Printing Easily from a Smart Device Epson iPrint on page 370 Adding or Replacing the Computer or Devices Connecting a Smart...

Страница 309: ... menu items are displayed Change Network Name Change the Wi Fi Direct simple AP network name SSID used for connecting to the printer to your arbitrary name You can set the network name SSID in ASCII characters that is displayed on the software keyboard on the control panel You can enter up to 22 characters When changing the network name SSID all connected devices are disconnected Use the new netwo...

Страница 310: ... the region this setting may not be displayed Restoring the Wi Fi Direct simple AP settings Checking the Network Connection Status You can check the network connection status in the following way Related Information Checking the Network Connection Status from the Control Panel on page 310 Printing a Network Connection Report on page 311 Checking the Network Connection Status from the Control Panel...

Страница 311: ...and so on for Wi Fi Direct connections Email Server Status Displays the network information for email server Print Status Sheet Prints a network status sheet The information for Ethernet Wi Fi Wi Fi Direct and so on is printed on two or more pages Printing a Network Connection Report You can print a network connection report to check the status between the printer and the wireless router 1 Select ...

Страница 312: ... Messages on the Network Environment Related Information E 1 on page 313 E 2 E 3 E 7 on page 313 E 5 on page 314 E 6 on page 314 E 8 on page 314 E 9 on page 315 E 10 on page 315 E 11 on page 315 E 12 on page 316 E 13 on page 316 Message on the Network Environment on page 317 Adding or Replacing the Computer or Devices Checking the Network Connection Status Printi 312 ...

Страница 313: ... Makes sure your SSID uses only ASCII characters alphanumeric characters and symbols The printer cannot display an SSID that contains non ASCII characters Makes sure you know your SSID and password before connecting to the wireless router If you are using a wireless router with its default settings the SSID and password are located on a label on the wireless router If you do not know your SSID and...

Страница 314: ...eless router is using shared authentication with WEP security make sure the authentication key and index are correct If the number of connectable devices on the wireless router is less than the number of network devices that you want to connect make settings on the wireless router to increase the number of connectable devices See the documentation provided with the wireless router to make settings...

Страница 315: ...heck the IP address subnet mask and default gateway from the Network Status part on the network connection report If DHCP is enabled change the printer s Obtain IP Address setting to Auto If you want to set the IP address manually check the printer s IP address from the Network Status part on the network connection report and then select Manual on the network settings screen Set the subnet mask to...

Страница 316: ...ted Information Network Settings on page 384 Making Settings for Connecting to the Computer on page 295 E 13 Solutions Check the following Network devices such as a wireless router hub and router are turned on The TCP IP Setup for network devices has not been set up manually If the printer s TCP IP Setup is set automatically while the TCP IP Setup for other network devices is performed manually th...

Страница 317: ... to the other network first You can confirm the number of wireless devices which can be connected simultaneously and the number of connected devices by checking the network status sheet or the printer s control panel The same SSID as Wi Fi Direct exists in the environment Change the Wi Fi Direct SSID if you cannot connect a smart device to the printer On the printer s control panel go to Wi Fi Dir...

Страница 318: ...re multiple DHCP servers on the same network you can find out the actual address assigned to the computer the referred DNS server etc Format ipconfig all Examples pathping command You can confirm the list of routers passing through the destination host and the routing of communication Format pathping xxx xxx xxx xxx Examples pathping 192 0 2 222 Adding or Replacing the Computer or Devices Checking...

Страница 319: ...Using Optional Items List of Optional Items 320 Printer Stand 322 Paper Cassette Unit 329 Manual Stapler 337 Fax Board Super G3 G3 Multi Fax Board 340 Ethernet Board 10 100 1000 Base T Ethernet 346 ...

Страница 320: ...g the paper you want to staple Manual Stapler on page 337 B Optional Cassette Unit C12C932611 C12C932621 For users in India Bangladesh Sri Lanka Allows you to load up to 500 sheets of plain paper 64 to 90 g m2 Paper Cassette Unit on page 329 C Printer Stand C12C934321 C12C934331 For users in India Use the printer stand whenever you install the printer on the floor otherwise the printer may fall Pr...

Страница 321: ...12C934501 For users in India C12C935691 For users in Taiwan You can add up to 2 lines You can use it as a fax or use it as a network fax to send and receive documents on your computer In addition you can connect to multiple phone lines by adding a fax board This allows you to send to a number of destinations in a short time or you can dedicate one line to receiving faxes thereby reducing the time ...

Страница 322: ...n Lifting the printer while it is unstable may result in injury Because this printer is heavy it should always be carried by four or more people when unpacking and transporting Because this printer stand is heavy it should always be carried by two or more people when unpacking and transporting Installing the Printer Stand The printer stand can be attached to the printer and the paper cassette unit...

Страница 323: ...lifting the printer place your hands in the positions shown below If you lift the printer holding other positions the printer may fall or you may trap your fingers when placing the printer 1 Turn off the printer by pressing the P button and then unplug the power cord 2 Disconnect any connected cables Note if the paper cassette unit has been installed uninstall it as well 3 Remove the output tray 4...

Страница 324: ...lustration 6 Place the stands inside the printer stand s casters 7 Secure the stands with the attachments and screws cImportant Make absolutely sure both stands are attached securely otherwise the printer may fall Using Optional Items Printer Stand Installing the Printer Stand 324 ...

Страница 325: ...cing bars with the attachments and screws 9 Place the printer stand on a flat surface and lock the casters at the front 10 Seucre the cover to the stands Using Optional Items Printer Stand Installing the Printer Stand 325 ...

Страница 326: ...er cassette 12 Lower the printer or a paper cassette unit gently onto the printer stand aligning the corners and then secure them with the screws Note Some screws will be left over after assembly Using Optional Items Printer Stand Installing the Printer Stand 326 ...

Страница 327: ...ssette unit at the back with the attachments and screws 14 Insert the paper cassette 15 Insert the output tray 16 Remove the seals and install the clamps as shown below Using Optional Items Printer Stand Installing the Printer Stand 327 ...

Страница 328: ...in reverse Related Information List of Optional Items on page 320 Wiring Codes with Clamps on page 322 Moving the Printer While the Printer Stand is Attached Before moving the printer uninstall the printer stand Complete the steps for moving the printer and then perform the steps in the following images Using Optional Items Printer Stand Moving the Printer While the Printer Stand is Attached 328 ...

Страница 329: ...he power cord from the printer and disconnect any cables before starting installation Otherwise the power cord may be damaged resulting in fire or electric shock When lifting the printer place your hands in the positions shown below If you lift the printer holding other positions the printer may fall or you may trap your fingers when placing the printer cImportant If you are using the printer stan...

Страница 330: ...them as well 3 Remove the output tray 4 Remove the paper cassette unit from its box and then remove any protective materials 5 Check the items supplied 6 Place the paper cassette unit where you want to set up the printer Using Optional Items Paper Cassette Unit Installing the Paper Cassette Units 330 ...

Страница 331: ...ack ink and the paper cassette 8 If you use multiple paper cassette units stack all paper cassette units on top of each other and then secure them with the screws Using Optional Items Paper Cassette Unit Installing the Paper Cassette Units 331 ...

Страница 332: ... corners and then secure them with the screws Note Some screws will be left over after assembly 10 Secure the paper cassette unit and the printer at the back with the attachments and screws Using Optional Items Paper Cassette Unit Installing the Paper Cassette Units 332 ...

Страница 333: ...to be loaded in the cassette into the holder 12 Insert the ink supply unit tray for black ink and the paper cassette 13 Place the sticker indicating the cassette number Using Optional Items Paper Cassette Unit Installing the Paper Cassette Units 333 ...

Страница 334: ...ation List of Optional Items on page 320 Installing the Printer Stand on page 322 Wiring Codes with Clamps on page 322 Setting the Paper Cassette Unit in the Printer Driver To use the installed paper cassette unit the printer driver needs to acquire the necessary information Setting the Paper Cassette Unit in the Printer Driver Windows Note Log on to your computer as an administrator 1 Open the pr...

Страница 335: ...nters and Other Hardware Printers and Faxes 2 Right click on your printer or press and hold it select Printer properties or Property and then click the Optional Settings tab 3 Select Acquire from Printer and then click Get Optional Paper Sources information is displayed in Current Printer Information 4 Click OK Setting the Paper Cassette Unit in the Printer Driver Mac OS 1 Select System Preference...

Страница 336: ...e Unit Paper Does Not Feed from the Paper Cassette Units If you have added paper cassette units you need to make settings in the printer driver Related Information Setting the Paper Cassette Unit in the Printer Driver on page 334 Paper Cassette Unit Specifications Supported Paper Type Plain Paper Recycled Paper Thick Paper Size A5 to A3 Weight of Paper 64 to 200g m2 Capacity Maximum 500 Sheets Usi...

Страница 337: ...22 3 in Depth 568 mm 22 4 in Height 160 mm 6 3in When installing 128 mm 5 0in Weight Approx 11 7 kg 25 8 lb Related Information Installation Location and Space on page 418 Manual Stapler Using Optional Items Manual Stapler 337 ...

Страница 338: ...ecause the sensor cannot detect the paper Use paper with a border of about 2 mm or more cImportant Do not open the staple cover when operating the stapler Otherwise a malfunction occurs and you may not be able to staple If a malfunction occurs turn off the printer Make sure that the staple cover is closed and then turn on the printer When stapling continuously place the next batch of papers at int...

Страница 339: ...es The LCD screen displays an animation that shows you how to remove jammed staples Next select OK to clear the error cImportant Do not remove the cartridge except to clear a staple jam or to replace it with a new one Do not open the part A shown below if not instructed to do so Do not remove the cartridge when staples remain in the cartridge You need to replace it with a new cartridge as a staple...

Страница 340: ...a fax while receiving a fax receive multiple faxes at the same time or send faxes at the same time Expansion Fax Ports A EXT port Making Settings When You Connect a Phone Device This is for standard faxing B LINE1 port Connect the printer to the phone line This is for standard faxing C LINE3 port Connect the printer to the phone line The method for connecting the port is the same as for the LINE1 ...

Страница 341: ...ds Installed You can find the menu on the printer s control panel below Settings General Settings Fax Settings Basic Settings Note On the Web Config screen you can find the menu below Fax tab Basic Settings Expansion Line Settings G3 2 Fax Speed ECM Dial Tone Detection Dial Mode Line Type Your Phone Number Rings to Answer G3 3 Fax Speed ECM Dial Tone Detection Dial Mode Line Type Your Phone Number...

Страница 342: ... Settings Fax Settings Receive Settings Save Forward Settings Conditional Save Forward Note On the Web Config screen you can find the menu below Fax tab Save Forward Settings Conditional Save Forward You can set saving and or forwarding destinations to the Inbox confidential boxes an external memory device email addresses shared folders and another fax machine To switch between enabling or disabli...

Страница 343: ...able on page 472 Sending Faxes Using the Printer with Optional Fax Boards You can send faxes by specifying a line and entering fax numbers from the printer s control panel Note The basic method for sending faxes is the same as for standard faxing Sending Faxes Using the Printer on page 134 1 Place the originals Placing Originals on page 43 2 Select Fax on the home screen on the printer s control p...

Страница 344: ...planation uses Microsoft Word as an example See the following for information on how to send a fax Sending Documents Created Using an Application Windows on page 161 The actual operation may differ depending on the application you use For details see the application s help 1 Using an application create a document to transmit by fax 2 Click Print from the File menu The application s Print window ap...

Страница 345: ... such as documents drawings and tables you have created An available line is automatically selected and sent The basics of sending faxes is the same as standard fax Related Information Sending a Fax from a Computer on page 161 Checking the Status of the Lines When Optional Fax Boards Installed You can check the status of each fax line such as whether it is ready or in use To display this menu pres...

Страница 346: ...onal Network on page 352 Scan to Folder 3 3 Setting a Shared Network Folder on page 456 Selecting the Network Transmission Route When Using an Additional Network on page 352 Scan to Document Capture Pro 3 3 Selecting the Network Transmission Route When Using an Additional Network on page 352 Scan to Cloud Scanning Originals to the Cloud on page 122 Faxing Sending and receiving faxes on a computer ...

Страница 347: ...n Using an Additional Network on page 353 Email notification 2 2 Configuring a Mail Server on page 452 Configuring Email Notification When Using an Additional Network on page 353 Configuring the administrator password 1 1 Configuring the Administrator Password from the Control Panel on page 508 Configuring the Administrator Password from a Computer on page 509 Configuring the Administrator Passwor...

Страница 348: ...electricity from your body by touching grounding yourself before installing the ethernet board 1 Turn off the printer by pressing the P button 2 Disconnect all cables such as the power cord and USB cable 3 Loosen the two screws and then remove the cover 4 Install the ethernet board straight into the additional interface slot for the ethernet board Insert the ethernet board firmly into the slot Usi...

Страница 349: ...ast eight digits of the MAC address To check this select Wired LAN Status for the additional network on the printer s control panel to display the details You can also confirm the MAC address on the label stuck to the Ethernet board We recommend that you change the initial password as soon as possible to prevent unauthorized access If you reset the additional network to the default settings the in...

Страница 350: ...ress 1 Turn on the printer 2 Select Settings on the home screen on the printer s control panel 3 Select General Settings Network Settings 4 Select Standard or Additional for the network that you want to set up 5 Select Advanced TCP IP Note When you select Advanced you need to enter the administrator password for the additional network 6 Select Manual for Obtain IP Address When you set the IP addre...

Страница 351: ...g the Proxy Server When Using an Additional Network Set up the proxy server if both of the following are true The proxy server is built for Internet connection When using a function in which a printer directly connects to the Internet such as Epson Connect service or another company s cloud services The proxy server is only available on the standard network 1 Select Settings on the home screen Whe...

Страница 352: ...the connection 1 Connect the printer and hub LAN switch by Ethernet cable 2 Select Job Status on the home screen 3 Select the Printer Status tab and then select the Options tab The Ethernet connection status is displayed Confirm the connection is correct Selecting the Network Transmission Route When Using an Additional Network The following scan and fax functions are available from the printer s c...

Страница 353: ...up the email server on the network standard or additional to which you want to send the email Related Information Configuring a Mail Server on page 452 Configuring Email Notification When Using an Additional Network Configure email notification by using Web Config from a computer on the standard network 1 Enter the printer s IP address for the standard network into a browser to access Web Config 2...

Страница 354: ...roblems when Using an Additional Network Cannot Print or Scan from a Computer The standard or additional network settings are incorrect You need to set up the standard network and the additional network Check the settings for both networks Related Information Connecting to the Network from the Control Panel When Using an Additional Network on page 350 Scan or Fax Functions from the Control Panel D...

Страница 355: ...ional network Select the menus on the control panel as described below Settings General Settings Network Settings Standard Set up the standard network See Related Information below Related Information Network Settings on page 384 Additional Set up the additional network Network Status Displays or prints the current network settings Wired LAN Status Print Status Sheet Advanced Make the following de...

Страница 356: ... Network Transmission Route Select the network to use the scan and fax functions from the control panel Scan to Email Scan to Folder Scan to Document Capture Pro Fax to Email Fax to Folder LDAP Server Select the network that has the LDAP server you want to use Using Optional Items Ethernet Board 10 100 1000 Base T Ethernet Menu Options for Network Settings 356 ...

Страница 357: ...roduct Information Paper Information 358 Consumable Products Information 365 Software Information 366 Settings Menu List 377 Product Specifications 407 Font Specifications 420 Regulatory Information 434 ...

Страница 358: ... size only Standard or Normal print quality settings are available Although some printer drivers allow you to select a better print quality the printouts are printed using Standard or Normal Paper suitable for printing documents Media Name Size Loading Capacity Sheets Paper Cassette 1 Paper Cassette 2 to 4 Paper Tray Epson Business Paper A4 250 500 150 Epson Bright White Paper A3 200 400 90 Epson ...

Страница 359: ...mium Semigloss Photo Paper A3 A3 A4 10x15 cm 4x6 in 35 Epson Photo Paper Glossy A3 A3 A4 13x18 cm 5x7in 10x15 cm 4x6 in 35 Commercially Available Paper Note 8 5 13 in 8K 270 390 mm 16K 195 270 mm and the half letter sizes are not available when printing with the PostScript printer driver See the following for information on available paper types for 2 sided printing Paper for 2 Sided Printing on p...

Страница 360: ...y the triangle symbol on the edge guide 120 A6 B6 Half Letter 2 Up to the line indicated by the triangle symbol on the edge guide 150 User Defined 2 mm 100 to 297 148 to 431 8 Up to the line indicated by the triangle symbol on the edge guide 50 User Defined 2 mm 148 to 297 210 to 431 8 Up to the line indicated by the triangle symbol on the edge guide Up to the line indicated by the triangle symbol...

Страница 361: ...n Legal 8K 270 390 mm 8 5 13 in US B 11 17 in 150 250 70 Letter A4 Executive 1 B5 A5 16K 195 270 mm 300 70 B6 A6 Half letter 1 150 70 User Defined 1 mm 100 to 297 148 to 431 8 150 35 User Defined 1 mm 148 to 297 210 to 431 8 150 250 35 User Defined 1 mm 55 to 329 127 to 1200 35 1 2 Product Information Paper Information Available Paper and Capacities 361 ...

Страница 362: ...l 8K 270 390 mm 8 5 13 in US B 11 17 in 120 200 50 Letter A4 Executive 1 B5 A5 16K 195 270 mm 250 50 B6 A6 Half letter 1 120 50 User Defined 1 mm 100 to 297 148 to 431 8 120 25 User Defined 1 mm 148 to 297 210 to 431 8 120 200 25 User Defined 1 mm 55 to 329 127 to 1200 25 1 2 Product Information Paper Information Available Paper and Capacities 362 ...

Страница 363: ... 55 to 329 127 to 1200 20 1 2 1 Only printing from computer is available 2 The numbers in parenthesis indicate the loading capacity for lengths of 431 9 mm or more Envelope Media Name Size Loading Capacity Envelopes Paper Cassette 1 Paper Cassette 2 to 4 Paper Tray Envelope Envelope 10 Envelope DL Envelope C6 15 Envelope C4 1 Paper for 2 Sided Printing Genuine Epson Paper Epson Business Paper Prod...

Страница 364: ...he numbers in parenthesis indicate the loading capacity for lengths of 431 9 mm or more Related Information Available Paper and Capacities on page 358 Unavailable Paper Types Do not use the following papers Using these types of paper causes paper jams and smears on the printout Papers that are wavy Papers that are torn or cut Papers that are folded Papers that are damp Papers that are too thick or...

Страница 365: ...uine Epson ink supply units Epson cannot guarantee the quality or reliability of non genuine ink The use of non genuine ink may cause damage that is not covered by Epson s warranties and under certain circumstances may cause erratic printer behavior Information about non genuine ink levels may not be displayed Related Information Technical Support Web Site on page 568 Maintenance Box Code Epson re...

Страница 366: ...om the control panel Windows 10 Windows Server 2019 Windows Server 2016 Click on the start button and then select Windows System Control Panel View devices and printers in Hardware and Sound Right click on your printer or press and hold it and then select Printing preferences Windows 8 1 Windows 8 Windows Server 2012 R2 Windows Server 2012 Select Desktop Settings Control Panel View devices and pri...

Страница 367: ...tions for the Printer Driver on page 53 Application for Printing from a Computer Mac OS Printer Driver The printer driver controls the printer according to the commands from an application Making settings on the printer driver provides the best printing results You can also check the status of the printer or keep it in top operating condition using the printer driver utility Accessing the printer ...

Страница 368: ...r from the control panel To make settings that apply to all of the applications access from the control panel Windows 10 Windows Server 2019 Windows Server 2016 Click on the start button and then select Windows System Control Panel View devices and printers in Hardware and Sound Right click on your printer or press and hold it and then select Printing preferences Windows 8 1 Windows 8 Windows Serv...

Страница 369: ... driver from applications Click Page Setup or Print on the File menu of your application If necessary click Show Details or d to expand the print window Note Depending on the application being used Page Setup may not be displayed in the File menu and the operations for displaying the print screen may differ See the application s help for details Starting the utility Select System Preferences from ...

Страница 370: ...pooler screen If the printer s IP address is changed by DHCP the printer is still detected You can use a printer located on a different network segment You can print using one of the various protocols IPv6 address is not supported Application for Printing Easily from a Smart Device Epson iPrint Epson iPrint is an application that allows you to print photos documents and web pages from a smart devi...

Страница 371: ... from the computer but also from the control panel of the printer that is connected over a network Document Capture Pro does not support Windows Vista Windows XP The names are for Windows For Mac OS the name is Document Capture For Windows Server the name is Document Capture Pro Server Starting on Windows Windows 10 Windows Server 2019 Windows Server 2016 Click the start button and then select Eps...

Страница 372: ...h charm and then select the displayed icon Windows 7 Windows Vista Windows XP Windows Server 2008 R2 Windows Server 2008 Windows Server 2003 R2 Windows Server 2003 Click the start button and then select All Programs or Programs EPSON Epson Scan 2 Mac OS Select Go Applications Epson Software Epson Scan 2 2 On the Scanner Settings screen click Add Note If Add is grayed out click Enable Editing If th...

Страница 373: ... Windows Vista Windows XP Click the start button and select All Programs or Programs Epson Software FAX Utility Starting on Mac OS Select System Preferences from the Apple menu Printers Scanners or Print Scan Print Fax and then select the printer FAX Click Options Supplies Utility Open Printer Utility Related Information Sending a Fax from a Computer on page 161 Receiving Faxes on a Computer on pa...

Страница 374: ...s Web Config Web Config is an application that runs in a web browser such as Microsoft Edge and Safari on a computer or smart device You can confirm the printer status or change the network service and printer settings To use the Web Config connect the printer and the computer or device to the same network The following browsers are supported Use the latest version Microsoft Edge Internet Explorer...

Страница 375: ...rinter list on the computer Windows 10 Click on the start button and then select Windows System Control Panel View devices and printers in Hardware and Sound Windows 8 1 Windows 8 Select Desktop Settings Control Panel View devices and printers in Hardware and Sound or Hardware Windows 7 Click the start button and select Control Panel View devices and printers in Hardware and Sound Windows Vista Cl...

Страница 376: ...er 2008 R2 Windows Server 2008 Windows Server 2003 R2 Windows Server 2003 Click the start button and select All Programs or Programs EpsonNet EpsonNet Config SE EpsonNet Config Starting on Mac OS Go Applications Epson Software EpsonNet EpsonNet Config SE EpsonNet Config Related Information Installing the Applications Separately on page 182 Software for Managing Devices on the Network Epson Device ...

Страница 377: ...splayed icon Windows 7 Windows Vista Windows XP Click the start button and then select All Programs or Programs EPSON Software Epson Software Updater Note You can also start Epson Software Updater by clicking the printer icon on the task bar on the desktop and then selecting Software Update Starting on Mac OS Select Go Applications Epson Software Epson Software Updater Related Information Installi...

Страница 378: ...uct may have this feature or the Power Off Settings feature depending on the location of purchase Select this setting to turn the printer off automatically when it is not used for a specified period of time You can adjust the time before power management is applied Any increase will affect the product s energy efficiency Please consider the environment before making any change Power Off Settings Y...

Страница 379: ...ons are performed for the specified time you are logged out and returned to the initial screen Keyboard Change the layout of the keyboard on the LCD screen Default Screen Job Status Select the default information you want to display when you press the button Original Size Auto Detection Option The ADF and the scanner glass are equipped with sensors that automatically detect the size of the paper H...

Страница 380: ... from a paper source that has the same settings as the paper settings for the print jobs You can set automatic selection for every paper source for each function in copy fax or other You cannot set everything to off This setting is disabled when you select a specific paper source in the paper settings for the print jobs Depending on the paper type setting on the Main tab of the printer driver pape...

Страница 381: ...g is incorrect but this may lower the print speed Skip Blank Page Skips blank pages in the print data automatically Color Correction Make settings such as brightness and contrast and perform color correction when printing from an external device When this feature is On the printer color correction settings take precedence over the settings of the standard printer driver Brightness Contrast Saturat...

Страница 382: ...ult font number for the default font source The available number varies depending on the settings you made Pitch Set the default font pitch if the font is scalable and of fixed pitch You can select from 0 44 to 99 99 cpi characters per inch in 0 01 increments This item may not appear depending on the font source or font number settings Height Set the default font height if the font is scalable and...

Страница 383: ...olor mode for PostScript printing Binary Select On when printing data that contains binary images The application may send the binary data even if the printer driver setting is set to ASCII but you can print the data when this feature is enabled PDF Page Size Select the paper size when printing a PDF file If Auto is selected the paper size is determined based on the size of the first page Auto Err...

Страница 384: ...o allow a computer to access the printer when connected by USB When Disable is selected printing and scanning that is not sent over a network connection is restricted USB I F Timeout Setting Specify the length of time in seconds that must elapse before ending USB communication with a computer after the printer receives a print job from a PostScript printer driver or PCL printer driver If the job e...

Страница 385: ...fault Settings Wired LAN Setup Set up or change a network connection that uses a LAN cable and router When this is being used Wi Fi connections are disabled Network Status Displays or prints the current network settings Wired LAN Wi Fi Status Wi Fi Direct Status Email Server Status Print Status Sheet Connection Check Checks the current network connection and prints a report If there are any proble...

Страница 386: ...control panel as described below Settings General Settings Web Service Settings You cannot change settings that have been locked by your administrator Epson Connect Services Displays whether the printer is registered and connected to Epson Connect You can register to the service by selecting Register and follow the instructions When you have registered you can change the following settings Suspend...

Страница 387: ...en is displayed enter the administrator password You cannot display this menu on the Web Config screen Quick Operation Button 1 Quick Operation Button 2 Quick Operation Button 3 Registers up to three shortcuts allowing you to quickly access the menu you use often when sending faxes The shortcuts are displayed on the following menu Fax Fax Settings tab Basic Settings You can find the menu on the pr...

Страница 388: ...ess code such as 0 or 9 Then when sending a fax to an outside fax number enter hash instead of the real code hash must also be used in Contacts as an external access code If an external access code such as 0 or 9 is set in a contact you cannot send faxes to the contact In this case set Access Code to Do Not Use otherwise you must change the code in Contacts to Header Enter your sender name and fax...

Страница 389: ... party s phone number is not in the contacts set whether to reject receiving the faxes Edit Blocked Number list You can register up to 30 fax numbers to reject the faxes and calls Enter up to 20 characters using 0 9 or space Receiving Paper Size Select the maximum paper size for faxes that the printer can receive Save Forward File Format File Format Select the format that you want to use for savin...

Страница 390: ...ory send feature starts sending the fax when the printer finishes scanning the first page If you do not enable this feature the printer starts sending after saving all of the scanned images to memory By using this feature you can reduce the overall operation time as scanning and sending are performed in parallel Batch Send When there are multiple faxes waiting to be sent to the same recipient this...

Страница 391: ... fax machines You can use these features at the same time If you disable all items in Unconditional Save Forward the printer is set to print received faxes Save to Inbox Saves received faxes to the printer s Inbox Up to 200 documents can be saved Note that saving 200 documents may not be possible depending on the usage conditions such as the file size of saved documents and using of multiple fax s...

Страница 392: ...that you test if you can send a scanned image to the destination in the scan mode Select Scan Email or Scan Network Folder FTP from the home screen select the destination and then start scanning Options When Forwarding Failed You can select whether to print the failed fax or save it to the Inbox When the Inbox is full receiving faxes is disabled You should delete the documents from the inbox once ...

Страница 393: ...perfect match When the password SID matches perfectly the received fax is saved and forwarded Receiving Time Saves and forwards a fax received during the specified period of time Save Forward Destination Select the destination to save and forward received documents that match the conditions You can use the features below at the same time Save to Fax Box Saves received faxes in the printer s Inbox ...

Страница 394: ...start scanning Options When Forwarding Failed You can select whether to print the failed fax or save it to the Inbox Print Prints received faxes Save Forward File Format You can set the file format when saving or forwarding received faxes PDF Settings Selecting PDF in Save Forward File Format enables the settings Document Open Password Password Setting Enables to set a document open password Passw...

Страница 395: ...enu on the printer s control panel below Settings General Settings Fax Settings Receive Settings Save Forward Settings Common Settings Note On the Web Config screen you can find the menu below Fax tab Fax Box Inbox Fax tab Save Forward Settings Common Settings Inbox settings Options when memory is full You can select the operation to print the received fax or refuse to receive it when the Inbox me...

Страница 396: ...Print Settings Note On the Web Config screen you can find the menu below Fax tab Print Settings If a password entry screen is displayed enter the password Auto Reduction Prints received faxes with large size documents reduced to fit on the paper in the paper source Reducing may not always be possible depending on the received data If this is turned off large documents are printed at their original...

Страница 397: ...ived faxes on both sides of the paper Print Start Timing Select options to start printing the faxes to receive All Pages Received Printing starts after receiving all of the pages To start printing from the first page or last page depends on the setting of Collation Stack feature See the explanation for Collation Stack First Page Received Starts printing when the first page is received and then pri...

Страница 398: ... fax using the Batch Send feature Sending a fax using the Store Fax Data feature Fax Log Auto Print Prints the fax log automatically Select On Every 100 to print a log every time 100 fax jobs are completed Select On Time to print the log at a specified time However if the number of fax jobs exceeds 100 the log is printed before the specified time Reception Report Prints a reception report after yo...

Страница 399: ...y entered Selecting Off enables manual entry of the recipient s fax numbers Broadcasting Restrictions Selecting On allows only one fax number to be entered as the Recipient Confirm Address List Selecting On displays a recipient confirmation screen before starting the transmission You can select the recipients from All or Only for Broadcasting Backup Data Auto Clear Backup copies of sent and receiv...

Страница 400: ...Making the Printer Ready to Send and Receive Faxes on page 490 Scan Settings Confirm Recipient Check destination before scanning Document Capture Pro Before scanning using the Computer menu on the control panel set the operation mode on the control panel to match the computer on which Document Capture Pro is installed Client Mode Select this if Document Capture Pro is installed on Windows or Mac O...

Страница 401: ...or when copying using Auto You can select the sensitivity from five levels between More B W and More Color Documents tend to be scanned in monochrome when selecting it closer to More B W and in color when selecting it closer to More Color Scanner Cleaning Suggestion Select Off if you do not want to display a message notifying you when to clean the ADF scanning components Reset Page count Resets th...

Страница 402: ...the time to enter power saving mode will be delayed Erase All Memory Erases all data on the hard disc You cannot perform other operations or turn off the device during formatting High Speed Erases all data with a dedicated erase command Overwrite Erases all data with a dedicated erase command and overwrites other data in all areas to erase all data Triple Overwrite Erases all data with a dedicated...

Страница 403: ...password You can also connect a USB device to backup the encryption key Audit Log Select On to record an audit log Program Verification on Start Up Select On to verify the printer s program when starting up Customer Research Select Approve to provide product usage information such as the number of prints to Seiko Epson Corporation Restore Default Settings Reset the settings in the following menus ...

Страница 404: ...of the maintenance box When is displayed the ink is running low or the maintenance box is nearly full When is displayed you need to replace the item as ink is expended or the maintenance box is full Related Information It is Time to Replace Ink Supply Units on page 269 Maintenance Select the menus on the control panel as described below Settings Maintenance Print Quality Adjustment Select this fea...

Страница 405: ...Paper Depending on the paper type ink feathering is differs Select this feature if there is banding in the print outs or misalignment for a specific paper type Periodic Cleaning The printer automatically performs Print Head Nozzle Check and Print Head Cleaning based on the specific period of time Select On to maintain premium print quality Under the following conditions perform Print Head Nozzle C...

Страница 406: ...nt List Print a list of fonts that are available for a PCL print Network Displays the current network settings You can also print the status sheet Contacts Manager Select the menus on the control panel as described below Settings Contacts Manager Register Delete Register and or delete contacts for the Fax Scan to Email and Scan to Network Folder FTP menus Frequent Register frequently used contacts...

Страница 407: ...ngs Authentication Device Status Displays the status of the authentication device Epson Open Platform Information Select the menus on the control panel as described below Settings Epson Open Platform Information Displays the status of the Epson Open Platform Product Specifications Printer Specifications Print Head Nozzle Placement Black ink nozzles 800 Color ink nozzles 800 for each color Weight o...

Страница 408: ... 0 16 in D 5 0 mm 0 20 in Printable Area for Envelopes Print quality may decline in the shaded areas due to the printer s mechanism A 3 0 mm 0 12 in B 3 0 mm 0 12 in C 54 0 mm 2 13 in D 49 0 mm 1 93 in Scanner Specifications Scanner Type Flatbed Photoelectric Device CIS Effective Pixels 7020 10200 pixels 600 dpi Maximum Document Size 297 431 8 mm 11 7 17 in A3 Scanning Resolution 600 dpi main scan...

Страница 409: ...igh quality plain paper Recycled paper Weight of Paper 38 to 128 g m2 1 sided 50 to 128 g m2 2 sided Loading Capacity 150 sheets 80 g m2 or 16 5 mm Even when the original meets the specifications for media that can be placed in the ADF it may not feed from the ADF or the scan quality may decline depending on the paper properties or quality Fax Specifications Fax capable Printers Only Fax Type Walk...

Страница 410: ...ith 1 minute intervals Interface RJ 11 Phone Line RJ 11 Telephone set connection The specifications may differ by country or region Note To check the fax firmware version select the following on the printer s control panel print the Fax Settings List and then check the version on the sheet Fax More Fax Report Fax Settings List Using Port for the Printer The printer uses the following port These po...

Страница 411: ...onnect Server HTTPS 443 XMPP 5222 When ERMS is used ERMS server Protocol HTTPS TCP 443 Protocol MQTT TCP 443 Collecting user information Use the contacts from the printer LDAP server LDAP TCP 389 LDAP SSL TLS TCP 636 LDAP STARTTLS TCP 389 User authentication when sending email When activating Epson Open Platform User authentication when collecting user information When using the contacts from the ...

Страница 412: ...PS printing data Printer IPP IPPS TCP 631 Searching WSD printer Printer WS Discovery UDP 3702 Forwarding the scan data from Document Capture Pro Printer Network Scan TCP 1865 Collecting the job information when push scanning from Document Capture Pro Printer Network Push Scan 2968 Web Config Printer HTTP TCP 80 HTTPS TCP 443 Forwarding FaxOut Data Printer IPP FaxOut TCP 631 PC FAX Printer HTTP TCP...

Страница 413: ...A2 PSK AES only 5 Complies with WPA2 standards with support for WPA WPA2 Personal Table B Standards IEEE802 11a b g n 1 ac Frequency Ranges IEEE802 11b g n 2 4 GHz IEEE802 11a n ac 5 GHz Channels Wi Fi 2 4 GHz 1 2 3 4 5 6 7 8 9 10 11 12 2 13 2 5 GHz 3 W52 36 40 44 48 W53 52 56 60 64 W56 100 104 108 112 116 120 124 128 132 136 140 144 W58 149 153 157 161 165 Wi Fi Direct 2 4 GHz 1 2 3 4 5 6 7 8 9 1...

Страница 414: ...ernet 2 Communication Mode Auto 10 Mbps Full duplex 10 Mbps Half duplex 100 Mbps Full duplex 100 Mbps Half duplex Connector RJ 45 1 Use a category 5e or higher STP Shielded twisted pair cable to prevent risk of radio interference 2 The connected device should comply with IEEE802 3az standards Network Functions and IPv4 IPv6 Functions Supported Remarks Network Printing EpsonNet Print Windows IPv4 S...

Страница 415: ...r Client IPPS SMTPS STARTTLS SSL TLS SNMPv3 You need to use a device for connection that complies with IEEE802 1X PostScript Level 3 Compatibility The PostScript used on this printer is compatible with PostScript Level 3 Supported Third Party Services Services Supported Remarks AirPrint Print iOS 5 or later Mac OS X v10 7 x or later Scan OS X Mavericks or later Fax OS X Mountain Lion or later Univ...

Страница 416: ...es not compressed Binary images not compressed or CCITT encoded PDF Version 1 7 compliant data file Image Size Horizontal 80 to 10200 pixels Vertical 80 to 10200 pixels File Size Less than 2 GB Maximum Number of Files JPEG 9990 3 TIFF 999 PDF 999 1 Design rule for Camera File system 2 Photo data stored on digital cameras with a built in memory is not supported 3 Up to 999 files can be displayed at...

Страница 417: ...Supply Rating AC 100 240 V Rated Frequency Range 50 60 Hz Rated Current 2 2 1 0 A Power Consumption with USB Connection Standalone copying Approx 50 0 W ISO IEC24712 Ready mode Approx 24 0 W Sleep mode Approx 1 2 W Power off Approx 0 3 W Note Check the label on the printer for its voltage For European users see the following Website for details on power consumption http www epson eu energy consump...

Страница 418: ...mperature 20 C 4 F Ink thaws and is usable after approximately 5 hours at 25 C 77 F You can store for one month at 40 C 104 F Installation Location and Space To ensure safe use place the printer in a location that meets the following conditions A flat stable surface that can support the weight of the printer Locations that do not block or cover the vents and openings in the printer Locations where...

Страница 419: ... to shocks or vibrations Near a television or a radio Near excessive dirt or dust Near water Near air conditioning or heating equipment Near a humidifier Use a commercially available anti static mat to prevent static generation in locations prone to generating static electricity Secure enough place to install and operate the printer correctly A 1559mm Product Information Product Specifications Ins...

Страница 420: ...OS X Mavericks OS X Mountain Lion Mac OS X v10 7 x Mac OS X v10 6 8 Note Mac OS may not support some applications and features The UNIX File System UFS for Mac OS is not supported Font Specifications The following fonts are available on the Internet Epson Barcode Font Available Fonts for PostScript Font Name Family HP Equivalent Nimbus Mono Medium Bold Italic Bold Italic Courier Letter Gothic Medi...

Страница 421: ...C Avant Garde URW Bookman Light Demi Light Italic Demi Italic ITC Bookman URW Century Schoolbook Roman Bold Italic Bold Italic New Century Schoolbook Nimbus Roman Medium Bold Italic Bold Italic Times URW Chancery Medium Italic ITC Zapf Chancery Italic Symbol Symbol URW Dingbats Wingdings Dingbats ITC Zapf Dingbats Standard Symbol SymbolPS Available Fonts for PCL URW Scalable Font Font Name Family ...

Страница 422: ...dium Bold Oblique Bold Oblique Helvetica Narrow 3 Palladio Roman Bold Italic Bold Italic Palatino 3 URW Gothic Book Demi Book Oblique Demi Oblique ITC Avant Garde Gothic 3 URW Bookman Light Demi Light Italic Demi Italic ITC Bookman 3 URW Century Schoolbook Roman Bold Italic Bold Italic New Century Schoolbook 3 Nimbus Roman Medium Bold Italic Bold Italic Times 3 URW Chancery Medium Italic ITC Zapf ...

Страница 423: ...ternational characters specific to each language When you are considering which font to use you should also consider which symbol set to combine with the font Note Since most software handles fonts and symbols automatically you will probably never need to adjust the printer s settings However if you are writing your own printer control programs or if you are using older software that cannot contro...

Страница 424: ...N Roman 9 4U PsMath 5M 8859 9 ISO 5N WiTurkish 5T MsPublishin 6J VeMath 6M 8859 10ISO 6N DeskTop 7J Math 8 8M Roman 8 8U WiE Europe 9E Pc1004 9J 8859 15ISO 9N PcTk437 9T Windows 9U PsText 10J IBM US 10U IBM DN 11U McText 12J PcMultiling 12U VeInternati 13J PcEur858 13U VeUS 14J PiFont 15U Product Information Font Specifications List of Symbol Sets 424 ...

Страница 425: ...yr 3R Greek8 8G WinGrk 9G WinCyr 9R Pc851Grk 10G ISOCyr 10N Pc8Grk 12G ISOGrk 12N Pc866Ukr 14R Hebrew7 0H 8859 8 ISO 7H Hebrew8 8H Pc862Heb 15H PC 862 Hebrew 15Q Arabic8 8V HPWARA 9V Pc864Ara 10V Symbol 19M Wingdings 579L ZapfDigbats 14L OCR A 0O OCR B 1O OCR B Extension 3Q Code3 9 0Y Product Information Font Specifications List of Symbol Sets 425 ...

Страница 426: ...BarCode Fonts are designed to add such codes automatically allowing you to easily print bar codes that conform to a variety of bar code standards Printing with Epson BarCode Fonts Follow the steps below to create and print bar codes using Epson BarCode Fonts The application featured in these instructions is Microsoft WordPad in Windows 10 The actual procedure may differ slightly when printing from...

Страница 427: ...r driver settings 5 Click Print to print the bar code Note If there is an error in the bar code character string such as inappropriate data the bar code will be printed as it appears on the screen but it cannot be read by a bar code reader Notes on inputting and formatting bar codes Please note the following when inputting and formatting bar code characters Do not apply shading or special characte...

Страница 428: ...s in other sizes may not be readable with all bar code readers Select Grayscale in the Print Settings and Standard or High in the Quality Note Depending on the print density or on the quality or color of the paper bar codes may not be readable with all bar code readers Print a sample and make sure the bar code can be read before printing large quantities Epson BarCode Fonts specifications This sec...

Страница 429: ...bar Center bar Check digit OCR B Print sample EPSON EAN 13 EPSON UPC A UPC A is the standard bar code specified by the American Universal Product Code UPC Symbol Specification Manual Only regular UPC codes are supported Supplementary codes are not supported Character type Numbers 0 to 9 Number of characters 11 characters Font size 60 pt to 96 pt Recommended sizes are 60 pt and 75 pt standard The f...

Страница 430: ...y hand Left Right margin Left Right guard bar Check digit OCR B The numeral 0 Print sample EPSON UPC E EPSON Code39 Four Code39 fonts are available allowing you to enable and disable the automatic insertion of check digits and OCR B The height of the bar code is automatically adjusted to 15 or more of its total length in conformance to the Code39 standard For this reason it is important to keep at...

Страница 431: ...t of the bar code is automatically adjusted to 15 or more of its total length in conformance to the Code128 standard For this reason it is important to keep at least one space between the bar code and the surrounding text to prevent overlapping Some applications automatically delete the spaces at the end of lines or change multiple spaces into tabs Bar codes containing spaces may not be correctly ...

Страница 432: ... an odd number of characters EPSON ITF fonts automatically add a zero to the beginning of the character string Character type Numbers 0 to 9 Number of characters No limit Font size When OCR B is not used 26 pt to 96 pt Recommended sizes are 26 pt 52 pt and 78 pt When OCR B is used 36 pt to 96 pt Recommended sizes are 36 pt and 72 pt The following codes are inserted automatically and need not be in...

Страница 433: ...eck digit Print sample EPSON Codabar EPSON Codabar CD EPSON Codabar Num EPSON Codabar CD Num EPSON EAN128 GS1 128 EAN128 fonts support code sets A B and C When the code set of a line of characters is changed in the middle of the line a conversion code is automatically inserted The following 4 kinds of the properties are supported as the Application Identifier AI 01 Global traded item number 10 Bat...

Страница 434: ...haracters 17 and 6 numbers 10 4 characters 10 and maximum of 20 alphanumeric characters 30 4 characters 30 and maximum of 8 numbers Font size 36 pt or more Recommended sizes are 36 pt 72 pt The following codes are inserted automatically and need not be input by hand Left Right quiet zone Start Stop character FNC1 character It inserts for discernment from Code128 and for a pause of the variable len...

Страница 435: ...re away from a person s body excluding extremities hands wrists feet and ankles Standards and Approvals for European Model For European users Hereby Seiko Epson Corporation declares that the following radio equipment model is in compliance with Directive 2014 53 EU The full text of the EU declaration of conformity is available at the following website http www epson eu conformity C731A For use onl...

Страница 436: ...gned Telecom will accept no responsibility should difficulties arise in such circumstances This equipment shall not be set up to make automatic calls to the Telecom 111 Emergency Service ZICTA Type Approval for Users in Zambia See the following website to check the information for ZICTA Type Approval https support epson net zicta German Blue Angel See the following website to check whether or not ...

Страница 437: ...rly copying copyrighted materials Unless acting on the advice of a knowledgeable attorney be responsible and respectful by obtaining the permission of the copyright holder before copying published material Product Information Regulatory Information Restrictions on Copying 437 ...

Страница 438: ...Administrator Information Connecting the Printer to the Network 439 Settings to Use the Printer 443 Managing the Printer 507 Advanced Security Settings 525 Epson Remote Services Information 566 ...

Страница 439: ...ynamically using the DHCP function this information is not required because it is set automatically Wi Fi connection information SSID Password These are the SSID network name and the password of the access point that the printer connects to If MAC address filtering has been set register the MAC address of the printer in advance to register the printer See the following for the supported standards ...

Страница 440: ... DHCP server or router The information to connect to the network subnet mask default gateway DNS server and so on is set automatically so you can easily connect the device to the network If the device or the router is turned off or depending on the DHCP server settings IP address may change when re connecting We recommend managing devices other than the IP address and communicating with protocols ...

Страница 441: ...ual for Obtain IP Address When you set the IP address automatically by using the DHCP function of router select Auto In that case the IP Address Subnet Mask and Default Gateway on step 5 to 6 are also set automatically so go to step 7 5 Enter the IP address Focus moves to the forward segment or the back segment separated by a period if you select l and r Confirm the value reflected on the previous...

Страница 442: ...rver 4 Select Use for Proxy Server Settings 5 Enter the address for the proxy server by IPv4 or FQDN format Confirm the value reflected on the previous screen 6 Enter the port number for the proxy server Confirm the value reflected on the previous screen 7 Tap Start Setup Connecting to LAN Connect the printer to the network by Ethernet or Wi Fi Connecting to Ethernet Connect the printer to the net...

Страница 443: ... Making Wi Fi Settings by Entering the SSID and Password on page 298 Making Wi Fi Settings by Push Button Setup WPS on page 299 Making Wi Fi Settings by PIN Code Setup WPS on page 300 Settings to Use the Printer Using the Print Functions Enable to use the print function through the network To use the printer on the network you need to set the port for network connection on the computer as well as ...

Страница 444: ...e client computers By accessing the Windows server and linking the printer the printer driver is installed on the client computer and can be used Features Manage the printer and the printer driver in batch Depending on the server spec it may take time to start the print job because all print jobs go through the print server You cannot print when the Windows server is turned off Print Settings for ...

Страница 445: ...r and then select The printer that I want isn t listed 3 Add a local printer Select Add a local printer or network printer with manual settings and then click Next 4 Select Create a new port select Standard TCP IP Port as the Port Type and then click Next 5 Enter the printer s IP address or printer name in Host Name or IP Address or Printer Name or IP Address and then click Next Example Printer na...

Страница 446: ...en using the printer under the server client connection printer sharing using the Windows server make the sharing settings hereafter Checking the Port Configuration Windows Check if the correct port is set for the print queue 1 Open the devices and printers screen Desktop Settings Control Panel Hardware and Sound or Hardware Devices and Printers 2 Open the printer properties screen Right click the...

Страница 447: ...nters on the print server 2 Right click the printer icon that you want to share with the clients and then click Printer Properties Sharing tab 3 Click Additional Drivers For Windows Server 2012 click Change Sharing Options and then configure the settings 4 Select versions of Windows for clients and then click OK 5 Select the information file for the printer driver inf and then install the driver U...

Страница 448: ...he range you can enter here depends on the paper source which is indicated on the side of Height When you select mm in Unit you can enter up to one decimal place When you select inch in Unit you can enter up to two decimal places Paper Type Select the paper type you want to set from the pull down menu 3 Check the settings and then click OK Setting the Interface Set the timeout of the print jobs or...

Страница 449: ...out using the printer driver Some items are not displayed depending on the printing language of your printer 1 Access Web Config and select the Print tab Universal Print Settings 2 Set each item 3 Check the settings and then click OK Basic Items Explanation Top Offset 30 0 30 0mm Sets the vertical position of the paper on which printing starts Left Offset 30 0 30 0mm Sets the horizontal position o...

Страница 450: ...rinting Set whether printing 2 sided PCL Menu Items Explanation Font Source Select whether to use the font installed on the printer or download it Font Number Specify the font number you want to use Pitch 0 44 99 99cpi If the font to use is scalable and fixed pitch font specify the font size in pitch Height 4 00 999 75pt If the font to use is scalable and proportional font specify the font size in...

Страница 451: ...I 0x20 0x7E Bonjour Location Enter location information such as the printer s placement within 127 bytes or less in Unicode UTF 8 Geolocation Latitude and Longitude WGS84 Enter the printer s location information This entry is optional Enter values by using WGS 84 datum which separates latitude and longitude with a comma You can enter 90 to 90 for the latitude value and 180 to 180 for the longitude...

Страница 452: ...mail server on the Internet confirm the setting information from the provider or website You can also set the mail server from the printer s control panel Access as below Settings General Settings Network Settings Advanced Email Server Server Settings 1 Access Web Config and select the Network tab Email Server Basic 2 Enter a value for each item 3 Select OK The settings you have selected are displ...

Страница 453: ...ted Account If you select SMTP AUTH or POP before SMTP as the Authentication Method enter the authenticated account name between 0 and 255 characters in ASCII 0x20 0x7E When you select SMTP AUTH enter the SMTP server account When you select POP before SMTP enter the POP3 server account Authenticated Password If you select SMTP AUTH or POP before SMTP as the Authentication Method enter the authenti...

Страница 454: ...not is changed Certificate Validation The certificate is validated when this is enabled We recommend this is set to Enable To set up you need to import the CA Certificate to the printer POP3 Server Address If you select POP before SMTP as the Authentication Method enter the POP3 server address between 0 and 255 characters using A Z a z 0 9 You can use IPv4 or FQDN format POP3 Server Port Number If...

Страница 455: ... authentication failed Unsupported communication method Check the followings SMTP Server Address SMTP Server Port Number This message appears when you try to communicate with unsupported protocols Connection to SMTP server failed Change Secure Connection to None This message appears when an SMTP mismatch occurs between a server and a client or when the server does not support SMTP secure connectio...

Страница 456: ... the shared network folder Creating the Shared Folder Before Creating the Shared Folder Before creating the shared folder check the following The printer is connected to the network where it can access the computer where the shared folder will be created A multi byte character is not included in the name of the computer where the shared folder will be created cImportant When a multi byte character...

Страница 457: ...ted access However the user who does not have authority cannot access them because the desktop folder is under the control of the user folder and then the security settings of the user folder are handed down to it The user who is permitted access on the Security tab user logged in and administrator in this case can operate the folder See below to create the proper location This example is when cre...

Страница 458: ...rive and then name it scan_folder For the folder name enter between 1 and 12 alphanumeric characters If the character limit of the folder name is exceeded you may not be able to access it normally by the varied environment 4 Right click the folder and then select Properties Administrator Information Settings to Use the Printer Setting a Shared Network Folder 458 ...

Страница 459: ...5 Click Advanced Sharing on the Sharing tab Administrator Information Settings to Use the Printer Setting a Shared Network Folder 459 ...

Страница 460: ...this folder and then click Permissions 7 Select Everyone group of Group or user names select Allow on Change and then click OK Administrator Information Settings to Use the Printer Setting a Shared Network Folder 460 ...

Страница 461: ...up that includes all users who can log in to the domain or computer This group is displayed only when the folder is created just below the root folder If it is not displayed you can add it by clicking Edit For more details see Related Information Administrator Information Settings to Use the Printer Setting a Shared Network Folder 461 ...

Страница 462: ...ns for Authenticated Users If it is not selected select Authenticated Users click Edit select Allow on Modify in Permissions for Authenticated Users and then click OK Administrator Information Settings to Use the Printer Setting a Shared Network Folder 462 ...

Страница 463: ...Permits Access on page 468 Example of Configuration for a Personal Computer This explanation is an example for creating the shared folder on the desktop of the user currently logging in to the computer The user who logs in to the computer and who has administrator authority can access the desktop folder and the document folder that are under the User folder Set this configuration when you DO NOT p...

Страница 464: ...ted by the administrator authority user account 2 Start explorer 3 Create the folder on the desktop and then name it scan_folder For the folder name enter between 1 and 12 alphanumeric characters If the character limit of the folder name is exceeded you may not be able to access it normally by the varied environment 4 Right click the folder and then select Properties Administrator Information Sett...

Страница 465: ...5 Click Advanced Sharing on the Sharing tab Administrator Information Settings to Use the Printer Setting a Shared Network Folder 465 ...

Страница 466: ...this folder and then click Permissions 7 Select Everyone group of Group or user names select Allow on Change and then click OK Administrator Information Settings to Use the Printer Setting a Shared Network Folder 466 ...

Страница 467: ...here can access the shared folder In this case the user who logs in to this computer and the Administrator can access the shared folder Add access permission if necessary You can add it by clicking Edit For more details see Related Information Administrator Information Settings to Use the Printer Setting a Shared Network Folder 467 ...

Страница 468: ...er from the computers of users or groups with access permission Related Information Registering a Destination to Contacts using Web Config on page 473 Adding Group or User Which Permits Access on page 468 Adding Group or User Which Permits Access You can add the group or user which permits access 1 Right click the folder and select Properties 2 Select Security tab Administrator Information Setting...

Страница 469: ...3 Click Edit Administrator Information Settings to Use the Printer Setting a Shared Network Folder 469 ...

Страница 470: ...full name of the group or user enter part of the name and then click Check Names The group names or user names that match part of the name are listed and then you can select the full name from the list If just one name matches the full name with underlining is displayed in Enter the object name to select Administrator Information Settings to Use the Printer Setting a Shared Network Folder 470 ...

Страница 471: ...f users or groups with access permission Using Microsoft Network Sharing When enabling it the following are possible Shares the USB storage over the network that is connected to the printer Forwards the scan result or receiving fax to the shared folder on the computer 1 Access Web Config and select the Network tab MS Network 2 Select Use Microsoft network sharing 3 Set each item 4 Click Next Admin...

Страница 472: ... to the printer User Name Set the user name for user authentication Enter between 1 and 127 characters in ASCII except However you cannot enter a single period or a combination of the period and a space alone Password Set the password for user authentication Enter between 1 and 64 characters in ASCII However you cannot just set 10 asterisks Encrypted Communication Set whether to enable encrypted c...

Страница 473: ...ol panel The differences between three tools are listed in the table below Features Web Config Epson Device Admin Printer s control panel Registering a destination Editing a destination Adding a group Editing a group Deleting a destination or groups Deleting all destinations Importing a file Exporting to a file Assigning destinations to frequent use Sorting destinations assigned to frequent use No...

Страница 474: ... click Apply Related Information Scanning Originals to a Network Folder on page 112 Running Web Config on a Web Browser on page 374 Destination Setting Items Items Settings and Explanation Common Settings Name Enter a name displayed in the contacts in 30 characters or less in Unicode UTF 8 If you do not specify this leave it blank Index Word Enter words to search in 30 characters or less in Unicod...

Страница 475: ...lder in 20 characters or less in Unicode UTF 8 However avoid using control characters 0x00 to 0x1f 0x7F FTP Secure Connection Select FTP or FTPS according to the file transfer protocol the FTP server supports Select FTPS to allow the printer to communicate with security measures Save to Enter the server name between 1 and 253 characters in ASCII 0x20 0x7E omitting ftp or ftps User Name Enter a use...

Страница 476: ...ick Edit 3 Select a group from Type 4 Click Select for Contact s for Group The available destinations are displayed 5 Select the destination that you want to register to the group and then click Select 6 Enter a Name and Index Word 7 Select whether or not you assign the registered group to the frequently used group Note Destinations can be registered to multiple groups 8 Click Apply Related Inform...

Страница 477: ...annot be edited because it is exported as a binary file When importing the printer settings to the printer contacts are overwritten For Epson Device Admin only contacts can be exported from the device s property screen Also if you do not export the security related items you can edit the exported contacts and import them because this can be saved as a SYLK file or csv file Importing Contacts Using...

Страница 478: ...ort Related Information Running Web Config on a Web Browser on page 374 Starting from Importing Contacts from Another Epson Printer If you have a printer that allows you to backup contacts and is compatible with this printer you can register contacts easily by importing the backup file Note For instructions on how to back up the printer contact s see the manual provided with the printer Follow the...

Страница 479: ...s All Items Export the encrypted binary file Select when you want to include the security items such as password and personal information You cannot edit the file If you select it you have to set the password Click Configuration and set a password between 8 and 63 characters long in ASCII This password is required when importing the binary file Items except Security Information Export the SYLK for...

Страница 480: ... multiple files 10 Click Import and then click OK on the import completion screen Return to the device s property screen 11 Click Transmit 12 Click OK on the confirmation message The settings are sent to the printer 13 On the sending completion screen click OK The printer s information is updated Open the contacts from Web Config or printer s control panel and then check that the contact is update...

Страница 481: ...Settings to make settings for Kerberos To perform Kerberos Authentication the following environment is required The printer and the DNS server can communicate The time of the printer KDC server and the server that is required for authentication LDAP server SMTP server File server are synchronized When the service server is assigned as the IP address the FQDN of the service server is registered on ...

Страница 482: ...selected are displayed Related Information Running Web Config on a Web Browser on page 374 LDAP Server Search Setting Items Items Settings and Explanation Search Base Distinguished Name If you want to search an arbitrary domain specify the domain name of the LDAP server Enter between 0 and 128 characters in Unicode UTF 8 If you do not search for arbitrary attribute leave this blank Example for the...

Страница 483: ...er set on LDAP Server Search Settings 1 Access Web Config and select the Network tab LDAP Server Connection Test 2 Select Start The connection test is started After the test the check report is displayed Related Information Running Web Config on a Web Browser on page 374 LDAP Server Connection Test References Messages Explanation Connection test was successful This message appears when the connect...

Страница 484: ...r location The administrative user account to the computer that creates save folders Destination for Scan to Network Folder SMB Contacts of the device User name and password to log on to the computer that has the save folder and the privilege to update the save folder Scan to Network Folder FTP Setup for FTP server log on Contacts of the device Logon information for the FTP server and the privileg...

Страница 485: ...or FQDN format you can use alphanumeric characters in ASCII 0x20 0x7E and except for at the beginning and end of the address 4 Click OK The network is re connected and then the settings are enabled Scanning From a Computer Install the software and check that the network scan service is enabled to scan via a network from the computer Software to be installed Epson Scan 2 This is a scanner driver If...

Страница 486: ...s being used the phone machine are connected correctly Fax basic settings Fax Setting Wizard is complete Other necessary Fax Settings are complete Connecting the Printer to a Phone Line on page 487 Making the Printer Ready to Send and Receive Faxes on page 490 Making Settings for the Printer s Fax Features According to Use on page 492 Fax Settings Fax Capable Printers Only on page 386 Configuring ...

Страница 487: ...jack using an RJ 11 6P2C phone cable When connecting a telephone to the printer use a second RJ 11 6P2C phone cable Depending on the area a phone cable may be included with the printer If it is included use that cable You may need to connect the phone cable to an adapter provided for your country or region Note Remove the cap from the EXT port of the printer only when connecting your telephone to ...

Страница 488: ...hone line connect the telephone to the printer Note If your phone device has a fax function disable the fax function before connecting See the manuals that came with the phone device for details Depending on the model of the phone device the fax function cannot be completely disabled so you may not be able to use it as an external phone If you connect an answering machine make sure the printer s R...

Страница 489: ...hone line make sure you connect the phone device to the EXT port of the printer If you split the line to connect the phone device and the printer separately the phone and the printer do not work correctly 3 Select Fax on the printer s control panel Administrator Information Settings to Use the Printer Making Fax Features Available Fax Capable Printe 489 ...

Страница 490: ...manually from the printer s control panel You need to run the wizard again in case the wizard is skipped when the printer is first turned on or when the connection environment has changed The items below are what you can set through the wizard Header Your Phone Number and Fax Header Receive Mode Auto or Manual Distinctive Ring Detection DRD Setting The items below are set automatically according t...

Страница 491: ...Receive Mode setting If you do not need to connect a phone device to the printer Select No Receive Mode is set to Auto If you need to connect a phone device to the printer Select Yes and then select whether or not to receive faxes automatically 5 Check the settings you made on the screen displayed and then proceed to the next screen To correct or change settings tap 6 Check the fax connection by s...

Страница 492: ...Making Settings for a PBX Phone System Make the following settings when using the printer in offices that use extensions and require external access codes such as 0 and 9 to get an outside line 1 Select Settings on the printer s control panel 2 Select General Settings Fax Settings Basic Settings 3 Select Line Type and then select PBX 4 When sending a fax to an outside fax number using hash instead...

Страница 493: ...tings on page 387 Making Settings to Receive Faxes Operating Only a Connected Phone You can start receiving incoming faxes by only picking up the handset and operating the phone without operating the printer at all The Remote Receive feature is available for telephones that support tone dialing 1 Select Settings on the printer s control panel 2 Select General Settings Fax Settings Basic Settings R...

Страница 494: ...ettings to save received faxes to a computer using the PC FAX feature see Feature PC FAX Send Receive Windows Mac OS on page 131 Note As well as using the printer s control panel you can use Web Config to make saving settings to receive faxes Select the Fax tab Save Forward Settings Unconditional Save Forward and then make the saving destination settings in Fax Output You can also print and or for...

Страница 495: ... Close to complete the Unconditional Save Forward Settings This completes making unconditional saving settings to receive faxes You can set Common Settings as necessary For details see the explanation for Common Settings in the Save Forward Settings menu Note If you want to save received faxes with conditions see the related information link below Related Information Save Forward Settings on page ...

Страница 496: ...m the contacts list You can specify up to five forwarding destinations D Tap Close to finish selecting forwarding destinations and then tap Close E In Options When Forwarding Failed select whether to print received documents or save them in the printer s Inbox when forwarding fails F Tap OK cImportant When the Inbox is full receiving faxes is disabled You should delete the documents from the inbox...

Страница 497: ...ake settings to save received faxes to the inbox and an external memory device from a specified sender or at a specified time Saving a fax in a confidential box or the inbox allows you to confirm the contents of the received fax by viewing the fax on the printer s LCD screen before the printer prints the fax Before you use the feature to save received faxes at a specified time make sure the printe...

Страница 498: ...the Receiving Time setting and then set the time in Start Time and End Time 5 Select Save Forward Destination and then make settings for the target destination box and or an external memory device To save the received faxes to the Inbox or a confidential box A Select Save to Fax Box B Tap Save to Fax Box to set this to On C Select the box in which to save the document To save received faxes to an ...

Страница 499: ...arding destination to the contacts list To forward to an email address you also need to configure the email server settings beforehand Configuring a Mail Server on page 452 Setting a Shared Network Folder on page 456 Making Contacts Available on page 472 Before you use the feature to forward received faxes at a specified time make sure the printer s Date Time and Time Difference settings are corre...

Страница 500: ...me setting and then set the time in Start Time and End Time 5 Select Save Forward Destination and then make settings for a forwarding destination A Select Forward B Select Yes To print the documents automatically while forwarding them select Yes and Print instead C Select Destination Add Entry and then select forwarding destinations from the contacts list You can specify a forwarding destination D...

Страница 501: ...that you test if you can send a scanned image to the destination in the scan mode Select Scan Email or Scan Network Folder FTP from the home screen select the destination and then start scanning Related Information Running Web Config on a Web Browser on page 374 Making Settings for Blocking Junk Faxes You can block junk faxes 1 Select Settings on the printer s control panel 2 Select General Settin...

Страница 502: ...eceived faxes on the printer as well as save them on a computer 1 Select Settings on the printer s control panel 2 Select General Settings Fax Settings Receive Settings 3 Select Save Forward Settings Unconditional Save Forward Save to Computer Yes and Print Making Save to Computer Setting not to Receive Faxes To set the printer not to save received faxes on the computer change the settings on the ...

Страница 503: ... Basic Settings Operation Time Out You can specify On or Off 3 Click OK Power Saving Settings During Inactivity You can set up the time to shift to the power saving mode or to turn the power off when the printer s control panel is not operated for a certain period of time Set the time depending on your usage environment 1 Access Web Config and select the Device Management tab Power Saving 2 Set up...

Страница 504: ...rmal Mode Set the sound when the printer is set to Normal Mode Quiet Mode Set the sound when the printer is set to Quiet Mode This is enabled when the one of the following items is enabled Printer s control panel Settings General Settings Printer Settings Quiet Mode Settings General Settings Fax Settings Receive Settings Print Settings Quiet Mode Web Config Fax tab Print Settings Quiet Mode 3 Clic...

Страница 505: ... to Email Scan to Memory Device Scan to Cloud Copy Fax 1 Access Web Config and select the functions for which you want to set the default value for the Scan Copy tab User Default Settings Select the Fax tab User Default Settings to set the default value for fax 2 Set each item 3 Click OK If the combination of the value is invalid it is automatically modified and then a valid value is set Problems ...

Страница 506: ...SSL TLS SSL TLS has the Encryption Strength You can open Web Config by using a web browser that supports bulk encryptions as indicated below Check you are using the a supported browser 80bit AES256 AES128 3DES 112bit AES256 AES128 3DES 128bit AES256 AES128 192bit AES256 256bit AES256 CA signed Certificate is expired If there is a problem with the expiration date of the certificate The certificate ...

Страница 507: ...sion or transferring and the user default settings An administrator sets a password to the device You can set or change from both Web Config and the printer s control panel Prevent from illegally reading and changing the information stored in the device such as ID password network settings and contacts Also reduce a wide range of security risks such as leakage of information for the network enviro...

Страница 508: ...moved Related Information Application for Configuring Printer Operations Web Config on page 374 Configuring the Administrator Password on page 508 Restricting Available Features on page 517 Disabling the External Interface on page 519 Making Settings for Processing Saved Data on page 520 Administrator Settings Configuring the Administrator Password When you set the administrator password you can p...

Страница 509: ... administrator password To delete the administrator password click Product Security tab Delete Administrator Password and then enter the administrator password Related Information Application for Configuring Printer Operations Web Config on page 374 Controlling the Panel Operation If you set the administrator password and enable the Lock Setting you can lock the items related to the printer s syst...

Страница 510: ...ig on page 374 Lock Setting Items for General Settings Menu This is a list of the Lock Setting items in Settings General Settings on the control panel Some functions can be set enabled or disabled individually General Settings menu Panel Lock Basic Settings LCD Brightness Sounds Sleep Timer Wake from Sleep Power Off Timer or Power Off Settings Date Time Settings Country Region Language 1 Start up ...

Страница 511: ...DL Print Configuration Auto Error Solver Memory Device Interface Thick Paper 1 Quiet Mode 1 Ink Drying Time Bidirectional Output Tray Auto Extension PC Connection via USB USB I F Timeout Setting General Settings menu Panel Lock Network Settings Administrator Information Managing the Printer Administrator Settings 511 ...

Страница 512: ...vanced Device Name TCP IP Proxy Server Email Server IPv6 Address MS Network Sharing Link Speed Duplex Redirect HTTP to HTTPS Disable IPsec IP Filtering Disable IEEE802 1X iBeacon Transmission General Settings menu Panel Lock Web Service Settings Epson Connect Services General Settings menu Panel Lock Fax Settings Administrator Information Managing the Printer Administrator Settings 512 ...

Страница 513: ... Report Settings Security Settings Check Fax Connection Fax Setting Wizard General Settings menu Panel Lock Scan Settings Confirm Recipient Document Capture Pro Email Server General Settings menu Panel Lock System Administration Administrator Information Managing the Printer Administrator Settings 513 ...

Страница 514: ...to be locked 1 You can enable or disable the lock from General Settings System Administration Security Settings Restrictions 2 Even though items on the upper level can be locked by administrator lock you can still access them from the same name menu of Settings Printer Status Print 3 Even though items on the upper level can be locked by administrator lock you can still access them from Home Descri...

Страница 515: ...ect General Settings System Administration Security Settings Restrictions 3 Select the item for the function that you want to change the setting of and then set to On or Off Items That Can Be Set Individually The administrator can permit the items below to display and change settings individually Job Log Access Job Status Log Control the display of the status monitor s job history Select On to per...

Страница 516: ...g of the language displayed on the control panel Select On to change the languages Access to Thick Paper Settings General Settings Printer Settings Thick Paper Control the changing of the settings of the Thick Paper function Select On to change the settings Access to Quiet Mode Settings General Settings Printer Settings Quiet Mode Control the changing of settings of the Quiet Mode function Select ...

Страница 517: ...length of time if there is no activity on the control panel Related Information Application for Configuring Printer Operations Web Config on page 374 Restricting Available Features You can register user accounts on the printer link them with functions and control functions that users can use When enabling access control the user can use functions such as copy fax etc by entering the password on th...

Страница 518: ...h function Select the function that you permit to use 4 Click Apply Return to the user setting list after a specific length of time Check that the user name you registered on User Name is displayed and changed Add to Edit Related Information Application for Configuring Printer Operations Web Config on page 374 Editing the User Account Edit the account registered to access control 1 Access Web Conf...

Страница 519: ...information Set it when you want to control the operation only from the printer s control panel and to permit printing and scanning from the computers 3 Click OK The completion message is displayed after a certain period of time Confirm that the icons such as copy and scan are grayed out on the printer s control panel Related Information Application for Configuring Printer Operations Web Config on...

Страница 520: ...ter using a USB cable and then confirm that the printer is not listed if you want to add the printer from Printers Scanners Related Information Application for Configuring Printer Operations Web Config on page 374 Making Settings for Processing Saved Data You can make settings for processing data stored in the internal hard disc Jobs for printing copying and scanning are temporarily saved to the h...

Страница 521: ... Select Settings on the home screen on the printer s control panel 2 Select General Settings System Administration HDD Erase Settings 3 Select Erase All Memory 4 Select High Speed Overwrite or Triple Overwrite according to the purpose 5 Select Yes on the confirmation screen Monitoring a Remote Printer Checking Information for a Remote Printer You can check the following information of the operatin...

Страница 522: ... Configuring a Mail Server on page 452 Configuring Email Notification Configure email notification by using Web Config 1 Access Web Config and select the Device Management tab Email Notification 2 Set the subject of email notification Select the contents displayed on the subject from the two pull down menus The selected contents are displayed next to Subject The same contents cannot be set on left...

Страница 523: ...d has been changed Paper out Notice when the paper out error has occurred in the specified paper source Printing stopped Notice when the printing is stopped due to paper jam or paper cassette not set Printer error Notice when the printer error has occurred Scanner error Notice when the scanner error has occurred Fax error Notice when the fax error has occurred Wi Fi failure Notice when the error o...

Страница 524: ... need the password to import the file Leave this blank if you do not want to encrypt the file 4 Click Export cImportant If you want to export the printer s network settings such as the device name and IPv6 address select Enable to select the individual settings of device and select more items Only use the selected values for the replacement printer Related Information Application for Configuring P...

Страница 525: ...rypts confidential information stored in the printer all passwords private keys for the certificates hard disk authentication keys Configure the password encryption and back up the encryption key Because the encryption key is not accessible from outside the printer encrypted confidential information can be protected Control of protocol Controls the protocols and services to be used for communicati...

Страница 526: ...Related Information Making Settings for Password Encryption on page 526 Controlling Using Protocols on page 528 SSL TLS Communication with the Printer on page 540 Encrypted Communication Using IPsec IP Filtering on page 541 Connecting the Printer to an IEEE802 1X Network on page 553 S MIME Settings on page 556 Security Feature Settings When setting IPsec IP filtering or IEEE802 1X it is recommende...

Страница 527: ...en tap OK 4 Select Proceed to Backup The encryption key backup screen is displayed 5 Connect the USB memory to the printer s external interface USB port 6 Tap Start Backup Writing to the USB memory starts If an encryption key has already been stored in the USB memory it is overwritten 7 When a backup completion message is displayed tap Close 8 Press the P button to turn off the printer 9 Press the...

Страница 528: ...an lower unintended security risks by restricting printing from specific pathways or by controlling the available functions Controlling protocols Configure the protocol settings 1 Access Web Config and then select the Network Security tab Protocol 2 Configure each item 3 Click Next 4 Click OK The settings are applied to the printer Related Information Application for Configuring Printer Operations...

Страница 529: ...AW Custom Port Settings You can specify whether or not to allow printing from the RAW port custom port When this is enabled you can print from the RAW port custom port IPP Settings You can specify whether or not to allow printing from IPP When this is enabled you can print over the Internet FTP Settings You can specify whether or not to allow FTP printing When this is enabled you can print over an...

Страница 530: ...t value for WSD printing between 3 to 3 600 seconds Scanning Timeout sec Enter the communication timeout value for WSD scanning between 3 to 3 600 seconds Device Name Displays the WSD device name Location Displays the WSD location name LLTD Settings Items Setting value and Description Enable LLTD Select this to enable LLTD The printer is displayed in the Windows network map Device Name Displays th...

Страница 531: ...g value and Description Enable IPP Select to enable IPP communication Only printers that sup port IPP are displayed Allow Non secure Communication Select Allowed to allow the printer to communicate without any security measures IPP Communication Timeout sec Enter the timeout value for IPP printing between 0 to 3 600 seconds Require PIN Code when using IPP printing Select whether or not to require ...

Страница 532: ...acters Authentication Settings Algorithm Select an algorithm for an authentication for SNMPv3 Password Enter the password for an authentication for SNMPv3 Enter between 8 and 32 characters in ASCII 0x20 0x7E If you do not specify this leave it blank Confirm Password Enter the password you configured for confirmation Encryption Settings Algorithm Select an algorithm for an encryption for SNMPv3 Pas...

Страница 533: ...lidate the server of the other party from the Certification Authority that issued the CA signed Certificate of the other server Self signed Certificate This is a certificate that the printer signs and issues itself It is also called the root certificate Because the issuer certifies itself it is not reliable and cannot prevent impersonation When using for SSL TLS communication Use it when making th...

Страница 534: ...tain the same certificate and use it in common 3 Click Generate of CSR A CSR creating page is opened 4 Enter a value for each item Note Available key length and abbreviations vary by a certificate authority Create a request according to rules of each certificate authority 5 Click OK A completion message is displayed 6 Select the Network Security tab 7 Select one of the following SSL TLS Certificat...

Страница 535: ...nter s IP address 192 0 2 123 Printer name EPSONA1B2C3 Common Name EPSONA1B2C3 EPSONA1B2C3 local 192 0 2 123 Organization Organizational Unit Locality State Province You can enter between 0 and 64 characters in ASCII 0x20 0x7E You can divide distinguished names with commas Country Enter a country code in two digit number specified by ISO 3166 Sender s Email Address You can enter the sender s email...

Страница 536: ...is opened 4 Enter a value for each item Set CA Certificate 1 and CA Certificate 2 when verifying the path of the certificate on the web browser that accesses the printer Depending on where you create a CSR and the file format of the certificate required settings may vary Enter values to required items according to the following A certificate of the PEM DER format obtained from Web Config Private K...

Страница 537: ...t a certificate of a certificate authority that issues a CA signed Certificate used as server certificate Specify a file if you need CA Certificate 2 If your certificate s format is Certificate PEM DER import a certificate of a certificate authority that issues CA Certificate 1 Specify a file if you need Related Information Importing a CA signed Certificate on page 535 Deleting a CA signed Certifi...

Страница 538: ...ity tab S MIME Basic and then delete the self signed certificate for S MIME 1 Access Web Config and then select the Network Security tab Next select SSL TLS Certificate or S MIME Client Certificate 2 Click Update 3 Enter Common Name You can enter up to 5 IPv4 addresses IPv6 addresses host names FQDNs between 1 to 128 characters and separating them with commas The first parameter is stored to the c...

Страница 539: ... on page 374 Configuring a CA Certificate When you set the CA Certificate you can validate the path to the CA certificate of the server that the printer accesses This can prevent impersonation You can obtain the CA Certificate from the Certification Authority where the CA signed Certificate is issued Importing a CA Certificate Import the CA Certificate to the printer 1 Access Web Config and then s...

Страница 540: ...Configuring Basic SSL TLS Settings If the printer supports the HTTPS server feature you can use an SSL TLS communication to encrypt communications You can configure and manage the printer using Web Config while ensuring security Configure encryption strength and redirect feature 1 Access Web Config and select the Network Security tab SSL TLS Basic 2 Select a value for each item Encryption Strength...

Страница 541: ...addresses services and port by using IPsec IP Filtering function By combining of the filtering you can configure the printer to accept or block specified clients and specified data Additionally you can improve security level by using an IPsec Note Computers that run Windows Vista or later or Windows Server 2008 or later support IPsec Configuring Default Policy To filter traffic configure the defau...

Страница 542: ...g feature Access Control Configure a control method for traffic of IP packets Items Settings and Explanation Permit Access Select this to permit configured IP packets to pass through Refuse Access Select this to refuse configured IP packets to pass through IPsec Select this to permit configured IPsec packets to pass through Administrator Information Advanced Security Settings Encrypted Communicati...

Страница 543: ... obtain and import a CA signed certificate in advance ID Type If you select Pre Shared Key for Authentication Method select the type of ID for the printer ID Enter the printer s ID that matches the type of ID You cannot use and for the first character Distinguished Name Enter 1 to 255 1 byte ASCII 0x20 to 0x7E characters You need to include IP Address Enter IPv4 or IPv6 format FQDN Enter a combina...

Страница 544: ...n 1 and 127 characters Confirm Pre Shared Key Enter the key you configured for confirmation Encapsulation If you select IPsec for Access Control you need to configure an encapsulation mode Items Settings and Explanation Transport Mode If you only use the printer on the same LAN select this IP packets of layer 4 or later are encrypted Tunnel Mode If you use the printer on the Internet capable netwo...

Страница 545: ...hentication algorithm for ESP This is available when ESP is selected for Security Protocol AH Authentication Select the encryption algorithm for AH This is available when AH is selected for Security Protocol Related Information Configuring Default Policy on page 541 Configuring Group Policy A group policy is one or more rules applied to a user or user group The printer controls IP packets that mat...

Страница 546: ... static IPv6 address Remote Address Host Enter a device s IP address to control access The IP address must be 43 characters or less If you do not enter an IP address all addresses are controlled Note If an IP address is assigned automatically e g assigned by DHCP the connection may be unavailable Configure a static IP address Method of Choosing Port Select a method to specify ports Service Name If...

Страница 547: ...e maximum Example 25 80 143 5220 If you do not enter a port number all ports are controlled IKE Version Select IKEv1 or IKEv2 for IKE Version Select one of them according to the device that the printer is connected to IKEv1 The following items are displayed when you select IKEv1 for IKE Version Items Settings and Explanation Authentication Method If you select IPsec for Access Control select an op...

Страница 548: ...e key you configured for confirmation Remote Authentication Method If you select IPsec for Access Control select an option Used certificate is common with a default policy ID Type If you select Pre Shared Key for Authentication Method select the type of ID for the device that you want to authenticate ID Enter the printer s ID that matches to the type of ID You cannot use and for the first characte...

Страница 549: ...ings and select an item other than Any for the other settings the device may not communicate depending on the other device that you want to authenticate Items Settings and Explanation IKE Encryption Select the encryption algorithm for IKE The items vary depending on the version of IKE Authentication Select the authentication algorithm for IKE Key Exchange Select the key exchange algorithm for IKE ...

Страница 550: ...ver and the a scanner driver SNMP UDP 161 Any port Acquiring and configuring of MIB from applications such as Epson Device Admin the Epson printer driver and the Epson scanner driver LPR TCP 515 Any port Forwarding LPR data RAW Port9100 TCP 9100 Any port Forwarding RAW data IPP IPPS TCP 631 Any port Forwarding data of IPP IPPS printing WSD TCP Any port 5357 Controlling WSD WS Discovery UDP 3702 An...

Страница 551: ...NetBIOS Datagram Service Local UDP 138 Any port NetBIOS Session Service Local TCP 139 Any port NetBIOS Name Service Remote UDP Any port 137 CIFS client forwarding scan data and received fax data to a folder NetBIOS Datagram Service Remote UDP Any port 138 NetBIOS Session Service Remote TCP Any port 139 HTTP Local TCP 80 Any port HTTP S server forwarding data of Web Config and WSD HTTPS Local TCP 4...

Страница 552: ...rily to change the printer settings Receiving access from a specified IP address only This example allows a specified IP address to access the printer Default Policy IPsec IP Filtering Enable Access Control Refuse Access Group Policy Enable this Group Policy Check the box Access Control Permit Access Remote Address Host IP address of an administrator s client Note Regardless of policy configuratio...

Страница 553: ...cess point 1 Access Web Config and then select the Network Security tab IEEE802 1X Basic 2 Enter a value for each item If you want to use the printer on a Wi Fi network click Wi Fi Setup and select or enter an SSID Note You can share settings between Ethernet and Wi Fi 3 Click Next A confirmation message is displayed 4 Click OK The printer is updated Related Information Application for Configuring...

Страница 554: ...ation regardless of the authentication method Import the certificate in CA Certificate Anonymous Name If you select PEAP TLS EAP TTLS or PEAP MSCHAPv2 for EAP Type you can configure an anonymous name instead of a user ID for a phase 1 of a PEAP authentication Enter 0 to 128 1 byte ASCII 0x20 to 0x7E characters Encryption Strength You can select one of the followings High AES256 3DES Middle AES256 ...

Страница 555: ... printer s user ID and or certificate protocol is incorrect Server ID Error Authentication has failed since the server ID of the server certificate and the server s ID do not match Server Certificate Error Authentication has failed since there are the following errors in the server certificate The server certificate is out of date The chain of the server certificate is incorrect CA Certificate Err...

Страница 556: ...that do not have an imported encryption certificate Items Settings and Explanation Scan to Email Configure email encryption when using Scan to Email If you select Select at runtime you can select whether or not to encrypt the email when sending it Default at runtime Select the default value of mail encryption when sending the mail This is available when Select at runtime is selected for Scan to Em...

Страница 557: ...mail when sending it Default at runtime Select the default value of the digital signature attachment when sending the mail This is available when Select at runtime is selected for Box to Email Fax to Email Configure the digital signature attachment to the email when using Fax to Email Algorithm Select an algorithm for the digital signature Related Information Configuring S MIME Basic Settings on p...

Страница 558: ...been imported a key icon is displayed on the contacts list Note You can check the certificate information for Encryption certificate status by selecting the destination number to which you have imported the encryption certificate and clicking Edit Related Information Application for Configuring Printer Operations Web Config on page 374 Solving Problems for Advanced Security Restoring the Security ...

Страница 559: ...supports the following algorithms Check the settings of the computer Security Methods Algorithms IKE encryption algorithm AES CBC 128 AES CBC 192 AES CBC 256 AES GCM 128 AES GCM 192 AES GCM 256 3DES IKE authentication algorithm SHA 1 SHA 256 SHA 384 SHA 512 MD5 IKE key exchange algorithm DH Group1 DH Group2 DH Group5 DH Group14 DH Group15 DH Group16 DH Group17 DH Group18 DH Group19 DH Group20 DH G...

Страница 560: ... tab IPsec IP Filtering Basic Group Policy Remote Address Host may not be found Use a static IP address Related Information Application for Configuring Printer Operations Web Config on page 374 Encrypted Communication Using IPsec IP Filtering on page 541 Cannot Create the Secure IPP Printing Port The correct certificate is not specified as the server certificate for SSL TLS communication If the sp...

Страница 561: ...into the printer after sending the CSR to a certificate authority Obtain the CA signed certificate again with the CSR CA signed Certificate is more than 5KB You cannot import a CA signed Certificate that is more than 5KB The password for importing the certificate is incorrect Enter the correct password If you forget the password you cannot import the certificate Re obtain the CA signed Certificate...

Страница 562: ... on page 534 Warning Relating to a Digital Certificate Appears Messages Cause What to do Enter a Server Certificate Cause You have not selected a file to import What to do Select a file and click Import CA Certificate 1 is not entered Cause CA certificate 1 is not entered and only CA certificate 2 is entered What to do Import CA certificate 1 first Invalid value below Cause Unsupported characters ...

Страница 563: ...certificate see the website of the certificate authority Cannot use the Server Certificates that include more than three CA certificates Cause The certificate file in PKCS 12 format contains more than 3 CA certificates What to do Import each certificate as converting from PKCS 12 format to PEM format or import the certificate file in PKCS 12 format that contains up to 2 CA certificates The certifi...

Страница 564: ...d computer failed or the file cannot be read by some errors What to do After checking the specified file and communication import the file again Related Information About Digital Certification on page 533 Delete a CA signed Certificate by Mistake There is no backup file for the CA signed certificate If you have the backup file import the certificate again If you obtain a certificate using a CSR cr...

Страница 565: ...Epson Open Platform Version Select the version of Epson Open Platform The corresponding version varies depending on the authentication system Product Key or License Key Enter the product key obtained from the dedicated Web site See the Epson Open Platform manual for details such as how to obtain the product key 3 Click Next A confirmation message is displayed 4 Click OK The printer is updated Rela...

Страница 566: ...on over the Internet This can be used to predict when consumables and replacement parts need to be replaced or replenished and to quickly resolve any errors or problems Contact your sales representative for more information about Epson Remote Services Administrator Information Epson Remote Services Information 566 ...

Страница 567: ...Where to Get Help Technical Support Web Site 568 Contacting Epson Support 568 ...

Страница 568: ...y if you give them the following information Product serial number The serial number label is usually on the back of the product Product model Product software version Click About Version Info or a similar button in the product software Brand and model of your computer Your computer operating system name and version Names and versions of the software applications you normally use with your product...

Страница 569: ...formation and technical support e mail Epson Helpdesk Phone 1300 361 054 Epson Helpdesk is provided as a final backup to make sure our clients have access to advice Operators on the Helpdesk can aid you in installing configuring and operating your Epson product Our Pre sales Helpdesk staff can provide literature on new Epson products and advise where the nearest dealer or service agent is located ...

Страница 570: ...is information includes your Epson product documentation type of computer operating system application programs and any information you feel is required Transportation of Product Epson recommends retaining product packaging for future transportation Help for Users in Indonesia Contacts for information support and services are World Wide Web http www epson co id Information on product specification...

Страница 571: ...Komplek Graha Niaga Nomor A 4 Medan SUMUT 061 42066090 42066091 mdn technical epson indonesia co id mdn adm epson indonesia co id PALEMBANG Epson Service Center Palembang Jl H M Rasyid Nawawi No 249 Kelurahan 9 Ilir Palembang Sumatera Selatan 0711 311 330 escplg epson indonesia co id escplg support epson indonesia co id PEKANBARU Epson Service Center PekanBaru Jl Tuanku Tambusai No 459 A Kel Tangk...

Страница 572: ...Boulevard B1 Jababeka cikarang Jawa Barat 021 89844301 29082424 ckg admin epson indonesia co id ckg technical epson indonesia co id MADIUN EPSON SERVICE CENTER MADIUN Jl Diponegoro No 56 MADIUN JAWA TIMUR 0351 4770248 mun admin epson indonesia co id mun technical epson indonesia co id PURWOKERTO EPSON SALES AND SERVICE Purwokerto Jl Jendral Sudirman No 4 Kranji Purwokerto JAWA TENGAH 0281 6512213 ...

Страница 573: ... indonesia co id SURABAYA EPSON SALES AND SERVICE SURABAYA GUBENG JL RAYA GUBENG NO 62 SURABAYA JAWA TIMUR 031 99444940 99446299 99446377 esssby epson indonesia co id esssby support epson indonesia co id AMBON EPSON SERVICE CENTER AMBON Jl Diponegoro No 37 Samping Bank Mandiri Syariah Kel Ahusen Kec Sirimau Ambon 97127 For other cities not listed here call the Hot Line 08071137766 Help for Users i...

Страница 574: ...on com ph contact E mail customercare epc epson com ph Accessible 9am to 6pm Monday through Saturday Except public holidays Our Customer Care team can help you with the following over the phone Sales enquiries and product information Product usage questions or problems Enquiries on repair service and warranty Epson Philippines Corporation Trunk Line 632 706 2609 Fax 632 706 2663 Help for Users in ...

Страница 575: ...ith the following over the phone Sales enquiries and product information Product usage questions or problems Enquiries on repair service and warranty Help for Users in Vietnam Contacts for information support and services are Epson Service Center 65 Truong Dinh Street District 1 Ho Chi Minh City Vietnam Phone Ho Chi Minh City 84 8 3823 9239 84 8 3825 6234 29 Tue Tinh Quan Hai Ba Trung Hanoi City V...

Страница 576: ...sales services users are welcome to contact Epson Hong Kong Limited Internet Home Page http www epson com hk Epson Hong Kong has established a local home page in both Chinese and English on the Internet to provide users with the following information Product information Answers to Frequently Asked Questions FAQs Latest versions of Epson product drivers Technical Support Hotline You can also contac...

Отзывы: