Power consumption
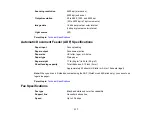
Standalone copying: Approx. 16 W (ISO/IEC24712)
(100 to 120 V model)
Ready mode: Approx. 6.5 W
Sleep mode: Approx. 3.8 W
Power off: Approx 0.2 W
Parent topic:
Environmental Specifications
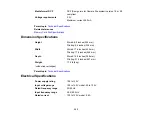
Temperature
Operating: 50 to 95 ºF (10 to 35 ºC)
Storage: -4 to 104 ºF (-20 to 40 ºC)
1 month at 104 ºF (40 ºC)
Humidity
Operating: 20 to 80% RH
(non-condensing)
Storage: 5 to 85% RH
Parent topic:
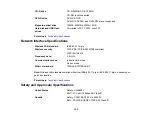
Interface Specifications
Interface type
Hi-Speed USB (Device class for computers)
Hi-Speed USB (for PictBridge-compliant devices/mass storage class
for external storage)
Note:
Epson cannot guarantee the operation of externally connected devices.
Parent topic:
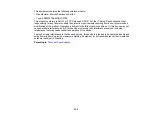
External USB Device Specifications
Note:
Use only external storage devices with independent AC power sources. External storage devices
that are powered via USB are not recommended.
324
Содержание WorkForce 545
Страница 1: ...WorkForce 545 645 Series User s Guide ...
Страница 2: ......
Страница 13: ...WorkForce 545 645 Series User s Guide Welcome to the WorkForce 545 645 Series User s Guide 13 ...
Страница 29: ...4 Slide the edge guide shown below to your paper size 29 ...
Страница 34: ...2 Pull out the paper cassette 3 Slide the edge guides outward 34 ...
Страница 39: ...2 Pull out the paper cassette 3 Slide the edge guides outward 39 ...
Страница 52: ...Parent topic Placing Originals on the Product Related topics Copying Scanning 52 ...
Страница 112: ... Normal preview Click the Auto Locate icon to create a marquee dotted line on the preview image 112 ...
Страница 116: ...3 Adjust the scan area as necessary 116 ...
Страница 123: ...123 ...
Страница 131: ...3 Adjust the scan area as necessary 131 ...
Страница 164: ...You see this window 5 Select Fax Settings for Printer You see this window 164 ...
Страница 175: ...5 Select Fax Settings for Printer You see this window 175 ...
Страница 176: ...6 Select your product if necessary 7 Select Speed Dial Group Dial List You see this window 176 ...
Страница 193: ...2 Insert your memory card into the correct slot making sure the card is oriented correctly 193 ...
Страница 249: ...249 ...
Страница 254: ...254 ...
Страница 281: ...5 Remove any jammed paper from the rear cover 6 Open the rear cover and remove any additional jammed paper 281 ...
Страница 282: ...7 Remove any paper jammed in the rear of your product Avoid touching the paper feed rollers 282 ...
Страница 285: ...3 Remove any jammed paper inside the cassette 4 Remove any paper jammed inside the paper cassette slot 285 ...
Страница 286: ...5 Carefully follow all paper loading instructions when you load new paper 6 Replace the paper cassette 286 ...
Страница 290: ...6 Lower the document cover 7 Raise the ADF input tray 8 Carefully remove the jammed paper 290 ...

