


Single-sheets
Size
A4 (8.3 × 11.7 inches [210 × 297 mm])
A6 (4.1 × 5.8 inches [105 × 148 mm])
Letter (8.5 × 11 inches [216 × 279 mm])
Legal (8.5 × 14 inches [216 × 357 mm])
4 × 6 inches (102 × 152 mm)
5 × 7 inches (127 × 178 mm)
8 × 10 inches (203 × 254 mm)
3.5 × 5 inches (89 × 127 mm)
16:9 wide (4 × 17.1 inches [102 × 434 mm])
Paper types
Plain paper and paper distributed by Epson
Thickness
0.003 to 0.004 inch (0.08 to 0.11 mm)
Weight
17 lb (64 g/m
2
) to 24 lb (90 g/m
2
)
Envelopes
Size
No. 10 (4.1 × 9.5 inches [105 × 241 mm])
Paper types
Plain bond paper
Weight
20 lb (75 g/m
2
) to 24 lb (90 g/m
2
)
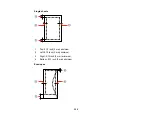
Parent topic:
Printable Area Specifications
Note:
When printing borderless, quality may decline in the expanded printable area.
319
Содержание WorkForce 545
Страница 1: ...WorkForce 545 645 Series User s Guide ...
Страница 2: ......
Страница 13: ...WorkForce 545 645 Series User s Guide Welcome to the WorkForce 545 645 Series User s Guide 13 ...
Страница 29: ...4 Slide the edge guide shown below to your paper size 29 ...
Страница 34: ...2 Pull out the paper cassette 3 Slide the edge guides outward 34 ...
Страница 39: ...2 Pull out the paper cassette 3 Slide the edge guides outward 39 ...
Страница 52: ...Parent topic Placing Originals on the Product Related topics Copying Scanning 52 ...
Страница 112: ... Normal preview Click the Auto Locate icon to create a marquee dotted line on the preview image 112 ...
Страница 116: ...3 Adjust the scan area as necessary 116 ...
Страница 123: ...123 ...
Страница 131: ...3 Adjust the scan area as necessary 131 ...
Страница 164: ...You see this window 5 Select Fax Settings for Printer You see this window 164 ...
Страница 175: ...5 Select Fax Settings for Printer You see this window 175 ...
Страница 176: ...6 Select your product if necessary 7 Select Speed Dial Group Dial List You see this window 176 ...
Страница 193: ...2 Insert your memory card into the correct slot making sure the card is oriented correctly 193 ...
Страница 249: ...249 ...
Страница 254: ...254 ...
Страница 281: ...5 Remove any jammed paper from the rear cover 6 Open the rear cover and remove any additional jammed paper 281 ...
Страница 282: ...7 Remove any paper jammed in the rear of your product Avoid touching the paper feed rollers 282 ...
Страница 285: ...3 Remove any jammed paper inside the cassette 4 Remove any paper jammed inside the paper cassette slot 285 ...
Страница 286: ...5 Carefully follow all paper loading instructions when you load new paper 6 Replace the paper cassette 286 ...
Страница 290: ...6 Lower the document cover 7 Raise the ADF input tray 8 Carefully remove the jammed paper 290 ...