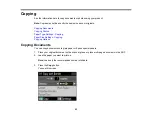

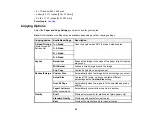


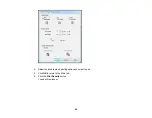

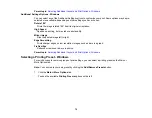

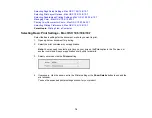
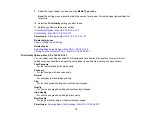


Print Density Adjustments - Windows
When you select the
User-Defined
setting (WorkForce 645 Series only), you can select any of the
available options on the Print Density Adjustment window to adjust the print quality of your double-sided
print job.
Print Density
Sets the level of ink coverage for double-sided printing.
Increase Ink Drying Time
Sets the amount of time required for drying ink after printing on one side of the paper before printing
the other side in double-sided printing.
Parent topic:
Selecting Double-sided Printing Settings - Windows
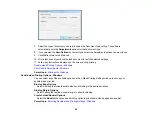
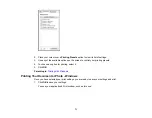
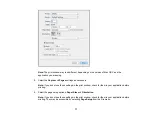
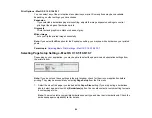
Selecting Additional Layout and Print Options - Windows
You can select a variety of additional layout and printing options for your document or photo on the More
Options tab.
67
Содержание WorkForce 545
Страница 1: ...WorkForce 545 645 Series User s Guide ...
Страница 2: ......
Страница 13: ...WorkForce 545 645 Series User s Guide Welcome to the WorkForce 545 645 Series User s Guide 13 ...
Страница 29: ...4 Slide the edge guide shown below to your paper size 29 ...
Страница 34: ...2 Pull out the paper cassette 3 Slide the edge guides outward 34 ...
Страница 39: ...2 Pull out the paper cassette 3 Slide the edge guides outward 39 ...
Страница 52: ...Parent topic Placing Originals on the Product Related topics Copying Scanning 52 ...
Страница 112: ... Normal preview Click the Auto Locate icon to create a marquee dotted line on the preview image 112 ...
Страница 116: ...3 Adjust the scan area as necessary 116 ...
Страница 123: ...123 ...
Страница 131: ...3 Adjust the scan area as necessary 131 ...
Страница 164: ...You see this window 5 Select Fax Settings for Printer You see this window 164 ...
Страница 175: ...5 Select Fax Settings for Printer You see this window 175 ...
Страница 176: ...6 Select your product if necessary 7 Select Speed Dial Group Dial List You see this window 176 ...
Страница 193: ...2 Insert your memory card into the correct slot making sure the card is oriented correctly 193 ...
Страница 249: ...249 ...
Страница 254: ...254 ...
Страница 281: ...5 Remove any jammed paper from the rear cover 6 Open the rear cover and remove any additional jammed paper 281 ...
Страница 282: ...7 Remove any paper jammed in the rear of your product Avoid touching the paper feed rollers 282 ...
Страница 285: ...3 Remove any jammed paper inside the cassette 4 Remove any paper jammed inside the paper cassette slot 285 ...
Страница 286: ...5 Carefully follow all paper loading instructions when you load new paper 6 Replace the paper cassette 286 ...
Страница 290: ...6 Lower the document cover 7 Raise the ADF input tray 8 Carefully remove the jammed paper 290 ...