background image

TM-C3400A User’s Manual   

17

E

6.

Slide the paper ejection guide to align it with the roll paper width.

7.

Lock the paper ejection guide, and then close the roll paper cover.

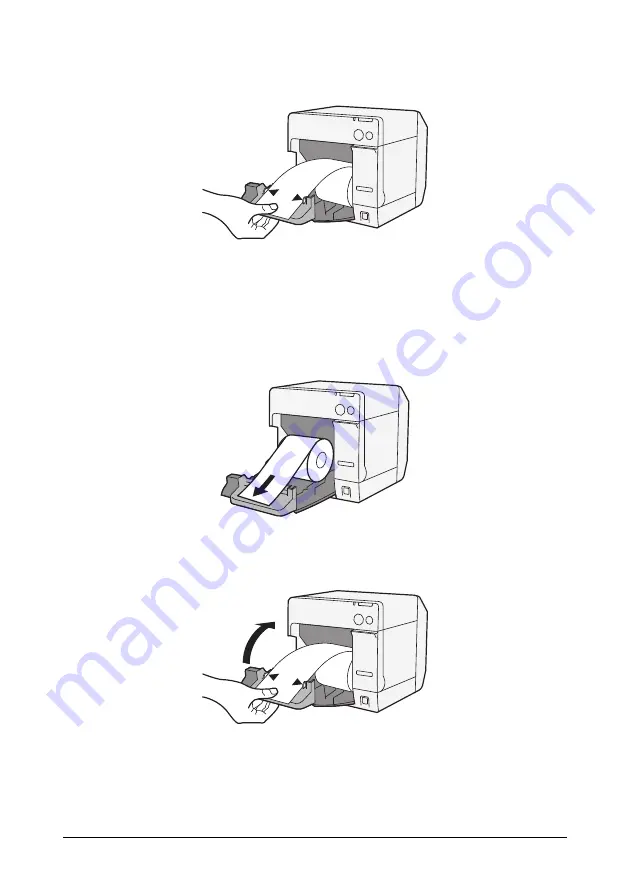
 Loading the paper and turning on the printer

1.

Pull the release lever to open the roll paper cover.

2.

Load the roll paper with the printable side up completely inside 
the printer.

3.

While aligning the roll paper with the paper ejection guide, close 
the roll paper cover.

4.

Turn on the printer, and then the paper is fed automatically.

Содержание TM-C3400A

Страница 1: ...User s Manual 412289100 ...

Страница 2: ... of this product or third parties for damages losses costs or expenses incurred by purchaser or third parties as a result of accident misuse or abuse of this product or unauthorized modifications repairs or alterations to this product or excluding the U S failure to strictly comply with Seiko Epson Corporation s operating and maintenance instructions Seiko Epson Corporation shall not be liable aga...

Страница 3: ...res Reorient or relocate the receiving antenna Increase the separation between the equipment and receiver Connect the equipment into an outlet on a circuit different from that to which the receiver is connected Consult the dealer or an experienced radio TV technician for help For Canadian Users This Class B digital apparatus complies with Canadian ICES 003 À l intention des utilisateurs canadiens ...

Страница 4: ...use an AC cable that meets the acquired safety standards Do not allow foreign matter to fall into the equipment Penetration by foreign objects may lead to fire If water or other liquid spills into this equipment unplug the power cord immediately and then contact your dealer or a Seiko Epson service center for advice Continued usage may lead to fire Do not use aerosol sprayers containing flammable ...

Страница 5: ... etc you should use this product only after giving consideration to including fail safes and redundancies into your design to maintain safety and total system reliability Downloading Drivers Utilities and Manuals Drivers utilities and manuals can be downloaded from the following URL http www epsonexpert com Unpacking The following items should be included with the printer If any items are damaged ...

Страница 6: ...If an accident occurs with the power switch cover attached unplug the AC cable immediately Continued used may cause fire Release lever Paper ejection guide Paper ejection guide lock Roll paper cover Power switch Ink cartridge cover Paper ejection tray Power LED Error LED Ink LED Paper LED Cut button Feed button Paper ejection table Power switch cover Fanfold paper cover Paper feed guide Fanfold pa...

Страница 7: ...led or is not correctly installed and when waste ink in the ink cartridge is full Off when ink in the ink cartridge is adequate Paper LED Lights when the paper is not installed or is not correctly installed Off when the paper is correctly installed Cut button Cuts the paper FEED button Feeds the paper Setup Follow in order the steps below to set up the printer 1 Installing the printer See page 8 2...

Страница 8: ...gh space in front of the printer for the ink cartridge cover and the roll paper cover to be fully opened Do not place the printer in dusty locations Protect the printer from heavy impacts They may cause defective print Do not allow cables to catch or foreign matter to accumulate under the printer Connecting the AC Cable WARNING Always use the Epson Model M159B PS 180 as the AC adapter Using the ot...

Страница 9: ...e ink cartridge cover When the ink cartridge is installed for the first time the printer takes approximately 8 minutes for ink charging The Power LED flashes during ink charging Do not turn off the printer or open the roll paper cover or the ink cartridge cover When ink charging finishes the Power LED stays on after flashing Note When the ink cartridge is installed for the first time the printer u...

Страница 10: ...the roll paper cover open The roll paper cover may close unexpectedly and your fingers may be caught Make sure paper is ejected straight from the paper ejection guides as shown in the illustration If paper is not ejected straight due to such causes as an obstruction the print result may be distorted Follow the steps below to install the paper When using this printert for the first time When instal...

Страница 11: ... the paper ejection table When installing roll paper When installing fanfold paper Removing paper page 11 Setting paper position detection page 12 Attaching the paper feed guide page 13 Loading the paper and turning on the printer page 17 Adjusting the guides page 16 Adjusting the guides page 13 Turning on the printer and loading the paper page 14 Removing the paper feed guide page 15 ...

Страница 12: ...paper position detection When paper position detection setting does not need to be changed skip this step Use the printer driver for this setting 1 Turn on the printer 2 Change Paper Position Detection on the Maintenance And Utilities tab of the printer driver depending on the paper to use Note For information on how to display the printer driver see page 19 3 Turn off the printer CAUTION The chan...

Страница 13: ...aper 1 Pull the release lever to open the roll paper cover 2 Insert the paper feed guide into the grooves inside of the roll paper cover to attach it 3 Close the roll paper cover Adjusting the guides When using the printer for the first time skip the following step 1 and 2 since the paper ejection guide is adjusted in the default setting 1 Unlock the paper ejection guide using the tip of a tool su...

Страница 14: ...on the printer and loading the paper CAUTION Do not pull the paper from inside the printer by opening the roll paper cover Doing so may cause a paper jam or other printing failures 1 Turn on the printer 2 When the Power LED stays on after flashing insert the paper with the printable side up until it is automatically drawn in approximately 100 mm and then the paper is fed automatically ...

Страница 15: ...UTION The paper feed guide should be attached to the printer only when you use fanfold paper Be sure to remove the paper feed guide when you use roll paper 1 Pull the release lever to open the roll paper cover 2 If the paper feed guide is attached into the grooves inside of the roll paper cover slide it in the direction of the arrow to remove it 3 Close the roll paper cover 40mm ...

Страница 16: ... release lever to open the roll paper cover 2 Unlock the roll paper guide 3 Push the roll paper guide on the left in the direction of the arrow and load the roll paper with the printable side up completely inside the printer 4 Lock the roll paper guide 5 Unlock the paper ejection guide using the tip of a tool such as a pen ...

Страница 17: ...the roll paper cover Loading the paper and turning on the printer 1 Pull the release lever to open the roll paper cover 2 Load the roll paper with the printable side up completely inside the printer 3 While aligning the roll paper with the paper ejection guide close the roll paper cover 4 Turn on the printer and then the paper is fed automatically ...

Страница 18: ...printed paper in the tray CAUTION Paper may not stay in the paper ejection tray depending on the paper curl and length 1 Attach the paper ejection tray to the hooks under the paper ejection table 2 Pull the lever at the bottom right of the paper ejection tray to unlock it 3 Slide the bottom tray to align it with the paper length and lock it ...

Страница 19: ...e the installation by following the instructions displayed If the screen confirming the connection to the computer is displayed during the installation connect the printer to the computer via the USB cable as shown below and then turn on the printer Displaying the Printer Driver Follow the steps below to display the printer driver For details on how to use the printer driver see the printer driver...

Страница 20: ...m cutting paper cleanly If this happens follow the steps below to clean the autocutter 1 Turn off the printer and unplug the AC cable from the inlet 2 Open the roll paper cover and remove the paper 3 Remove the adhesive on the autocutter blade on the side of the roll paper cover with an implement such as a cotton swab If necessary moisten the cotton swab with alcohol SW Function ON OFF 1 Operation...

Страница 21: ...ng Preferences screen of the printer driver 3 Click Manual Head Cleaning on the Maintenance And Utilities tab The printer checks for nozzle clogs If any found cleaning is performed automatically Cleaning will be repeated 5 times at most 4 Perform the nozzle check to confirm the cleaning result Troubleshooting Error LED on or flashing Check to see that the roll paper cover and the ink cartridge cov...

Страница 22: ...ollowing computers that run the above operating system PC AT compatible CPU Computers with a processor of 1 GHz or better are recommended Intel Pentium Celeron series AMD Athlon Duron family or processors that are compatible with these are recommended RAM 512 MB or larger is recommended HDD 250 MB Printing method Serial ink jet dot matrix Three color printing Paper feed Forward and reverse frictio...

Страница 23: ... Stacked GS1 DataBar Stacked Omnidirectional GS1 DataBar Expanded Stacked Composite Symbology DataMatrix Aztec Power supply Dedicated AC adapter Model M159B Life Carriage mechanism 6 million passes 3 million passes of carriage back and forth Print head 6 000 million shots nozzle Autocutter mechanism Normal paper 1 500 000 cuts Fine paper 750 000 cuts Normal label roll paper 750 000 cuts Fine label...

Страница 24: ...Printed in China ...

Отзывы: