background image

If you notice problems with the printed image after
transporting the printer, clean the print heads as described 
at the beginning of this chapter. If your printed images are
misaligned vertically, calibrate the printer as described in the

Setup and Software Guide

.

Troubleshooting 

This section describes what you can do if you are having
problems printing. It is divided into the following sections:

Error lights.

 See this section to identify a problem indicated

by the control panel lights.

Print quality problems. 

See this section if the print quality

is not good or not what you expect.

Problems with printing. 

See this section if your printer is

not printing.

Paper handling problems. 

See this section if you have

paper jams or other problems with paper feeding
incorrectly.

If you have a printing problem, check the appropriate section
and follow all suggestions that apply to your problem. Also
check the ReadMe icon on your Macintosh hard disk or in the
Windows EPSON group for the latest information. If none of
the suggested solutions solve your problem, call 

(800) 922-8911

in the U.S. and Canada. 

L

Verde+ Reference Guide

A5 size

Chapter 3

10-25-95

DR, pass 2-Rev1

3-10      

Maintenance and Troubleshooting

Содержание Stylus Pro - Stylus Color Pro Ink Jet Printer

Страница 1: ...ctly comply with Seiko Epson Corporation s operating and maintenance instructions Seiko Epson Corporation shall not be liable against any damages or problems arising from the use of any options or any consumable products other than those designated as Original EPSON Products or EPSON Approved Products by Seiko Epson Corporation EPSON EPSON Stylus and EPSON ESC P are registered trademarks and EPSON...

Страница 2: ...nter cover knob control panel paper tray output tray cover 1 interface card cover parallel interface serial interface cover 2 ink cartridge clamps paper thickness lever Control Panel Operate button cover 3 cover 4 L Verde Reference Guide A5 size Inside front cover 10 25 95 DR pass 1 Rev1 ...

Страница 3: ...ver is connected Consult the dealer or an experienced radio TV technician for help WARNING The connection of a non shielded equipment interface cable to this equipment will invalidate the FCC Certification of this device and may cause interference levels which exceed the limits established by the FCC for this equipment It is the responsibility of the user to obtain and use a shielded equipment int...

Страница 4: ...er and Other Media 1 2 Loading Plain Paper 1 4 Loading Oversized Paper 1 6 Using Special Papers and Other Media 1 7 Loading Special Papers and Transparencies 1 8 Loading Envelopes and Heavy Paper 1 11 Chapter 2 Controlling the Printer Using the Printer s Control Panel 2 2 Lights 2 3 Buttons 2 4 Using the Default Setting Mode 2 6 R Verde Reference Guide A5 size Frontmatter 10 25 95 DR pass 3 Rev1 4...

Страница 5: ...inter to the Network A 3 Turning On the Printer s Network Interface Mode A 4 Interface Boards for the PC A 5 Using the C823051 or C823061 Serial Interface Board A 5 Installing an Optional Interface Board A 6 Appendix B Technical Specifications Printing B 2 Paper B 3 Ink Cartridges B 6 Mechanical B 7 Electrical B 7 Environmental B 8 Safety Approvals B 8 Fonts B 8 Interface Specifications B 9 Parall...

Страница 6: ...haracter Tables Command List C 2 Character Tables C 3 International Character Sets C 10 Characters Available with ESC Command C 11 Glossary Index R Verde Reference Guide A5 size Frontmatter 10 25 95 DR pass 3 Rev1 4004918 01 v ...

Страница 7: ...in the Setup and Software Guide you can control settings such as document type printing mode and halftoning to produce just the right effects in your printed documents To make your job easy both the Windows and Macintosh printer drivers include an option that analyzes the elements on a page to be printed and automatically adjusts the driver settings so your printed results are appropriate for the ...

Страница 8: ...ch errors before you print If you have an electronic mail system available to you send E mail rather than memos Not only is this faster but you ll save paper and storage space too How to Use This Manual After you have set up the printer as described in the Setup and Software Guide refer to this manual for the following information Chapter 1 Paper Handling explains how to select the right paper for...

Страница 9: ...rted by the printer and shows the printer s built in character tables A Glossary and an Index are provided at the end of the manual Where to Get Help If you purchased your printer in the United States or Canada and you need technical assistance you can call an EPSON Color Specialist at one of the following numbers For the EPSON Stylus Pro 800 788 0343 For the EPSON Stylus Pro XL 800 667 0664 EPSON...

Страница 10: ... help with any software program you are using see that program s documentation for technical support information Electronic Support Services If you have a modem the fastest way to access helpful tips specifications drivers application notes tables for DIP switch or jumper settings and bulletins for EPSON products is through the online services below EPSON Bulletin Board Service You can call the EP...

Страница 11: ... 8199 in the United States and Canada and ask for representative 529 In other countries call the following U S telephone number 614 529 1611 or your local CompuServe access number World Wide Web site If you are connected to the Internet and have a Web browser you can access EPSON s World Wide Web site at http www epson com EPSON s home page links users to What s New EPSON Products EPSON Connection...

Страница 12: ...ot let the power cord become damaged or frayed If you use an extension cord with the printer make sure the total ampere rating of the devices plugged into the extension cord does not exceed the cord s ampere rating Also make sure the total of all devices plugged into the wall outlet does not exceed 15 amperes Except as specifically explained in this Reference Guide do not attempt to service the pr...

Страница 13: ...hoosing Paper and Other Media 1 2 Loading Plain Paper 1 4 Loading Oversized Paper 1 6 Using Special Papers and Other Media 1 7 Loading Special Papers and Transparencies 1 8 Loading Envelopes and Heavy Paper 1 11 1 R Verde Reference Guide A5 size Chapter 1 10 25 95 DR pass 2 Rev1 Paper Handling 1 1 ...

Страница 14: ...k jet printers These papers include the following EPSON Special coated paper for 360 dpi Use this paper for best results when printing at 360 dpi Five sample sheets are included with your printer EPSON Special coated paper for 720 dpi Use this paper for best results when printing at 720 dpi Five sample sheets are included with your printer EPSON High quality glossy paper Use this paper with 720 dp...

Страница 15: ...62 S041068 S041067 S041069 S041070 Special coated paper for 360 dpi Letter 8 5 x 11 inches A3 297 x 420 mm Super A3 B 13 x 19 inches S041060 S041065 S041066 High quality glossy paper Letter 8 5 x 11 inches A3 297 x 420 mm Super A3 B 13 x 19 inches B 11 x 17 inches S041072 S041073 S041074 S041075 Transparency film Letter 8 5 x 11 inches S041064 When selecting transparency film or high quality gloss...

Страница 16: ...printable surface down The printable surface is marked with an arrow on most plain paper packaging 1 Remove the output tray from the top of the paper tray 2 Slide the left edge guide inside the paper tray to the left as far as it will go 3 Flip up the rear edge guide and slide it toward you as far as it will go 4 Fan a stack of paper then tap it on a flat surface to even the edges rear edge guide ...

Страница 17: ...e left edge guide against the left edge of the paper as shown below You can load up to 100 sheets of plain bond paper but do not load paper above the arrow mark on the left edge guide 6 Slide the rear edge guide against the rear edge of the paper 7 Place the output tray on top of the paper tray WS 14 WS 15 R Verde Reference Guide A5 size Chapter 1 10 25 95 DR pass 2 Rev1 Paper Handling 1 5 ...

Страница 18: ...nd remove any paper in the paper tray 2 The paper tray extension acts as the rear edge guide so make sure the built in rear edge guide is folded down as shown in the illustration below 3 Gently pull the extension out using both hands one to hold the paper tray in position and the other to pull out the extension 4 Load the stack of paper in the tray and then slide in the extension until it meets th...

Страница 19: ...ies within six months Do not touch the printable surface of the paper The moisture and oils on your hands can reduce print quality Hold sheets by their edges Be sure to load paper with the printable surface face down The printable side is whiter than the other and is usually identified on the package When printing on high quality glossy paper or transparencies remove each sheet from the output tra...

Страница 20: ...ay need to adjust the paper thickness lever see page 1 11 If the paper doesn t feed properly or jams see Troubleshooting in Chapter 3 Loading Special Papers and Transparencies Follow these guidelines when printing on coated paper glossy paper or transparencies Use special coated paper for 360 or 720 dpi or transparencies only under these normal operating conditions Temperature 59 to 77 F 15 to 25 ...

Страница 21: ...l go 3 Fan a stack of paper then tap it on a flat surface to even the edges 4 Before you load paper make sure the printable surface is face down For coated papers the printable side is whiter than the other side For glossy paper and transparencies the printable side is face down when the cut corner is facing the right outside corner of the paper tray as shown in the following illustration 1 1 R Ve...

Страница 22: ...t edge guide against the left edge of the paper stack 5 Slide the rear edge guide against the rear edge of the paper 6 Change the Media Type and other printer driver settings to match the paper or transparencies you loaded as described in your Setup and Software Guide 1 6 1 3 L Verde Reference Guide A5 size Chapter 1 10 25 95 DR pass 2 Rev1 1 10 Paper Handling ...

Страница 23: ...g You can select from Bi D Uni D or Auto print directions using the Default setting mode The Uni D setting is recommended when printing at 720 dpi When loading heavy paper paper that is thick or stiff it is recommended that you load one sheet at a time Adjusting the paper thickness lever When printing on envelopes labels or heavy paper you need to adjust the paper thickness lever to compensate for...

Страница 24: ... the paper thickness lever follow these steps to load the paper tray 1 Remove the output tray and remove any paper from the paper tray 2 If you are printing on envelopes pull back the paper tray extension Then remove the rear edge guide turn it around and reinstall it as shown 1 8 1 9 L Verde Reference Guide A5 size Chapter 1 10 25 95 DR pass 2 Rev1 1 12 Paper Handling ...

Страница 25: ...r driver settings so they are appropriate for the media you loaded as described in your Setup and Software Guide Once you select the appropriate printer settings choose Print in the File menu to print on the media you loaded After you are finished printing on heavy paper or envelopes rotate the paper thickness lever by turning it counterclockwise to its original position Also return the rear edge ...

Страница 26: ...f Moira _______ Mary _______ Nancy _______ Cindy _______ Using the Printer s Control Panel 2 2 Lights 2 3 Buttons 2 4 Using the Default Setting Mode 2 6 2 R Verde Reference Guide A5 size Chapter 2 10 25 95 DR pass 2 Rev1 Controlling the Printer 2 1 ...

Страница 27: ...ront control panel contains lights for displaying the printer status and buttons for controlling certain settings Since most printer settings can be controlled from your software you do not often need to use the control panel This section describes how to read the lights and the buttons on the control panel Operate button 5 1 L Verde Reference Guide A5 size Chapter 2 10 25 95 DR pass 2 Rev1 2 2 Co...

Страница 28: ...re this light Economy On when economy printing mode is selected In economy mode the printer uses less ink by printing fewer dots per character which may make black text look gray Use this mode only for printing rough drafts of text from DOS applications Condensed On when condensed mode is selected The printer prints selected fonts at 60 of their width so more characters can fit on a page Software ...

Страница 29: ... of paper The printer normally loads and ejects paper automatically When pressed with Alt cleans the black print head Pause or Reset Stops printing temporarily Press it again to resume printing When pressed with Alt clears the printer s buffer and resets the printer settings to their factory defaults Economy Condensed or Color Selects economy or condensed mode In economy mode the printer uses less...

Страница 30: ... sheet of paper See Testing the Printer in Chapter 1 of the Setup and Software Guide To stop the self test press Pause and then turn off the printer Hex dump Operate Font Load Eject On a PC prints data in hexadecimal code for troubleshooting analysis See the Troubleshooting section in Chapter 3 Default setting mode Operate Economy Condensed Enters the Default setting mode See Using the Default Set...

Страница 31: ...ing mode and change the settings using the control panel buttons The table below lists the settings you can select in the Default setting mode Default values are shown in bold type Setting Options Print direction Auto Bi D Uni D Network interface mode On Off Auto line feed On Off Loading position 3 mm 8 5 mm Interface mode Auto I F mode Parallel I F Serial I F Option I F Auto interface wait mode 1...

Страница 32: ...d By default auto line feed is off If text lines print on top of one another turn on auto line feed Loading position Determines the top margin by defining how close to the paper edge the first line can print The loading position can be 3 mm default or 8 5 mm Normally you should use your software to adjust your top margin Interface mode Determines from which interface the printer receives print dat...

Страница 33: ...urn on Default setting mode and print instructions turn off the printer Then hold down the Economy Condensed button while you turn the printer back on Follow the instructions that describe how to change the default settings by pressing the buttons on the control panel When you are finished press Pause to exit the Default setting mode If there is still a sheet of paper in the printer press Load Eje...

Страница 34: ...rint Heads 3 2 Replacing an Ink Cartridge 3 3 Cleaning the Printer 3 8 Transporting the Printer 3 9 Troubleshooting 3 10 Error Lights 3 11 Print Quality Problems 3 12 Problems with Printing 3 16 Paper Handling Problems 3 20 3 R Verde Reference Guide A5 size Chapter 3 10 25 95 DR pass 2 Rev1 Maintenance and Troubleshooting 3 1 ...

Страница 35: ...a print head cleaning cycle to clear the print head nozzles so they deliver ink properly Note Because the cleaning cycle uses ink do not clean the print head s unless you notice a decline in print quality You must clean the print heads one at a time Each cleaning cycle takes about one minute During the cleaning cycle the carriage moves back and forth and you can hear the printer recharging the pri...

Страница 36: ...veral times If it does not improve after you clean the print heads five times replace one or both ink cartridges as described in the next section Replacing an Ink Cartridge You need to replace an ink cartridge when it runs out of ink the printer stops printing that color or if print quality declines and cleaning the print head did not improve it You can check print quality by doing a printer self ...

Страница 37: ...tridge you cannot reuse it Any paper in the paper path is ejected automatically when you replace the cartridge Follow these steps to replace either or both ink cartridges 1 Make sure the printer is on and open the printer cover 2 Press the Pause button and check that the Pause light comes on 3 Hold down the Alt button for about five seconds until the print head moves slightly left to the ink cartr...

Страница 38: ... carefully so any excess ink does not spill Do not take the used cartridge apart or try to refill it w Warning If ink gets on your hands wash them thoroughly with soap and water If ink gets into your eyes flush them immediately with water WS 8 7 1 R Verde Reference Guide A5 size Chapter 3 10 25 95 DR pass 2 Rev1 Maintenance and Troubleshooting 3 5 ...
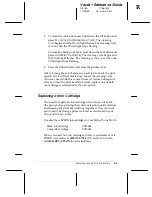
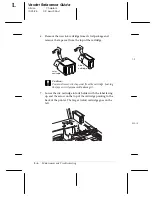
Страница 39: ...ng the tape on will permanently damage it 7 Lower the ink cartridge into its holder with the label facing up and the arrow on the top of the cartridge pointing to the back of the printer The larger color cartridge goes on the left color cartridge black cartridge 7 2 WS 10 L Verde Reference Guide A5 size Chapter 3 10 25 95 DR pass 2 Rev1 3 6 Maintenance and Troubleshooting ...
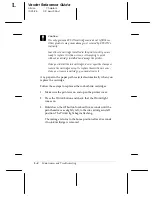
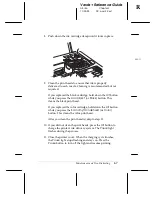
Страница 40: ... Alt button while you press the Economy Condensed or Color button This cleans the color print head After you clean the print head s skip to step 11 10 If you did not clean the print heads press the Alt button to charge the printer s ink delivery system The Pause light flashes during the process 11 Close the printer cover When the charging cycle finishes the Pause light stops flashing and stays on ...

Страница 41: ...sed to prevent water from getting inside 5 If the inside of the printer accidentally gets soiled with ink wipe it off with a damp cloth w Warning Be careful not to touch the gears inside the printer c Caution Never use alcohols or thinners to clean the printer these chemicals can damage the components as well as the case Be careful not to get water on the printer mechanism or electronic components...

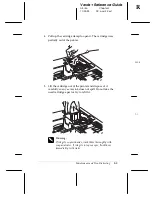
Страница 42: ...nter without the cartridges installed can damage it 3 Use a strong adhesive tape to secure the print head to the side of the printer 4 Unplug the power cord from the electrical outlet 5 Disconnect the interface cable from the printer 6 Remove the output tray from the top of the paper tray and remove any paper 7 Remove the paper tray from the printer 8 Attach the protective material to the printer ...

Страница 43: ...lity problems See this section if the print quality is not good or not what you expect Problems with printing See this section if your printer is not printing Paper handling problems See this section if you have paper jams or other problems with paper feeding incorrectly If you have a printing problem check the appropriate section and follow all suggestions that apply to your problem Also check th...

Страница 44: ...e are flashing Carriage error Turn the printer off check for and clear any carriage obstructions paper etc and turn the printer back on If the error persists contact your dealer or an authorized service provider All lights except Operate are flashing Fatal error Turn the printer off wait 10 seconds and then turn it on again If this does not correct the problem you can reset the printer s factory d...

Страница 45: ...page of text lines in various colors including black magenta cyan and yellow If the black lines don t print replace the black ink cartridge if any of the colored lines don t print change the color ink cartridge For color or complex grayscale images turn on MicroWeave and turn off High Speed mode Use a higher quality paper For best print quality use EPSON special coated papers for 360 and 720 dpi o...

Страница 46: ...er Use a higher quality paper If you are using 720 dpi resolution you will get better results if you use EPSON special coated paper for 720 dpi or EPSON high quality glossy paper Also check that the Media Type setting in the driver is set for the type of paper loaded Check whether economy printing mode is on To turn off this mode press the Economy Condensed button until the Economy light goes off ...

Страница 47: ... both print heads The printout contains incorrect or garbled characters Make sure EPSON Stylus Pro or Pro XL is selected as the default Windows printer driver PC driver or is the last printer selected in the Chooser Macintosh driver If you are running Windows make sure the Print Manager is turned off in the Control Panel Printers utility see your Windows documentation or online help for instructio...

Страница 48: ... your monitor and printer to more closely match colors If you are printing from a DOS application using economy mode black text or graphics will appear gray on your printout turn off economy mode to achieve deeper blacks Printing starts too high or too low on the page or the page length or margins are not what you expect Make sure you selected the correct Paper Size option in the printer driver se...

Страница 49: ...ace the ink cartridges The cable between the printer and your PC or Macintosh might not meet the specifications for the printer or computer For a parallel connection with your PC you need a shielded twisted pair parallel cable with a D SUB 25 pin male connector for the computer and a 36 pin Centronics compatible connector for the printer The cable should not be longer than 10 feet For the serial i...

Страница 50: ...ause lights flash There is a problem with the carriage Turn off the printer After a few seconds turn it back on and try printing again If this does not solve the problem contact your dealer or an authorized service provider The printer sounds like it is printing but nothing prints The print heads may need cleaning See Cleaning the Print Heads on page 3 2 for instructions One or both ink cartridges...

Страница 51: ...efault directory follow these steps 1 Make a directory on your hard disk to store the Spool Manager files for example C SPLTEMP 2 Open the EPSON program group and double click the Spool Manager icon 3 Make sure Stylus Pro or Stylus Pro XL is selected and then open the Queue menu 4 Select Setup In the Queue Setup dialog box change the spool directory to the one you created in step 1 5 Also make sur...

Страница 52: ...peed up text printing only turn off MicroWeave mode and turn on High Speed mode Some combinations of Printing Mode resolution and Media Type do not allow you to select these settings if this is the case for your settings select a lower resolution possibly using 180 dpi for drafts and 360 dpi for your final output However do not turn off MicroWeave when printing final copies of high quality graphic...

Страница 53: ...re EPSON Stylus Pro or Pro XL is selected as the default Windows printer driver PC driver or is the last printer selected in the Chooser Macintosh driver If you re an experienced user you can use the hex dump mode to pinpoint communication problems between the printer and a software program To turn on hex dump mode first turn off the printer Then hold down the Load Eject and Font buttons and turn ...

Страница 54: ...e direction shown otherwise ink from the printed sheet can come off onto the printer and smear other sheets 4 Pull the paper out carefully If it tears make sure you remove any remaining pieces 5 If paper is caught in the paper eject area gently pull it out of the printer 6 Close the printer cover 7 Turn on the printer to move the print heads to the correct positions 8 1 R Verde Reference Guide A5 ...

Страница 55: ...ets one at a time Paper feeding problems If paper is not feeding properly the most likely causes are the following Paper is curled or folded Use flat undamaged paper The paper is of poor quality use a better quality paper Too many sheets are loaded in the paper tray You can load up to 100 sheets of plain paper 70 sheets of special coated paper 30 sheets of high quality glossy paper 50 sheets of tr...

Страница 56: ...setting in your application software are set to print one copy at a time Also verify that you have selected the correct paper size in the driver and in your application software Ejected paper is wrinkled The paper is too thin or damp Do not store paper in damp or humid places Paper does not fully eject Use the Load Eject button to eject the page Make sure you selected the correct paper size in the...

Страница 57: ...oth sheets of paper Too much paper is loaded in the paper tray Remove a few sheets The paper is not the proper size and quality see Appendix B for exact specifications L Verde Reference Guide A5 size Chapter 3 10 25 95 DR pass 2 Rev1 3 24 Maintenance and Troubleshooting ...
Страница 58: ...for Macintosh A 2 Connecting the Printer to the Network A 3 Turning On the Printer s Network Interface Mode A 4 Interface Boards for the PC A 5 Using the C823051 or C823061 Serial Interface Board A 5 Installing an Optional Interface Board A 6 A R Verde Reference Guide A5 size Appendix A 10 25 95 DR pass 3 Rev1 Using Optional Interfaces A 1 ...

Страница 59: ...printer you need to obtain a LocalTalk or Ethernet interface board Contact your dealer or call EPSON Accessories at 800 873 7766 U S only In Canada call 800 BUY EPSON for sales locations If you install the LocalTalk board you also need to obtain a Locking Connector Kit DIN 8 version for the printer If your Macintosh is not already part of the network you need to obtain an additional kit for your M...

Страница 60: ... you are connecting to an EtherTalk network using a thin coaxial 10BASE2 cable first attach the T connector supplied with the board to the 10BASE2 connector on the Ethernet interface board Connect the network cable to one node of the T connector If the printer is not the last device in a daisy chain connect another network cable to the other node of the T connector If the printer is the last devic...

Страница 61: ... warms up it prints a page listing the available control panel languages 3 Unless you want to change the language of the control panel press the Alt button Press the Font button to change the control panel language The printer prints two instruction sheets that describe how to change default printer settings 4 Press the Font button until the Courier and Sans Serif H lights are on and the Roman T l...

Страница 62: ...ntact your dealer Using the C823051 or C823061 Serial Interface Board To use the C823051 or C823061 interface board see the sections below for information on selecting the baud rate handshake timing and error handling For all other data transfer conventions such as word structure and communications protocol see your interface board manual Selecting the baud rate You can select from the following b...

Страница 63: ... other errors including framing and overrun errors Installing an Optional Interface Board 1 Turn off the printer 2 Unplug the printer s power cord from the electrical outlet and disconnect any interface cables c Caution Do not install or remove an interface board when the printer is connected to the electrical outlet If you do you may damage your printer or computer 3 Remove the two screws securin...

Страница 64: ...operly 5 Slide the interface board along the slots on both sides of the interface compartment Push it in firmly to fully insert the connector at the rear of the interface board into the printer s internal socket 6 Secure the interface board in the slot with the two screws included with the interface board 6 1 6 2 R Verde Reference Guide A5 size Appendix A 10 25 95 DR pass 3 Rev1 Using Optional Int...

Страница 65: ... the printer is off Then plug in the power cord 10 If you are connecting your printer to an AppleTalk or EtherTalk network follow the guidelines on page A 3 You may need to change the settings for the interface options using the printer s Default setting mode See Using the Default Setting Mode in Chapter 2 for more information L Verde Reference Guide A5 size Appendix A 10 25 95 DR pass 3 Rev1 A 8 ...

Страница 66: ... Cartridges B 6 Mechanical B 7 Electrical B 7 Environmental B 8 Safety Approvals B 8 Fonts B 8 Interface Specifications B 9 Parallel Interface B 9 Serial Interface B 12 Optional Interfaces B 12 Initialization B 12 Default Settings B 13 B R Verde Reference Guide A5 size Appendix B 10 25 95 DR pass 2 Rev1 Technical Specifications B 1 ...

Страница 67: ...olution and amount of page covered Figures are based on letter size paper with color printing Resolution Maximum 720 720 dpi Paper feed speed 89 milliseconds per 1 6 inch line 2 2 inches per second Input buffer 64KB Print direction Bidirectional with logic seeking Control code ESC P 2 and expanded raster graphics code Paper feeding Auto sheet feeder Line spacing 1 6 inch default programmable to 1 ...

Страница 68: ... 10 envelopes Paper size Letter 8 5 11 inches A4 210 297 mm Legal 8 5 14 inches US B 11 17 inches Super A3 B 13 9 inches A3 297 420 mm Statement 8 5 5 5 inches Executive 7 5 10 inches Stylus Pro XL only Paper types Plain paper and special papers distributed by EPSON special coated paper high quality glossy paper and transparencies Paper thickness 0 003 to 0 004 inch 0 08 to 0 11 mm Paper weight 17...

Страница 69: ...ity 20 to 60 RH Use envelopes that do not curl The following EPSON genuine papers are available S041062 Special coated paper for 720 dpi printing Letter S041067 Special coated paper for 720 dpi printing Legal S041068 Special coated paper for 720 dpi printing A3 S041070 Special coated paper for 720 dpi printing B S041069 Special coated paper for 720 dpi printing Super A3 B S041060 Special coated pa...

Страница 70: ...nch for Statement and Executive size paper 9 7 mm 0 38 inch for Letter and Legal size paper and transparencies 13 8 mm 0 54 inch for DL envelopes 35 1 mm 1 38 inch for No 10 envelopes For Stylus Pro XL 3 mm 0 12 inch for all paper sizes and envelopes C The minimum bottom margin is 0 55 inch 14 mm A BR C BL A 1 A BL BR C A 2 R Verde Reference Guide A5 size Appendix B 10 25 95 DR pass 2 Rev1 Technic...

Страница 71: ...llion characters 670 sheets color letter 5 duty at 360 dpi Cartridge life 2 years from production date and up to 6 months after opening the package at 77 F 25 C based on letter size paper Temperature Storage 22 to 104 F 30 to 40 C 1 month at 104 F 40 C Transit 22 to 140 F 30 to 60 C 1 month at 104 F 40 C 120 hours at 140 F 60 C Freezing 21 2 F 6 C Dimensions 2 1 inches W 2 7 inches D 1 7 inches H ...

Страница 72: ...ges Dimensions and weight Stylus Pro Width 19 0 inches 482 mm Depth 20 9 inches 530 mm Height 7 2 inches 182 mm Weight 16 7 lb 7 5 kg Stylus Pro XL Width 22 8 inches 580 mm Depth 23 5 inches 597 mm Height 7 2 inches 182 mm Weight 22 1 lb 10 kg Electrical Input voltage range 103 5 to 132 V Rated frequency range 50 to 60 Hz Input frequency range 49 5 to 60 5 Hz Rated current 0 6 A Power consumption ...

Страница 73: ...2 2 950 with D3 R F I FCC part 15 subpart B class B Fonts The printer comes with an installed set of fonts shown below which are selectable with the Font button on the control panel However the printer always uses the fonts you select with your software program The only time you need to select the printer s installed fonts is when your software program does not allow you to select fonts font2 L Ve...

Страница 74: ...l Direction Description 1 19 STROBE IN STROBE pulse to read data 2 3 4 5 6 7 8 9 20 21 22 23 24 25 26 27 DATA 1 DATA 2 DATA 3 DATA 4 DATA 5 DATA 6 DATA 7 DATA 8 IN IN IN IN IN IN IN IN These signals represent information in bits 0 to 7 of parallel data respectively Each signal is at HIGH level when data is logical 1 and LOW when it is logical 0 10 28 ACKNLG OUT About a 5 µs pulse LOW indicates dat...

Страница 75: ...er is automatically fed one line after printing 15 NC Not used 16 GND Logic ground level 17 CHASSIS GND Printer s chassis ground which is connected to the logic ground 18 NC Not used 19 30 GND Twisted pair return signal ground level 31 16 INIT IN When this signal goes LOW the printer controller is reset to its state when the power is first turned on and the print buffer is cleared This level is no...

Страница 76: ...rn side All interface conditions are based on TTL level Both the rise and fall times of each signal must be less than 0 2 microseconds Data transfer must be carried out by observing the ACKNLG or BUSY signal Data transfer to this printer can be carried out only after receipt of the ACKNLG signal or when the level of the BUSY signal is LOW Timing chart The figure below shows the timing chart for th...

Страница 77: ...e interfaces are listed in Appendix A Please refer to the specifications in the user s guide packed with the optional interface card Initialization The printer can be initialized returned to a fixed set of conditions in these ways Hardware initialization The printer is turned on The printer receives an INIT signal from the parallel interface pin 31 goes LOW Software initialization Software sends t...

Страница 78: ...s 61 lines for letter size paper 65 lines for A4 size paper Left and right margins Cancelled Line spacing 1 6 inch line spacing Character pitch Last font selected on control panel Vertical tab position Cleared Horizontal tab positions Every eight characters Font selection Last font selected on control panel Special printing effects Cancelled except condensed and economy printing User defined chara...

Страница 79: ...______ Mary _______ Nancy _______ Cindy _______ Command List C 2 Character Tables C 3 International Character Sets C 10 Characters Available with ESC Command C 11 C R Verde Reference Guide A5 size Appendix C 10 30 95 DR pass 3 Rev1 Commands and Character Tables C 1 ...

Страница 80: ...ition motion ESC n1 n2 ESC n1 n2 ESC V nn ESC v nn ESC D nn HT ESC B nn VT ESC J n Font selection ESC k n ESC X nn ESC P ESC M ESC g ESC p 1 0 ESC x n ESC 4 ESC 5 ESC E ESC F ESC n Font enhancement SI DC2 SO ESC W 1 0 DC4 ESC w 1 0 ESC G ESC H ESC S 0 ESC S 1 ESC T ESC nn ESC 1 0 ESC q n Spacing ESC SP n ESC U nn ESC c n1 n2 Character handling ESC t nn ESC t n ESC R n ESC nn ESC 0 n 0 ESC n ESC 6 ...

Страница 81: ...ter you need you should never have to change the character table These character tables are selected using the printer s Default setting mode or by using software commands All tables except the italic are the same as the PC437 table for hex codes 00 through 7F so only the PC437 table is shown completely The rest of the tables show only the characters for hex codes 80 through FF PC437 U S Standard ...

Страница 82: ...PC850 Multilingual PC860 Portuguese PC861 Icelandic PC863 Canadian French PC850 PC860 PC861 PC863 L Verde Reference Guide A5 size Appendix C 10 30 95 DR pass 3 Rev1 C 4 Commands and Character Tables ...

Страница 83: ...PC865 Nordic PC437 Greek PC853 Turkish PC855 Cyrilic PC853 PC855 PC865 PC437g R Verde Reference Guide A5 size Appendix C 10 30 95 DR pass 3 Rev1 Commands and Character Tables C 5 ...

Страница 84: ...PC852 East Europe PC857 Turkish PC866 Russian PC869 Greek PC866 PC869 PC852 PC857 L Verde Reference Guide A5 size Appendix C 10 30 95 DR pass 3 Rev1 C 6 Commands and Character Tables ...

Страница 85: ...BRASCII Abicomp MAZOWIA Code MJK BRASCII ABICOMP MAZOWIA MJK R Verde Reference Guide A5 size Appendix C 10 30 95 DR pass 3 Rev1 Commands and Character Tables C 7 ...

Страница 86: ...ISO 8859 7 ISO Latin 1T Bulgaria IOS88590 ISOLATIN Bulgaria L Verde Reference Guide A5 size Appendix C 10 30 95 DR pass 3 Rev1 C 8 Commands and Character Tables ...

Страница 87: ...Italic No characters are available for hex code 15 in the italic character table Italic R Verde Reference Guide A5 size Appendix C 10 30 95 DR pass 3 Rev1 Commands and Character Tables C 9 ...

Страница 88: ...characters in the France row on the table below are used in the italic character table The following eight international character sets can be selected using Default setting mode or with the ESC R command The following seven additional sets can be selected only with the ESC R command intset10 intset20 L Verde Reference Guide A5 size Appendix C 10 30 95 DR pass 3 Rev1 C 10 Commands and Character Ta...

Страница 89: ...aracters Available with ESC Command To print the characters in the table below use the ESC command ESC R Verde Reference Guide A5 size Appendix C 10 30 95 DR pass 3 Rev1 Commands and Character Tables C 11 ...

Страница 90: ...ow and black K condensed printing Printing in which the width of each character is approximately 60 of the width of standard characters control code A special code used to control a printer function such as performing a carriage return or line feed cpi Characters per inch Determines the size and number of text characters that will fit in one inch Also called character pitch default A value or sett...

Страница 91: ...Courier or Helvetica grayscale An image consisting of multiple shades of gray ranging from white to black halftoning Method of repeating tiny dot patterns to represent images hex dump A troubleshooting feature that helps identify the cause of communication problems between the printer and the computer When the printer is in hex dump mode it prints each code it receives in hexadecimal notation and ...
Страница 92: ...ram that sends commands for using the features of a particular printer reset To return the printer to its default settings resolution A measure of the amount of detail that can be represented Resolution of printed images is measured in number of dots per inch dpi Your printer has three resolution settings 720 720 360 360 and 180 180 dpi RGB A method of specifying color by its component proportion ...

Страница 93: ... 13 Character tables available B 2 C 3 11 international C 10 selecting 2 6 2 8 Cleaning buttons 2 5 6 print heads 2 4 6 3 7 printer 3 8 Clearing paper jams see Jammed paper Coated papers loading 1 7 11 selecting 1 2 3 specifications B 3 5 Coaxial cable A 2 3 Color button 2 4 Color images 3 12 3 15 Color ink cartridge see Ink cartridges Color Specialist Intro 3 CompuServe Intro 5 Condensed button 2...

Страница 94: ...feeder Feeding problems 3 22 24 Film see Transparencies Fonts button 2 4 5 3 20 condensed 2 4 default selection B 13 light 2 3 specifications B 8 G Garbled characters 3 14 Gears printer 3 8 Glossy paper loading 1 7 11 selecting 1 2 3 specifications B 3 4 Graphic mode assignment B 13 Grayscale 3 12 Grinding noise 3 17 H Handshake timing A 6 B 9 B 11 Heads see Print heads Heavy paper loading 1 11 13...

Страница 95: ...oversized paper 1 6 7 plain paper 1 4 5 problems 3 22 23 transparencies 1 7 11 Loading position adjusting 2 6 7 3 15 Lubricants 3 8 M Macintosh Intro 1 3 16 A 2 Maintenance 3 2 8 Manuals how to use Intro 2 3 Margins default setting B 13 left and right B 5 top and bottom 2 7 3 15 B 5 Mechanical specifications B 7 Media Type setting 3 12 Messages error 3 18 Microsoft Windows Intro 1 3 10 MicroWeave ...

Страница 96: ... 6 light 2 3 3 11 3 17 Pin assignments B 9 11 Pitch character B 13 Plain paper 1 2 loading 1 4 5 specifications B 3 Power button 2 4 consumption B 7 cord Intro 6 3 8 light 2 3 Print direction 2 6 7 B 2 Print heads cleaning 2 4 6 3 2 3 3 7 life expectancy B 7 nozzles 3 2 3 7 B 2 securing 3 9 Print quality problems 3 12 15 Print speed increasing 2 7 specifications B 2 Printable area B 5 Printable co...

Страница 97: ...tions B 3 5 Special printing effects B 13 Specifications B 2 13 Speed see Print speed Spool Manager 3 14 3 18 3 20 Stop printing see Pause Support online Intro 5 T Tab positions B 13 Technical assistance Intro 4 5 3 10 Telephone numbers Intro 4 5 Temperature for ink cartridges B 6 for paper 1 8 B 4 for printer B 8 Testing the printer 2 5 3 12 Timeout period 2 7 Timing chart B 11 Top margin 2 7 3 1...

Страница 98: ... Weight paper B 3 4 printer B 7 White banding 3 14 Windows Intro 1 3 10 Windows 95 reinstalling driver 3 18 World Wide Web Intro 5 Wrinkled paper 3 23 X X OFF code A 6 X ON code A 6 L Verde Reference Guide A5 size Index 10 25 95 DR pass 2 Rev1 6 Index ...

Отзывы: