background image

34

Summary of Panel Settings

Summary of Panel Settings

s

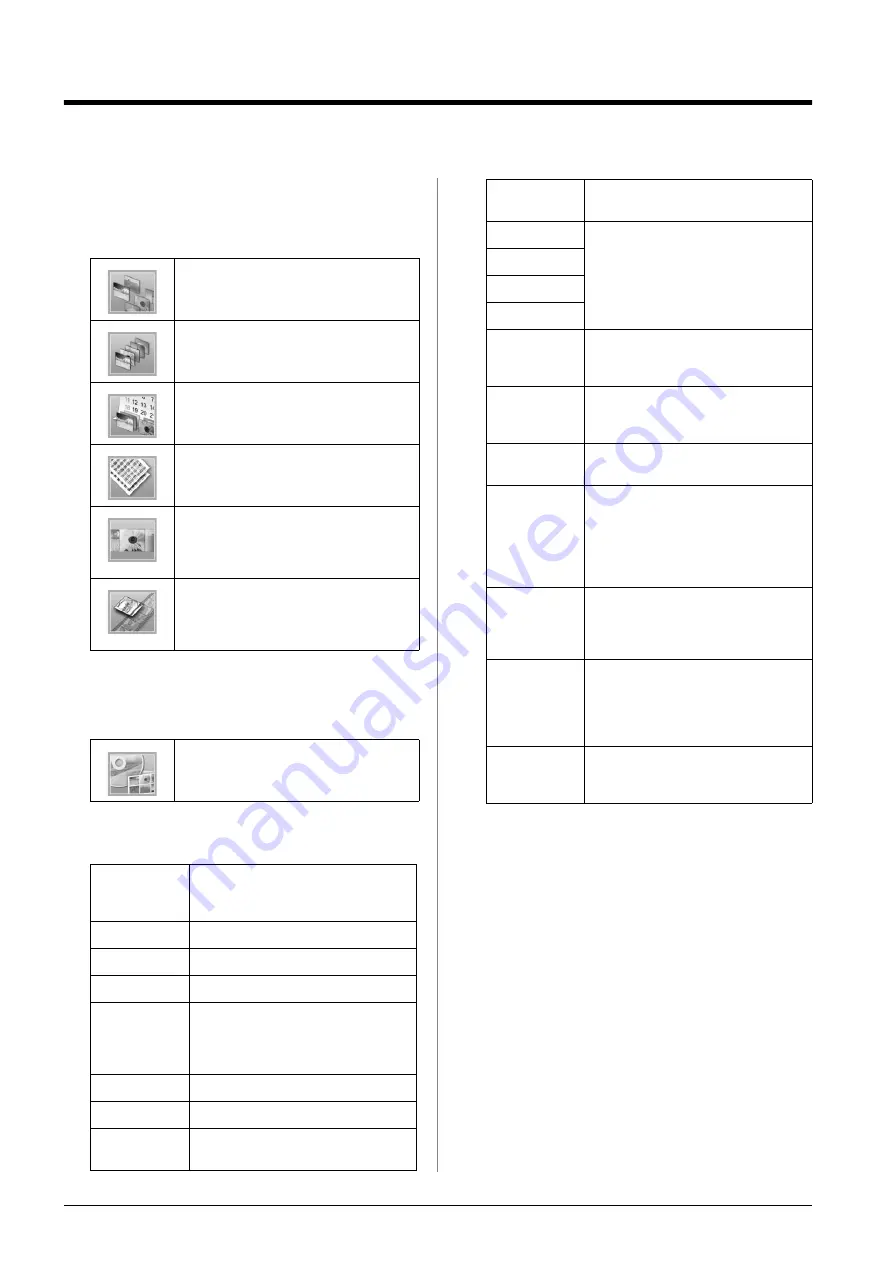
 Memory Card mode

On the first screen, you can select how to print or 
show data stored on a memory card.

CD/DVD [Print CD/DVD] mode

You can make an original CD/DVD in this mode.

x

 Print Settings

View and Print:

 Select several photos, with 

one or more copies for each (page 11).

Print All Photos:

 Print all the photos on your 

memory card (page 11).

Print by Date:

 Search photos by the date 

they are taken, and select the photos you 
want (page 12).

Print Proof Sheet:

 Print a thumbnail view of 

all the photos stored in your memory card 
(page 12).

Slide Show:

 View all photos on your 

memory card in sequence like a slide show, 
and select the photo you want to print 
(page 12).

Play Movie and Print Photos:

 View a 

movie on your memory card and select the 
scene that you want to print from the movie 
(page 17). 

Print on CD/DVD:

 Print on a 12-cm 

CD/DVD and make a CD jacket.

Media Type

In the 

CD/DVD

 [

Print CD/DVD

] mode, 

select 

CD/DVD

 or 

CD Jacket


depending on which you want to print.

Paper Type

For details, see page 19.

Paper Size

For details, see page 19.

Layout

For details, see page 19.

Movie 
Enhance

When set to 

On

, make adjustments to 

the image and improve its quality. This 
option is only available when printing 
from a movie.

Quality

Choose from 

Draft

Standard

, or 

Best

.

Filter

Print in B&W or Sepia.

Enhance

For details, see “Automatically 
adjusting your photos” on page 21.

Red-Eye 
Reduction

For details, see “Removing Red-Eye” 
on page 21.

Brightness

For details, see “Manually adjusting 
your photos” on page 21.

Contrast

Sharpness

Saturation

CD 
Inner-Outer

Adjust the print position for CD/DVD. 
For details, see “Adjusting the printing 
area” on page 15.

Density

Make your CD print lighter or darker. 
This option is available in the 

CD/DVD


[

Print CD/DVD

] mode.

Date

Print with captured date information. 
For details, see page 22.

Print Info.

Print the exposure time/shutter speed, 
F number, and ISO speed rate 
information based on the Exif 
information of the image data. This 
setting is not cleared even after turning 
off the printer.

Fit Frame

Enlarge or reduce the image to fit to the 
frame when set to 

On

. The longer side 

that extends beyond the printable area 
is not printed.

Bidirectional

Activate bidirectional printing so your 
printer prints both left-to-right and 
right-to-left. Bidirectional printing 
speeds up printing, but decreases print 
quality.

Expansion

Adjust the amount of image that 
extends beyond the paper size during 
borderless printing.

Содержание Stylus Photo R360

Страница 1: ... 17 Printing on Stickers 17 Photo Printing Options 19 Making the Paper and Layout Settings 19 Improving Print Quality 21 Removing Red Eye 21 Touching Up Your Photos 21 Cropping and Sizing Your Photos 21 Adding the Date 22 Printing Photos in Black and White or Sepia 22 Fit Frame 22 Setting the Printer Preferences 23 Restoring to Default Settings 23 Setting the Screen Saver 23 Changing the Language ...

Страница 2: ... stand it on its side or turn it upside down Otherwise ink may leak from the cartridges Avoid places subject to rapid changes in temperature and humidity Also keep the printer away from direct sunlight strong light or heat sources Leave enough room around the printer to allow for sufficient ventilation Place the printer near a wall outlet where the plug can be easily unplugged When using the print...

Страница 3: ... product or excluding the U S failure to strictly comply with Seiko Epson Corporation s operating and maintenance instructions Seiko Epson Corporation shall not be liable for any damages or problems arising from the use of any options or any consumable products other than those designated as Original Epson Products or Epson Approved Products by Seiko Epson Corporation Seiko Epson Corporation shall...

Страница 4: ...mputer and information on the software This guide is included in the software CD ROM and installed automatically when you installed the software To read this guide double click the icon on your desktop Online help Online help is built in each application included on the software CD ROM It provides detailed information on the application 1 Load paper Load paper printable side up then fit the edge g...

Страница 5: ...ition the front tray 3 Slide the edge guide to the left 4 Fan a stack of paper then tap it on a flat surface to even the edges 5 Load the paper against the right side of the sheet feeder with the printable side up Place the stack of paper behind the tabs and make sure it fits under the c mark inside the left edge guide Alwaysloadpapershortedgefirst evenfor landscape printing 6 Slide the edge guide...

Страница 6: ...r changes and lengthen display life For display Epson recommends that prints be framed under glass or a protective plastic sleeve to protect them from atmospheric contaminants like humidity cigarette smoke and high levels of ozone As with all photographs keep your prints away from high temperatures and humidity and out of direct sunlight For proper storage Epson recommends that you keep prints in ...

Страница 7: ...ory card meets the following requirements Data specifications Photo Movie These values are the maximum frame size and the maximum frame rate supported by this printer Depending on your movie data this printer may not be able to replay it even if it meets these requirements Card type CompactFlash Microdrive SD Memory Card miniSD card microSD card SDHC Memory Card miniSDHC card microSDHC card MultiM...

Страница 8: ...then save photos that are on your camera s memory card to an external device that you connect directly to your printer This lets you delete the images on your memory card and reuse it without losing your original photos For details on printing with a Bluetooth Photo Print Adapter see the on screen User s Guide Note Not all devices that can be connected with a USB cable are supported Contact your r...

Страница 9: ...n the CD R are capitals and the underscore _ Other characters are changed to underscores when backing up to CD R Printing photos from a storage device Note You may not be able to print photos in the storage device that were saved by using a product other than this printer 1 Make sure the printer is turned on 2 Plug your storage device into an electrical outlet if required 3 Connect a USB cable fro...

Страница 10: ... printer is not printing from a computer 2 Load the type of paper you want to use see page 5 3 Press the F Setup button 4 Press the l or r button to highlight PictBridge Settings then press the OK button 5 Use the LCD screen to select the print settings see page 19 6 When you finish selecting your print settings press the OK button 7 Aim your device s infrared port at the infrared port on the prin...

Страница 11: ...eat steps 3 and 4 for additional photos 6 Make the paper settings See Making the Paper and Layout Settings on page 19 Note You can confirm the print settings by pressing the OK button 7 Press the x Start button to print Printing all photos Print All Photos 1 Press the s Memory Card button 2 Press the l or r button to highlight Print All Photos on the first screen then press the OK button 3 Pressth...

Страница 12: ...thumbnails with the photo number and the date the photo was taken 1 Press the s Memory Card button 2 Press the l or r button to highlight Print Proof Sheet on the first screen then press the OK button 3 Make the paper settings if necessary See Making the Paper and Layout Settings on page 19 The layout printed in this print mode is fixed by the paper size as follows 4 Press the x Start button to pr...

Страница 13: ...utton 4 Press the Copies or button to choose the number of copies for that photo up to 99 5 Make Paper Type and Paper Size settings For details see Making the Paper and Layout Settings on page 19 Note You can check the print image by pressing the OK button 6 Press the x Start button to print Printing with DPOF Settings If your camera supports DPOF Digital Print Order Format you can use it to pre s...

Страница 14: ...he CD DVD tray or the internal transparent compartment are accidentally printed on immediately wipe off the ink Reprinting on the same CD DVD may not improve the print quality You can set the printable area of a CD DVD using EPSON Print CD Set the printable area to fit the printable area of the CD DVD that you are printing on When you make settings note that improper settings may stain the CD DVD ...

Страница 15: ...he 4 up 8 up or 12 up option for the Layout setting Note To select more than one photo repeat steps 4 and 5 to select other photos and the number of times to print them When selecting photos for the 4 up 8 up or 12 up layout setting you can select a number of photos less than the total Unused areas of the layout will be left blank You can confirm the print settings by pressing the OK button 6 Adju...

Страница 16: ...le You can print up to 24 photos on one sheet 1 Load A4 size paper 2 Press the CD DVD Print CD DVD button 3 When you see this screen press the OK button 4 Press the x Print Settings button 5 Select CD Jacket as the Media Type setting 6 Select the appropriate Paper Type setting for the paper loaded 7 Select A4 as the Paper Size setting 8 Select CD Case Upper or CD Case Index as the Layout setting a...

Страница 17: ...stheOKbutton Thenwhenyou see the last scene in range press the OK button again Note Use the following button when viewing the movie Press the l or r button to rewind or fast forward the movie Press the u or d button to pause or restart the movie Press the G Display Crop button to display the chapter list of the movie 7 Press the Copies or button to choose the number of copies for that photo up to ...

Страница 18: ...epeat steps 7 and 8 to select other photos and the number of copies for each You can confirm the print settings by pressing the OK button 9 Press the x Start button to print If the printing is misaligned When you print on Photo Stickers with a 16 up layout you can adjust the print position 1 Press the F Setup button to open the Setup menu 2 Press the l or r button to highlight Adjust CD Print Alig...

Страница 19: ...nd press the r button 3 Press the d or u button to select the setting from the following table that matches the type of paper you loaded then press the OK button Paper Type List 4 Press the d or u button to select Paper Size then press the r button 5 Press the d or u button to select a paper size from the list below then press the OK button to set Paper Size List For this paper Select this Paper T...

Страница 20: ...ze photo paper This is useful for identification photographs 2 up 4 up Prints multiple photos on one sheet The size of each photo is adjusted automatically according to the number of photos to print and the size of paper 12 up layout is only available when Play Movie and Print Photos is selected in s Memory Card mode 16 up layout is only available when printing on photo stickers In 20 up layout th...

Страница 21: ... control the saturation and sharpness If you want you can make manual adjustments while P I M or PhotoEnhance are turned on in order to fine tune your automatic settings Note These settings affect only your printed pictures They do not change your original image files These settings are saved when you turn off the printer or choose a different set of photos so remember to turn off the settings whe...

Страница 22: ... are saved when you turn off the printer or choose a different set of photos so remember to change the settings back to None when you are done Printing Photos in Black and White or Sepia You can print your photo in black and white or in a sepia tone without changing the original photo Note A sepia print has a brownish tone for an old fashioned photo look 1 Press the x Print Settings button 2 Press...

Страница 23: ...e Screen Saver You can set photos on the inserted memory card as the screen saver on the LCD screen After about 3 minutes of inactivity the screen saver comes on After about 10 minutes the printer enters sleep mode 1 Press the F Setup button to open the Setup menu 2 Press the l or r button to highlight Maintenance then press the OK button 3 Press the u or d button to select Screen Saver Settings t...

Страница 24: ...iately c Caution To avoid damaging the printer never move the print head by hand When an ink cartridge is expended you cannot continue printing even if the other cartridges still contain ink Leave the expended cartridge installed in the printer until you have obtained a replacement Otherwise the ink remaining in the print head nozzles may dry out An IC chip on each ink cartridge monitors the amoun...

Страница 25: ...aution Be careful not to break the hooks on the side of the ink cartridge when you remove it from the package Do not touch the green IC chip on the side of the cartridge This can damage the ink cartridge 4 Remove the yellow tape from the bottom of the ink cartridge c Caution You must remove the yellow tape from the cartridge before installing it otherwise print quality may decline or you may not b...

Страница 26: ...ove and charging of the ink delivery system will begin When the ink charging process is finished the print head will return to its home position and the message Ink cartridge replacement is complete is displayed on the LCD screen c Caution Never turn off the power supply to the printer before the completion message is displayed Doing so can result in incomplete charging of ink Do not insert CD DVD...

Страница 27: ...n Do not turn off the printer or interrupt the cleaning process 5 When cleaning is done run a nozzle check to confirm the print head nozzles are clean Make sure A4 plain paper is loaded in the printer then press the x Start button The nozzle check pattern is printed 6 Examine the nozzle check pattern you printed Each staggered horizontal and straight vertical line should be complete with no gaps i...

Страница 28: ...he LCD screen Do not use liquid or chemical cleaners on the LCD screen 5 If ink has spilled inside the printer wipe it off only in the area shown below using a soft damp cloth w Warning Do not touch the gears inside the printer c Caution Be careful not to wipe away lubricating grease inside the printer Never use a hard or abrasive brush or alcohol or thinner for cleaning they can damage the printe...

Страница 29: ...emove any paper from the printer push down the paper support extension and close the paper support 5 Open the printer cover Secure the ink cartridge holder to the printer with tape as shown then close the printer cover 6 Make sure the front tray is in the paper position lower position then push in the front tray extension and close the front cover 7 Repack the printer and its attachments in the or...

Страница 30: ...27 Run the Print Head Alignment utility See Aligning the print head on page 27 Make sure that the Paper Type selected on the LCD screen is appropriate for the type of media loaded in the printer The ink cartridge may be old or low on ink See Replacing Ink Cartridges on page 24 You see wrong or missing colors Run the Head Cleaning utility See Cleaning the print head on page 27 If colors are still i...

Страница 31: ...s printing Paper is rubbed during printing When you print on thick paper you can widen the gap where the paper feeds Press the F Setup button select Maintenance then press the OK button Next select Thick Paper Adjustment and press the OK button Then select On and press the OK button Smudges or blots appear on the printout Feed paper and clean the roller inside See Cleaning the roller inside the pr...

Страница 32: ...ck into place Movie Print Problems The same thumbnail images are printed on one sheet When you select Print N frames as the movie printing method ifyousetashortrangeforthemovie thesame thumbnail images are printed on one sheet Set a longer range for the movie and try again The printer does not play the movie If you see a when you select the movie you want to play the video codec for the movie data...

Страница 33: ...acting Customer Support see the Online Reference Guide included in the software CD ROM Europe URL http www epson com SelecttheSupportsection ofyour local EPSON web site for the latest drivers FAQs manuals and other downloadables Check your Pan European Warranty Document for information on how to contact EPSON Customer support Australia URL http www epson com au Telephone 1300 361 054 Fax 02 8899 3...

Страница 34: ...set to On make adjustments to the image and improve its quality This option is only available when printing from a movie Quality Choose from Draft Standard or Best Filter Print in B W or Sepia Enhance For details see Automatically adjusting your photos on page 21 Red Eye Reduction For details see Removing Red Eye on page 21 Brightness For details see Manually adjusting your photos on page 21 Contr...

Страница 35: ...re blurry or smeared youcanclean theroller inside the printer by using this function For details see Cleaning the roller inside the printer on page 28 Adjust CD Print Alignment CD DVD Adjust the print position for CD DVD For details see If the printing is misaligned on page 16 Sticker Adjust the print position for Photo Stickers For details see If the printing is misaligned on page 18 PictBridge S...

Страница 36: ...Printed in XXXXXX XX XX XX XXX ...

Отзывы: