background image

Cleaning the Print Head

39

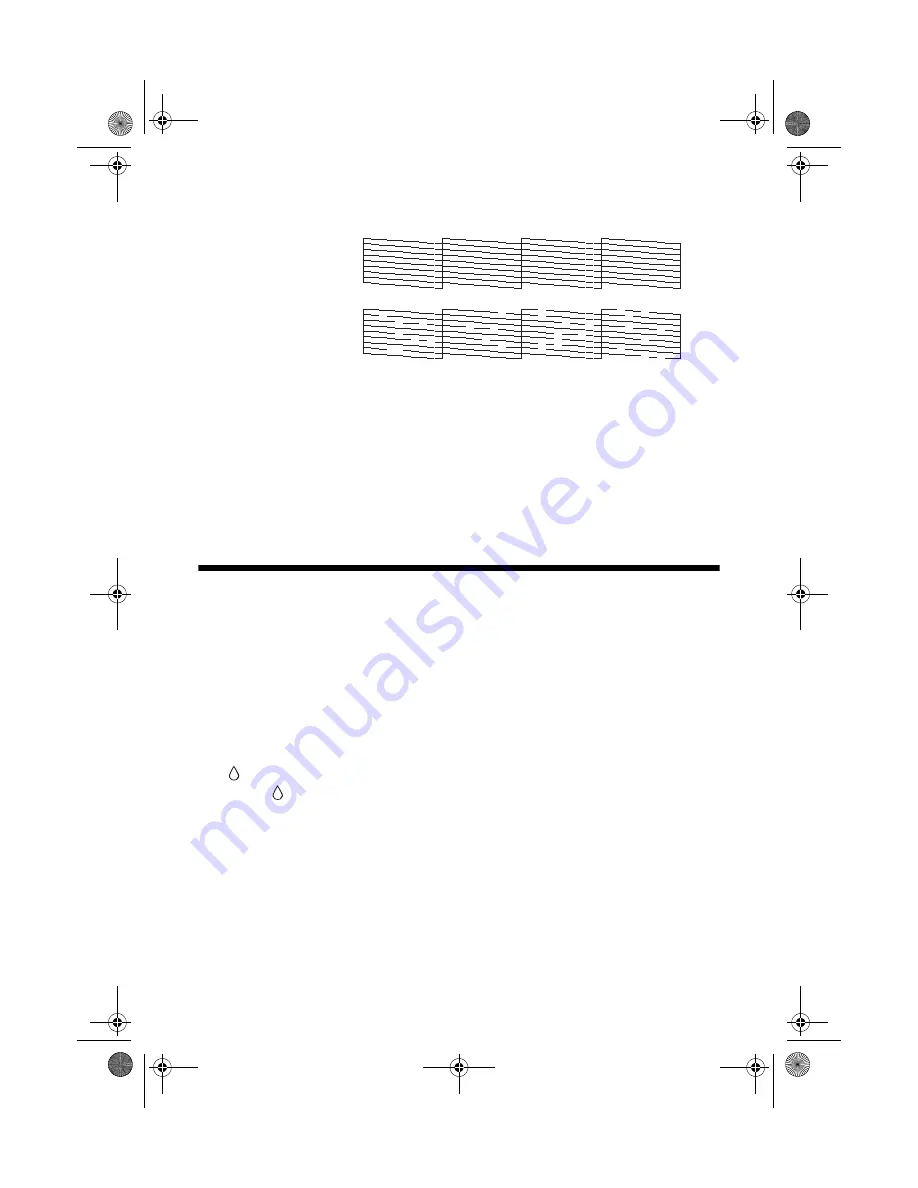
The nozzle check pattern prints:

5. If there are no gaps or lines, press the 

Setup/Utilities

 button to return to the 

previous mode.

If there are gaps or lines, or the test patterns are faint, clean the print head as 
described below. 

Note: 

You can also check the nozzles with software when connected to a computer; 

see your on-screen 

User’s Guide

 for details.

Cleaning the Print Head

If your printouts are unexpectedly light or faint, or you notice light or dark bands 
across your printout, you may need to clean the print head. This unclogs the 
nozzles so they can deliver ink properly. Run a nozzle check as described on 
page 38 to see if the print head needs cleaning.

Note: 

Print head cleaning uses ink, so clean it only if quality declines and the nozzle 

check indicates that the print head needs to be cleaned.

1. Make sure the Epson Stylus CX7700 is turned on but not printing, and the


 ink low icon is not displayed in the upper-left corner of the LCD screen. 

(If the


 ink low icon is displayed, you need to replace an ink cartridge 

before cleaning the print head; see page 41.)

2. Load a few sheets of letter-size plain paper. 

3. Press the 

Setup/Utilities

 button.

Print head does 
not need to be 
cleaned:

Print head needs 
to be cleaned:

CX7700.book  Page 39  Wednesday, July 27, 2005  5:57 PM

Содержание Stylus CX7700

Страница 1: ...Epson Stylus CX7700 Basics Guide Basic Copying Printing and Scanning Maintaining Your Epson Stylus CX7700 Solving Problems CX7700 book Page 1 Wednesday July 27 2005 5 57 PM ...

Страница 2: ...and ink jet printers like conventional photocopiers and cameras can be misused by improper copying or printing of copyrighted material While some countries laws permit limited copying of copyrighted material in certain circumstances those circumstances may not be as broad as some people assume Epson encourages each user to be responsible and respectful of the copyright laws when using digital came...

Страница 3: ...e Card 20 Printing Selected Photos 21 Printing an Index Sheet to Select Photos 22 Printing All Photos or DPOF Photos 24 Using Auto Correct 25 Printing From a Digital Camera 26 Printing From Your Computer 28 Printing in Windows 28 Printing With Macintosh OS X 31 Using Special Papers 34 Scanning a Photo Document Film or Slide 35 Maintaining Your Epson Stylus CX7700 38 Checking the Print Head Nozzles...

Страница 4: ...ons 48 Where To Get Help 50 Notices 52 System Requirements 52 Important Safety Instructions 53 Specifications 55 FCC Compliance Statement 57 Declaration of Conformity 58 ENERGY STAR Compliance 59 Limited Warranty 59 Index 63 CX7700 book Page 4 Wednesday July 27 2005 5 57 PM ...

Страница 5: ...ost of these things without ever turning on your computer Of course your Epson Stylus CX7700 can do lots more when you connect it to your Windows or Macintosh computer For additional instructions see the on screen User s Guide by selecting the icon for it on your desktop Please follow these guidelines as you read your Epson Stylus CX7700 instructions Warnings Warnings must be followed carefully to...

Страница 6: ...eft 3 Insert the paper printable side up against the right edge guide Always load it short edge first even for landscape printing You can load up to 100 sheets of plain paper or up to 20 sheets of photo paper See the User s Guide for capacity guidelines on other paper types 4 6 inch or 5 7 inch Letter size or 8 10 inch The printable side is often whiter or brighter than the other side CX7700 book ...

Страница 7: ...best results you ll want to use one of Epson s special ink jet papers designed for your printer For example your photos will look great printed on Epson Premium Glossy Photo Paper See page 34 for more information 4 Slide the left edge guide against the left edge of the paper but not too tightly 5 Flip the feeder guard back 6 Make sure the paper thickness lever is set down to the m L position CX770...

Страница 8: ...olor in Faded Photos Slides and Negatives on page 17 Placing the Original on the Glass 1 Open the document cover and place your original face down on the glass in the upper left corner Move your original about 5 mm 0 2 inch away from the top and left edges so all of it will be copied Move the original about 5 mm 0 2 inch away from the top and left edges to avoid cropping CX7700 book Page 8 Wednesd...

Страница 9: ...nd be careful not to move it Caution Do not use excessive force on the document cover and do not twist it You may damage the document cover Copying You can make copies using either letter size 8 5 11 inch 216 279 mm plain paper or letter size 4 6 inch 101 2 152 4 mm or 5 7 inch 127 179 mm photo paper Copying a Document 1 Make sure the Epson Stylus CX7700 is turned on 2 Place the document on the gl...

Страница 10: ... the output tray Note The copies may not be exactly the same size as the original Copying a Photo 1 Make sure the Epson Stylus CX7700 is turned on 2 Place the photo on the glass as described on page 8 Be sure to close the document cover 3 Load up to 20 sheets of letter size 4 6 inch 101 2 152 4 mm or 5 7 inch 127 179 mm photo paper as described on page 6 4 Press the Film Photo mode button 5 Press ...

Страница 11: ...ess the paper type button to select Plain Paper 4 Press the paper type button to select Letter 5 Press the Setup Utilities button to enter setup mode 6 Press the l or r Photo Options button to select Copy Quality Then press the x Start button 7 Press the u or d Copies button to select Draft Then press the x Start button to confirm your selection 8 Press the Copy mode button 9 Press the u or d Copi...

Страница 12: ...lacing 35mm Slides in the Holder see below Placing 35mm Film Strips in the Holder on page 13 Placing 35mm Slides in the Holder 1 Open the document cover and remove the document mat Pull up on the fastener at the top of the document mat Then pull out the mat 2 Place the film holder s tabs into the two small holes at the left edge of the glass Make sure the cutouts for 35mm slides are toward the bac...

Страница 13: ...older and the document table otherwise the prints may not be clear Continue with the steps on page 15 to scan and print your photos Placing 35mm Film Strips in the Holder 1 Open the document cover and remove the document mat Pull up on the fastener at the top of the document mat Then pull out the mat 2 Open the film strip cover CX7700 book Page 13 Wednesday July 27 2005 5 57 PM ...

Страница 14: ...lose the film strip cover Gently press until it clicks into place 5 Place the holder s tabs into the two small holes at the left edge of the glass Make sure the film strip is towards the back of the glass to align it with the fluorescent lamp when you close the document cover Continue with the steps on page 15 to scan and print your photos Fluorescent lamp CX7700 book Page 14 Wednesday July 27 200...

Страница 15: ...s Tip If your film is faded you can bring your photo back to life with color restoration For more information see page 17 5 Press the x Start button The film is scanned and a preview of the first photo appears on the LCD screen 6 Press the l or r Photo Options button to view the photos Press the u or d Copies button to select the number of copies to print of each photo 7 If necessary press the pap...

Страница 16: ...the document mat 2 With the film strip side on top and the pads facing the document cover place the film holder inside the lower hooks on the document cover Then push in the film holder 3 Set the clips at the bottom of the document mat into the slots on the document cover Then push on the fastener at the top of the document mat CX7700 book Page 16 Wednesday July 27 2005 5 57 PM ...

Страница 17: ... ON for positive color film Slides Restoration ON for slides B W Negative Film Restoration ON for black and white negatives 4 Press the x Start button The photo or film is scanned and a preview of the photo appears on the LCD screen 5 Press the l or r Photo Options button to view the photos Press the u or d Copies button to select the number of copies to print 6 If necessary press the paper type b...

Страница 18: ...is still in the camera Then when you insert the card in the Epson Stylus CX7700 it knows which photos to print and how many copies of each See these sections Compatible Cards and Image Formats on page 19 Inserting the Card on page 20 Printing Selected Photos on page 21 Printing an Index Sheet to Select Photos on page 22 Printing All Photos or DPOF Photos on page 24 Using Auto Correct on page 25 Fo...

Страница 19: ...2 or 16 one partition taken with a DCF version 1 0 or 2 0 compliant digital camera Supports Exif version 2 21 Image size 80 80 pixels to 9200 9200 pixels Number of files Up to 999 Top slot Adapter required Slot Type of card Top slot SmartMedia xD Picture Card xD Picture Card Type M Middle slot MagicGate Memory Stick MagicGate Memory Stick Duo Memory Stick Memory Stick Duo Memory Stick PRO Memory S...

Страница 20: ...r 3 Make sure the memory card access light is off and that no cards are in any of the slots then insert your card into the correct slot The memory card access light flashes and then stays on 4 Close the memory card door Now you can Print an index sheet so you can select which photos to print page 22 Print all the photos on the card page 24 Print photos pre selected on your camera using DPOF page 2...

Страница 21: ... in the slot see page 20 4 Press the Memory Card mode button to select Print Select Note If your camera supports DPOF you can use it to select the photos you want to print and the number of copies see page 24 5 Press the l or r Photo Options button to select a photo 6 Press the d or u Copies button to set the number of copies 7 Press the paper type button to select Plain Paper Photo Paper or Matte...

Страница 22: ...t the index sheet Up to 30 images are printed on each page so if there are more than 30 photos on the memory card you ll need enough sheets for all the index pages to be printed 3 Insert the memory card if it is not already in the slot see page 20 4 Press the Memory Card mode button to select Print from Index Sheet 5 Press the x Start button The P On light flashes and the Epson Stylus CX7700 start...

Страница 23: ...ur selections Note If you want one copy of all the photos on the index sheet fill in the ALL circle at the top of the page 2 Place the index sheet face down on the glass in the upper left corner so that the top of the sheet is aligned against the left edge of the glass 3 Close the document cover 4 Load up to 100 sheets of plain paper or up to 20 sheets of photo paper at a time see page 6 for detai...

Страница 24: ...F Photos Follow the steps below to print one copy of each photo on the card or to print only those photos that were pre selected with your camera s DPOF feature Note See your camera s manual for instructions on selecting photos with DPOF 1 Insert the memory card see page 20 2 Load up to 100 sheets of plain paper or up to 20 sheets of photo paper at a time see page 6 for details You can load more p...

Страница 25: ...1 Press the Setup Utilities button 2 Press the l or r Photo Options button to select Auto Correct Then press the x Start button 3 Press the u or d Copies button to select one of the following modes P I M Prints using PRINT Image Matching Automatically selected when your photos contain P I M data If the photo does not include P I M data try printing with PhotoEnhance PhotoEnhance Enhances photos au...

Страница 26: ...s 3 Load the type of paper you want to use see page 6 Load enough sheets for the number of photos you ll be printing 4 Press the paper type button to select Plain Paper or Photo Paper whichever you loaded If you select Plain Paper the photos print with a white border If you select Photo Paper the photos print borderless to the edge of the paper 5 Press the paper size button to select Letter 4 x6 1...

Страница 27: ... manual for details Note If your camera is not compatible with PictBridge or USB Direct Print the icon shown below appears on the LCD screen Epson cannot guarantee the compatibility of any cameras Depending on the Epson Stylus CX7700 settings and your digital camera settings some combinations of paper type size and layout may not be supported In addition some of your digital camera settings may no...

Страница 28: ... Start Here sheet Also be sure to use the right paper and select the correct paper type setting in the printer driver See page 34 for more information Follow the instructions in these sections Printing in Windows below Printing With Macintosh OS X on page 31 Using Special Papers on page 34 Printing in Windows 1 Load paper see page 6 2 Open the photo or document in your application program 3 Open t...

Страница 29: ...settings Make sure you choose the correct paper Type setting for the paper you are using See page 34 for details Note For more information about print settings click the or Help button Select the type of document you re printing choose Photo or Best Photo for photos Select your document Orientation Select your paper Size Select your paper Type Click here for more options Click here for borderless ...

Страница 30: ...ab and select settings as necessary 8 Click OK to save your settings then click OK or Print to start printing This window appears and shows the progress of your print job Select a color management method To choose No Color Adjustment click ICM first Select Print Options as necessary Select Paper Quality Options as necessary Click here if you want to see this Advanced screen each time you access yo...

Страница 31: ...ings For borderless printing choose the Sheet Feeder Borderless option in the Paper Size list for your paper size US Letter 216 279 mm 8 x 10 203 254 mm 5 7 127 179 mm or 4 6 101 2 152 4 mm 4 Click OK to close the Page Setup window 5 Open the File menu and select Print You see a window like this one Select Stylus CX7700 Select your Paper Size Select your document or image orientation Select Print ...

Страница 32: ...F button instead Scheduler Schedule your print job to print at a later time Paper Handling Select page printing options such as Reverse print order Cover Page OS X 10 4 x only Print a cover page before or after your document ColorSync or Color Management Select ColorSync or adjust the color controls change the gamma setting or turn off color adjustments in the printer software Expansion Reduce or ...

Страница 33: ...ob click the printer icon when it appears in the dock on the bottom of your desktop If you re using OS X 10 2 x click the Print Center icon instead then double click Stylus CX7700 in the Printer List window You see a screen like this 11 When you re finished close the printer window or Print Center Select Print Quality and other options as necessary Cancel printing Resume printing Pause printing Se...

Страница 34: ...03 254 mm S041465 Letter 8 5 11 in 216 279 mm S041286 Epson Premium Semigloss Photo Paper Letter 8 5 11 in 216 279 mm S041331 Epson Glossy Photo Paper Borderless 4 6 in 102 152 mm S041809 Letter 8 5 11 in 216 279 mm S041141 S041271 Epson Matte Paper Heavyweight Borderless 8 10 in 203 254 mm S041467 Letter 8 5 11 in 216 279 mm S041257 Epson Double Sided Matte Paper Letter 8 5 11 in 216 279 mm S0415...

Страница 35: ...ovides automatic image adjustments cropping tools and preset options for various types of scans Professional Mode Previews your image and lets you manually configure your scan settings with a full array of tools You can scan from any TWAIN compliant application such as ArcSoft PhotoImpression using EPSON Scan Or you can start EPSON Scan directly from your computer and save your image to a file 1 T...

Страница 36: ...r gently so you don t move the original or film holder 3 Do one of the following to start EPSON Scan Windows Double click the EPSON Scan icon on your desktop Macintosh Double click EPSON Scan in the Applications folder If you are scanning from an application start your application Then open the File menu choose Import or Acquire and select Epson Stylus CX7700 You see the EPSON Scan standby window ...

Страница 37: ...an black and white film or slides use Home or Professional mode For details see the on screen User s Guide If you are in Home or Professional Mode you see a different EPSON Scan settings window You can change the mode using the Mode selector in the upper right corner For details see the on screen User s Guide 5 You see the File Save Settings window Choose the location where you want to save your s...

Страница 38: ...d may be clogged or ink may be running low in one or more of the ink cartridges Follow the steps below to check the print head nozzles 1 Make sure the Epson Stylus CX7700 is turned on but not printing and the ink low icon is not displayed in the upper left corner of the LCD screen If the ink low icon is displayed you need to replace an ink cartridge see page 41 2 Load a few sheets of letter size p...

Страница 39: ...his unclogs the nozzles so they can deliver ink properly Run a nozzle check as described on page 38 to see if the print head needs cleaning Note Print head cleaning uses ink so clean it only if quality declines and the nozzle check indicates that the print head needs to be cleaned 1 Make sure the Epson Stylus CX7700 is turned on but not printing and the ink low icon is not displayed in the upper l...

Страница 40: ... on the LCD screen Cleaning takes approximately 30 seconds Caution Never turn off the Epson Stylus CX7700 while head cleaning is in progress You may damage it 6 When cleaning finishes make sure paper is loaded in the Epson Stylus CX7700 Press the l or r Photo Options button to select Check Ink Nozzles Then press the x Start button Print head does not need to be cleaned Print head needs to be clean...

Страница 41: ...en Then try cleaning the print head again Tip If you do not use your Epson Stylus CX7700 often it is a good idea to print a few pages at least once a month to maintain good print quality Replacing Ink Cartridges The LCD screen indicates when an ink cartridge is low or needs to be replaced When an ink cartridge is low you see the ink low icon in the upper left corner of the LCD screen When printing...

Страница 42: ...pson reseller To find the nearest reseller please call your nearest Epson sales office as described in Where To Get Help on page 50 Caution Leave the empty cartridge installed until you have obtained a replacement or the ink remaining in the print head nozzles may dry out We recommend that you use genuine Epson cartridges The use of other products may affect your print quality and could result in ...

Страница 43: ...he x Start button At the confirmation screen press the x Start button again 3 Open the cartridge cover Caution Never attempt to open the cartridge cover while the print head is moving Wait until the cartridges have moved to the replacement position 4 Squeeze the tab at the back of the cartridge and lift it straight out Dispose of it carefully Do not take the used cartridge apart or try to refill i...

Страница 44: ...remove or tear the label on the cartridge otherwise ink will leak Do not touch the green chip on the front of the cartridge This can damage the ink cartridge 6 Place the new ink cartridge into the cartridge holder and push it down until it clicks into place 7 Replace any other cartridges that need to be replaced CX7700 book Page 44 Wednesday July 27 2005 5 57 PM ...

Страница 45: ...7700 begins charging ink and the P On light starts flashing This takes about one minute When it s finished the P On light stops flashing and remains on Caution Never turn off the Epson Stylus CX7700 while the P On light is flashing or you ll waste ink 11 Press the Setup Utilities button to return to the previous mode CX7700 book Page 45 Wednesday July 27 2005 5 57 PM ...

Страница 46: ...n Empty ink cartridge Change the empty ink cartridges see page 41 The ink cartridge is not installed or not installed correctly Install the ink cartridge correctly see page 41 No paper is loaded in the sheet feeder Load paper in the sheet feeder Then press x Start to continue or y Stop Clear Settings to cancel Paper is jammed See page 48 for instructions on clearing the paper jam The index sheet w...

Страница 47: ...l new ink cartridges see page 41 There is a problem with the Epson Stylus CX7700 Turn the Epson Stylus CX7700 off and then back on If the error does not clear contact Epson see page 50 A part on the Epson Stylus CX7700 needs to be replaced Contact Epson see page 50 The waste ink pad is nearly full Contact Epson see page 50 The memory card does not contain any valid photos Remove the memory card an...

Страница 48: ...edge guide and slide the left edge guide against the paper but not too tightly Make sure the paper is not in front of the feeder guard Do not load too many sheets at once up to 20 sheets of photo paper or 100 sheets of plain paper See the User s Guide for more information If paper is jammed follow these steps to clear the jam 1 Press the x Start button to eject the jammed paper If the jammed paper...

Страница 49: ...special paper see page 34 and genuine Epson ink cartridges see page 42 Set the paper thickness lever to the m L position for most paper types If you are printing on envelopes set the lever to the H position If you notice light or dark bands across your printouts or they are too faint you may need to clean the print head This unclogs the nozzles so they can deliver ink properly Run a nozzle check a...

Страница 50: ... information ready Product name Epson Stylus CX7700 Product serial number located on the back Service Access World Wide Web From the Internet you can reach Epson at www latin epson com At this site you can download drivers and other files access troubleshooting information and receive technical advice through e mail Country Telephone number Argentina 54 11 5167 0300 Brazil 55 11 4196 6350 Chile 56...

Страница 51: ...se Computer configuration Description of the problem You can purchase genuine Epson ink and paper from an authorized Epson reseller To find the nearest reseller please contact your nearest Epson sales office as described previously CX7700 book Page 51 Wednesday July 27 2005 5 57 PM ...

Страница 52: ... with preinstalled Windows 98SE 2000 Me or XP and a Windows compliant USB port and shielded USB AB cable Using an improperly shielded USB cable may cause the printer to malfunction Macintosh System Requirements To use your Stylus CX7700 and its software your system should have An Apple iMac series or Power Macintosh G3 G4 or G5 with built in USB port Macintosh OS X 10 2 x or later 512MB RAM 200MB ...

Страница 53: ...not block or cover openings in the Epson Stylus CX case or insert objects through the slots Make sure the back of the Epson Stylus CX is at least 10 cm 3 9 inches away from the wall Do not place the Epson Stylus CX near a radiator or heating vent or in direct sunlight Place the Epson Stylus CX on a flat stable surface that extends beyond its base in all directions It will not operate properly if i...

Страница 54: ...ent the Epson Stylus CX from printing If you remove an ink cartridge for later use protect the ink supply area from dirt and dust and store it in the same environment as the Epson Stylus CX Note that there is a valve in the ink supply port making covers or plugs unnecessary but care is needed to prevent the ink from staining items that the cartridge touches Do not touch the ink cartridge ink suppl...

Страница 55: ...s 12 7 73 4 55 3 mm 0 5 2 9 2 2 in Weight Approximately 40 g 1 4 oz Ink thaws and is usable after approximately 3 hours at 25 C 77 F Caution To ensure good results use genuine Epson ink cartridges and do not refill them Other products may cause damage to your printer not covered by Epson s warranty Do not use an ink cartridge if the date on the package has expired Mechanical Paper path Sheet feede...

Страница 56: ...de Approx 1 5 W low power mode Approx 0 4 W power off mode Note Check the label on the back of the printer for the voltage information Environmental Temperature Operation 10 to 35 C 50 to 95 F Storage 20 to 40 C 4 to 104 F 1 month at 40 C 104 F Humidity Operation 20 to 80 RH Storage 5 to 85 RH Stored in shipping container Without condensation Scanning Scanner type Flatbed color image scanner Photo...

Страница 57: ...nt off and on the user is encouraged to try to correct the interference by one or more of the following measures Scanning Film type Color negative film Color positive film strip Color positive film mount Monochrome negative film Film scan unit 35mm film Maximum 6 images per strip Slides Maximum 4 color positive slides only Scanning resolution 1200 dpi main scan 2400 dpi with Micro Step Drive subsc...

Страница 58: ...th Canadian ICES 003 Cet appareil numérique de la classe B est conforme à la norme NMB 003 du Canada Declaration of Conformity According to 47CFR Part 2 and 15 for Class B Personal Computers and Peripherals and or CPU Boards and Power Supplies used with Class B Personal Computers We Epson America Inc Located at MS 3 13 3840 Kilroy Airport Way Long Beach CA 90806 Telephone 562 290 5254 Declare unde...

Страница 59: ... Epson also guarantees that the consumables ink cartridges toner batteries included with the product will perform according to the usage specifications as long as they are used prior to the expiration of their warranty period 2 Scope of Warranty Should Epson receive notice of a defect during the warranty period it may at its discretion repair or replace the defective product at no cost to the purc...

Страница 60: ...anty does not extend to accessories lids covers trays or replenishing supplies and consumables ink cartridges toner ink ribbons batteries photosensitive units knobs print heads lamps which due to their nature must be regularly purchased through authorized dealers 4 How To Obtain Warranty Service Please refer to the user documentation to ensure that the product settings have been properly set and t...

Страница 61: ...ne services Before calling Epson refer to the documentation included with your product If you do not find the solution to your problem visit Epson s website at http www latin epson com or call the local Epson office or an authorized dealer Service Centers If your country does not appear on the preceding list please contact the dealer where you purchased the product You may receive help or consult ...

Страница 62: ...ueri São Paulo SP 06460 020 Brazil Tel 55 11 4196 6350 Fax 55 11 4195 5624 Epson Costa Rica S A Embajada Americana 200 Sur y 300 Oeste San José Costa Rica Tel 50 6 210 9555 Fax 50 6 296 6046 Epson Venezuela S A Calle 4 con Calle 11 1 La Urbina Sur Caracas Venezuela Tel 58 212 240 1111 Fax 58 212 240 1025 Epson Chile S A La Concepción 322 Providencia Santiago Chile Tel 56 2 484 3400 Fax 56 2 484 34...

Страница 63: ...rmity 58 Digital camera printing from 26 to 27 Document cover removing film holder 16 storing film holder 16 Documents copying 9 to 10 scanning 35 to 37 thick 9 DPOF photos about 18 printing 24 to 25 Draft mode copying in 11 E ENERGY STAR 59 EPSON Scan 35 to 37 Exif auto correct 25 F FCC statement 57 File formats 19 Film loading 12 to 14 printing from 12 to 15 restoring color 17 scanning 35 to 37 ...

Страница 64: ...ages LCD screen 46 to 47 Modes scanning 35 N Negatives loading 13 to 14 printing from 12 to 15 restoring color 17 Nozzle Check 38 to 39 40 to 41 P P I M auto correct 25 Paper feeding problems 48 loading 6 to 7 special types 34 Paper Type setting 34 PhotoEnhance auto correct 25 Photos auto correct 25 copying 10 to 11 printing 18 to 25 restoring color 17 scanning 35 to 37 Print head cleaning 39 to 4...

Страница 65: ...tions 55 to 57 Electrical 56 Environmental 56 Ink cartridges 55 Mechanical 55 Printing 55 Scanning 56 57 Standards and Approvals 57 Technical support 50 to 51 Troubleshooting copying 48 image quality 49 LCD messages 46 to 47 memory card 47 paper feeding 48 scanning 49 Type setting Windows 29 34 U USB 52 requirements 52 Utilities Cleaning print head 39 to 41 Nozzle Check 38 to 39 40 to 41 W Warrant...

Страница 66: ...CPD 20428 Printed in XXXXXX XX XX XX XXX CX7700 book Page 68 Wednesday July 27 2005 5 57 PM ...

Отзывы: