background image

Scanning / Scanning Using Control Panel Functions 

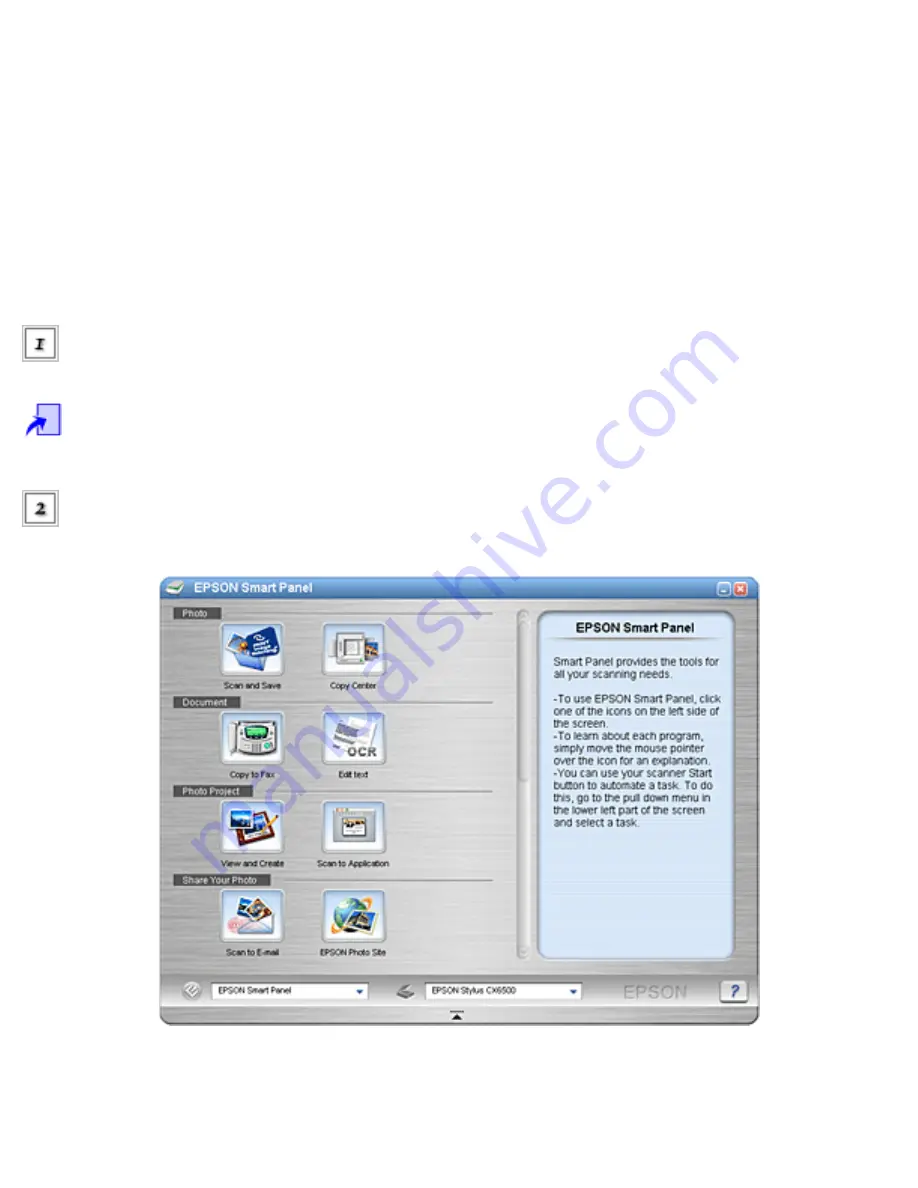
Assigning an Application in the EPSON Smart 
Panel Window 

To assign an application in the EPSON Smart Panel window to the buttons on the control panel, follow 
the steps below. 

Start EPSON Smart 
Panel. 

Starting EPSON Smart 
Panel


Select an application from the EPSON Smart Panel list 
box. 

The selected application is assigned to the buttons on the control panel. 

Содержание Stylus CX6500

Страница 1: ...0 printer By clicking the links on the left side of this screen you can get information on the following topics Printing Explains how to print with the CX6500 Printer Software Introductions Provides information on your printer software Scanning Explains how to scan with the CX6500 Scanner Software Introductions Provides information on your scanner software Replacing Ink Cartridges Explains how to ...

Страница 2: ...Covers troubleshooting and customer support information Product Information Contains technical specifications information Copyrights and Trademarks About Operating System Versions ...

Страница 3: ...lines that sometimes appear when printing graphics This occurs when the print head is misaligned bi level data Image data that is composed of 1 bit per pixel A pixel is represented by a single bit of digital data that can be expressed as only 1 light or 0 dark bit A binary digit 0 or 1 which is the smallest unit of information used by a printer or computer bit pixel The unit that indicates the num...

Страница 4: ... primary colors Additive primary colors red green and blue are used by the scanner and the subtractive primary colors cyan magenta and yellow plus black are used for printing press separation color space A method that reproduces a specific color Additive primary colors red green and blue are used by the scanner and subtractive primary colors cyan magenta and yellow plus black are used for printing...

Страница 5: ... scanner does not recognize and ignores You can select and deselect dropout colors in the scanner software DTP Desktop Publishing system a system that enables you to edit a publications on a computer economy printing Printing in which images are printed with fewer dots to save ink ESC I Abbreviation for Epson Standard Code for Image scanners A system of commands that allows you to control image sc...

Страница 6: ... screen as they exist on the scanned documents or prints colors as you see them on your screen initialization Returns the printer to its defaults fixed set of conditions This happens every time you turn on or reset the CX6500 ink cartridge Contains the ink the CX6500 uses when printing ink jet A method of printing in which each letter or symbol is formed by precisely spraying ink onto paper interf...

Страница 7: ...This means printing with only one color of ink which is generally black ink nozzle Fine tubes in the print head through which ink is sprayed on the page Print quality may decline if the print head nozzles are clogged operation check A method for checking the operation of the CX6500 When you perform an operation check the CX6500 prints the ROM version code page ink counter code and a nozzle check p...

Страница 8: ...X6500 to its defaults by turning the CX6500 off and back on resolution The number of dots per inch used to represent an image ROM Read Only Memory A portion of memory that can only be read and cannot be used for data storage ROM retains its contents when you turn off the CX6500 RGB Red green and blue These colors in phosphors irradiated by the computer monitor s electron gun are used to create the...

Страница 9: ...ether data will be processed as on or off In the case of color image data on means that a certain color will appear in a pixel or dot and off means that color will not appear there tone correction A method of adjusting the tone curve so that the reproduction results on different types of output devices have gradations similar to the original image tone curve The graph that shows the contrast ratio...

Страница 10: ...USB hubs allows you to add additional ports See also interface WYSIWIG What you see is what you get This term is used to describe printout that looks exactly like it appears on screen Top Back ...

Страница 11: ...nting Information Various Printing Options Improving the Print Quality Other Information Printer Software Introductions Scanning Scanner Software Introductions Replacing Ink Cartridges Maintenance Troubleshooting Product Information ...

Страница 12: ...g Printer Software Introductions Introduction Accessing the Printer Software Getting Information Scanning Scanner Software Introductions Replacing Ink Cartridges Maintenance Troubleshooting Product Information ...

Страница 13: ... Introductions Scanning How to Scan Various Scanning Options Scanning Using Control Panel Functions Using EPSON Smart Panel Scanner Software Introductions Replacing Ink Cartridges Maintenance Troubleshooting Product Information ...

Страница 14: ...inter Software Introductions Scanning Scanner Software Introductions EPSON Scan Starting EPSON Scan Getting Information Through Online Help Replacing Ink Cartridges Maintenance Troubleshooting Product Information ...

Страница 15: ...roductions Scanning Scanner Software Introductions Replacing Ink Cartridges Ink Cartridges Checking the Ink Supply Precautions on Ink Cartridge Replacement Replacing an Ink Cartridge Maintenance Troubleshooting Product Information ...

Страница 16: ...ons Scanning Scanner Software Introductions Replacing Ink Cartridges Maintenance Cleaning the CX6500 Transporting the CX6500 Connecting and Disconnecting the USB Cable Updating and Uninstalling Software Troubleshooting Product Information ...

Страница 17: ...placing Ink Cartridges Maintenance Troubleshooting Diagnosing the Problem Print Head Carriage Problem Memory Card Caught Between the Memory Card Slot and the Memory Card Cover Correcting USB Problems Printing and Copying Problems Scanning Problems Customer Support Product Information ...

Страница 18: ...ions Scanning Scanner Software Introductions Replacing Ink Cartridges Maintenance Troubleshooting Product Information Stylus CX6500 Parts Control Panel Functions Consumable Products Exif Print Using the Memory Card Product Specifications ...

Страница 19: ... liable for any damages or problems arising from the use of any options or any consumable products other than those designated as Original Epson Products or Epson Approved Products by Seiko Epson Corporation Seiko Epson Corporation shall not be held liable for any damage resulting from electromagnetic interference that occurs from the use of any interface cables other than those designated as Epso...

Страница 20: ...Sony Corporation xD Picture Card is a trademarks of Fuji Photo Film Co Ltd General Notice Other product names used herein are for identification purposes only and may be trademarks of their respective owners Epson disclaims any and all rights in those marks Copyright 2004 by Seiko Epson Corporation Nagano Japan Back ...

Страница 21: ...Back About Operating System Versions In this manual Windows indicates Windows 98SE Me 2000 or XP Mac OS 9 indicates Mac OS 9 1 or later Mac OS X indicates Mac OS X 10 2 x or 10 3 x Back ...

Страница 22: ...Printing Printer Software Introductions Scanning Scanner Software Introductions Replacing Ink Cartridges Maintenance Troubleshooting Product Information ...

Страница 23: ...g Photos Printing on Envelopes Basic Printing Information Various Printing Options Improving the Print Quality Other Information Printer Software Introductions Scanning Scanner Software Introductions Replacing Ink Cartridges Maintenance Troubleshooting Product Information ...

Страница 24: ...al Media Loading Envelopes Media Type Settings Making User Defined Paper Sizes Various Printing Options Improving the Print Quality Other Information Printer Software Introductions Scanning Scanner Software Introductions Replacing Ink Cartridges Maintenance Troubleshooting Product Information ...

Страница 25: ...s Borderless Printing Double Sided Printing Fit to Page Printing Pages Per Sheet Printing Poster Printing Watermark Printing Improving the Print Quality Other Information Printer Software Introductions Scanning Scanner Software Introductions Replacing Ink Cartridges Maintenance Troubleshooting Product Information ...

Страница 26: ...he Print Quality Checking the Printer Status Checking the Print Head Nozzles Cleaning the Print Head Aligning the Print Head Other Information Printer Software Introductions Scanning Scanner Software Introductions Replacing Ink Cartridges Maintenance Troubleshooting Product Information ...

Страница 27: ...Options Improving the Print Quality Other Information Setting Up Your Stylus CX6500 on a Network Increasing the Print Speed Printer Software Introductions Scanning Scanner Software Introductions Replacing Ink Cartridges Maintenance Troubleshooting Product Information ...

Страница 28: ...to get the best results from the CX6500 The printer utilities help you check the printer and keep it in top operating condition Top Accessing the printer software For information on accessing the printer software Refer to the sections below Accessing the Printer Software for Windows Accessing the Printer Software for Mac OS 9 Accessing the Printer Software for Mac OS X Note for Windows users The s...

Страница 29: ...e that provides you with instructions on printing making printer driver settings and using printer utilities Refer to the sections below Getting Information Through Online Help for Windows Getting Information Through Online Help for Mac OS 9 Getting Information Through Online Help for Mac OS X Top ...

Страница 30: ...r Software Accessing the Printer Software for Windows Accessing the Printer Software for Mac OS 9 Accessing the Printer Software for Mac OS X Getting Information Scanning Scanner Software Introductions Replacing Ink Cartridges Maintenance Troubleshooting Product Information ...

Страница 31: ...tting Information Getting Information Through Online Help for Windows Getting Information Through Online Help for Mac OS 9 Getting Information Through Online Help for Mac OS X Scanning Scanner Software Introductions Replacing Ink Cartridges Maintenance Troubleshooting Product Information ...

Страница 32: ... Basic Procedure Scanning an Image Placing Photos and Documents on the Document Table Various Scanning Options Scanning Using Control Panel Functions Using EPSON Smart Panel Scanner Software Introductions Replacing Ink Cartridges Maintenance Troubleshooting Product Information ...

Страница 33: ...ful Reproductions Scanning Multiple Images Simultaneously Scanning Documents to Convert to Text Data OCR Starting Scanner Software EPSON Scan Directly Using the Preview Window in EPSON Scan Scanning Using Control Panel Functions Using EPSON Smart Panel Scanner Software Introductions Replacing Ink Cartridges Maintenance Troubleshooting Product Information ...

Страница 34: ...ing Using Control Panel Functions Using Control Panel Functions Assigning an Application in the EPSON Smart Panel Window Assigning a different application in Windows Using EPSON Smart Panel Scanner Software Introductions Replacing Ink Cartridges Maintenance Troubleshooting Product Information ...

Страница 35: ...rious Scanning Options Scanning Using Control Panel Functions Using EPSON Smart Panel Overview of EPSON Smart Panel Applications in the EPSON Smart Panel Window Scanner Software Introductions Replacing Ink Cartridges Maintenance Troubleshooting Product Information ...

Страница 36: ...y not be able to access EPSON Scan from the application TWAIN TWAIN is a standard for the application program interface API between image input devices such as scanners and applications which control the image input devices Using a TWAIN compliant application and a TWAIN compliant scanner with a TWAIN compliant driver enables users to operate any scanner in the same manner TWAIN compliant Applicat...

Страница 37: ...or scanning an image Scanning an image While the TWAIN compliant application may appear to be controlling the CX6500 in the scanning process it is EPSON Scan which is actually doing the job You can use the EPSON Scan screen to specify various settings for scanning Note You can operate EPSON Scan in the same way on both Windows and Macintosh This guide explains the operation procedure using Windows...

Страница 38: ...can images using any TWAIN compliant application such as Adobe Photoshop If there is a scanner or a TWAIN compliant device selection menu in the application select Epson Stylus CX6500 or Stylus CX6500 then select the menu to import from a TWAIN compliant device EPSON Scan starts Note for Windows 98 users PhotoImpression support Windows 98 Second Edition or later If you scan an image with Windows 9...

Страница 39: ...ows XP users Do not choose WIA Epson Stylus CX6500 from the menu to select the CX6500 If you select it you cannot use the CX6500 s functions fully Top Using EPSON Scan as a stand alone application If you just want to save scanned images without editing them start EPSON Scan directly Scanned images are automatically saved as files in the specified folder For more details see Starting Scanner Softwa...

Страница 40: ... Save Settings dialog box does not appear automatically To open the dialog box click the small arrow to the right of the Scan button then select File Save Settings Click OK EPSON Scan starts For users of Mac OS 9 Select EPSON Scan from the Apple menu The File Save Settings dialog box appears ...

Страница 41: ...you finished scanning in the Home Mode or the Professional Mode last time the File Save Settings dialog box does not appear automatically To open the dialog box click the small arrow to the right of the Scan button then select File Save Settings Top Using the EPSON Smart Panel software EPSON Smart Panel allows you to scan and send data directly to an assigned application or the Epson photo sharing...

Страница 42: ...For more information on EPSON Smart Panel see Overview of EPSON Smart Panel Top ...

Страница 43: ...s Getting Information Through Online Help EPSON Scan has an extensive online help feature that provides you with instructions on scanning and making driver settings Click the Help button in any of the dialog boxes in EPSON Scan Top ...

Страница 44: ...e types varies by location The high capacity black ink cartridges are recommended as replacement cartridges for this printer for users who print frequently Users that print infrequently may want to choose the standard capacity black ink cartridge Your CX6500 includes the high capacity black ink cartridge Caution Epson recommends the use of genuine Epson ink cartridges Epson will not warranty any d...

Страница 45: ...onitor Macintosh shows the ink is low Using the control panel To check your ink supply on the LCD panel do one of the following Make sure the CX6500 is on then press the Setup Mode button Press the A button repeatedly until 2 Ink levels appears on the LCD panel and press the Color button The amount of ink appears If you want to replace the ink cartridge go on to the next section To return to the p...

Страница 46: ...s Epson Status Monitor 3 Access Epson Status Monitor 3 in one of the following ways Double click the printer icon on your Windows taskbar To add a shortcut icon to the taskbar see online help for details Open the printer software click the Maintenance tab then click the Epson Status Monitor 3 button A graphic displaying the amount of ink remaining will appear Note ...

Страница 47: ...any of the ink cartridges Be sure to replace or reinstall any ink cartridge indicated by Epson Status Monitor 3 Progress meter The progress meter dialog box appears automatically when you send a print job to the CX6500 You can check the remaining amount of ink from this dialog box Top For Macintosh You can check the amount of ink remaining in the ink cartridges using Epson StatusMonitor Follow the...

Страница 48: ... Setup dialog box Accessing the Printer Software for Mac OS 9 Click the Utility icon button then click the Epson StatusMonitor button in the Utility dialog box A graphic displaying the amount of ink remaining will appear Note ...

Страница 49: ...isplay an accurate calculation for the amount of ink remaining in any of the ink cartridges Be sure to replace or reinstall any ink cartridge when indicated by the Epson StatusMonitor For Mac OS X Double click Macintosh HD the default hard disk name double click the Applications folder then double click the Epson Printer Utility icon The Printer List window appears Select the CX6500 then click OK ...

Страница 50: ...ny one of the ink cartridges that are installed in the CX6500 are broken incompatible to the printer model or is installed improperly the Epson StatusMonitor will not display an accurate calculation for the amount of ink remaining in any of the ink cartridges Be sure to replace or reinstall any ink cartridge when indicated by the Epson StatusMonitor Top ...

Страница 51: ...idge is removed and later inserted again all of its ink can be used However some ink is consumed each time the cartridge is inserted because the CX6500 automatically checks its reliability When an ink cartridge becomes empty you cannot continue copying or printing even if the other cartridges still contain ink Before copying or printing replace the empty cartridge In addition to being used in docu...

Страница 52: ...Replacement Using the control panel Follow the steps below to replace ink cartridges Make sure the CX6500 is on When the ink is empty Refer to the LCD panel message to see which ink cartridge is empty then press the Color button When the ink is low Press the Setup Mode button to enter the Setup Mode and press the A button repeatedly until 5 Ink cartridge appears on the LCD panel then press the Col...

Страница 53: ...cument cover is still open Do not move the print head by hand Doing so may damage the CX6500 Do not start replacing an ink cartridge before the print head stops moving Before taking out a new ink cartridge from its package shake it four to five times ...

Страница 54: ...n the cartridge cover Pinch the sides of the ink cartridge that you want to replace Lift the cartridge out of the CX6500 and dispose of it properly Do not take the used cartridge apart or try to refill it ...

Страница 55: ...iscomfort or vision problems remain after a thorough flushing see a doctor immediately Caution Leave the used ink cartridge installed until just before replacement otherwise ink remaining in the print head nozzles may dry out Install the new ink cartridge straight into the cartridge holder then press the top of the cartridge until it clicks into place If you need to replace other ink cartridges re...

Страница 56: ...e the ink cartridge has been installed correctly Close the scanner unit The print head moves to its home position and ink charging begins Charging appears on the LCD panel when ink charging is in progress Charging disappears from the LCD panel when ink charging is completed Caution ...

Страница 57: ...artridge is low or empty click How to in the Epson Status Monitor window Follow the on screen instructions to replace the cartridge For more information on using Epson Status Monitor see Using Epson StatusMonitor for details Conserving black ink when the cartridge is low The dialog box below appears when black ink becomes low and the following requirements are met Plain Paper Bright White Paper is...

Страница 58: ... and again gives you the option to conserve black ink By clicking the No button you can continue using the remaining black ink for the job you are printing The dialog box appears the next time you print a job that uses black ink and again gives you the option to conserve black ink By clicking the Disable this feature button you can continue using black ink normally The dialog box does not appear a...

Страница 59: ...is dirty clean it with a soft clean cloth dampened with mild detergent Keep the document and scanner unit closed to prevent moisture from getting inside If the document table is dirty open the document cover Then clean the glass with a soft clean and dry cloth or with a blower brush If the inside of the CX6500 accidentally gets soiled with ink wipe the ink away with a damp cloth Warning Be careful...

Страница 60: ...canning mechanisms and electronic components Do not use a hard or abrasive brush Do not spray the inside of the CX6500 with lubricants unsuitable oils can damage the mechanisms Contact your dealer or a qualified service person if lubrication is needed Top ...

Страница 61: ...lows Remove all paper from the sheet feeder and make sure that the CX6500 is off Open the scanner unit and make sure that the print head is in the home position on the right Secure the ink cartridges to the CX6500 with a tape then close the scanner unit Unplug the power cord from the electrical outlet and the USB cable from your computer if connected Connecting and Disconnecting the USB Cable ...

Страница 62: ...the protective materials to both sides of the CX6500 then repack the CX6500 and attachments in the box Keep the CX6500 on a flat surface to protect it from shocks during transportation Note Do no forget to remove the protective materials and tape from the CX6500 before using it again Top ...

Страница 63: ...able to the CX6500 Make sure the CX6500 is turned off and all of its lights are off Open the scanner unit Plug the connector of the USB cable into the USB port of the CX6500 then place its cable in the slot Caution Push the USB cable securely into the slot The USB connector may snap if it is not securely in the slot and the scanner unit is closed with force ...

Страница 64: ...sconnecting the USB cable from the CX6500 Make sure the CX6500 is turned off and all of its lights are off Open the scanner unit Disconnect the USB cable from the CX6500 as shown in the illustration below Close the scanner unit Top ...

Страница 65: ... Maintenance Cleaning the CX6500 Transporting the CX6500 Connecting and Disconnecting the USB Cable Updating and Uninstalling Software Updating your OS Updating the Printer Software under Windows 98 Me 2000 or XP Uninstalling the Printer Software Uninstalling EPSON Scan Troubleshooting Product Information ...

Страница 66: ...n check Refer to the sections below If you have a specific problem relating to print quality a printout problem not related to print quality or a paper feeding problem or if the CX6500 does not print at all refer to the appropriate section in this chapter To solve a problem you may need to cancel printing For details see Canceling Printing Error messages You can identify many common problems using...

Страница 67: ... memory card has been added or removed after an the Index Form was printed Print the Index Form again No memory card Operation canceled A memory card was not inserted when you selected print directly from a memory card or scan to a memory card Insert a memory card into the memory card slot See Loading Memory Cards Cannot recognize the memory card Do you want to format the card The memory card inse...

Страница 68: ...tton was pressed while printing directly from a memory card Press the Color button when you print directly from a memory card When you copy in grayscale select an item other than Glossy or DB Photo as the paper type The adjust lever is in the position Except when printing on envelopes the position is recommend The adjust lever is in the position Set the adjust lever to the position except when pri...

Страница 69: ...aded in the sheet feeder Load paper in the sheet feeder then press the Color button Scanner unit open Close the scanner unit Scanner unit is open Close the scanner unit securely Paper jam Press the Color button Remove any remaining jammed paper by hand A paper jams has occurred Press the Color button If the paper jam is not cleared remove the jammed paper by hand See Paper jams Multi page feed err...

Страница 70: ...Progress Meter window When the ink runs low or out click the How to button in the Epson Status Monitor or Progress Meter window and Epson Status Monitor will lead you step by step through the cartridge replacement procedure If an error message indicating that parts inside the CX6500 are near the end of their service life appears contact your dealer for replacement Top Running a printer operation c...

Страница 71: ...check pattern Compare the quality of the printed test page with the sample shown below If there are no print quality problems the CX6500 is fine and the problem probably lies with the printer software settings the application settings the interface cable be sure to use a shielded cable or the computer itself If the test page does not print satisfactorily there is a problem with the CX6500 For exam...

Страница 72: ... Print Head Carriage Problem If the carriage cover does not close or the print head carriage does not move to its home position open the carriage cover and push the ink cartridges down until they click into place Top ...

Страница 73: ...Troubleshooting Memory Card Caught Between the Memory Card Slot and the Memory Card Cover Keep the memory card cover open then repeatedly close and open the memory card cover Top ...

Страница 74: ...ts the specifications for the USB interface of the CX6500 See USB Interface for details For best results you should connect the CX6500 directly to the computer s USB port If you must use multiple USB hubs we recommend that you connect the CX6500 to the first tier hub Top Windows operating system Your computer must have a pre installed version of Windows 98SE Me 2000 or XP You may not be able to in...

Страница 75: ...ll the printer software as described on the Start Here sheet If About is not displayed the printer software has been installed correctly Note If the Digital Signature Not Found Windows 2000 or Software Installation dialog box Windows XP appears during the installation process click Yes Windows 2000 or Continue Anyway Windows XP If you click No Windows 2000 or STOP Installation Windows XP you will ...

Страница 76: ... File menu Click the Details tab If EPUSBX Epson Stylus CX6500 is displayed in the Print to the following port list box then the USB printer device driver and printer software is installed correctly If the correct port is not displayed proceed to the next step ...

Страница 77: ... Epson USB Printer Devices should appear on the Device Manager menu If Epson USB Printer Devices does not appear on the Device Manager menu click the plus sign beside Other devices to view the installed devices If USB 2 0 MFP or Epson Stylus CX6500 appears under Other devices the printer software is not installed correctly Proceed to step5 ...

Страница 78: ... from the CX6500 then plug it into the CX6500 again Once you have confirmed that these items appear proceed to step 5 Under Other devices select USB 2 0 MFP or Epson Stylus CX6500 and click Remove Then click OK When the following dialog box appears click OK then click OK to close the System Properties dialog box ...

Страница 79: ...packed with the CX6500 Top Scanner software installation If you canceled the scanner software installation before the procedure was completed or you connected the CX6500 before installing the software EPSON Scan may be incorrectly installed Follow these steps to install the software correctly Disconnect the USB cable from your computer Reinstall the software as described in the Start Here sheet To...

Страница 80: ... Print Head Carriage Problem Memory Card Caught Between the Memory Card Slot and the Memory Card Cover Correcting USB Problems Printing and Copying Problems Print Quality Problems Printout Problems Not Related to Print Quality Paper Does Not Feed Correctly The CX6500 Does Not Print Canceling Printing Scanning Problems Customer Support Product Information ...

Страница 81: ...ng Diagnosing the Problem Print Head Carriage Problem Memory Card Caught Between the Memory Card Slot and the Memory Card Cover Correcting USB Problems Printing and Copying Problems Scanning Problems Scanner Operation Problems Software Operation Problems Quality Problems Color Matching Problems Customer Support Product Information ...

Страница 82: ...enance Troubleshooting Diagnosing the Problem Print Head Carriage Problem Memory Card Caught Between the Memory Card Slot and the Memory Card Cover Correcting USB Problems Printing and Copying Problems Scanning Problems Customer Support Technical Support Web Site Contacting Customer Support Product Information ...

Страница 83: ... paper automatically c Paper support Supports the paper loaded in the paper feeder d Feeder guard Prevents the objects which you place on the document cover from falling inside the CX6500 when opening the document cover e Document cover Open and close when you place a photo or document f Output extension tray Receives ejected paper g On button Turns the CX6500 on and off ...

Страница 84: ...en the print head and the paper to prevent smearing Adjust the position of the lever should ink appear to smear across your document when printing on thick paper or envelopes b Ink cartridge clamps Hold the ink cartridge in place c USB port Connect a USB cable when connecting the CX6500 with your computer ...

Страница 85: ...a Document table Place originals face down on the glass b Control panel See Control Panel Functions for details on panel operation Top ...

Страница 86: ...the A button the upper right for the B the lower left for the C and the lower right for the D button When you turn on the CX6500 it enters the mode selected the last time the CX6500 was turned off The example below shows the state when the CX6500 is in the Copy Mode You can also check the error messages on the LCD panel For details of the error messages see Error messages Messages Messages Status ...

Страница 87: ...rint head is moving Printing Printing image IDXXX Printing DPOF files The CX6500 is printing Scan and printing The CX6500 is scanning and printing Scanning The CX6500 is scanning Scan and saving image The CX6500 is scanning and saving an image file to the memory card Canceling The CX6500 is canceling the operation Color copying The CX6500 is copying in color B W copying The CX6500 is copying in gr...

Страница 88: ...rging the ink for the first time Top Buttons Buttons Function On Turns the CX6500 on and off Copy Mode Enters Copy Mode Card Print Mode Enters Card Print Mode Scan Mode Enters Scan Mode Setup Mode Enters Setup Mode Select Save 3sec Moves to the previous option When the CX6500 is in the Copy Mode the current settings are saved by pressing and holding this button for 3 seconds ...

Страница 89: ...f the settings are reset to their defaults Menu Displays menu items for detailed settings on the LCD panel OK Enters the settings you have selected B W Copies or prints in grayscale Color Copies or prints in color Starts scanning or the operation you have selected Stop Stops copying or scanning The sheet being copied is ejected Returns to the basic display when a menu item appears on the LCD panel...

Страница 90: ...Light Pattern Status Error On An error occurred For details see Error messages Mode Copy Card Print Scan Setup On Shows the mode the CX6500 is in A B C D On Indicates the button is valid Top ...

Страница 91: ...capacity black ink cartridges are recommended as replacement cartridges for this printer for users who print frequently Users that print infrequently may want to choose the standard capacity black ink cartridge Your CX6500 includes the high capacity black ink cartridge Media types Epson offers specially designed media for the CX6500 to meet most high quality printing needs See Media Type Settings ...

Страница 92: ......

Страница 93: ...s using an Exif Print compatible digital camera information about camera settings and scene conditions when the photograph was taken is embedded in the photo data Such information includes exposure mode white balance gain control contrast saturation and sharpness among other attributes The printer then corrects and enhances the photo data using this information and prints an image that reflects th...

Страница 94: ...When Exif Print data is embedded in the photo data the printer interprets how to adjust and print the image Note The images above are samples Print results may vary Top ...

Страница 95: ...tridges Maintenance Troubleshooting Product Information Stylus CX6500 Parts Control Panel Functions Consumable Products Exif Print Using the Memory Card Loading Memory Cards Copying Files to Your Computer Saving Files to the Memory Card Disconnecting or Turning off the CX6500 Product Specifications ...

Страница 96: ...ance Troubleshooting Product Information Stylus CX6500 Parts Control Panel Functions Consumable Products Exif Print Using the Memory Card Product Specifications System Requirements Printing Scanning Paper Built in card slots Ink Cartridges Mechanical Electrical Environmental Standards and Approvals USB Interface ...

Страница 97: ...nting Information Various Printing Options Improving the Print Quality Other Information Printer Software Introductions Scanning Scanner Software Introductions Replacing Ink Cartridges Maintenance Troubleshooting Product Information ...

Страница 98: ...ough the procedures for different kinds of printing Printing Text and Web Pages Explains how to print documents and images on various sizes or kinds of single sheet paper Printing Photos Explains how to print photos on various sizes or kinds of single sheet paper ...

Страница 99: ...Printing on Envelopes Explains how to print on envelopes Top ...

Страница 100: ...indows Driver settings for Mac OS 9 Driver settings for Mac OS X Before turning on the CX6500 make sure it is connected to your computer Press the On button to turn on the CX6500 All mode lights flash then the mode button for the mode you used last time lights meaning it has completed its initialization ...

Страница 101: ...s on loading single sheets of paper Loading Single Sheets of Paper When using special media refer to the section below Using Special Media Top Driver settings for Windows Open the file you want to print Access the printer driver Accessing the Printer Software for Windows ...

Страница 102: ...ine help Select a paper Type setting Media Type Settings Select a paper Size setting You can also define a custom paper size For details see the following section Making User Defined Paper Sizes Select Portrait tall or Landscape wide to change the orientation of your printout ...

Страница 103: ...Click OK to close the printer driver settings dialog box Print your data Top Driver settings for Mac OS 9 Open the file you want to print Access the Page Setup dialog box ...

Страница 104: ...r details see the following section For Mac OS 9 Select Portrait tall or Landscape wide to change the orientation of your printout Click OK to save the settings and close the Page Setup dialog box Access the Print dialog box Accessing the Printer Software for Mac OS 9 Select a Media Type setting Media Type Settings ...

Страница 105: ... for Mac OS X Open the file you want to print Access the Page Setup dialog box Accessing the Printer Software for Mac OS X Make the appropriate Format for setting Select a Paper Size and Orientation settings Click OK to close the Page Setup dialog box ...

Страница 106: ...int dialog box Accessing the Printer Software for Mac OS X Make the Printer setting so that it matches the Format for setting you made in the Page Setup dialog box in step 3 Then make the Copies Pages settings Note ...

Страница 107: ...tandard feature of Mac OS X See your operating system s documentation for details Select Print Settings from the pop up menu Select Media Type Color and Mode settings See online help for details Media Type Settings Click Print to start printing ...

Страница 108: ... Top ...

Страница 109: ... Driver settings for Mac OS 9 Driver settings for Mac OS X Before turning on the CX6500 make sure it is connected to your computer Press the On button to turn on the CX6500 All mode lights flash then the mode button for the mode you used last time lights meaning it has completed its initialization ...

Страница 110: ...s on loading single sheets of paper Loading Single Sheets of Paper When using special media refer to the section below Using Special Media Top Driver settings for Windows Open the file you want to print Access the printer driver Accessing the Printer Software for Windows ...

Страница 111: ...ine help Select a paper Type setting Media Type Settings Select a paper Size setting You can also define a custom paper size For details see the following section Making User Defined Paper Sizes Select Portrait tall or Landscape wide to change the orientation of your printout ...

Страница 112: ...Click OK to close the printer driver settings dialog box Print your data Top Driver settings for Mac OS 9 Open the file you want to print Access the Page Setup dialog box ...

Страница 113: ...r details see the following section For Mac OS 9 Select Portrait tall or Landscape wide to change the orientation of your printout Click OK to save the settings and close the Page Setup dialog box Access the Print dialog box Accessing the Printer Software for Mac OS 9 Select a Media Type setting Media Type Settings ...

Страница 114: ... for Mac OS X Open the file you want to print Access the Page Setup dialog box Accessing the Printer Software for Mac OS X Make the appropriate Format for setting Select a Paper Size and Orientation settings Click OK to close the Page Setup dialog box ...

Страница 115: ...int dialog box Accessing the Printer Software for Mac OS X Make the Printer setting so that it matches the Format for setting you made in the Page Setup dialog box in step 3 Then make the Copies Pages settings Note ...

Страница 116: ...tandard feature of Mac OS X See your operating system s documentation for details Select Print Settings from the pop up menu Select Media Type Color and Mode settings See online help for details Media Type Settings Click Print to start printing ...

Страница 117: ... Top ...

Страница 118: ...iver settings for Mac OS 9 Driver settings for Mac OS X Before turning on the CX6500 make sure it is connected to your computer Press the On button to turn on the CX6500 All mode lights flash then the mode button for the mode you used last time lights meaning it has completed its initialization ...

Страница 119: ...ding Envelopes See Printable area for the printable area Top Driver settings for Windows Open the file you want to print Access the printer driver Accessing the Printer Software for Windows Click the Main tab then select a Quality Option setting For details see online help ...

Страница 120: ...propriate envelope size from the available Size settings You can also define a custom paper size For details see the following section Making User Defined Paper Sizes Select Landscape wide as the Orientation setting Click OK to close the printer driver settings dialog box ...

Страница 121: ...ssing the Printer Software for Mac OS 9 Select an appropriate envelope size from the available Paper Size settings You can also define a custom paper size For details see the following section For Mac OS 9 Select Landscape wide as the Orientation setting Click OK to save the settings and close the Page Setup dialog box ...

Страница 122: ...Access the Print dialog box Accessing the Printer Software for Mac OS 9 Select Plain Paper Bright White Paper as the Media Type setting Click Print to start printing Top Driver settings for Mac OS X ...

Страница 123: ...dialog box Accessing the Printer Software for Mac OS X Select Stylus CX6500 as the Format for setting Select an appropriate envelope size as the Paper Size setting Select Landscape wide as the Orientation setting Click OK to close the Page Setup dialog box ...

Страница 124: ...pies Pages settings Note The Copies Pages settings available are a standard feature of Mac OS X See your operating system s documentation for details Select Print Settings from the pop up menu Select Plain Paper Bright White Paper as the Media Type setting then make the appropriate Color and Mode settings For details see online help ...

Страница 125: ...Click Print to start printing Top ...

Страница 126: ...ingle Sheets of Paper This section provides instructions on how to load paper in the sheet feeder Note Leave enough space in front of the CX6500 for paper to be fully ejected Pull out the output tray and its extension Flip the feeder guard forward ...

Страница 127: ...he distance between the two edge guides is slightly wider than the paper you are loading Fan the stack of paper then tap it on a flat surface to even the edges Load paper in the sheet feeder face up Slide the edge guide to fit the width of the paper ...

Страница 128: ...ular load limit mark on the edge guide Ensure that you set the adjust lever to the position If you print on paper other than envelopes when the lever is set to the position print quality and speed will be compromised Flip the feeder guard back over the paper Note If the paper is curled flatten it or curl it slightly toward the opposite side before loading Printing on curled paper may cause ink to ...

Страница 129: ... Top ...

Страница 130: ...l media for a complete list of these products When loading special media distributed by Epson read the instructions packed with the media first and keep the following points in mind Caution Cleaning sheets packaged with Epson special media should not be used with the CX6500 The cleaning function performed by these sheets is not necessary with this type of device and the sheets could jam inside the...

Страница 131: ... may cause ink to smear on your printout Loading capacities for Epson special media Refer to the chart below to find the loading capacities for Epson special media Media Type Loading Capacity Premium Bright White Ink Jet Paper Up to 125 sheets Double Sided Matte Paper One sheet at a time PremierArt Matte Scrapbook Paper ...

Страница 132: ...um Semigloss Photo Paper Ink Jet Transparencies Up to 30 sheets for Letter sized Ink Jet Transparencies Note Be careful not to print on support sheets that are loaded under special media Top Storing Epson Photo Paper Return unused paper to the original package as soon as you finish printing Epson recommends storing your printouts in a resealable plastic bag Keep them away from high temperature hum...

Страница 133: ...Printing Basic Printing Information Loading Envelopes Follow the steps below to load envelopes into the sheet feeder Slide out the extension tray Set the adjust lever to the position ...

Страница 134: ...e print speed when printing single sheets will decrease and the print quality may decline When the adjust lever is in the position make sure that the High Speed checkbox in the printer driver s Advanced dialog box is cleared To clear this checkbox you may also need to change the Print Quality setting Move the feeder guard towards you ...

Страница 135: ...stance between the two edge guides is slightly wider than the width of your envelopes Load envelopes short edge first with the flap side to the left then slide the left edge guide to fit the width of the envelopes as shown in the illustration ...

Страница 136: ...irst try printing one sheet to confirm that it can be printed properly You can then print the rest of the sheets The folding quality and thickness of envelopes vary widely If the total thickness of the stack of envelopes exceeds 10 mm press each envelope in the stack flat before loading If print quality declines when a stack of envelopes is loaded load one envelope at a time Do not use envelopes t...

Страница 137: ... during printing Do the following if paper cannot be fed properly Feed envelopes with the flap side on the right side and select the Rotate 180 checkbox on the Page Layout menu Windows or the Rotate by 180 degrees checkbox in the Page Setup dialog box Macintosh Press the four corners of the envelopes firmly with your fingers to make the envelopes flat Top ...

Страница 138: ...r Bright White Paper Plain paper Envelopes Epson Bright White Ink Jet Paper Letter S041586 Epson Photo Quality Ink Jet Paper Letter S041062 ML Matte Paper Heavyweightt Epson Matte Paper Heavywight Letter S041257 ML Epson Matte Paper Heavywight 8 x 10 inches S041467 Matte Paper Double Sided Epson Matte Paper Double Sided Letter S041568 DURABrite Ink Glossy Photo Paper Epson DURABrite Ink Glossy Pho...

Страница 139: ...ossy Photo Paper Letter S041141 ML Epson Glossy Photo Paper A4 S041140 Note The availability of special media varies by location For the latest information on media available in your area visit the Epson customer support web site See Contacting Customer Support Top ...

Страница 140: ...ndows For Mac OS 9 For Windows You can define a custom paper size and add it to the list Select User Defined as the Size setting The User Defined Paper Size dialog appears Type a name for your paper size in the Paper Size Name box Choose either cm or inch as the Unit setting ...

Страница 141: ...feeder on your CX6500 Therefore if necessary it is recommended that you reduce or enlarge documents to fit paper sizes within the range of your CX6500 s capabilities Click Save then click OK to return to the Main menu Your new user defined paper size name appears as the Size setting To delete a custom paper size from the list open the User Defined Paper Size dialog and select the user defined pape...

Страница 142: ...sections below Creating a new paper size If the appropriate paper size is not listed in the Paper Size list in the Page Setup dialog box follow the steps below to define a new custom paper size In the Page Setup dialog box click Customize The following dialog box appears To define a new paper size click New The dialog box now allows you to enter a name for the new size ...

Страница 143: ...a large range of paper sizes the size of paper you can feed into the CX6500 is limited by the size of the sheet feeder on your CX6500 Therefore if necessary it is recommended that you reduce or enlarge documents to fit paper sizes within the range of your CX6500 s capabilities Specify the margins by typing in the Margin text boxes or by manipulating the margins in the preview image Click OK to ret...

Страница 144: ...Custom Paper dialog box then click Delete Copying a pre existing paper size to use as a template Follow the steps below to copy an existing paper size to use as a template Select the existing paper size to be copied and click Copy Choose either cm or inch as the Unit setting Specify the margins by typing in the Margin text boxes or by manipulating the margins in the preview image Click OK Top ...

Страница 145: ...can print using many different types of paper The sections that follow the introduction explain procedures for each type of printing Click the title of each printing option to see more details Borderless Printing Lets you print without margins on all four sides of the paper Double Sided Printing Lets you print on both sides of the paper Note This feature is not available with Mac OS X ...

Страница 146: ...ically enlarge or reduce the size of your document to fit the paper size selected in the printer software Note This feature is not available with Mac OS X Pages Per Sheet Printing Lets you print two or four pages on a single sheet of paper ...

Страница 147: ...Poster Printing Lets you enlarge material on a single document page to cover 4 9 or 16 printed sheets of paper then make a poster Note This feature is not available with Mac OS X Watermark Printing ...

Страница 148: ...Lets you print text or an image as a watermark on your printout Note This feature is not available with Mac OS X For example you can put Confidential on an important document Top ...

Страница 149: ...ngs for Mac OS 9 Driver settings for Mac OS X The CX6500 allows you to print without margins on all four sides of the paper Follow the steps below to print Borderless documents and photos Note This feature is not available for all media and driver settings Compatible media You can use the following media when printing borderless documents and photos ...

Страница 150: ... above Print a single sheet to check the quality before printing large jobs Top Preparing the print data Because this option enlarges the image to a size slightly larger than the paper size the portion of the image that extends beyond the edges of the paper will not be printed When creating data in an application for print you need to adjust the data to the size of the paper If your application ha...

Страница 151: ...nter driver settings for Borderless printing Access the printer driver Accessing the Printer Software for Windows Click the Main tab then select a Quality Option setting For details see online help Click the Borderless checkbox Select a paper Type setting Media Type Settings Select a paper Size setting ...

Страница 152: ...rinting an entire job Note You can control the amount of the image that extends beyond the edges of the paper during borderless printing When the Borderless checkbox is selected on the Main menu the Borderless Expansion slider becomes available on the Page Layout menu Print one test copy and examine the results before printing an entire job Top ...

Страница 153: ... Borderless printing Access the Page Setup dialog box Accessing the Printer Software for Mac OS 9 Select a Paper Size setting Click the Borderless checkbox Click OK to save the settings and close the Page Setup dialog box Access the Print dialog box Accessing the Printer Software for Mac OS 9 ...

Страница 154: ... borderless printing When the Borderless checkbox is selected on the Page Setup dialog box the Borderless Expansion slider becomes available Top Driver settings for Mac OS X After you have loaded the media change your printer driver settings for Borderless printing Access the Page Setup dialog box Accessing the Printer Software for Mac OS X Select Stylus CX6500 as the Format for setting Select a P...

Страница 155: ...iate Orientation setting Click OK to close the Page Setup dialog box Access the Print dialog box Accessing the Printer Software for Mac OS X Select Stylus CX6500 as the Print setting then make the Copies Pages settings ...

Страница 156: ... available are a standard feature of Mac OS X See your operating system s documentation for details Select Print Settings from the pop up menu Select Media Type Color and Mode settings See online help for details Media Type Settings ...

Страница 157: ...nting Note Print one test copy and examine the results before printing an entire job You can control the amount of the image that extends beyond the edges of the paper during borderless printing See online help for details Top ...

Страница 158: ...double sided printing allows you to print the odd numbered pages first Once these pages are printed they can be reloaded to print the even numbered pages onto the opposite side of the paper Folded Booklet double sided printing allows you to make single fold booklets To create it the pages that appear on the outside after the page is folded are printed first The pages that will appear inside the bo...

Страница 159: ...f the first sheet of paper pages 6 and 7 on the back of the second sheet of paper and pages 10 and 11 on the back of the third sheet of paper The resulting pages can then be folded and bound together into a booklet Note This feature is not available with Mac OS X This feature is not available when selecting the Borderless checkbox on the Main menu Windows or in the Page Setup dialog box Macintosh ...

Страница 160: ...xt and images ink may bleed through to the other side of the paper The surface of the paper may be smeared during double sided printing Standard double sided printing for Windows Follow the steps below to print odd and even numbered pages onto opposite sides of the sheet Access the printer driver Accessing the Printer Software for Windows Click the Main tab then select a Quality Option setting For...

Страница 161: ...Click the Page Layout tab then select the Double Sided Printing checkbox Click Margins to open the Margins dialog box ...

Страница 162: ...h as the Unit setting Then specify the width of the binding margin You can enter any width from 0 12 inches to 1 18 inches Note The actual binding margin may be different from the specified settings depending on your application Experiment with a few sheets to examine actual results before printing the entire job ...

Страница 163: ...gs Load paper into the sheet feeder then send the print job from your application Instructions for generating the even numbered pages will be displayed while the odd numbered pages are printed Loading Single Sheets of Paper Follow the on screen instructions to reload the paper ...

Страница 164: ...dges against a hard flat surface before reloading the stack into the sheet feeder Follow the instructions provided when reloading the printouts Paper jams or improperly placed binding margins may occur if the printouts are not reloaded correctly If a paper jam occurs see Paper Does Not Feed Correctly Once the paper is reloaded click Resume to print the even numbered pages Top Standard double sided...

Страница 165: ...ssing the Printer Software for Mac OS 9 Select a Paper Size setting Select the Double Sided Printing checkbox Click Margins Specify the edge of the paper where the binding will be placed You can choose Left Top or Right Specify the width of the binding margin in the text box You can enter any width from 0 12 inch to 1 18 inch Note ...

Страница 166: ... Page Setup dialog box Then click OK to save your settings and close the dialog box Access the Print dialog box Accessing the Printer Software for Mac OS 9 Select a Media Type setting Media Type Settings Load paper into the sheet feeder then click Print to start printing Instructions for generating the even numbered pages will be displayed while the odd numbered pages are printed Loading Single Sh...

Страница 167: ... during printing due to the amount of ink used Should this occur slightly curl the sheets in the opposite direction before reloading them into the sheet feeder Align the sheet stack by tapping its edges against a hard flat surface before reloading the stack into the sheet feeder ...

Страница 168: ... is reloaded click Resume to print the even numbered pages Top Folded booklet double sided printing for Windows Use the following steps to create a folded booklet as described in the beginning of this section Access the printer driver Accessing the Printer Software for Windows Click the Main tab then select a Quality Option setting For details see online help Select a paper Type setting Media Type...

Страница 169: ...Click the Page Layout tab and select the Double Sided Printing checkbox Then select the Folded Booklet checkbox Click Margins to open the Margins dialog box ...

Страница 170: ...binding position is available when Landscape is selected as the Orientation setting Choose cm or inch as the Unit setting Specify the width of the binding margin You can enter any width from 0 12 inches to 1 18 inches The specified margin width will be used on both sides of the fold For example if a 0 12 inch margin is specified a 0 24 inch margin will be inserted a margin of 0 12 inches will be p...

Страница 171: ...Portrait Landscape Folding edge Margin Click OK to return to the Page Layout menu Then click OK to save your settings ...

Страница 172: ...te The paper may curl during printing due to the amount of ink used Should this occur slightly curl the sheets in the opposite direction before reloading them into the sheet feeder Align the sheet stack by tapping its edges against a hard flat surface before reloading the stack into the sheet feeder Follow the instructions provided when reloading the printouts Paper jams or improperly placed bindi...

Страница 173: ...sing a stapler or other binding method Top Folded booklet double sided printing for Macintosh Use the following steps to create a folded booklet as described in the beginning of this section Access the Page Setup dialog box Accessing the Printer Software for Mac OS 9 Select a Paper Size setting Select the Double Sided Printing checkbox Then select the Folded Booklet checkbox Click Margins ...

Страница 174: ...e The Top binding position is supported when Landscape is selected as the Orientation setting Specify the width of the binding margin in the text box You can enter any width from 0 12 inch to 1 18 inch The specified margin width will be used on both sides of the fold For example if a 0 12 inch margin is specified a 0 24 inch margin will be inserted a margin of 0 12 inches will be placed on each si...

Страница 175: ...log box Access the Print dialog box Accessing the Printer Software for Mac OS 9 Select a Media Type setting Media Type Settings Load paper into the sheet feeder then click Print to start printing Instructions for printing the inside pages will be displayed while the outside pages are printed Loading Single Sheets of Paper ...

Страница 176: ... during printing due to the amount of ink used Should this occur slightly curl the sheets in the opposite direction before reloading them into the sheet feeder Align the sheet stack by tapping its edges against a hard flat surface before reloading the stack into the sheet feeder ...

Страница 177: ...nding margins may occur if the printouts are not reloaded correctly If a paper jam occurs see Paper Does Not Feed Correctly Once the paper is reloaded click Resume to print the inside pages Once printing is complete fold the sheets and bind them together using a stapler or other binding method Top ...

Страница 178: ...ent on another size paper Fit to Page printing automatically fits images or text you want to print to the paper size you select in the printer software or it allows you to manually resize the image Note This feature is not available with Mac OS X This feature is not available when selecting the Borderless checkbox on the Main menu Windows or in the Page Setup dialog box Macintosh Loading paper Loa...

Страница 179: ...tings for Windows Access the printer driver Accessing the Printer Software for Windows Click the Main tab then select a Quality Option setting For details see online help Select a paper Type setting Media Type Settings Select a paper Size setting ...

Страница 180: ...ces the size of your document to make it fit the paper size selected in the By Output Paper Size list By Percentage Allows you to manually reduce or enlarge an image Click the arrows to select a percentage between 10 and 400 Select the paper size loaded in the sheet feeder from the drop down list when selecting By Output Paper Size or use the arrows to choose a percentage when selecting By Percent...

Страница 181: ...OK to close the printer driver settings dialog box After finishing all steps above start printing Top Driver settings for Macintosh Access the Page Setup dialog box Accessing the Printer Software for Mac OS 9 ...

Страница 182: ...setting Click OK to save the settings and close the Page Setup dialog box Access the Print dialog box Accessing the Printer Software for Mac OS 9 Select a Media Type setting Media Type Settings Click the Layout icon button ...

Страница 183: ...Select the Fit to Page checkbox Select the paper size loaded in the sheet feeder from the Output Paper Size list Click OK to save the settings and close the Layout dialog box ...

Страница 184: ...Click Print to start printing Top ...

Страница 185: ...iver settings for Mac OS X Pages Per Sheet printing allows you to print two or four pages on single sheets of paper Note This feature is not available when selecting the Borderless checkbox on the Main menu Windows or in the Page Setup dialog box Mac OS 9 Loading paper Load paper into the sheet feeder Loading Single Sheets of Paper ...

Страница 186: ...ws Access the printer driver Accessing the Printer Software for Windows Click the Main tab then select a Quality Option setting For details see online help Select a paper Type setting Media Type Settings Select a paper Size setting ...

Страница 187: ...Click the Page Layout tab and select the Multi Page checkbox Then select Pages Per Sheet ...

Страница 188: ...of paper Print Page Borders Prints frames around the pages printed on each sheet Page Order Allows you to specify the order in which the pages will be printed on the sheet of paper Some settings may be unavailable depending on the Orientation setting on the Main menu Click OK to close the printer driver settings dialog box ...

Страница 189: ... settings for Mac OS 9 Access the Page Setup dialog box Accessing the Printer Software for Mac OS 9 Select a Paper Size setting Click OK to save the settings and close the Page Setup dialog box Access the Print dialog box Accessing the Printer Software for Mac OS 9 ...

Страница 190: ...Select a Media Type setting Media Type Settings Click the Layout icon button Select the Multi Page checkbox in the Layout dialog box then select Pages Per Sheet ...

Страница 191: ... paper Page Order Allows you to specify the order in which the pages will be printed on the sheet of paper Some settings may be unavailable depending on the Orientation setting in the Page Setup dialog box Print page frames Prints frames around the pages printed on each sheet Click OK to save the settings and close the Layout dialog box ...

Страница 192: ...ver settings for Mac OS X Access the Page Setup dialog box Accessing the Printer Software for Mac OS X Select Stylus CX6500 as the Format for setting Select a Paper Size and Orientation settings Click OK to close the Page Setup dialog box ...

Страница 193: ...X Select Stylus CX6500 as the Printer setting Make the Copies Pages settings Note The Copies Pages settings available are a standard feature of Mac OS X See your operating system s documentation for details Select Layout from the pop up menu Select the following settings ...

Страница 194: ... printed on the sheet of paper Border Prints a border around the pages printed on each sheet You can choose from None Single hairline Single thin line Double hairline or Double thin line Note The Layout settings available are a standard feature of Mac OS X See your operating system s documentation for details Select Print Settings from the pop up menu Select Media Type Color and Mode settings ...

Страница 195: ...Media Type Settings Click Print to start printing Top ...

Страница 196: ...r printouts Poster printing allows you to print poster size images by enlarging one page to cover several sheets of paper Note This feature is not available with Mac OS X This feature is not available when selecting the Borderless checkbox on the Main menu Windows or in the Page Setup dialog box Macintosh Loading paper Load paper into the sheet feeder ...

Страница 197: ...tings for Windows Access the printer driver Accessing the Printer Software for Windows Click the Main tab then select a Quality Option setting For details see online help Select a paper Type setting Media Type Settings Select a paper Size setting ...

Страница 198: ...Click the Page Layout tab and select the Multi Page checkbox Then select Poster Printing Click the up or down arrow to select 2x2 3x3 or 4x4 ...

Страница 199: ...Click Settings to adjust the way your poster will print The Poster Settings dialog box opens ...

Страница 200: ...heckbox to turn the cutting guide options on Overlapping Alignment Marks Slightly overlaps the panels and prints alignment markers so that the panels can be aligned more precisely Trim Lines Prints border lines on the panels to guide you when trimming the pages Note ...

Страница 201: ...h to print Click OK to close the Poster Settings dialog box After finishing all of the steps above start printing Top Driver settings for Macintosh Access the Page Setup dialog box Accessing the Printer Software for Mac OS 9 Select a Paper Size setting Click OK to save the settings and close the Page Setup dialog box ...

Страница 202: ...Access the Print dialog box Accessing the Printer Software for Mac OS 9 Select a Media Type setting Media Type Settings Click the Layout icon button Select the Multi Page checkbox then select Poster ...

Страница 203: ...om 4 9 or 16 sheets Overlapping Alignment Marks Slightly overlaps the panels and prints alignment markers so that the panels can be aligned more precisely Trim Lines Prints border lines on the panels to guide you when trimming the pages Panel Selection Click the panels you do not need to print then click the OK button to print the remaining panels Note ...

Страница 204: ...og box Click Print to start printing Top How to make a poster from your printouts Here is an example of how to make a poster with 2x2 selected under Poster Printing and Overlapping Alignment Marks selected as the print cutting guide Refer to the accompanying illustrations as well Cut off the margin of Sheet 1 along a vertical line through the center of the top and bottom cross marks as shown in th...

Страница 205: ...ugh the alignment markers this time a line to the left of the cross marks as shown in the illustration below Align the edges of the paper together using the alignment markers and tape them from the back side of the paper Repeat the instructions from step 1 to step 4 to tape Sheets 3 and 4 together Repeat the instructions from step 1 to step 4 to tape the top and bottom faces of the paper ...

Страница 206: ...Cut off the remaining margins Warning Be careful when using sharp tools Top ...

Страница 207: ...dows Creating your own watermark for Macintosh Watermark printing allows you to print a text based or an image based watermark on your document Note This feature is not available with Mac OS X This feature is not available when selecting the Borderless checkbox on the Main menu Windows or in the Page Setup dialog box Macintosh Loading paper Load paper into the sheet feeder ...

Страница 208: ...watermark for Windows Access the printer driver Accessing the Printer Software for Windows Click the Main tab then select a Quality Option setting For details see online help Select a paper Type setting Media Type Settings Select a paper Size setting ...

Страница 209: ...Click the Page Layout tab choose the desired watermark from the Watermark list then click Settings ...

Страница 210: ...Specify the necessary settings for the watermark You can change the position and size of the watermark by dragging the image within the preview window at the left of the dialog box ...

Страница 211: ...Page Layout menu Click OK to close the printer driver settings dialog box Print the data from your application Top Printing the watermark for Macintosh Access the Page Setup dialog box Accessing the Printer Software for Mac OS 9 ...

Страница 212: ...setting Click OK to save the settings and close the Page Setup dialog box Access the Print dialog box Accessing the Printer Software for Mac OS 9 Select a Media Type setting Media Type Settings Click the Layout icon button ...

Страница 213: ...ired watermark from the Name list Specify the necessary settings for the watermark You can change the position and size of the watermark by dragging the image within the preview window at the left of the dialog box Click OK to save the settings and close the Layout dialog box ...

Страница 214: ...t printing Top Creating your own watermark for Windows You can add your own text based or image based watermarks to the watermark list Click Add Del under Watermark on the Page Layout menu The following dialog box appears ...

Страница 215: ...sed as the watermark name If you want to change the watermark name type a new name in the Name text box then click Save Click OK to return to the Page Layout menu Click Settings The following dialog box appears Make sure that the appropriate watermark is selected in the Watermark list then make Color Position Density Size Font Font Style and Angle settings For details see online help Your settings...

Страница 216: ...he watermark list Click Add Del beside the Name list The following dialog box appears To use an image file as a watermark click Add PICT Specify the desired image file then click Open To create a text based watermark click Add Text Type the text in the Text text box select a font and a text style then click OK ...

Страница 217: ... box To change the name of an image watermark select it from the list then type a new name When a text watermark is selected in the Name list you can edit the text or change the font and text style by clicking Edit Text Click OK to add your watermark to the Name list in the Layout dialog box Top ...

Страница 218: ...gress meter appears as shown in the illustration below The progress meter indicates the progress of the current print job and provides printer status information when bidirectional communication between the CX6500 and the computer is established This meter also displays error messages as well as helpful tips for better printing Refer to the sections below Epson Printing Tips ...

Страница 219: ... displayed in the window click the Details button Error messages If a problem occurs during printing an error message appears in the text box at the top of the progress meter window When the ink runs low or out a How to button appears below the text box Click How to and Epson Status Monitor 3 will lead you step by step through the cartridge replacement procedure Using Epson Spool Manager ...

Страница 220: ...s not available with Windows XP and 2000 After you send a print job a printer icon appears on the taskbar Click this icon to open Epson Spool Manager Using Epson Status Monitor 3 Epson Status Monitor 3 displays detailed information on the status of the CX6500 Note Before using Epson Status Monitor 3 be sure to read its README file To open this file click Start point to Programs for Windows Me 98 a...

Страница 221: ...information a graphic display and status messages If the ink runs low or out the How to button appears in the Epson Status Monitor 3 window Clicking How to displays ink cartridge replacement instructions and moves the print head to the ink cartridge replacement position Ink Levels Epson Status Monitor 3 provides a graphic display of the amount of ink remaining and an estimate of the number of page...

Страница 222: ... will inform you with an error message When the ink runs low or out a How to button appears Click How to and Epson StatusMonitor will lead you step by step through the ink cartridge replacement procedure You can also use this utility to check ink levels before printing When open Epson StatusMonitor displays the amount of ink remaining at the time it was opened To update the ink level information c...

Страница 223: ...g box Accessing the Printer Software for Mac OS 9 Click the StatusMonitor icon button or click the Utility icon button then the Epson StatusMonitor button in the Utility dialog box The Epson StatusMonitor dialog box appears For Mac OS X ...

Страница 224: ...The Epson Printer Utility dialog box appears Click the Epson StatusMonitor button The Epson StatusMonitor dialog box appears Using the Configuration Settings dialog box To change the way that the Epson StatusMonitor utility monitors the CX6500 or to change the way that the CX6500 handles print jobs follow the steps below ...

Страница 225: ...e menu of your application Click the Utility icon button Click Configuration The Configuration Settings dialog box appears In the Configuration Settings dialog box you can make the following settings Error notification Choose the way Epson StatusMonitor notifies you in case of an error ...

Страница 226: ...then send the image data to the CX6500 as a whole rather than as rectangular bands Check for errors before starting to print Select this checkbox to have the CX6500 check for errors before starting to print Check the ink level before starting to print Select this checkbox to have the CX6500 check the ink levels before starting to print Using Epson MonitorIV After you send a print job to the CX6500...

Страница 227: ...Note You can also open Epson MonitorIV by double clicking the Epson MonitorIV icon in the Extensions folder Managing print jobs using Epson MonitorIV Using Epson MonitorIV you can manage print jobs as described below Use the buttons below to hold resume and delete print jobs Select the print job that you want to manage then click the appropriate button Hold Pauses printing and keeps the current pr...

Страница 228: ...tarts Epson Status Monitor which displays the amount of ink remaining Double click a file in the list to preview it this function is disabled when you are printing the ESC P command file Double click Copies to change the number of copies of the selected print job that will be printed Click the Show details arrow to open an extension similar to the one below at the bottom of the Epson MonitorIV dia...

Страница 229: ...change the priority of print jobs whose print times were previously set in the printer software s Background Printing dialog box In the Document Name column select the print job for which you want to change the priority Click the Show details arrow to open an extension similar to the one below at the bottom of the Epson MonitorIV dialog box ...

Страница 230: ...ent Normal Hold or Print Time Note If you select Print Time a dialog box appears allowing you to specify the date and time when the document will be printed Make sure that the CX6500 and computer are turned on at the specified time Top ...

Страница 231: ...ck utility in the printer software or from the CX6500 itself by using the buttons on the control panel Note Do not start the nozzle check while printing is in progress otherwise your printout may be marred Using the Nozzle Check utility Refer to the sections below to use the Nozzle Check utility For Windows Follow the steps below to use the Nozzle Check utility Make sure that A4 or Letter size pap...

Страница 232: ... sheet feeder Make sure that the CX6500 is on and the Error light is off Access the Print or Page Setup dialog box Accessing the Printer Software for Mac OS 9 Click the Utility icon button then click the Nozzle Check button in the Utility dialog box Follow the on screen instructions For Mac OS X Follow the steps below to use the Nozzle Check utility Make sure that A4 or Letter size paper is loaded...

Страница 233: ...nstructions Top Using the control panel buttons Follow the steps below to check the print head nozzles using the control panel Note When the Error light is on and a message appears on the LCD panel to prompt you to replace an ink cartridge or to indicate the ink is low you cannot clean the print head In this case replace the appropriate ink cartridge first Make sure that A4 or Letter size paper is...

Страница 234: ...heck the printout The following examples indicate when the print head needs to be cleaned Good print head does not need to be cleaned yet Not Good print head needs to be cleaned If the nozzle check page does not print satisfactorily there is a problem with the CX6500 This could be a clogged ink nozzle or a misaligned print head See Cleaning the Print Head for details on cleaning the print head Top...

Страница 235: ... both color and black inks To avoid wasting ink clean the print head only if the copy quality drops for example blurred printout incorrect or missing color Use the nozzle check first to confirm that the print head needs to be cleaned This saves ink When the Error light is on and a message appears on the LCD panel to prompt you to replace the ink cartridge or to indicate the ink is low you cannot c...

Страница 236: ...Head cleaning appears on the LCD panel while the CX6500 performs the cleaning cycle Caution Never turn off the CX6500 while Head cleaning appears on the LCD panel Doing so may damage it When Head cleaning disappears from the LCD panel click Print Nozzle Check Pattern in the Head Cleaning dialog box to confirm that the print head is clean Good print head does not need to be cleaned yet Not Good pri...

Страница 237: ... improved one or both of your ink cartridges may be old or damaged and may need to be replaced To replace an ink cartridge before it is empty see Replacing an Ink Cartridge If the copy quality remains a problem after replacing the ink cartridges contact your dealer To maintain good copy quality we recommend printing a few pages at least once every month For Mac OS 9 Follow the steps below to clean...

Страница 238: ... the LCD panel Doing so may damage it When Head cleaning disappears from the LCD panel click the Confirmation button in the Head Cleaning dialog box to print a nozzle check pattern Use the check pattern to confirm that the print head is clean Good print head does not need to be cleaned yet Not Good print head needs to be cleaned If the nozzle check page does not print satisfactorily you may need t...

Страница 239: ...lacing an Ink Cartridge If the copy quality remains a problem after replacing the ink cartridges contact your dealer To maintain good copy quality we recommend printing a few pages at least once every month For Mac OS X Follow the steps below to clean the print head using the Head Cleaning utility Make sure that Letter size paper is loaded in the sheet feeder Make sure that the CX6500 is on and th...

Страница 240: ... Use the check pattern to confirm that the print head is clean Good print head does not need to be cleaned yet Not Good print head needs to be cleaned If the nozzle check page does not print satisfactorily you may need to repeat the head cleaning and print the nozzle check pattern again See Cleaning the Print Head Note If the copy quality has not improved after repeating this procedure four or fiv...

Страница 241: ... below to clean the print head using the control panel buttons Make sure the CX6500 is on and the Error light is off Press the Setup Mode button to enter the Setup Mode Press the A or Select button repeatedly until 4 Head Cleaning appears on the LCD panel then press the Color button Cleaning of the print head starts and Head cleaning appears on the LCD panel Caution Never turn off the CX6500 while...

Страница 242: ...m the nozzle check again and repeat head cleaning if necessary If the print quality still has not improved one or more of your ink cartridges may be old or damaged and may need to be replaced To replace an ink cartridge see Replacing an Ink Cartridge To maintain the finest print quality we recommend printing a few pages at least once a month Top ...

Страница 243: ...er to the sections below Note Do not press the Stop button to cancel printing while printing an alignment pattern For Windows Follow the steps below to align the print head using the Print Head Alignment utility Make sure that Letter size plain paper is loaded in the sheet feeder and that the adjust lever is set to the position Make sure that the CX6500 is on and Error lights is off Access the pri...

Страница 244: ...der and that the adjust lever is set to the position Make sure that the CX6500 is on and Error lights is off Access the Print or Page Setup dialog box Accessing the Printer Software for Mac OS 9 Click the Utility icon button then click the Print Head Alignment button Follow the on screen instructions to align the print head Top For Mac OS X Follow the steps below to align the print head using the ...

Страница 245: ...lity dialog box Follow the on screen instructions to align the print head Top Using the control panel buttons Follow the steps below to align the print head using the control panel Make sure that A4 or Letter size paper is loaded in the sheet feeder Make sure that the CX6500 is on and the Error light is off Press the Setup Mode button to enter the Setup Mode Press the A or Select button repeatedly...

Страница 246: ... button to print the alignment patterns again otherwise press the Stop button Note Even if you press the Stop button the settings you made in step 5 remains saved Look at the alignment patterns Find the pair of horizontal bars with no dark or light band between them then select the number of the pair using the numeric buttons Press the Color button to register your selection If you want to continu...

Страница 247: ... install software programs if you log in with a Limited account user After you install Windows XP the user account is set as a Computer Administrator account To install software programs in Windows 2000 it is necessary to log on as a user with administrative privileges a user who belongs to the Administrators group The illustrations in the following section pertain to Windows XP First set up the C...

Страница 248: ...ory View click Printers and Other Hardware then click Printers and Faxes For Windows 2000 click Start point to Settings then click Printers Right click the icon for the CX6500 then click Sharing Select Share this printer then type a name for the shared printer Note Do not use spaces or hyphens in the share name ...

Страница 249: ...rinter driver on each computer that will access it Follow the steps below Note The CX6500 must be set up as a shared resource on the computer that it is directly connected to before you can access it from another computer See Setting up the CX6500 as a shared printer For Windows XP click Start Control Panel then double click Printers and Faxes If the Control Panel is in Category View click Printer...

Страница 250: ...On the next screen click Next Double click the icon of the computer that is directly connected to the CX6500 Then click the icon for the CX6500 ...

Страница 251: ...st set up the CX6500 as a shared printer on the computer connected directly to it Then install the printer software on each computer that will access the CX6500 through the network Note This section describes how to use the CX6500 as a shared printer on a network To connect it directly to a network without setting it up as a shared printer consult your network administrator Setting up the CX6500 a...

Страница 252: ...ting that you insert the Windows Me or 98 CD ROM insert the CD into the CD ROM drive then follow the on screen instructions If a dialog box appears requesting that you restart your computer do so open the Printers folder then continue with step 7 Select the icon for the CX6500 in the Printers folder then click Sharing on the File menu Select Shared As type the information for the CX6500 as require...

Страница 253: ...t will access it Follow the steps below Note The CX6500 must be set up as a shared resource on the computer that it is directly connected to before you can access it from another computer See Setting up the CX6500 as a shared printer Click Start point to Settings then click Printers Double click the Add Printer icon The Add Printer Wizard appears ...

Страница 254: ...Click Next Select Network printer then click Next On the next screen click Browse Double click the icon of the computer that is directly connected to the CX6500 Then click the icon for it ...

Страница 255: ...e network and can be used by other computers First set up the CX6500 as a shared printer on the computer connected directly to it Next specify the network path to the CX6500 from each computer that will use it and install the printer software on those computers Setting up the CX6500 as a shared printer To share the CX6500 with other computers on an AppleTalk network follow the steps below to confi...

Страница 256: ...Turn on the CX6500 Select Chooser from the Apple menu click the icon for the CX6500 then select the port it is connected to Click the Setup button The Printer Sharing Setup dialog box opens ...

Страница 257: ...network To access the CX6500 from other computers on a network follow the steps in this section for each computer that will access it Turn on the CX6500 Install the printer software from the software CD ROM Select Chooser from the Apple menu Click the icon for the CX6500 and select the printer port that you want to use from the Select a printer port list Note Only printers that are connected to yo...

Страница 258: ...ssword for the CX6500 then click OK Select the appropriate Background Printing radio button to turn background printing on or off Close the Chooser Top For Mac OS X Use the Printer Sharing setting which is a standard feature of Mac OS X 10 2 or later ...

Страница 259: ...See your operating system s documentation for details Top ...

Страница 260: ...e a fast print speed However even if your document requires the highest resolution and extensive use of color for example when you are printing a camera ready composite that includes color photographs it may still be possible to optimize the print speed by adjusting other printing conditions Keep in mind that changing some conditions to increase the print speed may also lower print quality The fol...

Страница 261: ...peed Faster Slower Menu or dialog box Printer software settings Orientation Portrait Landscape Main menu Windows Page Setup dialog box Macintosh Color Macintosh Black Color Print dialog box Edge smoothing Off On Advanced dialog box Fast Feed On Off Advanced dialog box Photo Enhance Off On Main menu Windows Print dialog box Macintosh ...

Страница 262: ...color Hardware resources System speed Faster Slower HDD free space Large Small Memory free space Large Small Software status Running applications One Many Virtual memory Not in use In use Varies depending on the printer software and application that you are using Grayscale means using black ink only to print varying shades of gray ranging from pure black to pure white Varies depending on the media...

Страница 263: ...nter software s Maintenance menu The following dialog box appears The settings related to print speed are listed below Note The specific features available in the printer software vary depending on the CX6500 model and the version of Windows that you are using High speed copies To print multiple copies of your document faster select High Speed Copies This speeds up printing by ...

Страница 264: ...applications use the EMF format by default Try using this option if documents spooled in EMF format do not print correctly Spooling RAW datatype requires less resources than EMF so some problems Insufficient memory disk space to print Slow print speed etc can be solved by selecting the Always spool RAW datatype checkbox Note When spooling RAW datatype print progress as displayed by the Progress Me...

Страница 265: ...lect Notification Displays the current error notification settings Select the checkboxes of the error types for which you want to receive notification Note Click the Default button to revert all Select Notification settings to their defaults ...

Страница 266: ... icon placed in your Windows taskbar You can click the shortcut icon in the taskbar to open Epson Status Monitor 3 or right click the icon to access some of the printer utilities Allow monitoring of shared printers Select this checkbox to allow monitoring of a shared printer by other computers Top ...

Страница 267: ...you are using When you access the printer software from the Start menu or the taskbar the settings that you make apply to all of your Windows applications Refer to the sections below From Windows applications Follow the steps below to access the printer software Click Print or Print Setup from the File menu In the dialog box that appears click Printer Setup Options Preferences or Properties Depend...

Страница 268: ...nd 2000 click Start point to Settings then click Printers For Windows XP and 2000 select the CX6500 then click Printing Preferences on the File menu For Windows 98 and Me select the CX6500 then click Properties on the File menu You see the printer software window Top From the taskbar Right click the printer icon on the taskbar then select Printer Settings You see the printer software window Top ...

Страница 269: ...dialog box Page Setup Click Page Setup on the File menu of your application Layout Click the Layout icon button in the Print dialog box Utility Click the Utility icon button in the Print or Page Setup dialog box In addition the dialog boxes below are accessed from the Print dialog box Dialog Box How to Access It Background Printing Click the Background Printing icon button in the Print dialog box ...

Страница 270: ...Save File Click the Preview icon button in the Print dialog box until the Print button changes into the Save File button then click the Save File button Top ...

Страница 271: ...nu of your application Epson Printer Utility You can access the CX6500 in the following two ways Double click the Epson Printer Utility icon in the Applications folder in Macintosh HD Select the CX6500 from the Printer List then click OK Open the Applications folder on your hard drive then open the Utilities folder and double click the Print Center or Printer Setup Utility icon Select any one of t...

Страница 272: ...h any item on a menu by right clicking the item then clicking the What s This command You can also view a detailed explanation of a setting or option by clicking the button on the top right of the printer driver window then clicking the item Top Accessing help from the Windows Start menu Access the printer software see From the Start menu You can get specific help related to any item on a menu by ...

Страница 273: ...Printer Software Introductions Getting Information Getting Information Through Online Help for Mac OS 9 Choose Print or Page Setup from the File menu of your application Then click the Help button Top ...

Страница 274: ...ting Information Through Online Help for Mac OS X Click the Help button when settings for Epson printer software such as Print Settings or Color Management are selected in the Print dialog box For other setting see your operating system s documentation Top ...

Страница 275: ... Place your materials on the document table Start a TWAIN compliant application In the application open EPSON Scan Full Auto Mode EPSON Scan automatically previews the images and recognizes the document source and type Images are automatically optimized and scanned Home Mode or Professional Mode Make settings to optimize images and click Scan The scanned images are sent to the application Save the...

Страница 276: ...ry or disk space If you try to scan the image an alert appears on the screen Note for Macintosh users Most illustrations shown in this section are for Windows so they may vary in appearance from what actually appears on your screen The instructions are the same except as noted Caution Before starting the following steps make sure that all the necessary software including EPSON Scan has been instal...

Страница 277: ...tand alone application Start EPSON Scan from a TWAIN compliant application This section provides information on how to start EPSON Scan from ArcSoft PhotoImpression For details on starting EPSON Scan as a stand alone application see Starting EPSON Scan Note for Windows 98 users ArcSoft PhotoImpression 5 supports Windows 98 Second Edition or later For version earlier than Windows 98 Second Edition ...

Страница 278: ...ck the PhotoImpression folder Finally double click the PhotoImpression 5 icon Click the Camera Scanner button Select a file format location and file name then click Epson Stylus CX6500 EPSON Scan starts See File formats for information on file formats Note for Windows XP users Do not choose WIA Epson Stylus CX6500 from the menu to select the CX6500 If you select it you cannot use the Epson scanner...

Страница 279: ...lick Options to open the Options dialog box For more details on settings click the Help button in the Option dialog box After EPSON Scan has previewed and recognized the document type the following window appears You can see the document type in the window ...

Страница 280: ...ates the target images modifies their skew and starts scanning Caution Do not open the scanner unit during scanning or copying otherwise you may damage the CX6500 Note Be aware that clicking Cancel on this screen closes EPSON Scan ...

Страница 281: ...by your image processing application when you save image files Format File extension Explanation BMP format BMP Windows only BMP is a standard image file format in Windows Most Windows applications including word processor applications can read images in this format TIFF format TIF TIFF is a file format which is designed for data exchange between applications such as graphics software and DTP soft...

Страница 282: ...e file format for Macintosh Most Macintosh applications including word processor software can read images in this format PNG format PNG PNG is a portable and highly compressed file format designed for viewing in Web browsing applications which allows a choice in compression quality The image quality does not deteriorate when the image file is saved in PNG Top ...

Страница 283: ...canning a document remember to respect the rights of copyright owners Do not scan published text or images without first checking the copyright status Note Keep the document table clean You cannot scan films Open the document cover Place the original document face down on the document table Make sure that the document is properly aligned ...

Страница 284: ...oes not move Note To scan the document properly close the document cover to prevent interference from the external light Do not leave photographs on the document table for an extended period of time They may stick to the glass of the document table Do not place heavy objects on top of the CX6500 For a thick or large document you can remove the document cover to make it easier to align the document...

Страница 285: ... sure you press the document from above to keep it flat When you press the document do not move the document and do not add too much pressure Removing and installing the document cover When removing the document cover open the cover then pull it up When installing the document cover install it in the reverse order of removing it Caution ...

Страница 286: ... force when removing the document cover and do not twist it diagonally Doing so may damage the document cover Do not open and shut the scanner unit without the document cover It might cause the injury and the breakdown Top ...

Страница 287: ...o adjust the basic image settings for scanned images Professional Mode In the Professional Mode there are many options available to give you greater control over your scanning You can sharpen correct or enhance your images before scanning them in the Professional Mode The following table indicates the suitable mode to use according to the scanning purpose Purpose Full Auto Mode Home Mode Professio...

Страница 288: ... described in the following section Changing the scanning mode You can change the scanning mode from the list box at the top right of the window Click the small arrow to the right of the list box then click to select the desired mode Note The scanning mode that was selected the last time you used EPSON Scan remains in effect when you start it again Top ...

Страница 289: ... reflective documents in Professional Mode Place photos on the document table If necessary see the following section for more information Placing Photos and Documents on the Document Table Start EPSON Scan and select Professional Mode For details on how to select a scanning mode see Changing the scanning mode The settings window appears Select the settings to match your document Refer to the illus...

Страница 290: ...Original Document Type Reflective Document Source Document Table Auto Exposure Type Photo Destination Image Type Select a suitable image type ...

Страница 291: ...get Size To be set in a later step Adjustments To be set in a later step Click the Preview button to preview the images Use Target Size to specify the output size of the scanned images then specify the Adjustments settings if necessary See Creating Beautiful Reproductions for details ...

Страница 292: ...n The following table indicates suitable resolutions for different scanning tasks Purpose Resolution Sending E mail 96 to 150 dpi OCR Optical Character Recognition 300 dpi Printing 300 dpi Filing 300 dpi Sending Fax 200 dpi Top For text and line art Follow the steps below to select suitable settings for scanning text and line art in Professional Mode With this feature outlines of text and line art...

Страница 293: ...nts on the Document Table Start EPSON Scan and select Professional Mode For details on how to select a scanning mode see Changing the scanning mode The settings window appears Select the settings that match your document Refer to the illustration and the table below ...

Страница 294: ...ed Resolution 300 dpi for texts 600 dpi for line arts Target Size To be set in a later step Adjustments To be set in a later step Click the Preview button to preview the images Use Target Size to specify the output size of the scanned images then specify the Adjustments settings if necessary See Creating Beautiful Reproductions for details ...

Страница 295: ...document is simplified to prevent the scanned image from being mottled It is also suitable for modifying colors of an image with a color re touching application Place a document on the document table Placing Photos and Documents on the Document Table Start EPSON Scan and select Professional Mode For details on how to select a scanning mode see Changing the scanning mode The settings window appears...

Страница 296: ...Original Document Type Reflective Document Source Document Table Auto Exposure Type Document Destination Image Type Color Smoothing ...

Страница 297: ... set in a later step Adjustments To be set in a later step Click the Preview button to preview the images Use Target Size to specify the output size of the scanned images then specify the Adjustments settings if necessary See Creating Beautiful Reproductions for details Click Scan to start scanning ...

Страница 298: ... can avoid a blank area being scanned as a yellowish image or images on the back side of paper being scanned through Place a document on the document table Placing Photos and Documents on the Document Table Start EPSON Scan and select Professional Mode For details on how to select a scanning mode see Changing the scanning mode The settings window appears Select the settings that match your documen...

Страница 299: ...Original Document Type Reflective Document Source Document Table Auto Exposure Type Document Destination Image Type Select an appropriate image type ...

Страница 300: ... set in a later step Adjustments To be set in a later step Click the Preview button to preview the images Use Target Size to specify the output size of the scanned images then specify the Adjustments settings if necessary See Creating Beautiful Reproductions for details Click Scan to start scanning ...

Страница 301: ...The scanned images are sent to the application or saved in the specified folder Top ...

Страница 302: ...on you will get the information on what you can do and how you do it Remove the moiré pattern from a scanned image You can remove a wavy or ripped pattern called moiré which tends to happen in areas of halftone color such as skin color Follow the steps below to remove these patterns Note This feature is not available when the resolution is set to greater than 600 dpi You cannot use this feature wh...

Страница 303: ...lied Top Improve image sharpness If the outline of the original edge of the image is not sharp enough you can improve the sharpness of the scanned image by using this feature in Professional Mode This feature is automatically enabled in Home Mode Follow the steps below Note This feature is not available when Color Smoothing Halftone or Black White is selected for Image Type ...

Страница 304: ...nsharp Mask Filter not applied Unsharp Mask Filter applied Select the level of adjustments Top Liven up the color of a scanned image You can liven up the color of a scanned image by adjusting the brightness of color contrast or color balance Follow the steps below Note ...

Страница 305: ...This feature is only available when you are scanning a color image Click the Image Adjustment button Adjust the items you want to change by sliding the tabs ...

Страница 306: ...g the Close button Top Restore faded color images Color Restoration is a scanner software feature that restores faded color on photos in Home or Professional Mode In Home Mode click the Preview button to prescan your image click the Image Adjustments button then select the Color Restoration checkbox ...

Страница 307: ... down and select the Color Restoration checkbox Note Do not specify 8 bit Grayscale for Image Type Do not specify Document for Auto Exposure Type Depending on the condition of photos the color may not be restored as you desire Top Enhance the quality of a scanned image PRINT Image ...

Страница 308: ...a dynamic range of brilliant colors Note PRINT Image Matching information does not change the image data or the way the image is displayed on a computer screen Follow the steps below to enhance the quality of your scanned images using EPSON Smart Panel Place your materials on the document table Placing Photos and Documents on the Document Table Start EPSON Smart Panel Starting EPSON Smart Panel EP...

Страница 309: ...e icon on the EPSON Smart Panel Specify Location File Name and Image Format settings Select Print Image Matching II JPEG or Print Image Matching II TIFF from the Type list box and change the Photo Scene setting if necessary ...

Страница 310: ...Click Scan and Save to start scanning or Scan with Options to change scanning settings Top ...

Страница 311: ... steps below to scan multiple materials using Professional Mode Place documents on the document table See Placing Photos and Documents on the Document Table for details Note If you plan to preview images using the Thumbnail method while scanning multiple photos position each photo at least 20 mm apart from its adjacent photos Start EPSON Scan and select Professional Mode For details on how to sele...

Страница 312: ...settings to match your images Click the Preview button to preview the images Note You can select a preview method Thumbnail Preview or Normal Preview Click the small arrow to the right of the Preview button then select Thumbnail or Normal ...

Страница 313: ...w them as thumbnail images Select the number checkbox of an image you want to scan Note Depending on the materials you want to scan Epson scan may not be able to automatically locate the target images or preview the images as thumbnails In this case preview the images in the Normal Preview window ...

Страница 314: ...In the Normal Preview window Create marquees on the previewed image to select an area you want to scan You can create up to 50 marquees For more details see Using marquees ...

Страница 315: ... Size list A marquee proportional to the measurements of the Target Size setting appears in the Preview window You can move this marquee to the area of the image you want to scan For more details see the online help Specify the Adjustments settings if necessary You may need to scroll to the bottom of the screen ...

Страница 316: ...ifications to all of the images at once by clicking All In Normal Preview you need to make marquees For detail see Using marquees Click Scan EPSON Scan starts scanning The scanned images are sent to the application or saved in the specified folder Top ...

Страница 317: ... a graphical representation of text to interpret which usually comes from a scanned image Follow all of the steps described in For text and line art Import the scanned image into the OCR software Improving character recognition Use the Threshold slider to change the threshold value monitoring the results of the changes in the Preview window Adjusting the threshold value can make it easier for OCR ...

Страница 318: ... recognition difficult and should be avoided if possible Items that have been copied from other copies Faxes Text with tightly spaced characters or line pitch Text that is in tables or underlined Cursive or italic fonts and font sizes less than 8 points Remember that OCR software cannot recognize handwritten characters Top ...

Страница 319: ...s files in the folder specified in the File Save Settings dialog box This operation can be set up as follows Open the File Save Settings dialog box For Windows users Click Start point to All Programs for Windows XP users or Programs for Windows 98 Me or 2000 users point to EPSON Scan then select EPSON Scan For Mac OS 9 users Select EPSON Scan from the Apple menu For Mac OS X users Click the EPSON ...

Страница 320: ...ion where scanned images are saved If you want to change the default location click Browse for Windows or Choose for Macintosh then select a folder Specify a file name with an alphanumeric character string prefix and a 3 digit number start number If you want to change the file name type an alphanumeric character string in Prefix and select a start number The name of a file is generated using a com...

Страница 321: ...s can read images in this format JPEG JPG A compressed file format The compression quality can be selected The JEPG format enables relatively high compression ratio However the higher the compression ratio is the lower the image quality becomes Note that the original data cannot be restored In addition the quality deteriorates every time the data is saved The TIFF format is recommended in cases wh...

Страница 322: ... as graphic and DTP software When scanning black white images you can specify the compression type Click OK EPSON Scan starts scanning The scanned image is automatically saved in the specified location If the Open image folder after scanning checkbox in the File Save Settings dialog box is selected Windows Explorer Windows or Finder Macintosh automatically opens the folder where the scanned image ...

Страница 323: ...pears to the right of the Preview button allowing you to select a preview method Click the arrow and select Thumbnail or Normal to change the preview method Note The preview window is not available in the Full Auto Mode If the Auto preview checkbox is selected in the Home Mode main window preview scanning automatically starts when you access the Home Mode If there is no arrow to the right of the P...

Страница 324: ... marquees see Using marquees Click the Zoom Preview button to zoom in on a selected area of the image Use a marquee to select the part of the image you want to zoom in then click the Zoom Preview button An enlargement of the selection appears in the Zoom menu allowing you to see the effects of your settings in more details Note ...

Страница 325: ...of the image you want to scan For more details see the online help Thumbnail preview The Thumbnail Preview method allows you to preview multiple images in a thumbnail layout EPSON Scan automatically locates the target images and applies the Auto Exposure feature to each image You can modify each thumbnail image and make additional image adjustments You can also use marquees to scan selected portio...

Страница 326: ...select it then select your settings The selected image has a blue frame around it To apply the same modifications to all of the thumbnail images at once click All To enlarge a thumbnail image select it and click the Full Size tab An enlargement of the selected image appears in the Full Size menu allowing you to see the effects of your settings in more details ...

Страница 327: ...area you want to enlarge using the Zoom Preview button Thumbnail Preview You can make only one marquee for one thumbnail image To create a marquee move the pointer over the image in the Preview window The pointer becomes a set of cross hairs Hold down the mouse button and drag the cross hairs over an area of the image then release the mouse button to create the marquee The frame around the marquee...

Страница 328: ...e Preview window If you drag the hand pointer while pressing the Shift key the marquee becomes restricted to the vertical or horizontal movement When the mouse pointer is placed on the edge of the marquee it changes to an arrow allowing you to re size the marquee If you drag the arrow pointer while pressing the Shift key the marquee is resized proportionally ...

Страница 329: ...To remove or delete a marquee click the marquee and click the Delete marquee button Top ...

Страница 330: ...ote for Windows users The Scanner events are supported by Windows You can assign a desired application to the buttons on the CX6500 See Assigning an Application in the EPSON Smart Panel Window for details on setting up the buttons Note for Mac OS X users The desired applications may not properly start when you press the buttons For solutions see Pressing the buttons on the control panel does not s...

Страница 331: ...the LCD panel then press the D or OK button The EPSON Smart Panel window appears Click an application icon The selected application opens and start scanning then the scanned image is automatically sent to application Refer to the EPSON Smart Panel online help for details Caution Never open the scanner unit while scanning or copying otherwise you may damage the CX6500 Top ...

Страница 332: ... can use this feature Connect the CX6500 to your computer then start up the computer Place your materials on the document table Placing Photos and Documents on the Document Table Press the Scan button to enter the Scan Mode Press the A button or the Select button repeatedly until 3 To E mail appears on the LCD panel then press the D or OK button The EPSON Smart Panel window appears ...

Страница 333: ...e type Note To cancel the operation click Pause and click Close The following window appears with a progress bar to indicate the scanning progress You can see the type of document being scanned When scanning multiple photos you can also see the number of scanned images ...

Страница 334: ...e scan settings and click Next The scanned image is transferred to a pre selected e mail program and attached to a new e mail massage Note If no e mail program has been selected the Select Software dialog box appears For details refer to the EPSON Smart Panel documentation ...

Страница 335: ... For details about the settings refer to the EPSON Smart Panel documentation Top ...

Страница 336: ...ndow To assign an application in the EPSON Smart Panel window to the buttons on the control panel follow the steps below Start EPSON Smart Panel Starting EPSON Smart Panel Select an application from the EPSON Smart Panel list box The selected application is assigned to the buttons on the control panel ...

Страница 337: ...Note The application currently assigned to the buttons on the control panel has the Scan button icon added to its application icon Top ...

Страница 338: ...he control panel EPSON Scan s dialog box opens or scanning starts and the scanned image is automatically sent to the application which does not need to be opened manually Make sure the application supports Scanner events and follow the steps Note for Macintosh users You cannot assign any application other than EPSON Smart Panel to the buttons on the control panel For Windows XP users Double click ...

Страница 339: ...te If Prompt for which program to run is selected when the button is pressed a dialog box appears to prompt you to select an application from the list Some applications do not support linkage to scanners and digital cameras Linkage is available only for applications which appear on the list To save your settings click Apply and OK ...

Страница 340: ... in this section are from Windows Me so they may differ in appearance from what actually appears on your screen The instructions are the same Click Start point to Settings and select Control Panel Double click the Scanners and Cameras icon For Windows Me users Right click the CX6500 s icon and select Properties For Windows 98 and 2000 users Select the CX6500 from the installed scanners and cameras...

Страница 341: ... clear the rest of the checkboxes Note If multiple applications are selected when the button is pressed a dialog box appears to prompt you to select just one from the list Some applications do not support linkage to scanners and digital cameras Linkage is available only with the applications that appear in the Send to this application list ...

Страница 342: ...tings click Apply and OK Note You need to click Apply whenever you change a button setting If you need to disable the Scanner events select the Disable device events checkbox in the scanner s Properties dialog box Top ...

Страница 343: ...d see Enhance the quality of a scanned image PRINT Image Matching Note for Windows 98 users EPSON Smart Panel supports Windows 98 Second Edition or later PRINT Image Matching PRINT Image Matching is a standardized method of recording a wider range of color information to enhance the quality of your scanned images When you use the Epson Photo Site feature PRINT Image Matching information is recorde...

Страница 344: ...e menu For Mac OS X users Double click the Applications folder in Macintosh HD then double click the Smart Panel folder Finally double click the EPSON Smart Panel icon The EPSON Smart Panel window appears To access an application click its application icon in the window See Applications in the EPSON Smart Panel Window for details about the applications available For details refer to the EPSON Smar...

Страница 345: ...addition you can assign any of the available applications to the control panel buttons of the CX6500 See Assigning an Application in the EPSON Smart Panel Window for details This makes scanning and sending data to the assigned application even simpler All you need to do is press the control panel buttons of the CX6500 Scan and Save Use this application to scan convert then save an image to a speci...

Страница 346: ...g this application you can scan and print images as photos You can copy in various sizes or place several photos on the same page Before you print an image you can see the effects of image adjustments using the Preview window When you launch this application the following screen appears Note For Windows or Mac OS X you can select paper easily when Epson EasyPrintModule is installed ...

Страница 347: ... Top View and Create Use this application to scan photos using ArcSoft PhotoImpression When you launch this application the following screen appears and ArcSoft PhotoImpression starts automatically ...

Страница 348: ...Create icon appears dimmed and is not available Top Scan to Application Use this application to scan and send images to a desired application for further editing When you launch this application the following screen appears and the image is scanned from EPSON Scan ...

Страница 349: ... to E mail Use this application to scan an image and send an e mail message with your scanned image attached When you launch this application the following screen appears and the image is scanned from EPSON Scan ...

Страница 350: ...ck Next and the following dialog box appears Click Upload to upload the image Note For information on PRINT Image Matching technology see PRINT Image Matching Top Copy to Fax Use this application to send the image scanned from a document on the document table and send it by fax using a fax application You can send documents just like using a fax machine When you click Copy to Fax the Copy Utility ...

Страница 351: ... your computer Top Edit Text Use this application to scan and convert images into text The converted text can be saved or sent to a word processing application When you launch this application the following screen appears Note This application is available when Fine Reader is installed ...

Страница 352: ... Top ...

Страница 353: ...l the printer driver and EPSON Scan before updating your system See Uninstalling the Printer Software and Uninstalling EPSON Scan After uninstalling the printer driver and EPSON Scan turn off the computer and make sure the CX6500 is unplugged and disconnected from the computer Turn on the computer and install the system Make sure that the system is installed correctly then shut down your computer ...

Страница 354: ...s 98 Me 2000 or XP When you update the printer software in Windows 98 Me 2000 and XP be sure to uninstall the previous printer software before you install the new software Installing over the existing printer software results in a failure to update See Uninstalling the Printer Software Top ...

Страница 355: ...g on with a Computer Administrator account You cannot uninstall applications if you log in with a Limited account user Turn off the CX6500 and disconnect the CX6500 from the computer In the Windows Control Panel double click the Add Remove Programs icon for Windows 98 Me or 2000 users or the Add or Remove Programs icon for Windows XP users Select Epson Printer Software from the list then click Add...

Страница 356: ...does not appear in the Add Remove Programs list double click EPUSBUN EXE on the software CD ROM then follow the on screen instructions Top For Macintosh For Mac OS 9 Quit all applications Insert the Epson printer software CD ROM into your Macintosh Double click the English OS 9 Drivers folder double click the Printer folder then double click the Installer icon Double click the Installer icon Click...

Страница 357: ...the software license agreement screen appears read the statement and click Accept Select Uninstall from the menu at the upper left and click Uninstall Follow the on screen instructions Note If the printer name remains in the Print Center or Printer Setup Utility after uninstalling the printer software delete your printer name from the Print Center or Printer Setup Utility Open the Print Center or ...

Страница 358: ...to the Administrators group To uninstall applications in Windows XP it is necessary to log on with a Computer Administrator account You cannot uninstall applications if you log in with a Limited account user Turn off the CX6500 and disconnect the CX6500 from the computer In Control Panel in Windows double click the Add Remove Programs icon for Windows 98 Me or 2000 users or the Add or Remove Progr...

Страница 359: ...uter now is selected and click Finish Top For Macintosh For Mac OS 9 Turn on your Macintosh and insert the software CD into the CD ROM drive Double click the English OS 9 Drivers folder double click the Epson Scan folder then double click the Epson Scan Installer icon Click Accept The Installer dialog box appears Select Uninstall from the pull down menu at the top left then click Uninstall ...

Страница 360: ...er Double click the ESCAN folder then double click the Epson Scan Installer icon If the Authenticate window opens click the key icon enter the administrator s name and password click OK then click Continue Click Accept The Installer dialog box appears Select Uninstall from the pull down menu at the top left then click Uninstall ...

Страница 361: ... Top ...

Страница 362: ...ropriate section below Using the Stop button on the control panel To cancel a print job press the Stop button When the Canceling message still appears Depending on your printing environment the Canceling message may still appear after you press the Stop button To clear this message use one of the solutions below Turn the CX6500 off and back on again Send the next print job to the CX6500 Top For Wi...

Страница 363: ...Windows 98 and Me It is possible to cancel printing using either the Progress Meter or Epson Spool Manager Refer to the sections below Using the Progress Meter When you send a print job to the CX6500 the Progress Meter appears on your computer screen ...

Страница 364: ...may be called a print queue When a print job reaches the top of the line the Epson Spool Manager sends the job to the printer From the Spool Manager you can cancel print jobs You can also view print status information about the print jobs which have been sent to the CX6500 as well as pause and resume selected print jobs After you send a print job an Epson Stylus CX6500 Series button appears on the...

Страница 365: ...ure for canceling printing for Macintosh varies depending upon whether background printing is on or off Refer to the sections below When background printing is on Follow the steps below to cancel a print job Select Epson Monitor IV from the application menu Press the Stop button to stop printing ...

Страница 366: ...background printing is off Follow the steps below to cancel a print job Press the Stop button to stop printing Hold down the command key on your keyboard and press the period key to cancel the print job Top For Mac OS X Follow the steps below to cancel a print job Click the Print Center or Printer Setup Utility icon in the Dock ...

Страница 367: ...ess the Stop button to stop printing In the Printer List double click Stylus CX6500 In the Document Name list select the document which is printing then click the Delete button to cancel the print job Top ...

Страница 368: ...Ejecting memory cards Supported memory card The CX6500 features three memory card slots The supported memory cards for each slot are shown below Slot Card a Memory Stick MagicGate Memory Stick Memory Stick Duo Memory Stick PRO SD Card miniSD Card MultiMediaCard b SmartMedia xD Picture Card c CompactFlash Microdrive An adapter is required ...

Страница 369: ...es DOS FAT FAT 12 or 16 one partition taken with a DCF version 1 0 compliant digital camera Image size Vertical 120 to 4600 pixels horizontal 120 to 4600 pixels Number of files Up to 999 DCF stands for the Design rule for Camera File system standard which is set by the Japan Electronics and Information Technology Industries Association JEITA Supports Exif Version 2 1 2 2 Note You cannot print imag...

Страница 370: ...memory card slot cover Make sure the memory card light beside the memory card slot is off then insert a memory card as far as it can go into the appropriate slot Note You can load only one memory card at a time ...

Страница 371: ...ot from dust and static otherwise data on the memory card may be lost or the CX6500 may be damaged Depending on the memory card loaded in the CX6500 the static charge on the memory card may cause it to malfunction Note If the memory card is inserted incorrectly the memory card light does not go on If the images are stored on the memory card the following message appears Press the D or OK button To...

Страница 372: ...ove the memory card or turn off the CX6500 while the printing or while the memory card light is flashing Data on the memory card may be lost If you are using the CX6500 with a computer which has Windows 2000 or XP installed never turn it off or disconnect the USB cable with a memory card inserted in the card slot this may destroy data on the memory card See Disconnecting or Turning off the CX6500 ...

Страница 373: ...e information The paper stack fits under the tabs inside the edge guides and does not exceed the loading limit indicated by the arrow mark on the left edge guide The number of sheets in the paper stack does not exceeded the limit specified for the media See Paper specifications Paper is not jammed inside the CX6500 If it is remove the jammed paper See Paper jams The ink cartridges are not empty Re...

Страница 374: ...ndows or in the Print dialog box Macintosh and in your application See online help for details Top Paper jams If paper is jammed inside the CX6500 an error message appears on the LCD panel You may be able to clear the jammed paper using the control panel Follow the steps below Press the Color button to eject the jammed paper If the jammed paper is not ejected go on to the next step Locate where th...

Страница 375: ...ve the arrow on the left edge guide The paper stack fits under the tabs inside the edge guides The number of sheets in the paper stack does not exceed the limit specified for that media See Loading capacities for Epson special media The left edge guide is adjusted to fit your paper The CX6500 is on a flat stable surface that extends beyond its base in all directions The CX6500 will not operate pro...

Страница 376: ...feature If multiple pages feed when using the double sided printing feature remove the paper as instructed in Multiple pages feed If the paper that was fed in error has not been creased or wrinkled it may still be usable Reload only the usable paper properly into the CX6500 If a paper jam should occur while using the double sided printing feature remove the paper as instructed in Paper jams If mul...

Страница 377: ...vision 2 0 Universal Serial Bus Device Class Definition for Printing Devices Version 1 1 Universal Serial Bus Mass Storage class Bulk Only Transport Revision 1 0 Bit rate 480 Mbps high speed device 12 Mbps full speed device Data encoding NRZI Adaptable connector USB Series B Recommended cable length Under 2 m Top ...

Страница 378: ...rintout Print quality does not improve after head cleaning If you are having print quality problems first perform a Test Printing Then compare your test printing with the illustrations below Click the caption under the illustration that best resembles your printout Horizontal banding Vertical misalignment or banding Horizontal banding Vertical misalignment or banding ...

Страница 379: ...ge setting under Quality Option on your printer software s Main menu Windows or select the Automatic setting under Mode in the Print dialog box Macintosh Check the ink level using the LCD panel See Checking the Ink Supply If XXX ink out displayed on LCD panel replace the appropriate ink cartridge See Replacing an Ink Cartridge Make sure that the Media Type selected in the printer software is appro...

Страница 380: ... Advanced dialog box Run the Head Cleaning utility See Cleaning the Print Head If colors are still incorrect or missing replace the color ink cartridge If the problem persists replace the black ink cartridge See Replacing an Ink Cartridge for details Do not use ink cartridges beyond the expiration data printed on the cartridge package Also if the CX6500 has not been used for a long time replace th...

Страница 381: ... Set the adjust lever to the position and make sure that the Media Type setting in your printer driver is correct Continue printing even if an alert appears on the screen when setting the adjust lever to the position Remove each sheet from the output tray as it is printed If you are printing on glossy media place a support sheet or a sheet of plain paper beneath the stack Or load only one sheet at...

Страница 382: ...the quality of your printouts remains poor even after repeatedly cleaning and aligning the print head one or some of the ink cartridges may be old or damaged and should be replaced To replace an ink cartridge before the Status Monitor notifies you that the cartridge is empty See Replacing an Ink Cartridge Top ...

Страница 383: ...ect the CX6500 as the default printer in Windows Windows 98 and Me users can clear any stalled print jobs from the Spool Manager See Using Epson Spool Manager Turn off the CX6500 and computer Make sure that the USB cable is securely plugged in Top Incorrect margins Try one or more of these solutions Check the margin settings in your application Make sure that the margins are within the printable a...

Страница 384: ...gs are appropriate for the paper size you are using Run the Head Cleaning utility to clear any clogged nozzles See Cleaning the Print Head After trying one or more of these solutions run a printer operation check to check your results See Running a printer operation check Top Printout has smears on the bottom edge If the paper is curled toward the printable side flatten it or curl it slightly towa...

Страница 385: ...ur printer software s Main menu See online help for details For Macintosh select the Automatic setting under Mode in the Print dialog box and move the slider to Speed See online help for details Close any applications that you are not using at the moment If you upgraded from Windows 95 to Windows 98 uninstall the printer software using Add Remove programs in the Control Panel in Windows then insta...

Страница 386: ...on Turn off the CX6500 and make sure that the power cord is securely plugged in Make sure that your outlet works and is not controlled by a wall switch or timer Top Lights came on and went out The CX6500 s voltage may not match the outlet rating Turn off the CX6500 and unplug it immediately Then check the CX6500 labels Caution If the voltage does not match DO NOT PLUG YOUR CX6500 BACK IN Contact y...

Страница 387: ...our computer may not have enough memory to print Try printing a smaller image Windows 98 and Me users can clear any stalled print jobs from the Spool Manager See Using Epson Spool Manager If the CX6500 sounds like it is trying to print but is unable to run the Head Cleaning utility See Cleaning the Print Head If this does not work replace the ink cartridges See Replacing an Ink Cartridge Top The E...

Страница 388: ... computer or software see your Start Here sheet Incorrect operation of your software see your software documentation Also see the documentation that came with your computer and the CX6500 for possible solutions The CX6500 does not scan Try one or more of these solutions You cannot scan when any one of the lights is flashing Your system may not work properly if you do not use a USB cable that meets...

Страница 389: ... application list is selected For Mac OS X users When in Classic mode the buttons are disabled Quit Classic mode Initially only the user who installed the scanner software can scan using the buttons Other users must start EPSON Scanner Monitor in the Applications folder before using the buttons for the first time From then on pressing a button will automatically start the application assigned to i...

Страница 390: ...Try one or more of these solutions Position each photo at least 20 mm apart from adjacent photos Make sure your application is able to scan multiple images Top ...

Страница 391: ...CX6500 s name appears under Imaging devices hardware type without a question or an exclamation mark If the CX6500 appears with a question or an exclamation mark or as an Unknown devices hardware type uninstall EPSON Scan Then reinstall it following the instructions in your Start Here sheet Top The scanner software does not work properly Try one or more of these solutions Make sure your software is...

Страница 392: ...ws Remove the CX6500 from the list of installed devices then reinstall EPSON Scan following the instructions in your Start Here sheet Make sure your computer meets the memory and other system requirements specified for the software you are using Make sure the computer has enough memory for your software If the computer does not have enough memory available see your software and computer documentat...

Страница 393: ...int or out of focus The image is too dark Image is dark with little or no detail Scanned image is too large Moiré cross hatch patterns appear in the scanned image Poor character recognition during OCR scanning The printed image is larger or smaller than the original Scanned images cannot be printed or come out garbled when printed Images cannot be located properly in the Thumbnail preview Edges of...

Страница 394: ...are may not have sufficient color matching and color management features or these components may not be installed correctly See the documentation that came with your software and computer If you are importing an image file make sure the file format is one your software can read Also make sure the image settings of your software are appropriate for the type of scanned image Top A line of dots is al...

Страница 395: ...nd side of the document table Top Scanned image by using the buttons on the control panel is missing Make sure desired application is assigned to the Color button Top The entire image is distorted or blurred Try one or more of these solutions Make sure the document is flat against the document table Caution Do not place heavy objects on the document table Make sure you do not accidentally move the...

Страница 396: ...or warped at the edges can cause discoloration Cover the edges of the document with paper to block outside light Make sure the document is flat against the document table Caution Do not place heavy objects on the document table Top The image is faint or out of focus Try one or more of these solutions Make sure the document is flat against the document table Caution Do not place heavy objects on th...

Страница 397: ...mputer display Top Image is dark with little or no detail Try one or more of these solutions Change the Display Gamma setting See online help for details Change the Destination setting in the Home Mode or the Professional Mode main window In the Home Mode select Screen Web as the Destination Selecting a printer may cause on screen colors to be different from the colors of the original however colo...

Страница 398: ...g and the halftone screens Try one or more of these solutions Check the Descreening Filter checkbox in the Home Mode or the Professional Mode main window In Professional Mode set the Screen Ruling of the Descreening Filter setting to the appropriate setting for your document Place a transparent sheet such as an overhead projector sheet between the document and the document table Reposition the doc...

Страница 399: ...ize Top Scanned images cannot be printed or come out garbled when printed Try one or more of these solutions Make sure the CX6500 is properly connected to the computer correctly set up and maintained Check that your software is properly installed and set up for the CX6500 see your Start Here sheet Top Images cannot be located properly in the Thumbnail preview Try one or more of these solutions In ...

Страница 400: ... Top ...

Страница 401: ...es of your computer display adapter and software Some computers can change the color palette to adjust the colors on your screen See your software and hardware manuals for details Use the color management system for your computer ICM for Windows or ColorSync for Macintosh For Windows add a color profile that matches your monitor Exact color matching is very difficult Check your software and monito...

Страница 402: ...stems monitors use RGB red green and blue while printers typically use CMYK cyan magenta yellow and black Top Printed colors are different from those in the original image Exact color matching is very difficult Check your software or contact your printer company for information on color matching and calibration Top ...

Страница 403: ...Support Web Site Epson s Technical Support Web Site provides help with problems that cannot be solved using the troubleshooting information in your documentation If you can connect to the Internet access the site at http www latin epson com Top ...

Страница 404: ...l assistance 24 hours a day through the electronic support services and automated telephone services listed in the following table Service Access World Wide Web From the Internet you can reach Epson Support at http www latin epson com At this site you can download drivers and other files look at product documentation access troubleshooting information and receive technical advice through e mail Co...

Страница 405: ... software on your system see the documentation for that software for technical support information You can purchase ink cartridges ribbon cartridges paper manuals and accessories from your nearest Epson distributor If you need help finding a distributor neear you contact Epson as described above Argentina EPSON ARGENTINA S A Avenida Belgrano 964 970 1092 Buenos Aires Tel 54 11 4346 0300 Fax 54 11 ...

Страница 406: ...1 7295 5624 http www epson com br Chile EPSON CHILE S A La Concepción 322 Providencia Santiago Tel 56 2 236 2453 Fax 56 2 236 6524 http www epson cl Colombia EPSON COLOMBIA LTDA Diagonal 109 No 15 49 Bogotá Colombia Tel 57 1 523 5000 Fax 57 1 523 4180 http www epson com co Costa Rica ...

Страница 407: ...50 6 296 6046 http www epsoncr com Mexico EPSON MEXICO S A de C V Boulevard Manuel Ávila Camacho 389 Edificio 1 Conjunto Legaria Col Irrigación C P 11500 México DF Tel 52 55 1323 2000 http www epson com mx Peru EPSON PERU S A Av Del Parque Sur 400 San Isidro Lima Perú Tel 51 1 224 2336 Fax 51 1 476 4049 ...

Страница 408: ...http www epson com pe Venezuela EPSON VENEZUELA S A Calle 4 con Calle 11 1 La Urbina Sur Caracas Venezuela Tel 58 212 240 1111 Fax 58 212 240 1128 http www epson com ve Top ...

Страница 409: ... storage driver must be installed USB storage driver is automatically installed when you install the printer software for the first time For Windows 98 and Me you can not scan disk over the memory card inserted to the CX6500 Top Copying files to your computer Make sure the CX6500 s is on the memory card is inserted and connect the CX6500 to your computer with a USB cable For Windows XP users Click...

Страница 410: ...o not set the volume label removable disk displayed as drive name Insert the memory card correctly otherwise an error message will appear Click Cancel and insert the memory card correctly Select the image file and drag it to the folder you want to transfer it to Top ...

Страница 411: ...when you install the printer software for the first time For Windows 98 and Me you can not run scan disk over the memory card inserted in the CX6500 Make sure write protection is turned off and the memory card is writable When you save image files to the memory card from the computer the number in the memory card displayed on the LCD panel is not changed Remove and reinsert the memory card Top Sav...

Страница 412: ...e volume label it displayed as drive name If you do not set the volume label removable disk displayed as drive name Insert the memory card correctly otherwise an error message will appear Click Cancel and insert the memory card correctly Select the image file and drug to the folder you want to save Top ...

Страница 413: ...t it from your computer Caution When you re finished using the CX6500 with your computer be sure to turn off and disconnect it properly following the steps in the sections below For Windows XP Double click the icon on the taskbar Select USB Mass Storage Device and click Stop Select USB Mass Storage Device and click OK Click anywhere on the dialog box Remove the USB cable if necessary Turn off the ...

Страница 414: ...y Turn off the CX6500 Note If you turn off the CX6500 or disconnect the USB cable before turning off your computer the Problem Ejecting USB Mass Storage Device window may appear Top For Windows 98 Me Double click the My Computer icon on the desktop The My Computer window appears Right click the Removable Disk icon then click Eject ...

Страница 415: ...Remove the USB cable if necessary Turn off the CX6500 Top For Macintosh On the desktop drag the removable disk icon into the Trash Remove the USB cable if necessary Turn off the CX6500 Top ...

Страница 416: ...need a Microsoft Windows 98SE Me 2000 or XP pre installed PC equipped with a USB port and the CX6500 must be connected via a standard shielded USB AB cable Your computer should also meet the following system requirements Minimum Recommended CPU Windows Me Windows 98SE Windows XP Windows 2000 Pentium 233 MHz Pentium 233 MHz Pentium 233 MHz Pentium 233 MHz Pentium 300 MHz Pentium 300 MHz Pentium 300...

Страница 417: ...te your system if it does not meet these requirements For Macintosh Your Macintosh must also meet the following system requirements Minimum Recommended Operating System Mac OS 9 1 or later Mac OS 9 1 or later CPU PowerPC G3 233 MHz PowerPC G4 355 MHz RAM 64 MB 256 MB HDD Space 60 MB 1 3 GB Minimum Recommended Operating System Mac OS X 10 2 x or 10 3 x Mac OS X 10 2 CPU PowerPC G3 233 MHz PowerPC G...

Страница 418: ... Mac OS 9 the memory requirements above are for printing on Letter size paper These requirements may vary depending on the size of the paper the type of application you are using and the complexity of the document that you want to print In addition to these system and memory requirements you need 20 MB of free hard disk space to install your printer software To print you also need extra hard disk ...

Страница 419: ...Browser Web browser Microsoft Internet Explorer 4 0 or later recommended Top ...

Страница 420: ...roduct Specifications Printing Printing method On demand ink jet Nozzle configuration Monochrome black 180 nozzles Color cyan magenta yellow 177 nozzles 59 each color x 3 Print direction Bidirectional with logic seeking Top ...

Страница 421: ...297 mm A4 or US letter size The reading area can be specified from your software Scanning resolution 1200 dpi main scan 2400 dpi with Micro Step sub scan Output resolution 50 to 4800 dpi in 1 dpi increments 7200 dpi and 9600 dpi Image data 48 bits per pixel per color internal 24 bits per pixel per color external Gamma correction User defined 2 level Interface USB 2 0 Light source RGB Three Color L...

Страница 422: ...ways test a sample of paper stock before purchasing large quantities or printing large jobs Paper specifications Single sheets Size A4 8 3 x 11 7 inches A5 5 8 x 8 3 inches Letter 8 5 x 11 inches Half letter 8 5 x 5 5 inches Legal 8 5 x 14 inches Executive 7 25 x 10 5 inches Paper types Plain bond paper special paper distributed by Epson Thickness for plain bond paper 0 003 to 0 004 inch 0 08 to 0...

Страница 423: ... g m2 to 20 lb 75 g m2 Premium Bright White Paper Size Letter 8 5 x 11 inches Paper types Special paper distributed by Epson Matte Paper HeavyWeight Size Letter 8 5 x 11 inches 8 10 inches Paper types Special paper distributed by Epson Double Sided Matte Paper Size Letter 8 5 x 11 inches Paper types Special paper distributed by Epson PremierArt Matte Scrapbook Paper ...

Страница 424: ...es Paper types Special paper distributed by Epson Photo Paper or Glossy Photo Paper Size A4 8 3 x 11 7 inches Letter 8 5 x 11 inches 4 x 6 inches Paper types Special paper distributed by Epson Premium Semigloss Photo Paper Size Letter 8 5 x 11 inches Paper types Special paper distributed by Epson Ink Jet Transparencies Size Letter 8 5 x 11 inches ...

Страница 425: ...ms If you encounter problems switch to a higher grade paper Do not load curled or folded paper Use paper under normal conditions Temperature 15 to 25 C 59 to 77 F Humidity 40 to 60 RH Top Printable area Refer to the sections below for the printable area of single sheets and envelopes with the standard borders Single sheets Envelopes ...

Страница 426: ...3 0 mm 0 12 3 0 mm B L left margin 0 12 3 0 mm 0 12 3 0 mm B R right margin 0 12 3 0 mm 0 12 3 0 mm C bottom margin 0 12 3 0 mm 0 78 20 0 mm Note Depending on the type of media being used the print quality may deteriorate in the top and areas of the printout or these areas may be smeared Top ...

Страница 427: ...ndard 2000 Memory Stick Memory Stick PRO card slot Compatible with Memory Stick Standard version 1 3 and Memory Stick Standard Memory Stick PRO FORMAT Specifications version 1 0 SD MMC card slot Compatible with SD Memory Card Specifications PART1 Physical Layer Specification Version 1 0 Compatible with MultiMediaCard Standard xD Picture card slot Compatible with xD Picture Card card specification ...

Страница 428: ...ory Stick MagicGate Memory Stick Memory Stick Duo Memory Stick PRO Microdrive SD Secure Digital Card MiniSD Card MultiMediaCard xD Picture Card Voltage Requirements 3 3 v 5 v 3 3 v Maximum current is 500 mA Maximum capacity is 128MB Adapter required Top ...

Страница 429: ... 30 to 50 C 10 days at 122 F 50 C Freezing 3 2 F 16 C Dimensions 0 5 in W x 2 9 in D x 2 2 in H 12 7 mm W x 73 5 mm D x 55 3 mm H Ink thaws and is usable after approximately 3 hours at 25 C 77 F Caution Epson recommends the use of original Epson ink cartridges only Products not manufactured by Epson may cause damage to your CX6500 and may not be covered by Epson s warranty Do not use an ink cartri...

Страница 430: ... Do not refill the ink cartridge The CX6500 calculates the amount of ink remaining using an IC chip on the ink cartridge so even if the cartridge is refilled the IC chip will report that it is empty Top ...

Страница 431: ...per path Top feed with one ASF Sheet feeder capacity About 150 sheets of 24 lb 90 g m2 paper Dimensions 17 7 in x 16 9 in x 8 6in 450 mm x 429 mm x 218 mm_ W x D x H not including rubber feet and loading tray Weight 19 8 lb 9 0 kg without ink cartridges Top ...

Страница 432: ... to 132V Rated frequency range 50 to 60 Hz Input frequency range 49 5 to 60 5 Hz Rated current 0 5 A Power consumption Approx 15 W Standalone copying ISO10561 Letter pattern Approx 3 5 W in sleep mode Approx 0 3 W in power off mode Top 220 240V Model Input voltage range 198 to 240V Rated frequency range 50 to 60 Hz ...

Страница 433: ...5 Hz Rated current 0 3 A Power consumption Approx 14 W Standalone copying ISO10561 Letter pattern Approx 3 5 W in sleep mode Approx 0 5 W in power off mode Note Check the label on the back of the CX6500 for the voltage information Top ...

Страница 434: ...ons Environmental Temperature Operation 50 to 95 F 10 to 35 C Storage 4 to 140 F 20 to 60 C 1 month at 104 F 40 C 120 hours at 140 F 60 C Humidity Operation 20 to 80 RH Storage 5 to 85 RH Stored in shipping container Without condensation Top ...

Страница 435: ...Product Information Product Specifications Standards and Approvals Safety UL 60950 CSA 22 2 No 60950 EMC FCC part 15 Subpart B class B CSA C108 8 Class B Top ...

Страница 436: ... paper is loaded and the printer is on Follow the steps below to print a test page 1 Click Print on the File menu of the browser you are currently using 2 Make sure that your printer is selected as the default printer and click OK or Print 3 Make sure the test print illustration on the printout prints properly 4 Click Back to go back to the previous page Back ...

Отзывы: