background image

Maintenance

21

En

g

li

s

h

Cleaning This Product

To keep the operation of the product at its best, clean 
it periodically using the following procedure.

1.

Unplug the power cord.

2.

Remove all paper from the sheet feeder.

3.

Use a soft brush to carefully clean away all dust 
and dirt from the sheet feeder.

4.

If the glass surface of the document table gets 
dirty, clean it with a soft, dry, clean cloth. If the 
glass surface is stained with grease or some other 
hard-to-remove material, use a small amount of 
glass cleaner and a soft cloth to remove it. Wipe 
off all remaining liquid.

5.

If the inside of the product accidentally gets 
soiled with ink, use a soft, dry, clean cloth to 
wipe the ink off the area indicated in the 
illustration.

w

Warning:

Be careful not to touch the gears or rollers inside the product.

c

Caution:

Do not press the glass surface of the document table with any 
force.

Be careful not to scratch or damage the glass surface of the 
document table, and do not use a hard or abrasive brush to 
clean it. A damaged glass surface can decrease the scan 
quality.

Do not apply grease to the metal parts under the print head 
carriage.

Never use alcohol or thinner to clean the product. These 
chemicals can damage the components as well as the case.

Be careful to keep water away from the printing and scanning 
mechanisms and electronic components.

Do not spray the inside of the product with lubricants. 
Unsuitable oils can damage the mechanism. Contact your 
dealer or a qualified service person if lubrication is needed.

Transporting This Product

If you need to move the product some distance, you 
need to prepare it for transportation in its original 
box or one of a similar size.

c

Caution:

When storing or transporting the product, avoid tilting it, placing 
it vertically, or turning it upside down; otherwise ink may leak 
from the cartridges.

Leave the ink cartridges installed; removing the cartridges for 
transportation may damage the product.

1.

Remove all paper from the sheet feeder and 
make sure the product is off.

2.

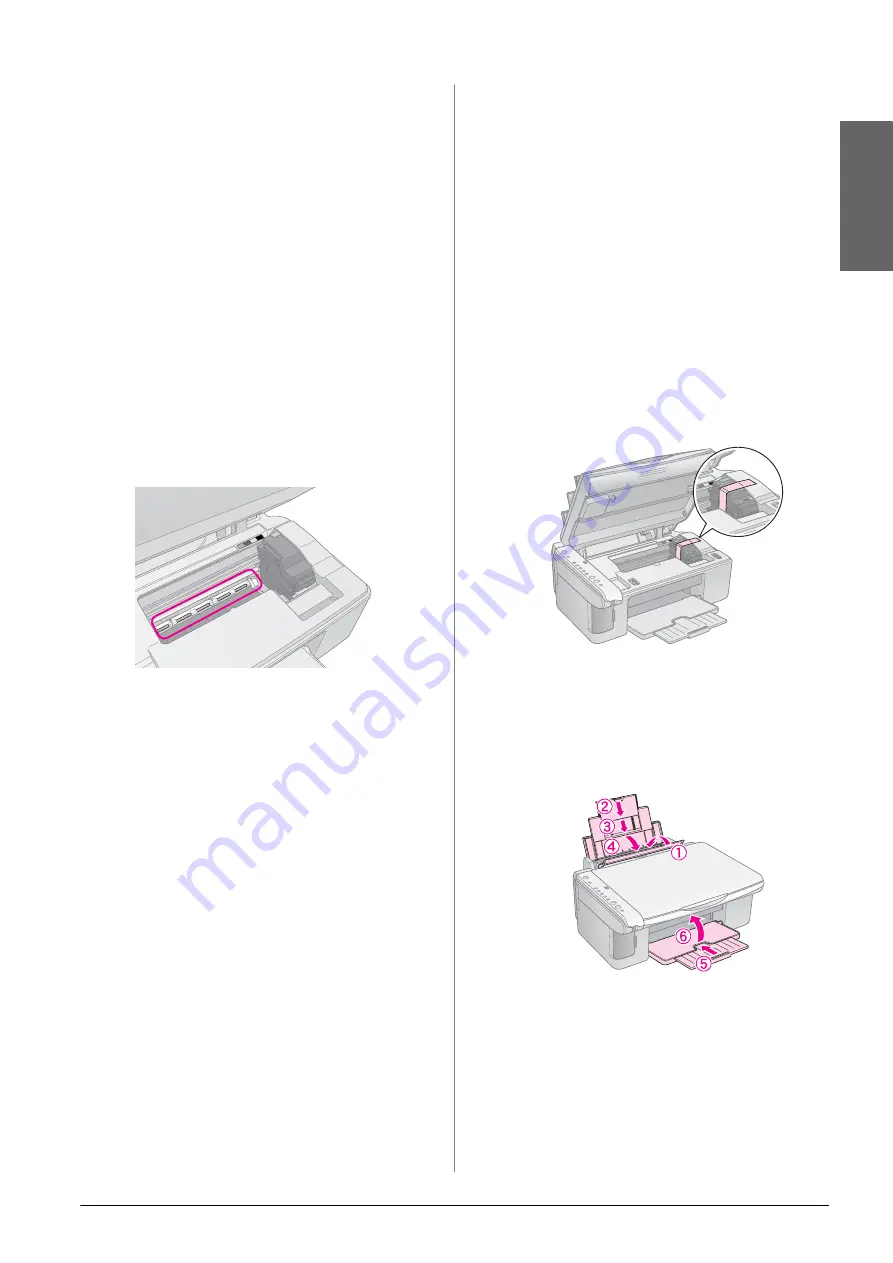
Open the scanner unit and make sure the print 
head is in the home position on the right. 

3.

Secure the ink cartridge holder to the case with 
tape as shown.

4.

Close the scanner unit.

5.

Unplug the power cord from the outlet, then 
disconnect the USB cable from your computer.

6.

Close the paper support, the feeder guard, and 
the output tray.

7.

Repack the product in the box, using the 
protective materials that came with it.

Keep the product level as you transport it. After you 
move it, remove the tape securing the print head. If 
you notice a decline in print quality, run a cleaning 
cycle (

&

“Checking and Cleaning the Print Head” on 

page 20) or align the print head (

&

“Aligning the 

Print Head” on page 20).

Содержание Stylus CX4900 Series

Страница 1: ... from a Memory Card Handling a Memory Card 12 Selecting and Printing Photos Using an Index Sheet 14 Printing All Photos or DPOF Photos 15 Printing from a Digital Camera Digital Camera Requirements 16 Connecting and Printing 16 Maintenance Replacing Ink Cartridges 17 Checking and Cleaning the Print Head 20 Aligning the Print Head 20 Cleaning This Product 21 Transporting This Product 21 Solving Prob...

Страница 2: ...structions on copying and printing from a memory card If you have problems using the product see the Solving Problems chapter in this book Online manuals User s Guide This guide provides instructions for printing and scanning from your computer and information on the software This guide is included on the software CD ROM and installed automatically when you installed the software To read this guid...

Страница 3: ...t Doing so may cause fire Except as specifically explained in your documentation do not attempt to service the product yourself Unplug the product and refer servicing to qualified service personnel under the following conditions if the power cord or plug is damaged if liquid has entered the product if the product has been dropped or the case damaged if the product does not operate normally or exhi...

Страница 4: ...s or Epson Approved Products by Seiko Epson Corporation Seiko Epson Corporation shall not be held liable for any damage resulting from electromagnetic interference that occurs from the use of any interface cables other than those designated as Epson Approved Products by Seiko Epson Corporation EPSON is a registered trademark and EPSON STYLUS and Exceed Your Vision are trademarks of Seiko Epson Cor...

Страница 5: ... Parts AC inlet USB port document cover memory cardslot cover control panel external interface USB port document table paper support output tray output tray extension edge guide memory card slots feeder guard sheet feeder paper support extension cartridge cover scanner unit paper thickness lever ...

Страница 6: ...le when the images on the memory card contain DPOF information To print all images on the memory card turn off DPOF mode on your camera 4 k Copies Press to set the number of copies The number in the window changes from 1 to 9 then and then the cycle repeats 5 g l Paper Type Press to select a paper type option Select g for Photo paper loaded in the sheet feeder Select l for plain paper loaded in th...

Страница 7: ...rror has occurred H The paper thickness lever has been set to the envelope position L The paper thickness lever has been set to the m standard position P Flashes when a camera with PictBridge data is connected When the connected device is not supported the P double flashes and the b Error light and f e DPOF Print All DPOF PictBridge lights flash dot The product enters sleep mode when no buttons ar...

Страница 8: ...rmines how the ink is applied to the paper Choose from these paper types and settings You can use paper with a weight of 64 to 90 g m2 Loading Paper 1 Open and extend the paper support 2 Open the output tray and slide out the extensions 3 Flip the feeder guard forward Paper type Size Paper type setting Loading capacity Plain paper A4 l Plain paper 12 mm EPSON Bright White Ink Jet Paper A4 l Plain ...

Страница 9: ...r Type setting before printing to make sure it matches the type of paper you have loaded Selecting Paper on page 8 The printable side is often whiter or brighterthanthe other side place behind the tabs make sure it fits under the arrow inside the left edge guide 10 15 cm 4 6 in and 13 18 cm 5 7 in A4 The letter L appears briefly in the k Copies window on the control panel when you move the lever t...

Страница 10: ... otherwise the copy will be out of focus Do not pull out paper that is being printed it will be ejected automatically Placing Originals on the Document Table 1 Open the document cover and place your original face down on the document table in the upper left corner 2 Close the cover gently so you do not move the original c Caution Never open the document cover beyond where it stops and do not place...

Страница 11: ...nd after a moment your photo is copied If you need to stop copying press the y Stop button Speeding Up Copying If you want to make a copy quickly and do not need high quality you can print a draft copy The print quality is reduced but the copy is printed faster 1 Load A4 size plain paper and select l Plain Paper and A4 on the control panel 2 When you are ready to copy press and hold down the y Sto...

Страница 12: ... are in the slots Then insert your memory card Card type CompactFlash Microdrive SD Memory Card SDHC Memory Card MultiMediaCard miniSD card miniSDHC card microSD card microSDHC card Memory Stick Memory Stick PRO Magic Gate Memory Stick Magic Gate Memory Stick Duo Memory Stick Duo Memory Stick PRO Duo xD Picture Card xD Picture Card Type M xD Picture Card Type H Media format DCF Design rule for Cam...

Страница 13: ...ause malfunction Note You can print only in color from a memory card you cannot print in black and white If a digital camera is connected to the product disconnect it before you insert your memory card Removing the memory card 1 Make sure all print jobs are finished 2 Open the memory card slot cover 3 Make sure the memory card light is not flashing 4 Remove the memory card by pulling it straight o...

Страница 14: ...emory card page 12 3 Press the C Memory Card button one or more times until the m Print Index Sheet A4 light comes on 4 Make sure l Plain Paper and A4 are selected 5 Press the x Start E Color button The On light flashes and the index sheet is printed If you need to cancel printing press the y Stop button Note Make sure the triangle mark on the upper left corner of the index sheet is printed proper...

Страница 15: ... more than one index sheet wait each time until printing is complete Then repeat the steps above to scan and print from each additional sheet Printing All Photos or DPOF Photos Follow the steps below to print one copy of each photo on the memory card or to print only those photos that were pre selected with your camera s DPOF feature 1 Load the type of paper you want to use page 8 Load enough shee...

Страница 16: ... Select the paper size you loaded 5 Connect the USB cable that came with your camera to the external interface USB port of this product 6 Make sure your camera is turned on and use it to select the photos you want to print adjust any necessary settings and print your photos See your camera s manual for details Note If your camera is not compatible with PictBridge or USB DIRECT PRINT a double flash...

Страница 17: ...cannot guarantee the quality or reliability of non genuine ink Information about the ink cartridge status is not displayed when non genuine ink is used Ink cartridge precautions w Warning If ink gets on your hands wash them thoroughly with soap and water If ink gets in your eyes flush them immediately with water If you still have discomfort or vision problems see a doctor immediately To avoid dama...

Страница 18: ...d the print head moves to the ink cartridge replacement position 5 Open the cartridge cover c Caution Never attempt to open the cartridge cover while the print head is moving Wait until the cartridges have moved to the replacement position Be careful not to touch the parts highlighted below 6 Remove the cartridge you need to replace Squeeze the tab at the back of the cartridge and lift it straight...

Страница 19: ...s into place 10 Replace any other ink cartridges that need to be replaced 11 Close the ink cartridge cover and press it until it clicks into place c Caution If you find it difficult to close the cover make sure all the cartridges are firmly seated Press down on each cartridge until you hear it click into place Do not attempt to force the cover closed 12 Close the scanner unit 13 Press the B ink bu...

Страница 20: ...the product is on and the B ink light is off 2 Hold down the B ink button for three seconds until theOnlight starts flashing A head cleaning cycle begins and the On light stays flashing c Caution Never turn off the product while head cleaning is in progress You may damage it 3 When the On light stops flashing print a nozzle check pattern to check the results Checking the print head on page 20 If t...

Страница 21: ...eful to keep water away from the printing and scanning mechanisms and electronic components Do not spray the inside of the product with lubricants Unsuitable oils can damage the mechanism Contact your dealer or a qualified service person if lubrication is needed Transporting This Product If you need to move the product some distance you need to prepare it for transportation in its original box or ...

Страница 22: ...ge is running low on ink Replace the ink cartridge Replacing Ink Cartridges on page 17 O B An ink cartridge is expended or not installed correctly If any cartridge is expended you cannot print until you replace it Replace the ink cartridge Replacing Ink Cartridges on page 17 k b Error k m Print Index Sheet A4 k i Print From Index Sheet k f e DPOF Print All DPOF PictBridge k Copies An unsupported m...

Страница 23: ...upported device is connected Remove the connected device or press the y Stop button When a digital camera is supported the P flashes normally k b Error k Copies The paper thickness lever is set to the position Set the lever to the m position O b Error O B k All other lights k Copies Waste ink pad in the printer is saturated Contact your dealer to replace it Contacting Customer Support on page 26 k...

Страница 24: ...document table If the edges of the copy are cropped off move the original away from the corner slightly Make sure the paper size settings are correct for the paper you have loaded Make sure your paper is loaded short edge first all the way to the right with the left edge guide lightly against the paper Loading Paper on page 8 Do not load paper above the c arrow mark inside the left edge guide Load...

Страница 25: ...If you are printing on envelopes set the lever to the position Clean the document table Cleaning This Product on page 21 Your printout is faint or has gaps Clean the print head Cleaning the print head on page 20 If you notice jagged vertical lines you may need to align the print head Aligning the Print Head on page 20 The ink cartridges may be old or low on ink Replace the ink cartridges Replacing...

Страница 26: ...ou purchased your product Customer support will be able to help you much more quickly if you give them the following information Product serial number The serial number label is usually on the back of the product Product model Product software version ClickAbout Version Info or a similar button in the product software Brand and model of your computer Your computer operating system name and version...

Страница 27: ...Solving Problems 27 English ...

Страница 28: ...Purchasing ink cartridges Product name Black Cyan Yellow Magenta DX5000 series T0711 T0712 T0714 T0713 CX4900 series T0731 T0732 T0734 T0733 ...

Отзывы: