background image

Replacing Ink Cartridges

11

Eng

lish

Replacing an Ink Cartridge

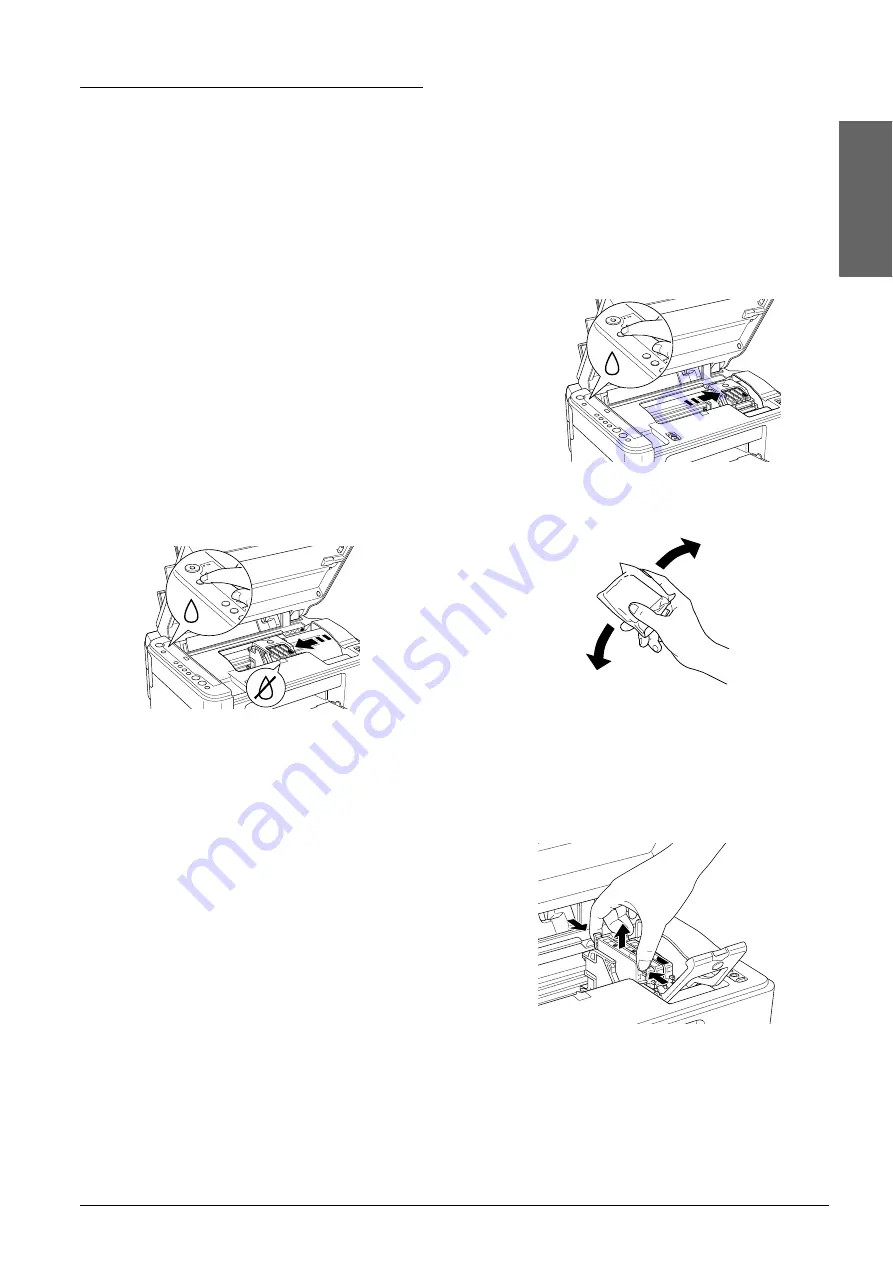
To replace an ink cartridge using the 

H

Ink button, 

follow the steps below.

Note:

The illustrations show replacement of the Cyan ink 
cartridge. Replace the ink cartridge appropriate to your 
situation.

1.

Make sure that this product is on. The On light 
should be on, but not flashing.

2.

Make sure that the document cover is closed, 
and then open the scanner unit.

c

Caution:

Do not open the scanner unit when the 
document cover is still open.

3.

Press the 

H

Ink button. The print head moves to 

the ink cartridge check position and the On light 
and the Ink light begins to flash. The ink 
cartridge indicated by the 

_

mark is either 

empty or low.

Note:

Do not press the 

H

Ink button for more than three 

seconds. Otherwise this product starts cleaning 
the print head.

If any ink cartridge is not low or empty, the print 
head moves to the ink cartridge replacement 
position without moving to the ink cartridge 
check position. Proceed to step 5.

c

Caution:

Do not move the print head by hand, as this 
may damage this product. Always press the 

H

Ink button to move it.

4.

Press the 

H

Ink button.

If more than one ink cartridge is empty or low, 
the print head moves so that the empty or low 
ink cartridge is indicated by the 

_

mark. This 

occurs each time the 

H

Ink button is pressed until 

all empty or low ink cartridges have been 
indicated.
Once all of the empty or low ink cartridges have 
been indicated, the print head moves to the ink 
cartridge replacement position when the 

H

Ink 

button is pressed.

5.

For best results, shake the ink cartridge four or 
five times before opening the package.

6.

Remove the new ink cartridge from the package.

7.

Open the cartridge cover. Pinch the sides of the 
ink cartridge that you want to replace. Lift the 
cartridge out of this product and dispose of it 
properly. Do not take the used cartridge apart or 
try to refill it.

The illustration shows replacement 
of the cyan ink cartridge.

Содержание STYLUS CX3600

Страница 1: ...Printing or Scanning Printing from Your Computer 9 Scanning to Your Computer 9 Canceling Printing 9 Replacing Ink Cartridges Choosing Ink Cartridges 10 Precautions on Ink Cartridge Replacement 10 Replacing an Ink Cartridge 11 Maintenance Checking the Print Head Nozzles and Remaining Ink Levels 13 Cleaning the Print Head 13 Aligning the Print Head 14 Troubleshooting Using the Error Light and Other ...

Страница 2: ...ing and maintenance instructions Seiko Epson Corporation shall not be liable for any damages or problems arising from the use of any options or any consumable products other than those designated as Original Epson Products or Epson Approved Products by Seiko Epson Corporation Seiko Epson Corporation shall not be held liable for any damage resulting from electromagnetic interference that occurs fro...

Страница 3: ...t the total ampere rating of all devices plugged into the wall outlet does not exceed the wall outlet s ampere rating If you plan to use this product in Germany the building installation must be protected by a 10 or 16 amp circuit breaker to provide adequate short circuit protection and over current protection for this product When handling ink cartridges Do not shake the ink cartridge after remov...

Страница 4: ...ll be made To make between 10 and100 copies make sure that is displayed then insert the same amount of sheets in the feeder as the number of copies you want made If you make up to 99 copies a paper outerror will occur when this product finishes making copies and runs out of paper To clear the error press the y Stop button 1 appears in the LED window if this button is pressed when is displayed Plai...

Страница 5: ...to use it until it is empty On Indicates that an ink cartridge is empty or missing Copy LED window 1 to 9 Indicates the number of copies Indicates that 100 copies will be made E Indicates that an error has occurred H Indicates that the adjust lever has been set to the position L Indicates that the adjust lever has been set to the standard m position dot Indicates that the control panel is operatin...

Страница 6: ...ide it into the sheet feeder 5 Slide the left edge guide so that it meets the left edge of the paper Note Always load paper short edge first into the sheet feeder Make sure that the paper stack is flush with or lower than the triangular load limit mark on the edge guide Make sure that the paper is loaded under the tabs inside the edge guides Ensure that you set the adjust lever to the m position I...

Страница 7: ... as shown in the following table Refer to the appropriate section that follows for the detailed procedures on making copies with each mode Standard Copying 1 Follow the steps in Loading Paper on page 6 2 Follow the steps in Placing a Photo or Document on the Document Table on page 7 3 Press the Copy button repeatedly until the desirednumberofcopiesisdisplayedintheLED window Note To make between 10...

Страница 8: ...hoto Paper 5 Press the paper size button to select A4 or 10x15 For moreinformation aboutselectingpapersize see Buttons on page 4 6 Press the Fit to Page button The Fit to Page light comes on 7 Proceed with step 6 in Standard Copying on page 7 Small Margin Copying 1 Follow steps 1 to 3 in Standard Copying on page 7 2 Press the paper type button to select Photo Paper Note You cannot make a copy with...

Страница 9: ...ation you are using For details see the documentation provided with your application For detailed information on print settings see the Online Reference Guide Scanning to Your Computer 1 Follow the steps in Placing a Photo or Document on the Document Table on page 7 2 Start EPSON Smart Panel For more information see Starting EPSON Smart Panel in the Online Reference Guide 3 Click the Scan and Save...

Страница 10: ...tely following the removal of the current ink cartridge If the ink cartridge is not installed promptly the print head may dry out rendering it unable to print Be careful not to break the hooks on the side of the ink cartridge when you remove it from its package Do not remove or tear the label on the cartridge otherwise ink will leak This product uses ink cartridges equipped with an IC chip The IC ...

Страница 11: ...ves to the ink cartridge replacement position without moving to the ink cartridge check position Proceed to step 5 c Caution Do not move the print head by hand as this may damage this product Always press the H Ink button to move it 4 Press the H Ink button If more than one ink cartridge is empty or low the print head moves so that the empty or low ink cartridge is indicated by the _ mark This occ...

Страница 12: ...icks into place then close the scanner unit 10 Press the H Ink button The unit begins charging the ink delivery system This process takes about one minute to complete When the ink charging process is finished The On light stops flashing and remains lit and the Ink light goes out c Caution The On light continues to flash while this product performs the ink charging operation Never turn off this pro...

Страница 13: ...e these problems by cleaning the print head which ensures that the nozzles are delivering ink properly Note Print head cleaning uses both color and black ink To avoidwastingink cleantheprintheadonlyifthecopy quality drops for example blurred printout incorrect or missing color Before cleaning the print head perform the nozzle check first to see if it really needs to be cleaned This saves ink If th...

Страница 14: ...ded 1 Make sure that this product is turned off 2 Make sure that the adjust lever is set to the m position 3 Load A4 paper in the sheet feeder 4 Press the P On button while pressing the Copy button An alignment pattern is printed 5 Look at the alignment pattern and find the patch which is most evenly printed with no noticeable streaks or lines Press the Copy button until the number for that patch ...

Страница 15: ...or button to continue Press the y Stop button to cancel Multiple pages have been fed into the sheet feeder Remove and reload the paper and then press the x Start Color button to continue Press the y Stop button to cancel Flashing A Paper jam has occurred Press the x Start Color button If the paper jam is not cleared remove the jammed paper by hands See Clearing Jammed Paper on page 15 Off Ink ligh...

Страница 16: ... accéder à l AIDE EN LIGNE http www epson fr support services index shtml pour accéder aux SERVICES du support technique For user in Germany EPSON Service Center c o Exel Hünxe GmbH Werner Heisenberg Strase 2 46569 Hünxe For user in Italy EPSON Italia S p a Via M Viganò de Vizzi 93 95 20092 Cinisello Balsamo MI Tel 02 660 321 Fax 02 612 36 22 Assistenza e Servizio Clienti TECHNICAL HELPDESK 02 268...

Страница 17: ...s for the operating conditions of this product Model 100 120V 220 240V Input voltage range 90 to 132V 198 to 240V Rated frequency range 50 to 60 Hz 50 to 60 Hz Power consumption Approx 12 W Standalone copying ISO10561 Letter pattern Approx 2 5 W in sleep mode Approx 0 2 W in power off mode Approx 12 W Standalone copying ISO10561 Letter pattern Approx 2 5 W in sleep mode Approx 0 4 W in power off m...

Страница 18: ...nt quality may decline in the top and bottom areas of the printout or these areas may be smeared The precise margins vary slightly depending on the loading conditions Standard Copy Small Margins Copy Borderless Copy A top margin 3 0 mm 0 12 1 5 mm 0 6 0 mm B L left margin 3 0 mm 0 12 1 5 mm 0 6 0 mm B R right margin 3 0 mm 0 12 1 5 mm 0 6 0 mm C bottom margin 3 0 mm 0 12 1 5 mm 0 6 0 mm A C B L B ...

Страница 19: ...English ...

Страница 20: ...Printed in XXXXXX XX XX XX ...

Отзывы: