background image

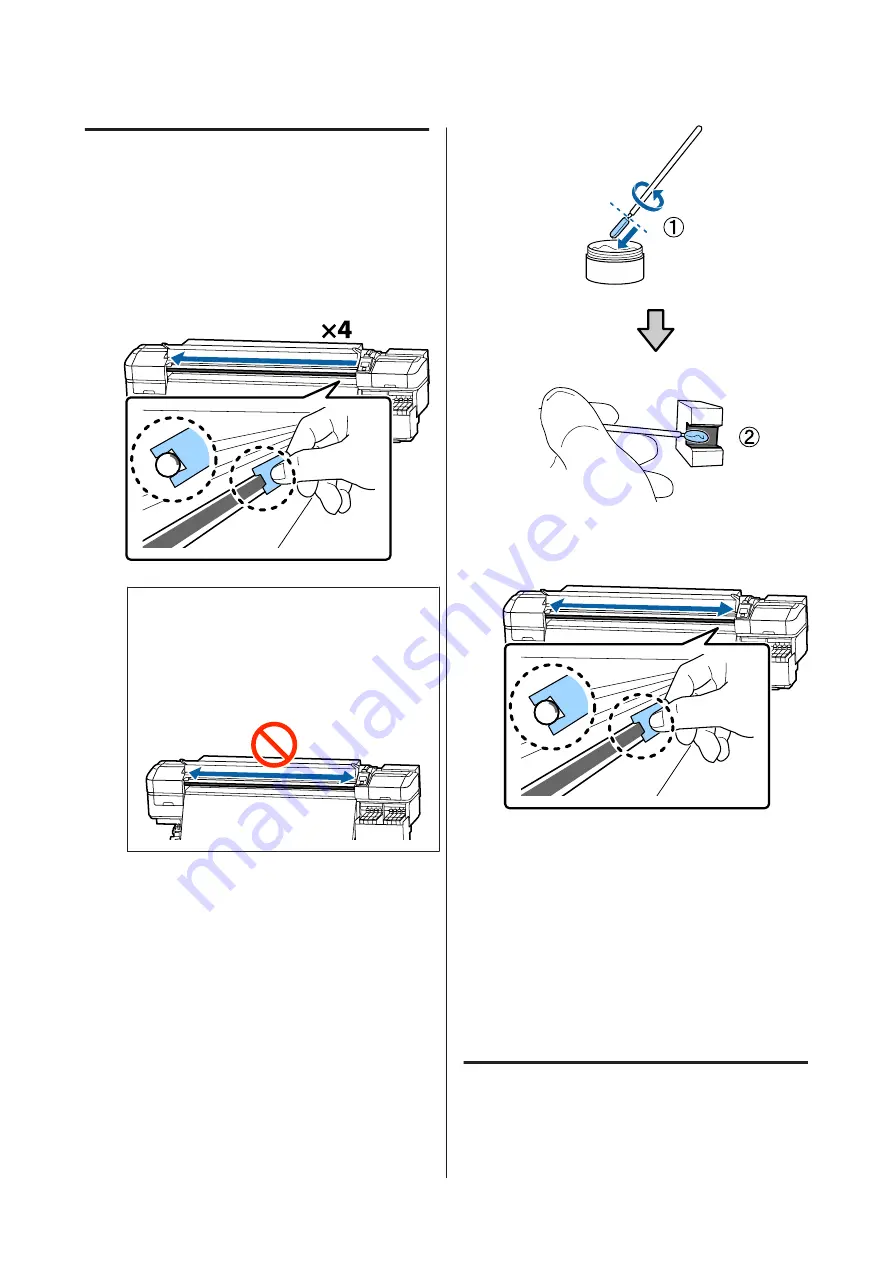
Greasing procedure for carriage 
rod B

A

Hold a new pad B firmly against the gray part
of the rod as shown in the illustration, and
smoothly slide it from the right end to the left
end to wipe off stains on the rod.

Repeat this action four times.

c

Important:

Do not slide pad B back and forth.

If you slide the tool back and forth, dust will
be moved to the print head stand-by position
and a malfunction may occur.

B

Apply grease to the new pad B as described
below.

Replace pad B used in step 1. These should not
be reused.

(1) Insert the tip of the cleaning stick fully into

the container, and twist it 2 to 3 times to get
enough grease on the stick.

(2) Apply grease to new pad B.

C

Hold pad B as described in step 1, and slide the
pad back and forth twice.

D

Close the front cover, and then press the 

Z

button.

The carriage moves back and forth.

E

Remove the stained pad from the grease tool,
and then store the grease tool with the grease.

Disposing of used pads, cleaning sticks, and
other items used to apply grease

U


“Disposal of used consumables” on page 80

Storing Grease

Replace the cap to prevent foreign objects falling
into the grease.

SC-F9300 Series     User's Guide

Maintenance


86

Содержание SC-F9300 series

Страница 1: ...User s Guide CMP0106 00 EN ...

Страница 2: ...ucts other than those designated as Original Epson Products or Epson Approved Products by Seiko Epson Corporation Seiko Epson Corporation shall not be held liable for any damage resulting from electromagnetic interference that occurs from the use of any interface cables other than those designated as Epson Approved Products by Seiko Epson Corporation EPSON and EPSON EXCEED YOUR VISION or EXCEED YO...

Страница 3: ...re Printing 45 Saving New Media Settings 45 Type and Summary of Media Settings 45 Easy Media Setup Procedure 46 Media Adjust 48 Media Adjust Auto Feed Adjustment 48 Media Adjust Manual 48 Changing settings during printing 50 Changing the Heater s Temperature 50 Correcting Banding 51 Printable area 52 Maintenance When to Perform Various Maintenance Operations 55 Cleaning Locations and Cleaning Timi...

Страница 4: ...dix Options and Consumable Products 117 Supported Media 119 Moving and Transporting the Printer 119 Moving the Printer 119 Transport 120 Parallel Adjustments for the Auto Take up Reel Unit 121 Preparations for Parallel Adjustment 121 How to Adjust 121 Media Settings List for Each Media Type 129 System Requirements 130 Epson Control Dashboard 130 Epson Edge Print 131 Specifications Table 132 Where ...

Страница 5: ...e 62 B Heater The heater can be used to rapidly dry ink after printing U Changing the Heater s Temperature on page 50 C Media guide bar The bar maintains tension to prevent the media sagging as it is taken up D Handle After placing the roll core on the left roll core holder rotate the handle to press the roll core holder and apply pressure to the roll core SC F9300 Series User s Guide Introduction...

Страница 6: ...ising in the ink tank when using a commercially available heat er When it becomes hard to see inside the ink tank because ink has adhered to the heat shield clean it U Cleaning the Heat Shield on page 83 J Ink tank This holds the ink to be used for printing K Slider U Slider on page 12 L Lock levers When removing the slider to replace the chip unit raise the lock levers to unlock After installing ...

Страница 7: ...dia prior to removal Q Alert lamp This lamp lights or flashes when an error occurs Light Flash An error occurred The type of error is indicated by how the lamp lights or flashes Check the contents of the error on the control panel s screen Off No error R Control panel U Control panel on page 12 S Front cover Open when loading media cleaning the inside of the printer or removing jammed media Normal...

Страница 8: ... so U Disposing of Waste Ink on page 73 E Casters There are two casters on each leg Once installation is complete the front casters should be kept locked while the printer is in use F Adjusters When installing on a carpeted floor or a sloping floor check level gauge of the printer and adjust these to keep the printer stable U Setup Guide G AC inlet 1 AC inlet 2 Connects the power cable Be sure to ...

Страница 9: ... head prints by moving left and right while emitting ink Clean at least once a month U Cleaning Around the Print Head on page 62 B Media edge plates The media edge plates prevent the media riding up and keeps fibers on the cut edge of the media from touching the print head Position the plates at either side of the media before printing U Loading media on page 27 C Cutter groove Pass the blade of a...

Страница 10: ...3 G Wiper unit The wiper removes ink from the surface of the print head nozzles The wiper unit is a consumable item Replace when a message is displayed on the control panel prompting you to do so U Replacing the Head Cleaning Set on page 75 H Flushing pad Ink is discharged onto this pad during flushing This is a consumable Replace the wiper unit at the same time U Replacing the Head Cleaning Set o...

Страница 11: ...ort Rest media on these supports before placing it on the roll holders There are same parts on both the left and the right E Lift lever If the media to be mounted on the roll holders seems heavy use these levers to raise the media easily to the level of the roll holders They are on both the left and right sides F Handle After placing media on the right roll holder rotate the handle to press the ho...

Страница 12: ...cluded with the ink pack Control panel A P button power button Turns the power on and off B P light power light The printer s operational status is indicated by a lit or flashing light On The power is on Flashi ng The printer is receiving data or performing head cleaning or other operations during shut down Off The power is off C M button media setup button SC F9300 Series User s Guide Introductio...

Страница 13: ...sumed by releasing the button and then pressing it again When the media loading lever in a raised position the button to rewind media depends on how the loaded media is rolled Printable Side Out Press the u button Printable Side In Press the d button Keep the button pressed to rewind the media up to 25 cm When the menus are displayed these buttons can be used to select menu items and options U Men...

Страница 14: ...ture The heater has not reached the selected temperature C Feed adjustment information during printing This information is displayed when the adjustment value is specified during printing U Correcting Banding on page 51 D Media info This shows information related to the media as shown below This is the setting number for the media that is selected The values for the platen gap are indicated by the...

Страница 15: ...flashing The chip for automatic charging that was mounted has been removed Lowering the lock levers displays the normal icon The chip unit you removed is as good as new Automatic charging cannot be done because the lock levers are raised Lower the lock levers This refers to one of the following statuses Reposition the chip unit or replace it with a correct chip unit The chip unit has been mounted ...

Страница 16: ...leaning Notices for when periodic cleaning or auto clean ing are to occur are displayed as shown below The times these are done change greatly depending on the ambient temperature of the print heads In addition auto cleaning may be done regardless of the notice display when the power is turned back on H M This appears 24 hours prior to when auto cleaning and periodic cleaning are to be done when t...

Страница 17: ...ers Supports Windows only Epson Edge Print a RIP software that has basic functions Epson Edge Print is the standard RIP software developed by Epson Loaded with Epson s superior image processing technologies it unlocks the maximum printing speed and image quality for your printer Just like a printer driver anyone can easily and readily operate Epson Edge Print as well as register media settings and...

Страница 18: ...hat you secure the following space clear of any other objects so that paper ejection and consumable replacement are not obstructed See the Specifications Table for the external dimensions of the printer U Specifications Table on page 132 Notes when using the printer Note the following points when using this printer to avoid breakdowns malfunctions and print quality decline When using the printer o...

Страница 19: ...logged Head cleaning will be performed automatically after the printer is turned on and started Head cleaning prevents clogged print heads and maintains print quality Do not turn the printer off until cleaning is complete A service engineer must do pre and post maintenance when the printer is not used for over 2 weeks Pre and post maintenance will be provided for a fee Moreover depending on the en...

Страница 20: ...entation provided with each type of media Notes on Handling Do not fold the media or damage the printable surface Do not touch the printable surface Moisture and oils from your hands can affect print quality When handling media hold it by both edges We recommend wearing cotton gloves Keep the media dry Packaging materials can be used to store media and should not be thrown away Avoid locations tha...

Страница 21: ...t Print settings EMX files Update information for the printer firmware you can update the firmware easily from Epson Control Dashboard Update information when update information is available start EPSON Software Updater to perform the update for software and manuals installed from the supplied software disc and setup navigator Information from Epson With Epson Control Dashboard installed you can m...

Страница 22: ... Config SE With this software you can configure various network settings for the printer from your computer This is useful as it allows you to enter addresses and names using the keyboard SC F9300 Series User s Guide Introduction 22 ...

Страница 23: ... is installed on another computer You can access Epson Control Dashboard from a computer on the same network as the computer on which it is installed is connected to You do not need to install Epson Control Dashboard on the startup computer A Launch a browser on the computer you want to access from B Enter the following in the address bar http xxxxxxxxxxxx 30561 For xxxxxxxxxxxx enter the name and...

Страница 24: ...Interval to Check box and then click OK Uninstalling Software cImportant Log into a Computer administrator account an account with administrative privileges Enter the administrator password when prompted and then proceed with the remainder of the operation Exit any other applications that may be running Windows This section describes how to uninstall Epson Control Dashboard and the Epson communica...

Страница 25: ... The following describes how to remove Epson Control Dashboard A Quit Epson Control Dashboard B Double click Applications Epson Software Epson Control Dashboard Epson Control Dashboard Uninstaller Follow the on screen instructions to continue SC F9300 Series User s Guide Introduction 25 ...

Страница 26: ... the media is heavy it should not be carried by one person We recommend using a lifter for media that weighs over 40 kg Be careful not to trap your hands or fingers when opening or closing the front cover Failure to observe this precaution could result in injury Do not rub your hands along the edges of the media The edges of the media are sharp and can cause injury Load the media just before print...

Страница 27: ...oading media You can check the procedure in a video on YouTube Video Manual A Press the P button and then wait until Load media is displayed on the screen B Open the front cover and then lower the media loading lever C While holding the tabs of the media edge plate on both sides move the plate out of the way toward both edges of the platen D SC F9300 Series User s Guide Basic Operations 27 ...

Страница 28: ...sition according to the inner diameter of the roll of the media that will be loaded F While pressing from the top of the roll holder tighten the fixing screw until it no longer turns Tighten it so the roll holder does not move G Note The method of placing the roll media varies as follows depending on how media is rolled Printable Side Out Printable Side In H SC F9300 Series User s Guide Basic Oper...

Страница 29: ...e roll core into the roll holder J K Note If the roll of media has an outer diameter that is less than 140 mm the roll core will not reach the roll holder when raised using the lift lever Raise it with your hands and insert the roll core into the roll holder L To ensure that the roll holder is sufficiently inserted into the roll core push the top of the roll holder towards the end of the roll two ...

Страница 30: ...e roll holder may move during printing This could cause stripes and unevenness in the print results N Rotate the handle until part A in the illustration below is fully inserted cImportant Once part A is hidden do not turn the handle any further Failure to observe this precaution could damage the roll holder If part A is still visible even after the handle has been turned fully rewind the handle Lo...

Страница 31: ...o 16 in reverse to adjust the position of the roll holder Do not attempt to reposition the roll holders while they are inserted in the media Q R Hold the center of the media in one hand and pull it straight until it is aligned with the bottom edge of the label on the heater Do not pull the media with both hands This could cause the media to skew or move around SC F9300 Series User s Guide Basic Op...

Страница 32: ...in the media Once the looseness is corrected lower the media loading lever U While holding the tabs of the media edge plate on both sides move the plate to the top edge of the media Adjust so that the edges of the media are aligned with the center of the round holes in the media edge plates The media edge plates prevent the media from riding up and keep fibers on the cut edge of the media from tou...

Страница 33: ...al Caution Follow the instructions in the manual when loading media or roll cores or removing media from the take up roll Dropping media roll cores or take up rolls could result in injury Be sure that your hands or hair do not get caught in the Media Feeding Unit or Auto Take up Reel Unit while it is operating Failure to observe this precaution could result in injury Important points for correct t...

Страница 34: ... the media is pulled by hand the media may twist during take up B Loosen the roll core holder fixing screws on both sides and adjust the roll core holders so that the distance between the two is wider than the media If the roll supports are not positioned evenly move them so that they are even cImportant If the left side roll core handle s shaft is not visible rotate the handle as shown in the ill...

Страница 35: ...older F Check that the left side roll core holder is fully inserted into the roll core and that the roll core and edges of the media are not misaligned cImportant If the edges of the media are misaligned the media cannot be taken up correctly If the edges are misaligned loosen the fixing screw for the right side roll core holder and then restart from step 3 SC F9300 Series User s Guide Basic Opera...

Страница 36: ...de roll core holder tighten the fixing screw Tighten it so the roll core holder does not move I Rotate the handle until part A in the illustration below is fully inserted cImportant Once part A is hidden do not turn the handle any further Pressing too hard may damage the roll core holder If part A is still visible even after the handle has been turned fully the roll core holder may not be fully in...

Страница 37: ...with printed side in see U Take up with the Printed Side Facing In on page 37 For information on taking up with printed side out see U Take up with the Printed Side Facing Out on page 39 Take up with the Printed Side Facing In A While pulling the center of the media straight down wrap it around the roll core from back to front and affix it using commercially available adhesive tape cImportant Atta...

Страница 38: ...to take up the media for a single wrap around the core D Flip the Auto switch to E Confirm that the media is attached without looseness If the tension on the left and right of the media is different in the areas shown in the illustration below the media will not be taken up correctly When one side is loose restart the procedure from Step 1 SC F9300 Series User s Guide Basic Operations 38 ...

Страница 39: ... Out A While pulling the center section of the media straight down affix the media to the take up roll core with commercially available adhesive tape cImportant Attach the media to the take up roll core with the media pulled tightly If media is attached loosely the media may move around during take up B Hold down the d button in the control panel to feed enough media for a single wrap around the t...

Страница 40: ...without looseness If the tension on the left and right of the media is different in the areas shown in the illustration below the media will not be taken up correctly When one side is loose restart the procedure from Step 1 Note You can confirm differences in tension by lightly tapping both edges of the media as shown in the illustration below SC F9300 Series User s Guide Basic Operations 40 ...

Страница 41: ...a length Set the length of the loaded media Buttons that are used in the following settings A Use the d u buttons to select the media setting number to which the print settings have been registered and then press the Z button OK Done 1 2 3 4 5 Select Media If media settings have not yet been made for new media select an unassigned number finish loading the media and then perform Easy Media Setup U...

Страница 42: ...ning is displayed when the amount of media remaining reaches a specified level The printer will display Ready after a brief pause showing that it is ready to print Transmit the data to be printed from the computer Removing the Take up Roll Follow the steps below when replacing the media 1 Print the remaining amount of media When Media Remaining is set to On 2 Cut the media 3 Remove the media Print...

Страница 43: ...print is fed to the cut position cutter groove If you have printed the amount of media remaining press the u button to rewind the media until this information appears on the roll side beyond the cutter groove so that it will remain on the roll after the media is cut B Raise the cutter and then move it so that the cutter blade fits the cutter groove properly If you cannot position your hand correct...

Страница 44: ... in injury A Rotate the handle of the left side roll core holder B To prevent the media from sliding off the roll support the roll at its left end C Loosen the left roll core holder fixing screw and remove the roll core holder from the roll D Lower the roll onto the roll support E To prevent the media from sliding off the roll support the roll at its right end F Loosen the right roll core holder f...

Страница 45: ... and time consuming endeavor You can easily and quickly register media setting valuestotheprinterusingoneofthefollowingmethods Easy Media Setup This is suitable for quick printing After registering the media settings to the printer in Easy Media Setup select the generic print information that was already registered to the supplied RIP Epson Edge Print Register the media settings to the printer fro...

Страница 46: ...n D Use the d u buttons to select the desired media number and press the Z button If a number with the saved settings is selected the existing settings are overwritten E The setting name is registered Name the media setting bank Using distinctive names makes it easier to select banks for use Use the d u buttons to display letters and symbols When the desired character is displayed press the r butt...

Страница 47: ...buttons and set the value printed under the pattern selected in group A from step 9 and then press the Z button Set B in the same way When printing restarts for the adjustment pattern and printing is complete the adjustment value entry screen is displayed K Check the printed adjustment pattern Status Adjustment Pattern In 1 head mode 4 blocks A to D In 2 head mode 12 blocks A to L Select the fines...

Страница 48: ...nit on page 33 B Press the Menu button The settings menu will be displayed C Select in the order of Media Setup Customize Settings Media Adjust Auto Feed Adjustment D When you press Z auto adjust starts and an adjustment pattern is printed Wait until adjustment is complete Media Adjust Manual Feed Adjustment This menu is used when banding horizontal banding tint unevenness or stripes is detected i...

Страница 49: ...t 0 0 in the cases shown below If there are patterns where the overlapping or gaps are the same enter the middle value in step 7 Enter 0 05 in the cases shown below If all of the adjustment patterns contain either overlapping or misalignments and you cannot narrow it down to one enter 0 0 for the time being In this situation the media feed is not adjusted Do the following steps to complete Feed Ad...

Страница 50: ... print the adjustment pattern Wait until printing is complete E Check the printed adjustment pattern Status Adjustment Pattern In 1 head mode 4 blocks A to D In 2 head mode 12 blocks A to L Select the finest lined pattern all lines overlap for both Select 1 in the cases shown below F The screen for entering values is displayed Using the u d buttons enter the pattern number recorded in Step 5 and p...

Страница 51: ...tton during printing The current adjustment value is displayed B Use thed ubuttons to changethe current value If the feed amount is too small black bands dark stripes will appear adjust the feed amount upwards If in contrast the feed amount is too large white bands pale stripes will appear adjust the feed amount downwards C Check the printing result If you are not satisfied with the results use th...

Страница 52: ...s recognized as the media edge The edges of the media are not detected correctly if the media edge plates are not attached correctly U Loading media on page 27 Media Size Check Off The center of the black rectangle on the heater s label shown in the illustration below is the standard position for the right edge of the media Regardless of the width of the loaded media the left edge of the media is ...

Страница 53: ... Differs by the length the media was pulled when the media is loaded For continuous printing although the margins set in RIP are added to maintain media feeding accuracy if the setting is less than 5 mm the setting is switched to 5 mm 5 mm or more CLeftedge 3 4 The value selected for Side Margin Left in the printer s setup menu The default setting is 5 mm 3 to 25 mm D Right edge 3 4 The total of t...

Страница 54: ...the total of the print data width and set left and right margins exceeds the printable area a portion of the data will not be printed Note If the following points are not observed when Media Size Check is Off printing may occur outside the left and right edges of the media Ink used outside the edges of the media will stain the inside of the printer Ensure that the print data width does not exceed ...

Страница 55: ...e plates U Daily Cleaning on page 59 At least once a month B Around the Print Head C Caps D Flushing pad when dirty U Performing Regular Cleaning on page 60 You can check the procedure in a video on YouTube Video Manual cImportant The printer contains precision instruments If any lint or dust adheres to the nozzles on the print head print quality will decline Perform regular cleaning more frequent...

Страница 56: ...le U Disposing of Waste Ink on page 73 As soon as ink low warning is displayed on the control panel display E Ink refill U Ink refill on page 65 When the plates are deformed or damaged C media edge plates U Replacing the media edge plates on page 78 Regular maintenance When to perform Operation Once a week Stir the High Density Black Ink U Procedure for stirring the High Density Black Ink on page ...

Страница 57: ...When a clog is found after checking for clogged nozzles Head Cleaning U Head Cleaning on page 81 When it has become difficult to see inside the ink tanks because of dirt on the heat shield Clean the heat shield U Cleaning the Heat Shield on page 83 When a greasing message is displayed on the control panel Applying the supplied grease to the carriage rod U Applying Grease to the Carriage Rod on pag...

Страница 58: ...he set A Clean room wipers x100 B Tweezers x1 Maintenance Kit supplied with the printer Use these when wiping up ink stains The following accessories are in the kit A Ink cleaner x1 B Cup x1 C Gloves x12 D Cleaning stick x25 How to use these U Using the ink cleaner on page 60 A metal tray supplied with the printer Use when putting cleaning utensils removed consumables or ink cleaner moved in the c...

Страница 59: ...leaning sticks or sticks contained in a maintenance kit Other types of sticks that produce lint will damage the print head Always use fresh cleaning sticks Re using sticks can make stains even harder to remove Do not touch the tips of the cleaning sticks Oil from your hands could damage the print head Do not use anything other than the specified ink cleaner when cleaning around the print head caps...

Страница 60: ...removed be sure to attach the plates to their original positions Removing and installing the media edge plates U Replacing the media edge plates on page 78 Performing Regular Cleaning Clean the parts in the following order Moving the Print Head Cleaning Around the Print Head Cleaning Around the Caps cImportant The following message is displayed on the control panel display if cleaning has not been...

Страница 61: ...r cleaning stick and clean room wipers are industrial waste Dispose of them in the same way as for waste inks U Disposal of used consumables on page 80 Moving the Print Head This section describes how to move to cleaning position of the print head cImportant Be sure to follow the steps below when positioning the print head Moving the print head manually could cause malfunction Buttons that are use...

Страница 62: ...the left end of the printer and then open the left side maintenance cover B Dampen the cleaning stick with ink cleaner Use new products for both the cleaning stick and ink cleaner U Using the ink cleaner on page 60 cImportant Rinse a cleaning stick using ink cleaner for each step After removing a clot of ink with a cleaning stick wipe off using a clean room wiper C Wipe off any adhered ink lint an...

Страница 63: ...k with ink cleaner U Using the ink cleaner on page 60 C Hold the cleaning stick flat and wipe the edges of all the caps Caps have 2 blocks Clean all of the caps cImportant When using a cleaning stick or tweezers do not touch the inside of the cap and do not push strongly against the edges or the surrounding area of the cap The part maybe deformed and it may no longer be possible to perform capping...

Страница 64: ...equire cleaning see the following sections and perform the necessary cleaning When there is lint or dust in the cap Remove using the tip of the cleaning stick or tweezers If no other parts need to be cleaned proceed to the following section U Finishing Cleaning on page 65 When there is lint attached to the flushing pad Wipe off lint and dust with the tip of a cleaning stick cImportant Do not defor...

Страница 65: ...his PrinterU Options and Consumable Products on page 117 cImportant This printer has a remaining ink warning system Information about the available amount of ink in one pack is recorded in the chip unit supplied with a new ink pack This information is written to the printer when the chip unit is mounted on the printer The ink remaining warning system estimates the remaining ink based on the ink us...

Страница 66: ...ntly tilt the ink pack when pouring ink into the ink tank cImportant Epson recommends the use of genuine Epson ink packs Epson cannot guarantee the quality or reliability of nongenuine ink The use of non genuine ink may cause damage that is not covered by Epson s warranties and under certain circumstances may cause erratic printer behavior Information about non genuine chip unit status may not be ...

Страница 67: ...nk tank Replace the ink tank Replacements and repairs will be provided for a fee During replacements and repairs the ink in the ink tank is discarded This is necessary because fine dirt dust and other foreign bodies mixed into the ink in the ink tank cause the ink tank to malfunction The ink tank replacement interval depends on the usage environment and conditions Contact your dealer or Epson Supp...

Страница 68: ... pack horizontally about 5 cm to the left and right for approximately 15 times in 5 seconds H Confirm that no warning or error is displayed on the control panel screen and then open ink inlet cover of the slider When a warning or error is displayed resolve the warning error according to the instructions and then go to the following operations I Remove the ink inlet cap from the ink tank The method...

Страница 69: ...igh Density Black Ink 1 Grip the ink inlet cap s hook and pull up Ink will adhere if you hold another part to remove the ink inlet cap 2 Hook the stirring stick onto the projection on the ink tank SC F9300 Series User s Guide Maintenance 69 ...

Страница 70: ...nt Get all the ink out of the ink pack so that there is none remaining Do not use the ink in an ink pack to refill multiple ink tanks This can cause messages from the remaining ink warning system to not display properly L Put the ink inlet cap back on the ink tank The method for attaching the ink inlet cap differs depending on the type of ink being refilled SC F9300 Series User s Guide Maintenance...

Страница 71: ... U Cleaning the Heat Shield on page 83 Procedure for stirring the High Density Black Ink A characteristic of High Density Black Ink is that sedimentation occurs easily Stir the ink in the ink tank once a week There may be color differences in the printouts if printing is performed when sedimentation has occurred You can stir the ink whenever you want regardless if you are printing or if the printe...

Страница 72: ...e the ink inlet cap from the ink tank Grip the ink inlet cap s hook and pull up Ink will adhere if you hold another part to remove the ink inlet cap cImportant Remove the ink inlet cap slowly If you remove the cap too quickly ink may splatter SC F9300 Series User s Guide Maintenance 72 ...

Страница 73: ...posing of Waste Ink Preparing and Replacement Timing When Prepare empty waste ink bottle is displayed Prepare a new Waste Ink Bottle as soon as possible When you want to replace the Waste Ink Bottle at this stage due to night operations and so on select Replace Ink Bottle from the setup menu and then replace the bottle If you perform the replacement without selecting Replace Ink Bottle the waste i...

Страница 74: ... Maintenance Menu on page 104 cImportant If you replace the Waste Ink Bottle before being prompted by a message always clear the waste ink counter Otherwise the replacement interval for the Waste Ink Bottle will no longer be notified correctly from the next message Replacing the Waste Ink Bottle Follow the procedure below to replace the parts Before starting this procedure be sure to read the foll...

Страница 75: ...another container Use a container made of PE polyethylene when transferring the waste ink Attach the spout included with the printer to the rim of the waste ink bottle and transfer the waste ink Pour the waste ink carefully Pouring the waste ink quickly may cause it to spill and splatter Store the waste ink by securely closing the lid of the container to which you transferred it Disposing of used ...

Страница 76: ...ot replaced The head cleaning sets contains the following parts Wiper unit x1 Flushing pad x1 Gloves x2 Always choose a replacement head cleaning set that is specified for this printer U Options and Consumable Products on page 117 Before starting this procedure be sure to read the following U Precautions regarding maintenance on page 59 How to Replace the Head Cleaning Set A Press the Z button in ...

Страница 77: ...d press down until you hear a click H After replacing the wiper unit press the Z button I Lift up the tab on the flushing pad and remove it Remove the flushing pad that you removed and place it on the metal tray J Insert the two hooks on the flushing pad into the slots on the printer and press the tab down until the pad clicks into place SC F9300 Series User s Guide Maintenance 77 ...

Страница 78: ...o the print head Replacement procedure A Remove media and turn off the printer Check that the screen display has turned off and then unplug the power cable from the outlet U Removing the Take up Roll on page 42 Disconnect both of the power cables B Leave the printer for a minute and then open the left maintenance cover and the front cover C While holding the tabs of the media edge plate on both si...

Страница 79: ... the metallic plate against the platen attach the hooked sections to the front corner of the platen E Check that three hooked sections at the rear of the media edge plate are securely applied as shown below and that they are attached with no gap between the platen and media edge plate Hook into the tip Corners of the platen Hook into the rear of square hole Groove in front of white line Hook into ...

Страница 80: ...d that you check the nozzles for clogs each time you print to ensure quality results Ways to Check for Clogs The following are 2 ways to check for nozzle clogs On Demand Nozzle Pattern When you want to check that there is no clogging or stripes and unevenness in print results before printing print a nozzle check pattern Inspect the printed check pattern visually to determine whether the nozzles ar...

Страница 81: ...Head Cleaning on page 81 cImportant Always remove clogs from the nozzles of all colors before resuming use If clogged nozzles including clogged nozzles for colors that are not used remain when printing after resuming use the clogs can no longer be removed D The menus close when printing is complete Head Cleaning Types of Head Cleaning Head cleaning is split between the following two types Perform ...

Страница 82: ... nozzle arrays with faint or missing segments in the pattern and then press the Z button 2 After selecting the arrays you want to clean select Execute With Selection and then press the Z button F Head cleaning starts A confirmation message is displayed when cleaning is complete If you paused the printer in Step 1 printing will resume when head cleaning is complete check the printout to confirm whe...

Страница 83: ...ly loosen the four screws that hold the heat shield in place to remove the heat shield B Soak a soft cloth in water wring it out thoroughly and then wipe off any ink that has adhered to the heat shield C Install the heat shield Align the heat shield s holes with those in the ink tank holder and tightly screw in the screws Applying Grease to the Carriage Rod When Apply secondary carriage rod grease...

Страница 84: ...enu will be displayed B Use the u button to select Other maintenance and then press the Z button C Use the u button to select Grease Carriage Rod and then press the Z button When Grease kit is needed Continue is displayed Make sure that you have a grease kit ready to use D Select Yes and then press the Z button E Insert the tab of the pad A new firmly into the rectangular slot on the grease tool a...

Страница 85: ...of the container to remove excess grease cImportant Failure to remove the excess could result in falling grease dirtying the platen and media L Using a cleaning stick apply grease to the pad you attached to the tool as described below 1 Insert the tip of the cleaning stick fully into the container and twist it 2 to 3 times to get enough grease on the stick 2 Apply grease to the pad on the tool M H...

Страница 86: ...step 1 These should not be reused 1 Insert the tip of the cleaning stick fully into the container and twist it 2 to 3 times to get enough grease on the stick 2 Apply grease to new pad B C Hold pad B as described in step 1 and slide the pad back and forth twice D Close the front cover and then press the Z button The carriage moves back and forth E Remove the stained pad from the grease tool and the...

Страница 87: ... Store the container at room temperature with the cap uppermost in a location that is not exposed to direct sunlight SC F9300 Series User s Guide Maintenance 87 ...

Страница 88: ...Proceed Back OK Media Setup Printer Setup Maintenance Printer Status Other Settings Media Setup Proceed Back OK Feed To Cut Position Easy Media Setup Media Remaining Customize Settings Select Media Media Remaining Proceed Back OK Print Remaining Length Length Remaining Alert When printing or adjusting after selecting an item and pressing the Z button the status display screen is displayed when the...

Страница 89: ...a Remaining Print Length Media Remaining Print Remaining Length Print Length Off 1 0 to 600 0 m Remaining Alert 1 to 15 m Reset Print Length Manual Reset Execute Auto Reset Off Per Job Customize Settings Current Settings 1 to 30 media setting number Setting Name Up to 22 half size characters Media Type Thinnest Thin Thick Thickest Adhesive Media Adjust Auto Feed Adjustment Print Manual Feed Adjust...

Страница 90: ...e Printing Off 2 to 8 Feed Speed Limiter On Off Pressure Roller Load Light Medium Heavy Remove Skew On Off Periodic CL Cycle Auto Manual Printing Time Enter Time 1 to 240 hours When To Clean Between Pages Middle Of Page Cleaning Level Light Heavy Media Usage Enter Value 1 to 999 When To Clean Between Pages Middle Of Page Cleaning Level Light Heavy Off Prevent Sticking On Off Reduce Print Streak Of...

Страница 91: ...Check On Off Media Skew Check On Off Media End Option Continue Stop Printing Btw Pages Nozzle Check Off Print Pattern 1 to 10 Lamp Setting Auto Manual Head Mode 2 Heads Mode Head1 Head2 Sleep Mode 15 to 240 minutes Charge Setting Extend Charge Timing Select Target Ink Tank On Off Forced Charge Select Target Ink Tank Execute Cancel Cleaning During Standby When To Clean Off 1 to 240 h Cleaning Level...

Страница 92: ...Nozzles Cleaning Heavy Selected Nozzles Preventive Cleaning Execute Cancel Head Maintenance Auto Head Maintenance Execute Regular Cleaning Move Head Replace Ink Bottle Head Cleaning Set Other maintenance Grease Carriage Rod Yes No Printer Status Details on menu U The Printer Status Menu on page 105 Item Parameter Firmware Version XXXXXXX X_XX XXXX Preference Details on menu U The Preference Menu o...

Страница 93: ...heet Print Restore Settings Yes No Preferences Date And Time MM DD YY HH MM Language Japanese English French Italian German Portuguese Spanish Dutch Russian Korean Chinese Turkish Units Unit Length m ft in Unit Temperature C F Alert Sound Setting On Off Alert Lamp Setting On Off Reset All Settings Yes No SC F9300 Series User s Guide Using the Control Panel Menu 93 ...

Страница 94: ...Media Remaining to Off the remaining media is not displayed on the status screen If Auto Reset is set to Off in the next section s Reset Print Length a cumulative value for the print length is displayed until you do Manual Reset Print Length Media Remaining Print Remaining Length Print Use Print Remaining Length to print the amount of media remaining on the current roll before replacing it with an...

Страница 95: ...t Media 1 to 30 media setting number XXXXXXXXXXX displays name of registered custom paper Choose the media settings used for printing To register new settings either do Easy Media Setup or register the media settings on the printer using the supplied Epson Control Dashboard U Saving New Media Settings on page 45 Change setting content in Customize Settings Media Setting Item The optimal media sett...

Страница 96: ...EMX files are registered to the printer with Epson Control Dashboard When the following conditions occur after performing media adjustment When banding can be seen in the print results even after doing Auto Feed Adjustment When the media type is the same but the width is different When changing Advanced Settings after saving media settings Adjustment types and execution procedureU Media Adjust on ...

Страница 97: ... printing 1 to 3 passes Standard 4 passes Slow 6 or more passes Slowest Standard Slow Slowest After Heater Feed On Select whether to feed the end of the printout to the heater after printing On or not Off Select On if the media will be cut before the next job starts Note however that the margin will increase Off Feeding Tension Lv1 to Lv8 Lv6 Increase tension if creases appear in the media during ...

Страница 98: ...crease the frequency 2 to 8 Feed Speed Limiter On Off is recommended in normal circumstances Set this to On if media sticks or wrinkles or tears easily when printing on thin media When this is set to On print speed slows down Off Pressure Roller Load Low If the following occurs when printing you may be able to avoid it by changing to a load that reduces the pressure on the rollers for example Medi...

Страница 99: ...eaning Level sets the strength for head cleaning Printing Time Enter Time 1 to 240 hours When To Clean Between Pages Middle Of Page Cleaning Level Light Heavy Media Usage Enter Value 1 to 999 When To Clean Between Pages Middle Of Page Cleaning Level Light High Off Neither Auto nor Manual periodic cleaning is done Prevent Sticking On Select whether to do non stick operations On or not Off when the ...

Страница 100: ...Side Margin Right will be left blank See the following for more information U Printable area on page 52 Margin Between Pages Standard You can adjust a margin between pages Even after making adjustments the size of the margin may change depending on the media and usage environment The margin increases when the number is moved in the direction and decreases when the number is moved in the direction ...

Страница 101: ... the Nozzle Check to occur periodically When this is set to Off Btw Pages Nozzle Check is not performed Print Pattern prints a check pattern in the middle of a print run after the set number of pages has been printed When all printing is complete you can visually inspect the check pattern to determine whether there may be faint or missing colors in the preceding or following printout Print Pattern...

Страница 102: ... press any button in the control panel except P The control panel display will however turn off again if no operations are performed for another 30 seconds under these conditions The printer and heaters are only fully reactivated when a print job is received the media loading lever is used or another operation involving printer hardware is performed To return from sleep mode and begin prehearing t...

Страница 103: ...etting if the indicator has only 1 level remaining when it is time to refill the ink Do a Forced Charge as shown in the next section Select Target Ink Tank On Off Forced Charge Do this if there is a discrepancy with the indicator when only 1 level remains refer to the following illustration when it is time to refill the ink while continuing to use a reserved chip Indicator Ink tank Set a new chip ...

Страница 104: ... vary with the option selected for Media Size Check and the width of the media used Print At Center Print At Left Cleaning Cleaning Light You can set head cleaning to two types First do Cleaning Light If the clogs are not cleared even if you have done Cleaning Light then do Cleaning Heavy When you select Cleaning Heavy note the numbers of patterns that contain faint or missing colors and clean sel...

Страница 105: ...l panel s screen do so from this menu Head Cleaning Set If you are replacing the head cleaning set before the message indicating that it is time to replace the head cleaning set appears on the control panel s screen do so from this menu Other maintenance Grease Carriage Rod Yes When Apply secondary carriage rod grease See manual is displayed on the control panel screen select Yes to apply grease t...

Страница 106: ...work Setup menu to their default settings No Preferences Date And Time MM DD YY HH MM Set the printer s built in clock The time set here is used to display the printer s status in the job logs and on the Epson Control Dashboard Language Japanese Select the language used in the control panel display English French Italian German Portuguese Spanish Dutch Russian Korean Chinese Turkish Units Unit Len...

Страница 107: ... Off the alert lamp that lights when an error occurs Off Reset All Settings Yes When you select Yes all settings in the configuration menu except for the items in Preferences are returned to their defaults No SC F9300 Series User s Guide Using the Control Panel Menu 107 ...

Страница 108: ...ith chip unit that supports this printer Please check ink level The ink is running low Immediately take care of the next two points Prepare an ink pack of the appropriate color U Options and Consumable Products on page 117 Check the level of the ink If the remaining ink is 70 mm or less from the bottom of the ink tank replace the chip unit and refill the ink U Procedure for Ink Refills on page 66 ...

Страница 109: ...width the printer may print if Off is selected for Media Size Check U The Printer Setup Menu on page 99 Media Sensor Error Loaded media or sensor has a problem Refer to the manual for error details Media Sensor Error Refer to manual for details of error Adjust manually Press the W button to clear the message from the display Auto Feed Adjustment in Media Adjust and Auto Feed Adjustment in Easy Med...

Страница 110: ...nance request code You cannot clear the maintenance request until the part is replaced A service call occurs if you continue to use the printer Call For Service XXXX Error XXXX Power off and then on If this doesn t work note the code and call for service A call for service occurs when The power cable is not connected securely An error that cannot be cleared occurs When a call for service has occur...

Страница 111: ...USB cable directly into your computer s USB port o Is the USB hub recognized correctly Make sure the USB hub is recognized correctly on the computer If it has disconnect the USB hub from the computer and connect the computer directly to the printer Ask the USB hub manufacturer about USB hub operation You cannot print under the network environment o Are the network settings correct Ask your network...

Страница 112: ...g tint unevenness or stripes Select Media Adjust Feed Adjustment in the media settings to make adjustment based on the target media U Feed Adjustment on page 48 o Are you using a genuine Epson ink pack This printer is developed for use with Epson ink packs If you use non Epson ink packs printouts may be faint or the color of the printed image may be changed because the remaining ink level is not c...

Страница 113: ...menu Choose On for Media Size Check in the setup menu U The Printer Setup Menu on page 99 Vertical ruled lines are misaligned o Is the media wavy Certain types of media may develop waves under some conditions humidity and temperature while installed in the printer If a wave has developed press the d button in the control panel to feed the media and avoid the affected area We recommend that you low...

Страница 114: ... a message is displayed and the printer will not turn off unplug both power cables B Open the front cover C Move the media edge plates to the right and left sides of the platen Hold both tabs on the media edge plates to move them cImportant Cease use of the printer if the media edge plates are deformed Continued use could damage the pressure rollers or print head Contact your dealer or Epson Suppo...

Страница 115: ...etting on the Printer Setup menu See the following for more information U The Printer Setup Menu on page 99 If it does not clear even when you implement the Charge Setting clear the discrepancies by continuing to use the chip unit without doing a reservation Heater automatically turns Off o The heater turns off if no print job is received for some time and no errors in the printer occur The time b...

Страница 116: ...The red light is on inside the printer o This is not a failure The red light is a light inside the printer SC F9300 Series User s Guide Problem Solver 116 ...

Страница 117: ...stances may cause erratic printer behavior Information about non genuine ink levels may not be displayed and use of non genuine ink is recorded for possible use in service support Others Product Part number Explanation Head Cleaning Set except for SC F9380 C13S210051 The following consumable items are included in one maintenance set Wiper unit x1 Flushing pad x1 Gloves x2 Head Cleaning Set for SC ...

Страница 118: ...ical to the product supplied with the printer Clean Room Wiper 1 C13S090016 1 Not available for purchase in some countries and regions We recommend BEMCOT M 3II by Asahi Kasei Corporation when purchasing commercial products SC F9300 Series User s Guide Appendix 118 ...

Страница 119: ...oad media that weighs over 40 kg are as follows Thickness of the fork and table under 28 mm The surface of the fork and table can be lowered approximately 190 mm from the floor Moving and Transporting the Printer This section describes how to move and transport the product Moving the Printer This section assumes that the product is being moved to another location on the same floor without traversi...

Страница 120: ...ove Setup After moving the printer follow the steps below to ready it for use A Check that the location is appropriate for installation and set up the printer U Setup Guide booklet If you do not have the Setup Guide contact your dealer or Epson Support U Where To Get Help on page 134 B Do parallel adjustments to the Auto Take up Reel Unit U Parallel Adjustments for the Auto Take up Reel Unit on pa...

Страница 121: ...rovided shorter roll core and adjustment tools Get the following items ready before beginning adjustment A Counterweights B Hex wrench C Film a D Film b x2 E Roll core shorter roll Note The adhesive side may be dirty if you reuse a film that has already been used once Soak a lint free cloth in water wring it out and then use it to wipe away the dust and lint stuck to the reverse side How to Adjust...

Страница 122: ... be dirty if you reuse a film that has already been used once Soak a lint free cloth in water wring it out and then use it to wipe away the dust and lint stuck to the reverse side F As shown in the illustration align Hole 2 Hole 3 and Hole 4 of film b with the screws on the left edge of the heater and then adhere them G Repeat steps 5 and 6 to attach another film b to the right side of the heater ...

Страница 123: ...properly loaded if the handle s shaft is not visible I Align the right roll core holder with the position of the dotted line and then tighten the roll core holder locking screw J Pass film a through the roll core K Insert the roll core into the right roll core holder L Insert the left roll core holder and then tighten the roll core holder locking screw SC F9300 Series User s Guide Appendix 123 ...

Страница 124: ...he printer O Bring film a perfectly alongside the film b on the left P Attach a counterweight to film a at the back of the printer letting it hang in the position shown in the following illustration Q After film a stops swinging make note of the value of the scale where film a overlaps the front edge of the white line on the platen SC F9300 Series User s Guide Appendix 124 ...

Страница 125: ...e between the values of both sides is more than 0 5 mm proceed to the adjustments in the next section If the difference is under 0 5 mm no adjustments are necessary Refer to the following to remove the films U Completing Adjustments on page 127 Adjustments A Loosen all of the metal fixing screws in the illustration below B Completely loosen the adjustment screws on both sides in the illustration b...

Страница 126: ...ues of both sides is more than 0 5 mm proceed to step 6 to adjust the screw with the higher value If the difference is under 0 5 mm proceed to step 7 F Align film a perfectly with film b on the side that is to be adjusted While checking the scale turn the adjustment screw clockwise until the difference in the values for both sides is less than 0 5 mm The scale moves from the place that has tension...

Страница 127: ...ng Adjustments A Remove the counterweight attached to film a at the back of the printer B Pull film a out from the front of the printer C Loosen the roll core holder locking screws on the right side and remove the roll core holder D Remove the roll core E Remove film a from the roll core SC F9300 Series User s Guide Appendix 127 ...

Страница 128: ...ght If you plan on using the films again remove dust etc and stretch it well before use G Loosen the roll core holder locking screw on the left side and then move both roll core holders inward H Turn the cover in the illustration below to close it and then tighten the screw SC F9300 Series User s Guide Appendix 128 ...

Страница 129: ...rea Feed Standard Standard Standard Standard Standard Feeding Tension Lv6 Lv6 Lv6 Lv6 Lv6 Take up Tension Lv1 Lv6 Lv6 Lv6 Lv6 Media Suction Lv2 Lv8 Lv8 Lv8 Lv8 Head Movement Data Width Data Width Data Width Data Width Data Width Multi Strike Printing Off Off Off Off Off Feed Speed Limiter Off Off Off Off Off Pressure Roller Load Medium Medium Medium Medium Medium Remove Skew On On On On On Periodi...

Страница 130: ...e function Disable the sleep function so that the computer does not enter sleep status Windows Operating systems Windows Vista SP2 Windows Vista x64 SP2 Windows 7 SP1 Windows 7 x64 SP1 Windows 8 Windows 8 x64 Windows 8 1 Windows 8 1 x64 Windows 10 Windows 10 x64 CPU Intel Core2Duo 2 0GHz or more Free memory 1 GB or more Hard disk free space during installation 300MB or more Display resolution 1280...

Страница 131: ...or more Display resolution 1280 x 1024 or better Communication interface High Speed USB Ethernet 1000Base T Browser Firefox 17 or later including IceWeasel Epson Edge Print Operating system OS Windows 7 SP1 Windows 7 SP1 x64 Windows 8 Windows 8 x64 Windows 8 1 Windows 8 1 x64 Windows 10 Windows 10 x64 64 bit recommended CPU Core2Duo 3 0GHz or more Free memory 2 GB or more Hard disk drive free spac...

Страница 132: ...ff Approx 1 0 W Temperature and humidity without condensation When printing 15 to 25 C 40 to 60 Media loading or maintenance etc 15 to 35 C 20 to 80 In storage Before unpacking 20 to 60 C 5 to 85 Within 120 hours at 60 C within a month at 40 C In storage Before charging ink 20 to 40 C 5 to 85 Within a month at 40 C Printer Specifications Temperature and humidity range Gray area When loading media ...

Страница 133: ...e day the ink tank was refilled with an ink pack Storage temperature 5 to 35 C Capacity 1000 ml Note To ensure the colors you want to print maintain a constant room temperature of 15 to 25 C Information of EU declaration of conformity The full text of the EU declaration of conformity of this equipment is available at the following internet address http www epson eu conformity SC F9300 Series User ...

Страница 134: ...operly and you cannot solve the problem using the troubleshooting information in your product documentation contact Epson support services for assistance If Epson support for your area is not listed below contact the dealer where you purchased your product Epson support will be able to help you much more quickly if you give them the following information Product serial number The serial number lab...

Страница 135: ... authorized reseller To find the nearest reseller call 800 GO EPSON 800 463 7766 Or you can purchase online at http www epsonstore com U S sales or http www epson ca Canadian sales Help for Users in Europe Check your Pan European Warranty Document for information on how to contact Epson support Help for Users in Taiwan Contacts for information support and services are World Wide Web http www epson...

Страница 136: ... the first call for advise on problems they can often solve problems quickly and easily as well as give advise on the next step to take Internet URL http www epson com au Access the Epson Australia World Wide Web pages Worth taking your modem here for the occasional surf The site provides a download area for drivers Epson contact points new product information and technical support e mail Epson He...

Страница 137: ...Product usage questions or problems Enquiries on repair service and warranty Help for Users in Vietnam Contacts for information support and services are Epson Hotline Phone 84 8 823 9239 Service Center 80 Truong Dinh Street District 1 Hochiminh City Vietnam Help for Users in Indonesia Contacts for information support and services are World Wide Web http www epson co id Information on product speci...

Страница 138: ... Hotline You can also contact our technical staff at the following telephone and fax numbers Phone 852 2827 8911 Fax 852 2827 4383 Help for Users in Malaysia Contacts for information support and services are World Wide Web http www epson com my Information on product specifications drivers for download Frequently Asked Questions FAQ Sales Enquiries questions through e mail Epson Trading M Sdn Bhd ...

Страница 139: ...ode Help for Users in the Philippines To obtain technical support as well as other after sales services users are welcome to contact the Epson Philippines Corporation at the telephone and fax numbers and e mail address below Trunk Line 63 2 706 2609 Fax 63 2 706 2665 Helpdesk Direct Line 63 2 706 2625 E mail epchelpdesk epc epson com ph World Wide Web http www epson com ph Information on product s...

Страница 140: ...m or work as Original Code and stating that it is subject to the terms of this Apple Public Source License version 2 0 License As used in this License 1 1 Applicable Patent Rights mean a in the case where Apple is the grantor of rights i claims of patents that are now or hereafter acquired owned by or assigned to Apple and ii that cover subject matter contained in the Original Code but only to the...

Страница 141: ...nal Code to do the following 2 1 Unmodified Code You may use reproduce display perform internally distribute within Your organization and Externally Deploy verbatim unmodified copies of the Original Code for commercial or non commercial purposes provided that in each instance a You must retain and reproduce in all copies of Original Code the copyright and other proprietary notices and disclaimers ...

Страница 142: ...cations of the same scope and extent as Apple s licenses under Sections 2 1 and 2 2 above 4 Larger Works You may create a Larger Work by combining Covered Code with other code not governed by the terms of this License and distribute the Larger Work as a single product In each such instance You must make sure the requirements of this License are fulfilled for the Covered Code or any portion thereof...

Страница 143: ...BILITY OR OTHERWISE EVEN IF APPLE OR SUCH CONTRIBUTOR HAS BEEN ADVISED OF THE POSSIBILITY OF SUCH DAMAGES AND NOTWITHSTANDING THE FAILURE OF ESSENTIAL PURPOSE OF ANY REMEDY SOME JURISDICTIONS DO NOT ALLOW THE LIMITATION OF LIABILITY OF INCIDENTAL OR CONSEQUENTIAL DAMAGES SO THIS LIMITATION MAY NOT APPLY TO YOU In no event shall Apple s total liability to You for all damages other than as may be re...

Страница 144: ...s develop for it market and or distribute technology or products that perform the same or similar functions as or otherwise compete with Modifications Larger Works technology or products that You may develop produce market or distribute 13 4 Waiver Construction Failure by Apple or any Contributor to enforce any provision of this License will not be deemed a waiver of future enforcement of that or ...

Страница 145: ...Harald Denker Jean Michel Dubois Jean loup Gailly Hunter Goatley Ed Gordon Ian Gorman Chris Herborth Dirk Haase Greg Hartwig Robert Heath Jonathan Hudson Paul Kienitz David Kirschbaum Johnny Lee Onno van der Linden Igor Mandrichenko Steve P Miller Sergio Monesi Keith Owens George Petrov Greg Roelofs Kai Uwe Rommel Steve Salisbury Dave Smith Steven M Schweda Christian Spieler Cosmin Truta Antoine V...

Страница 146: ... including but not limited to labeling of the altered versions with the names Info ZIP or any variation thereof including but not limited to different capitalizations Pocket UnZip WiZ or MacZip without the explicit permission of Info ZIP Such altered versions are further prohibited from misrepresentative use of the Zip Bugs or Info ZIP e mail addresses or the Info ZIP URL s such as to imply Info Z...

Отзывы: