background image

52

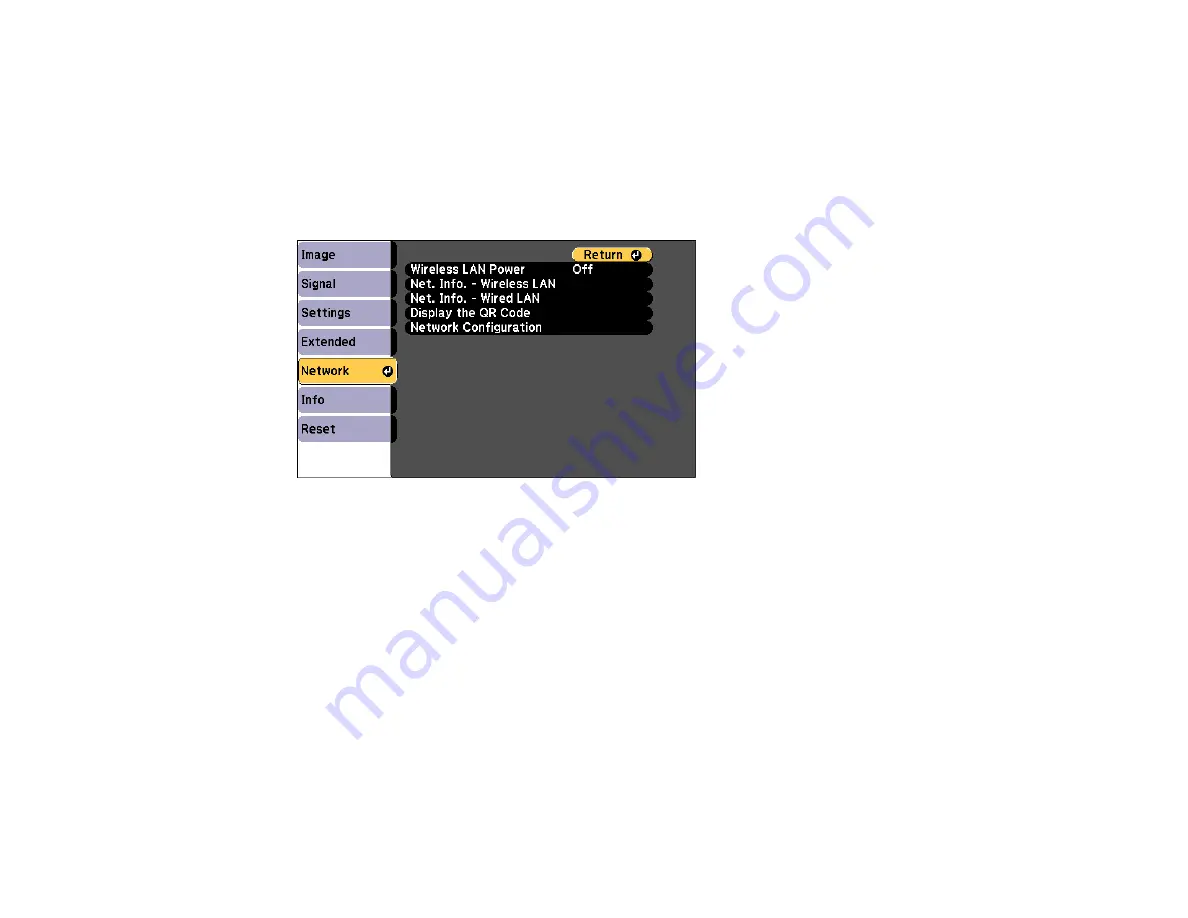
Selecting Wireless Network Settings Manually

Before you can project from your wireless network, you must select the network settings for the projector
using its menu system.

1.

Turn on the projector.

2.

Press the

Menu

button.

3.

Select the

Network

menu and press

Enter

.

4.

Make sure the

Wireless LAN Power

setting is set to

On

.

5.

Select

Network Configuration

and press

Enter

.

Содержание PowerLite EB-L520W

Страница 1: ...PowerLite EB L520W User s Guide ...

Страница 2: ......

Страница 3: ...umentation 18 Where to Go for Additional Information 18 Projector Part Locations 19 Projector Parts Front Top 19 Projector Parts Rear 20 Projector Parts Interface Ports 21 Projector Parts Base 22 Projector Parts Control Panel 23 Projector Parts Remote Control 24 Setting Up the Projector 26 Projector Placement 26 Projector Setup and Installation Options 26 Projection Distance 29 Projector Connectio...

Страница 4: ...g Wireless Network Settings in Windows 57 Selecting Wireless Network Settings on Mac 57 Setting Up Wireless Network Security 57 Using a QR Code to Connect a Mobile Device 59 Setting Up Projector Network E Mail Alerts 60 Network Projector E mail Alert Messages 62 Setting Up Monitoring Using SNMP 62 Controlling a Networked Projector Using a Web Browser 64 Web Control Options 66 Controlling a Network...

Страница 5: ...on 98 Displaying a Test Pattern 99 Adjusting the Image Height 100 Image Shape 101 Correcting Image Shape with H V Keystone 102 Correcting Image Shape with Quick Corner 104 Correcting Image Shape with Arc Correction 106 Selecting an Image Source 107 Remote Control Operation 109 Projection Modes 111 Changing the Projection Mode Using the Remote Control 111 Changing the Projection Mode Using the Menu...

Страница 6: ...mage 135 Adjusting Projector Features 138 Shutting Off the Picture and Sound Temporarily 138 Stopping Video Action Temporarily 139 Zooming Into and Out of Images 139 Projector Security Features 140 Password Security Types 141 Setting a Password 141 Selecting Password Security Types 143 Entering a Password to Use the Projector 144 Saving a User s Logo Image to Display 145 Locking the Projector s Bu...

Страница 7: ... Flash Drive 170 Saving Settings to a Computer 171 Transferring Settings from a Computer 173 Adjusting the Menu Settings 176 Using the Projector s Menus 176 Image Quality Settings Image Menu 177 Input Signal Settings Signal Menu 180 Projector Feature Settings Settings Menu 183 Projector Setup Settings Extended Menu 187 Projector Network Settings Network Menu 195 Projector Information Display Info ...

Страница 8: ...age is Not Rectangular 230 Solutions When the Image Contains Noise or Static 230 Solutions When the Image is Fuzzy or Blurry 231 Solutions When the Image Brightness or Colors are Incorrect 232 Solutions When an Afterimage Remains On the Projected Image 233 Solutions to Sound Problems 233 Solutions to PC Free Problems 234 Solving Projector or Remote Control Operation Problems 234 Solutions to Proje...

Страница 9: ...l Specifications 246 Projector Environmental Specifications 247 Projector Safety and Approvals Specifications 248 Supported Video Display Formats 248 Notices 251 Recycling U S and Canada 251 Important Safety Information 251 Laser Safety Information 251 Important Safety Instructions 253 Restriction of Use 257 List of Safety Symbols corresponding to IEC60950 1 A2 257 FCC Compliance Statement 261 Bin...

Страница 10: ......

Страница 11: ...11 PowerLite EB L520W User s Guide Welcome to the PowerLite EB L520W User s Guide For a printable PDF copy of this guide click here ...

Страница 12: ...light output measured in accordance with ISO 21118 Native resolution of 1280 800 pixels WXGA Flexible connectivity Wired and wireless optional network support for projection monitoring and control via remote network computer Projection from iOS or Android devices with free Epson iProjection app Two HDMI ports for multiple high definition input devices Variety of connection methods to computer or v...

Страница 13: ...ty and Registration Information U S and Canada Warranty and Registration Information Latin America Parent topic Introduction to Your Projector Related concepts Projector Connections Related tasks Using a QR Code to Connect a Mobile Device Projecting Two Images Simultaneously Setting Up Crestron Connected Product Box Contents Save all the packaging in case you need to ship the projector Always use ...

Страница 14: ...ns watch movies and more Contact your device manufacturer for compatible adapter options Unless listed as available from Epson in this table see your local computer or electronics dealer for purchase information Signal or connection type Additional component necessary Component video D sub 15 pin component to VGA video cable or adapter Available for purchase from Epson or an authorized Epson resel...

Страница 15: ...ojector software Manual Description Epson Projector Management Windows only Epson Projector Management Operation Guide Lets you monitor and control your projector through the network You can download the latest software and documentation from the Epson web site Epson iProjection Windows Mac Epson iProjection Operation Guide Windows Mac Lets you project the computer screens of users over a network ...

Страница 16: ...ple App Store Note Epson iProjection is not recommended for use with streaming video Parent topic Projector Features Related references Where to Get Help U S and Canada Where to Get Help Latin America Optional Equipment and Replacement Parts U S and Canada You can purchase screens other optional accessories and replacement parts from an Epson authorized reseller To find the nearest reseller call 8...

Страница 17: ...uthorized reseller To find the nearest reseller go to Or you can contact your nearest sales office as described in Where to Get Help Note Availability of accessories varies by country Epson offers the following optional accessories and replacement parts for your projector Option or part Part number Replacement air filter ELPAF56 V13H134A56 Wireless LAN module ELPAP11 V12H731P02 HDBaseT transmitter...

Страница 18: ...ur documentation Warnings must be followed carefully to avoid bodily injury Cautions must be observed to avoid damage to your equipment Notes contain important information about your projector Tips contain additional projection information Parent topic Introduction to Your Projector Where to Go for Additional Information Need quick help on using your projector Here s where to look for help epson c...

Страница 19: ...ojector Parts Front Top Projector Parts Rear Projector Parts Interface Ports Projector Parts Base Projector Parts Control Panel Projector Parts Remote Control Parent topic Introduction to Your Projector Projector Parts Front Top 1 Air intake vent 2 Front adjustable foot 3 Focus ring 4 Zoom ring 5 Projection lens ...

Страница 20: ...aker 10 Air exhaust vent 11 Remote receiver Parent topic Projector Part Locations Related references Projector Light Status Projector Parts Rear 1 Kensington security slot 2 AC inlet 3 Interface ports 4 Control panel 5 Remote receiver Parent topic Projector Part Locations ...

Страница 21: ...1 port 3 Audio2 port 4 Audio Out port 5 RS 232C port 6 Computer2 Monitor Out port 7 Service port 8 USB A port 9 Wireless LAN module cover screw 10 HDMI2 port 11 HDMI1 port 12 HDBaseT port 13 Network LAN port 14 Cable holder Parent topic Projector Part Locations ...

Страница 22: ...chment points 4 3 Safety wire carabiner attachment point 4 Rear feet 5 Security cable attachment point Note Do not attach the optional safety wire to this point 6 Air filter cover screws 2 7 VESA compliant mount attachment points 4 Parent topic Projector Part Locations ...

Страница 23: ...or off 4 Left arrow button and displays the Control Panel Lock screen 5 Down arrow button and displays a test pattern 6 Enter button selects options 7 Right arrow button and displays the Info menu 8 Esc button cancels exits functions 9 Up arrow button and displays screen adjustment options 10 Menu button accesses projector menu system Parent topic Projector Part Locations ...

Страница 24: ...24 Projector Parts Remote Control 1 Power button 2 HDMI button cycles through connected HDMI sources ...

Страница 25: ... and out of the image 14 A V Mute button turns off picture and sound 15 Split button splits the screen between two image sources 16 Home button accesses projector Home screen 17 Freeze button stops video action 18 Volume up down buttons adjust speaker volume 19 Default button resets the selected setting to its default value 20 Esc button cancels exits functions and controls wireless mouse function...

Страница 26: ... considerations in mind as you select a projector location Place the projector on a sturdy level surface or install it using a compatible mount Place the projector parallel to the screen Leave plenty of space around and under the projector for ventilation and do not place it on top of or next to anything that could block the vents Position the projector within reach of a grounded electrical outlet...

Страница 27: ...27 Front Rear Front ceiling ...

Страница 28: ...unt of space around the projector to avoid blocking the air exhaust and intake vents 1 3 94 inches 10 cm 2 7 87 inches 20 cm 3 15 75 inches 40 cm Note When setting up multiple projectors be sure to leave the following amount of space between the projectors ...

Страница 29: ...e Extended Operation Advanced menu and adjust the OSD Rotation setting in the Extended Display menu Parent topic Projector Placement Related references Projector Setup Settings Extended Menu Important Safety Instructions Projection Distance The distance at which you place the projector from the screen determines the approximate size of the image The image size increases the farther the projector i...

Страница 30: ... Calculator here U S here Canada or here Caribbean 1 Projection distance 2 Distance from the center of the lens to the base of the screen 3 Center of lens 16 10 Aspect Ratio Image or Screen Screen or image size Projection distance 1 Wide to Tele Distance from center of lens to base of screen 2 29 inches 33 to 55 inches 85 to 140 cm 0 4 to 15 inches 1 to 38 cm 40 inches 47 to 76 inches 118 to 193 c...

Страница 31: ...o 51 7 inches 3 to 131 cm 150 inches 178 to 289 inches 451 to 733 cm 2 0 to 77 5 inches 5 to 197 cm 200 inches 237 to 385 inches 603 to 979 cm 2 6 to 103 3 inches 7 to 263 cm 250 inches 297 to 482 inches 754 to 1224 cm 3 3 to 129 2 inches 8 to 328 cm 280 inches 333 to 540 inches 845 to 1371 cm 3 7 to 144 7 inches 9 to 368 cm 4 3 Aspect Ratio Image or Screen Screen or image size Projection distance...

Страница 32: ...46 8 inches 3 to 119 cm 100 inches 134 to 218 inches 340 to 553 cm 1 5 to 58 5 inches 4 to 149 cm 120 inches 161 to 261 inches 408 to 664 cm 1 8 to 70 2 inches 5 to 178 cm 150 inches 201 to 327 inches 511 to 831 cm 2 3 to 87 8 inches 6 to 223 cm 200 inches 269 to 436 inches 682 to 1108 cm 3 0 to 117 inches 8 to 297 cm 250 inches 336 to 546 inches 854 to 1386 cm 3 8 to 146 3 inches 10 to 371 cm 16 ...

Страница 33: ... 2 inches 2 to 77 cm 80 inches 97 to 158 inches 246 to 401 cm 1 1 to 40 3 inches 3 to 102 cm 100 inches 121 to 197 inches 308 to 502 cm 1 4 to 50 4 inches 3 to 128 cm 150 inches 183 to 297 inches 464 to 754 cm 2 0 to 75 6 inches 5 to 192 cm 200 inches 244 to 396 inches 619 to 1006 cm 2 7 to 100 8 inches 7 to 256 cm 250 inches 305 to 495 inches 775 to 1258 cm 3 4 to 126 0 inches 9 to 320 cm 275 inc...

Страница 34: ...rojector Setup Settings Extended Menu Connecting to Computer Sources Follow the instructions in these sections to connect a computer to the projector Connecting to a Computer for VGA Video and Audio Connecting to a Computer for HDMI Video and Audio Connecting to a Computer for Sound Parent topic Projector Connections Connecting to a Computer for VGA Video and Audio You can connect the projector to...

Страница 35: ...Audio port that corresponds to the Computer port you are using Parent topic Connecting to Computer Sources Connecting to a Computer for HDMI Video and Audio If your computer has an HDMI port you can connect it to the projector using an optional HDMI cable Note To connect a Mac that includes only a Mini DisplayPort Thunderbolt port or Mini DVI port for video output you need to obtain an adapter tha...

Страница 36: ...ector Setup Settings Extended Menu Connecting to a Computer for Sound If your computer presentation includes sound and you did not connect it to the projector s HDMI port you can still play sound through the projector s speaker system Just connect an optional 3 5 mm stereo mini jack audio cable as described here 1 Connect the audio cable to your laptop s headphone or audio out jack or your desktop...

Страница 37: ...e of the projector s audio ports instead to play sound Connect one end of an optional 3 5 mm stereo mini jack audio cable to one of the projector s audio ports and the other end to your video source s audio out port Then select the audio port you connected to as the HDMI1 Audio Output or HDMI2 Audio Output setting in the Extended menu Parent topic Connecting to Video Sources Related references Pro...

Страница 38: ...ectrical outlet 2 Connect the USB device or cable to the projector s USB A port 3 If you connected a USB cable connect the other end to the USB device as necessary The projector displays images stored on the USB device If you turned on the Content Playback setting in the Settings menu you can only view images that have been added to a playlist created in Epson Projector Content Manager Parent topi...

Страница 39: ... send a signal to or control the projector from a remote location such as in a hall or event site since you can use a network cable up to 328 feet 100 m in length To ensure proper data transmission use a Category 5e STP cable or better 1 Turn off the projector and HDBaseT transmitter Note Make sure the projector and HDBaseT transmitter are turned off when connecting or disconnecting a network cabl...

Страница 40: ...o the projector s Computer port you can also connect an external monitor to the projector This lets you see your presentation on the external monitor even when the projected image is not visible To output images to an external VGA monitor set the Monitor Out Port setting to Monitor Out in the projector s Extended menu If you want to output images to an external monitor when the projector is turned...

Страница 41: ...the external speakers when the projector is turned off you need to select Always On as the A V Output setting in the projector s Extended menu Note The projector s built in speaker system is disabled when you connect external speakers 1 Make sure your computer or video source is connected to the projector with both audio and video cables as necessary 2 Locate the appropriate cable to connect your ...

Страница 42: ...ntrol The remote control uses the two AA batteries that came with the projector Caution Use only the type of batteries specified in this manual Do not install batteries of different types or mix new and old batteries 1 Remove the battery cover 2 Insert the batteries with the and ends facing as shown ...

Страница 43: ...ire injury or damage to the product 3 Replace the battery cover and press it down until it clicks into place Warning Dispose of used batteries according to local regulations Do not expose batteries to heat or flame Keep batteries out of the reach of children they are choking hazards and are very dangerous if swallowed Parent topic Setting Up the Projector ...

Страница 44: ... do this you connect the projector to your network with an Ethernet cable and then set up your projector and computer for network projection You can use Epson iProjection to project static images and presentations over a wired network Note Epson iProjection is not recommended for use with streaming video After connecting and setting up the projector install the projector software You may need to i...

Страница 45: ...able to your network hub switch or router 2 Connect the other end of the cable to the projector s LAN port Parent topic Wired Network Projection Selecting Wired Network Settings Before you can project from computers on your network you must select the network settings for the projector using its menu system Note Make sure you already connected the projector to your wired network using the LAN port...

Страница 46: ...lect Network Configuration and press Enter 5 Select the Basic menu and press Enter 6 Select the following basic options as necessary Projector Name lets you enter a name up to 16 alphanumeric characters long to identify the projector over the network ...

Страница 47: ...rd Projector Keyword lets you turn on a security password to prevent access to the projector by anyone not in the room with it You must enter a displayed randomized keyword from a computer using the Epson iProjection Windows Mac software to access the projector Display Keyword lets you select whether or not to display a projector keyword on the projected image when using the Epson iProjection Wind...

Страница 48: ...ions to save your settings and exit the menus Parent topic Wired Network Projection Related references Projector Network Settings Network Menu Wireless Network Projection You can project over a wireless network To do this you must set up your projector and computer for wireless projection Note The Epson 802 11b g n wireless LAN module is not included with your projector and is optional There are t...

Страница 49: ...less LAN Module To use the projector over a wireless network install the optional Epson wireless LAN module Do not install any other type of wireless LAN module Caution Never remove the module while its indicator light is blue or flashing or while you are projecting wirelessly You may damage the module or lose data Note The indicator on the wireless LAN module does not operate See the wireless LAN...

Страница 50: ... Parent topic Wireless Network Projection Related references Projector Light Status Using Quick Wireless Connection Windows You can create a Quick Wireless Connection USB Key to quickly connect the projector to a Windows computer wirelessly Then you can project your presentation and remove the key when you are done Note A USB flash drive is not included with your projector ...

Страница 51: ...select Run MPPLaunch exe and select Allow on the next screen 9 Follow the on screen instructions to install the Epson iProjection Windows Mac software Note If you see a Windows Firewall message click Yes to disable the firewall You need administrator authority to install the software If it is not installed automatically double click MPPLaunch exe in the USB key After a few minutes your computer im...

Страница 52: ...reless network you must select the network settings for the projector using its menu system 1 Turn on the projector 2 Press the Menu button 3 Select the Network menu and press Enter 4 Make sure the Wireless LAN Power setting is set to On 5 Select Network Configuration and press Enter ...

Страница 53: ...accessing the projector over the web Default user name is EPSONWEB default password is admin Moderator Password lets you enter a password up to 4 numbers long for accessing the projector as a moderator with the Epson iProjection Windows Mac software or the Epson iProjection app Projector Keyword lets you turn on a security password to prevent access to the projector by anyone not in the room with ...

Страница 54: ... press Enter to select them 8 Select the Wireless LAN menu and press Enter 9 Select the settings on the Wireless LAN menu as necessary for your network 10 When you finish selecting settings select Complete and follow the on screen instructions to save your settings and exit the menus After you complete the wireless settings for your projector you need to select the wireless network on your compute...

Страница 55: ...nt To Search View Search for available wireless network access points in Advanced connection mode SSID Up 32 alphanumeric characters Sets the SSID network name of the wireless LAN system the projector is connecting to Security Open WPA2 PSK WPA3 PSK WPA2 WPA3 PSK WPA3 EAP WPA2 WPA3 EAP Selects the type of wireless security used in the wireless network some options are only available when the Conne...

Страница 56: ...atically set to Off to manually enter the network s IP Address Subnet Mask and Gateway Address some options are only available when the Connection Mode setting is set to Advanced SSID Display On Off Selects whether to display the SSID on the network standby screen IP Address Display On Off Selects whether to display the IP address on the network standby screen IPv6 Settings IPv6 Auto Configuration...

Страница 57: ...twork on your Mac 1 Click the AirPort icon on the menu bar at the top of the screen 2 Make sure AirPort is turned on then do one of the following If your projector is set up on an existing network Advanced mode select the network name SSID If your projector is configured for Quick mode select the projector s SSID Parent topic Wireless Network Projection Setting Up Wireless Network Security You can...

Страница 58: ...lected WPA2 PSK WPA3 PSK or WPA2 WPA3 PSK Select Complete and follow the on screen instructions to save your settings and exit the menus Skip the remaining steps WPA3 EAP or WPA2 WPA3 EAP Select EAP Method and press Enter 8 Select your authentication protocol as the EAP Type setting 9 To import your certification select the certificate type either Client Certificate or CA certificate and press Ent...

Страница 59: ...u finish selecting settings select Complete and follow the on screen instructions to save your settings and exit the menus Parent topic Wireless Network Projection Related tasks Registering Digital Certificates from a Web Browser Using a QR Code to Connect a Mobile Device After you select the wireless network settings for your projector you can display a QR code on the screen and use it to connect...

Страница 60: ...less Network Projection Related references Projector Network Settings Network Menu Additional Projector Software and Manuals Setting Up Projector Network E Mail Alerts You can set up the projector to send you an e mail alert over the network if there is a problem with the projector Note If the Standby Mode setting is set to Communication On in the Extended menu you can receive e mail alerts even i...

Страница 61: ...dress and select or deselect the alerts you want to receive there Your e mail address can be up to 32 alphanumeric characters long Repeat for up to three addresses 10 If you are using the PJLink protocol for projector control turn on the PJLink Notification setting and enter the IP address where you want to receive PJLink notifications as the Notified IP Address setting 11 When you finish selectin...

Страница 62: ...ing Up Projector Network E Mail Alerts Setting Up Monitoring Using SNMP Network administrators can install SNMP Simple Network Management Protocol software on network computers so they can monitor projectors If your network uses this software you can set up the projector for SNMP monitoring 1 Press the Menu button 2 Select the Network menu and press Enter 3 Select Network Configuration and press E...

Страница 63: ...oomView controller turn on the Crestron Connected setting to allow the projector to be detected 12 If you are using the projector with a Control 4 Simple Device Discovery Protocol SDDP automation system turn on the Control4 SDDP setting 13 If you want this projector to receive broadcast messages over the network turn on the Message Broadcasting setting Administrators can broadcast messages over th...

Страница 64: ...etworks that do not use a proxy server for connection You cannot select all of the projector menu settings or control all projector functions using a web browser 1 Make sure the projector is turned on 2 Start your web browser on a computer or device connected to the network 3 Type the projector s IP address into the browser s address box and press the computer s Enter key Note You may need to log ...

Страница 65: ...Crestron Connected to open the menu 4 Select Advanced to open the advanced menu screen 5 Select Status Information to view the projector s status 6 Select OSD Control Pad to change the projector s menu settings 4 Select the option corresponding to the projector function you want to control Web Control Options Parent topic Using the Projector on a Network ...

Страница 66: ... name and password The default username is EPSONREMOTE and the default password is guest 1 Returns to the Home screen 2 Turns the projector on or off 3 Input source selection controls 4 A V Mute button control 5 Pauses or resumes images 6 Displays the QR code 7 Volume button controls 8 Searches for sources ...

Страница 67: ...l screen 2 Displays the projector s setting menus 3 Use your finger or mouse to navigate the menus 4 Returns projector to default settings 5 Returns to the previous menu 6 Displays help topics Note You cannot change some settings using Epson Web Control ...

Страница 68: ...68 Test Pattern screen 1 Returns to the Home screen 2 Displays available test patterns select to project a test pattern 3 Turns off test pattern display ...

Страница 69: ...Web Control Password is set a screen prompting you to change the password appears before you can view the Advanced screen It is strongly recommended that you change the password regularly to prevent unauthorized access to your projector Note Not all settings can be changed through Web Control The following settings can only be set using Web Control Monitor Password up to 16 alphanumeric characters...

Страница 70: ...3621 3625 3629 4352 4649 5357 10000 10001 or 41794 1 Opens the menus 2 Displays the selected menu name 3 Contains the selected projector settings 4 Locks or unlocks the projector settings 5 Updates the projector settings Parent topic Controlling a Networked Projector Using a Web Browser ...

Страница 71: ...e Playlists or USB Memory Device screen is displayed data saved on the USB device may be damaged 1 Make sure the projector is turned on and your computer or device is connected to the same network as the projector 2 Start your web browser on the computer or device 3 Type the projector s IP address into the browser s address box and press the computer s Enter key You see the Epson Web Control scree...

Страница 72: ...og in to access some of the options on the Web Control screen If you see a log in window enter your user name and password The default user name is EPSONWEB and the default password is admin Web Control Options in Content Playback Mode Parent topic Using the Projector on a Network Related references Additional Projector Software and Manuals Related tasks Switching to Content Playback Mode Projecti...

Страница 73: ...need to enter your user name and password The default username is EPSONREMOTE and the default password is guest 1 Returns to the Epson Web Control screen 2 Turns the projector on or off 3 Selects the input source 4 A V Mute button control 5 Turns Overlay Effect on or off 6 Displays the screen settings ...

Страница 74: ...ects your favorite playlists 8 Adjusts the speaker volume Playlists 1 Returns to the Epson Web Control screen 2 Controls playback of the playlist 3 Edits copies or deletes the playlist 4 Creates a new playlist ...

Страница 75: ...vorites list 4 Displays the images or movies in the order that they will be played 5 Adds items to the playlist 6 Deletes items from the playlist 7 Opens the Switch Image screen specifies the time before the projector switches to the next item in the playlist 8 Opens the Effects screen 9 Previews the playlist ...

Страница 76: ... add to playlists on a USB device 3 Deletes images or videos on the USB device Note You can upload avi jpeg jpg png bmp or gif files using Epson Web Control If you want to add mp4 or mov files to the playlist use the Epson Projector Content Manager software or the Epson Creative Projection app ...

Страница 77: ...77 Time Table 1 Returns to the Epson Web Control screen 2 Turns the time table on or off see the Epson Projector Content Manager Operation Guide for more information ...

Страница 78: ... previous menu 6 Displays help topics Note You cannot change some settings using Epson Web Control Parent topic Controlling a Networked Projector in Content Playback Mode Using Crestron Connected If you are using the Crestron Connected network monitoring and control system you can set up your projector for use on the system Crestron Connected lets you control and monitor your projector using a web...

Страница 79: ... To set up your projector for monitoring and control using a Crestron Connected system make sure your computer and projector are connected to the network Note If you want to use the Crestron Connected system when the projector is turned off you need to adjust the Standby Mode settings in the Extended menu Note If you are connecting wirelessly set up the projector using the Advanced network connect...

Страница 80: ...ess box 8 Select the Crestron Connected settings See the Crestron Web site for details Parent topic Using Crestron Connected Related references Projector Setup Settings Extended Menu Projector Network Settings Network Menu Controlling a Networked Projector Using Crestron Connected Once you have set up your projector to use Crestron Connected you can control and monitor projection using a compatibl...

Страница 81: ...elect Crestron Connected 4 When you finish selecting settings select Set and then select Yes to save the network settings Parent topic Using Crestron Connected Setting Up Web API You can setup Web API from a Web browser and operate the projector using Web API Note You can authenticate Web API communications using API authentication Digest authentication The user name for API authentication is EPSO...

Страница 82: ...list play 3 If secure HTTP is enabled change the http in the URL to https Parent topic Using the Projector on a Network Related tasks Controlling a Networked Projector Using a Web Browser Secure HTTP You can use the HTTPS protocol to increase security between the projector and a web browser communicating with it To do this you create a server certificate install it on the projector and turn on the...

Страница 83: ...jector registration and saved in the root directory of the USB flash drive 2 Press the Menu button on the remote control 3 Select the Network menu and press Enter 4 Select the Network Configuration setting and press Enter 5 Select the Others menu and press Enter 6 Select On as the Secure HTTP setting 7 Select the Web Server Cert setting and press Enter 8 Select Register and press Enter 9 Insert a ...

Страница 84: ...icate may not install correctly Registering Digital Certificates from a Web Browser Digital Certificate Types Parent topic Using the Projector on a Network Registering Digital Certificates from a Web Browser You can register the digital certificates on the projector for wireless LAN authentication 1 Make sure your digital certificate file is compatible with projector registration 2 Make sure the p...

Страница 85: ...ct the certificate file and click Open 9 Enter a password in the Password box and click Send 10 When you finish registering the certificate click Apply to finalize your changes and complete the registration Parent topic Registering a Digital Certificate on the Projector Related references Digital Certificate Types ...

Страница 86: ...96 bit Password Up to 32 alphanumeric characters required CA Certificate PEAP PEAP TLS EAP TLS EAP FAST Specification Description Format X509v3 Extension DER CER PEM Encryption RSA Hashes MD5 SHA 1 SHA 256 SHA 384 SHA 512 Key length 512 1024 2048 4096 bit Encoding BASE64 Binary Web Server Certificate Secure HTTP Specification Description Format PKCS 12 Extension PFX P12 Encryption RSA Hashes MD5 S...

Страница 87: ...nal Password Up to 32 alphanumeric characters required Note You can set a password of up to 64 characters if you use a web browser to enter the text Parent topic Registering a Digital Certificate on the Projector Related tasks Registering Digital Certificates from a Web Browser ...

Страница 88: ...ion Using Screen Position Displaying a Test Pattern Adjusting the Image Height Image Shape Selecting an Image Source Remote Control Operation Projection Modes Image Aspect Ratio Color Mode Turning On Dynamic Contrast Adjusting the Hue Saturation and Brightness Adjusting Gamma Adjusting the Brightness Controlling the Volume with the Volume Buttons Projecting a PC Free Presentation Projecting in Con...

Страница 89: ...o turn on the projector The projector beeps and the Status light flashes blue as the projector warms up After about 30 seconds the Status light stops flashing and turns blue Warning Never look into the projector lens when the laser is on This can damage your eyes and is especially dangerous for children and pets When turning on the projector at a distance using the remote control make sure there i...

Страница 90: ...ted computer or video device Insert a DVD or other video media and press the play button if necessary Change the screen output from the computer if you are using a laptop computer Press the Source Search button on the projector or remote control to detect the video source Press the Home button and select the source you want to project on the Home screen Using the Home Screen Parent topic Using Bas...

Страница 91: ...onnection Guide 3 Indicates the Content Playback mode 4 Display the Help screen 5 Display the projector s menus 6 Select customizable menu options 7 Select to change the Light Source Mode 8 Select to change the Color Mode 3 Press the Home button to hide the Home screen Parent topic Turning On the Projector Related tasks Switching to Content Playback Mode Using the Projector Help Displays ...

Страница 92: ...utdown confirmation screen press the power button on the projector or the remote control again To leave the projector on press any other button The projector beeps twice the laser turns off and the Status light turns off Note With Epson s Instant Off technology there is no cool down period so you can pack up the projector for transport right away if necessary Note If the Light Source Calibration s...

Страница 93: ...the power cord 4 Attach the lens cover Parent topic Using Basic Projector Features Selecting the Language for the Projector Menus If you want to view the projector s menus and messages in another language you can change the Language setting 1 Turn on the projector 2 Press the Menu button ...

Страница 94: ...or Esc to exit the menus Parent topic Using Basic Projector Features Related references Projector Setup Settings Extended Menu Setting the Date and Time You can set the date and time for the projector 1 Press the Menu button 2 Select the Extended menu and press Enter 3 Select the Operation setting and press Enter 4 Select the Date Time setting and press Enter ...

Страница 95: ...tings Then select Set and press Enter to confirm your changes 9 To update the time automatically from an internet time server select the Internet Time setting and press Enter 10 Select the Internet Time setting and set it to On 11 Enter the IP address of the internet time server Select Set and press Enter to confirm your changes 12 When you are finished press the Menu button to exit Date and Time ...

Страница 96: ...o start or end daylight saving time DST Adjustment min sets the difference between standard and daylight saving time Internet Time Internet Time Internet Time Server Automatically adjusts the time through an Internet connection Internet Time turn on this setting to update the date and time automatically through an Internet time server Internet Time Server sets the IP address for the Internet time ...

Страница 97: ...0 minutes after turning on the projector before setting the focus and zoom for maximum accuracy 2 To sharpen the image focus rotate the projector s focus ring Parent topic Using Basic Projector Features Setting the Screen Type You can use the Screen Type setting to match the aspect ratio of the displayed image to the screen you are using Note This setting is unavailable when using the USB or LAN i...

Страница 98: ...6 Press the Menu button to exit 7 Adjust the aspect ratio for the projected image if necessary Parent topic Using Basic Projector Features Related references Projector Feature Settings Settings Menu Adjusting the Image Position Using Screen Position You can adjust the image position if there are margins between the edge of the image and the projected screen frame Note You cannot adjust the screen ...

Страница 99: ...ojector Features Displaying a Test Pattern You can display a test pattern to adjust the projected image without connecting a computer or video device Note The test pattern s shape is determined by the Screen Type setting Be sure to set the correct screen type before adjusting with the test pattern 1 Turn on the projector 2 Press the down arrow button on the control panel ...

Страница 100: ...n to clear the test pattern Parent topic Using Basic Projector Features Related references Projector Feature Settings Settings Menu Related tasks Setting the Screen Type Adjusting the Image Height If you are projecting from a table or other flat surface and the image is too high or low you can adjust the image height using the projector s adjustable feet 1 Turn on the projector and display an imag...

Страница 101: ... Shape You can project an evenly rectangular image by placing the projector directly in front of the center of the screen and keeping it level If you place the projector at an angle to the screen or tilted up or down or off to the side you may need to correct the image shape for the best display quality Note After correction your image is slightly smaller For the best quality images try to adjust ...

Страница 102: ...with Quick Corner Correcting Image Shape with Arc Correction Parent topic Using Basic Projector Features Correcting Image Shape with H V Keystone You can use the projector s H V Keystone setting to correct the shape of an image that is unevenly rectangular on the sides Note You cannot combine H V Keystone correction with other image shape correction methods 1 Turn on the projector and display an i...

Страница 103: ...5 Select the H V Keystone setting and press Enter Then press Enter again You see the H V Keystone adjustment screen 6 Use the arrow buttons on the projector or the remote control to select between vertical and horizontal keystone or balance correction and to adjust the image shape as necessary V Keystone ...

Страница 104: ...uick Corner setting to correct the shape and size of an image that is unevenly rectangular on all sides Note To provide the best possible image quality adjust the projector s position to correct the image shape If this isn t possible use the Quick Corner setting to correct the image shape Note If you change the Screen Type or Screen Position setting your image adjustments are reset 1 Turn on the p...

Страница 105: ...Geometry Correction setting and press Enter 5 Select the Quick Corner setting and press Enter You see the Quick Corner adjustment screen Note To reset your adjustments press and hold the Esc button for at least 2 seconds to display a reset screen Then select Yes ...

Страница 106: ...e of the directional arrows on the screen turns gray you cannot adjust the shape any further in that direction 8 When you are finished press Esc Parent topic Image Shape Related references Projector Feature Settings Settings Menu Correcting Image Shape with Arc Correction You can use the projector s Arc Correction setting to adjust the curve or arc of the sides of your image 1 Turn on the projecto...

Страница 107: ...en press Enter 7 Press the arrow buttons to adjust the image shape as necessary 8 When you are finished press Esc Parent topic Image Shape Related references Projector Feature Settings Settings Menu Selecting an Image Source If you connected multiple image sources to the projector such as a computer and DVD player you may want to switch from one image source to the other Note If you turned on the ...

Страница 108: ...lowing Press the Source Search button on the projector or remote control until you see the image from the source you want Press the button for the source you want on the remote control If there is more than one port for that source press the button again to cycle through the sources 1 HDMI sources 2 VGA port sources 3 USB port sources computer display or external devices 4 Network sources ...

Страница 109: ... the current input source You can see thumbnail previews of most input sources Parent topic Using Basic Projector Features Related references Projector Setup Settings Extended Menu Related tasks Using the Home Screen Remote Control Operation The remote control lets you control the projector from almost anywhere in the room up to 26 feet 8 m away You can point it at the front or rear of the project...

Страница 110: ...control in conditions with bright fluorescent lights or in direct sunlight or the projector may not respond to commands If you will not use the remote control for a long time remove the batteries Parent topic Using Basic Projector Features Related references Solutions to Remote Control Problems Related tasks Replacing the Remote Control Batteries ...

Страница 111: ... can change the projection mode using the remote control or by changing the Projection setting in the Extended menu Changing the Projection Mode Using the Remote Control Changing the Projection Mode Using the Menus Parent topic Using Basic Projector Features Related references Projector Setup Settings Extended Menu Changing the Projection Mode Using the Remote Control You can change the projection...

Страница 112: ...s Enter 4 Select the Projection setting and press Enter 5 Select a projection mode and press Enter 6 Press Menu or Esc to exit the menus Parent topic Projection Modes Related references Projector Setup Settings Extended Menu Image Aspect Ratio The projector can display images in different width to height ratios called aspect ratios Normally the input signal from your video source determines the im...

Страница 113: ...hen the Scale setting is turned off or the Scale Mode setting is set to Full Display Note You may not be able to set the aspect ratio for all sources 1 Turn on the projector and switch to the image source you want to use 2 Press the Aspect button on the remote control The shape and size of the displayed image changes and the name of the aspect ratio appears briefly on the screen 3 To cycle through...

Страница 114: ...o setting Description Auto Automatically sets the aspect ratio according to the input signal Normal Displays images in the same aspect ratio of the input signal 4 3 Displays images at a 4 3 aspect ratio 16 9 Displays images at a 16 9 aspect ratio Full Displays images using the full size of the projection area but does not maintain the aspect ratio Native Displays images as is aspect ratio and reso...

Страница 115: ...ures Changing the Color Mode You can change the projector s Color Mode using the remote control to optimize the image for your viewing environment 1 Turn on the projector and switch to the image source you want to use 2 If you are projecting from a DVD player or other video source insert a disc or other video media and press the play button if necessary 3 Press the Color Mode button on the remote ...

Страница 116: ... medical images Multi Projection Best for projecting from multiple projectors reduces the color tone difference between images Available only when inputting RGB signals Note The DICOM SIM Color Mode is for reference purposes only and should not be used to make medical diagnoses Parent topic Color Mode Turning On Dynamic Contrast You can turn on the Dynamic Contrast setting to automatically optimiz...

Страница 117: ... as the scene changes 5 Press Menu or Esc to exit the menus Parent topic Using Basic Projector Features Related references Image Quality Settings Image Menu Adjusting the Hue Saturation and Brightness You can adjust the Hue Saturation and Brightness settings for R red G green B blue C cyan M magenta and Y yellow color components 1 Turn on the projector and switch to the image source you want to us...

Страница 118: ...just the Hue setting To adjust the overall vividness of the color adjust the Saturation setting To adjust the overall brightness of the color adjust the Brightness setting 6 Press the left or right arrow buttons to adjust the Hue Saturation and Brightness settings 7 Repeat the previous three steps as necessary to adjust each color 8 Press Menu or Esc to exit the menus Parent topic Using Basic Proj...

Страница 119: ...onment and screen 1 Turn on the projector and switch to the image source you want to use 2 Press the Menu button 3 Select the Advanced Image menu and press Enter 4 Select the Gamma setting and press Enter You see a screen like this 5 Select and adjust the correction value Note When you select a smaller value you can reduce the overall brightness of the image to make the image sharper When you sele...

Страница 120: ... adjust the tone and press Enter 8 Press Menu or Esc to exit the menus Parent topic Using Basic Projector Features Related references Image Quality Settings Image Menu Adjusting the Brightness You can adjust the brightness of your projector s light source 1 Turn on the projector and switch to the image source you want to use 2 Press the Menu button ...

Страница 121: ... ideal for darker environments with ambient light such as museums and art galleries where a reduced maintenance cycle is desired Custom Allows you to select a custom brightness level between 70 to 100 7 If you selected Custom select Brightness Level from the Brightness Settings screen and use the left and right arrow buttons to select the brightness 8 If you selected Custom and want to maintain co...

Страница 122: ...urs Parent topic Using Basic Projector Features Related references Projector Setup Settings Extended Menu Projector Feature Settings Settings Menu Related topics Scheduling Projector Events Constant Brightness Usage Hours Light source life span The estimated life span of the light source varies depending on the Brightness Level setting and whether the Constant Brightness setting is on or off Const...

Страница 123: ...ay not be able to select a high Brightness Level setting Parent topic Adjusting the Brightness Controlling the Volume with the Volume Buttons You can use the Volume buttons on the remote control to adjust the volume as you project a presentation with audio The volume buttons control the projector s internal speaker system or any external speakers you connected to the projector You must adjust the ...

Страница 124: ...Menu Projecting a PC Free Presentation You can use your projector s PC Free feature whenever you connect a USB device that contains compatible files This lets you quickly and easily display the contents of the files and control their display using the projector s remote control Note Make sure Content Playback is disabled in the projector s Settings menu PC Free Precautions Supported PC Free File T...

Страница 125: ...to a connected card reader at a time You cannot correct keystone distortion while projecting in PC Free so correct the image shape before you begin your presentation You can use the following features while projecting in PC Free Freeze A V Mute E Zoom Parent topic Projecting a PC Free Presentation Supported PC Free File Types You can project these types of files using the projector s PC Free featu...

Страница 126: ...ced Motion JPEG movie avi Supports only AVI 1 0 Make sure the file is not Saved with a video codec other than Motion JPEG Saved with an audio codec other than PCM or ADPCM Above 1280 720 resolution Larger than 2GB Parent topic Projecting a PC Free Presentation Starting a PC Free Slideshow After connecting a USB device or digital camera to the projector you can switch to the USB input source and st...

Страница 127: ...inside a subfolder on your device press the arrow buttons to highlight the folder and press Enter To move back up a folder level on your device highlight Back to Top and press Enter To view additional files in a folder highlight Next page or Previous page and press Enter 3 Do one of the following To display an individual image press the arrow buttons to highlight the image and press Enter Press th...

Страница 128: ...ous image press the left or right arrow button 5 To stop the display follow the on screen instructions or press the Esc button 6 Turn off the USB device if necessary and then disconnect the device from the projector Parent topic Projecting a PC Free Presentation Related references Projector Setup Settings Extended Menu Related tasks Connecting to a USB Device Starting a PC Free Movie Presentation ...

Страница 129: ...Enter 3 To play back a movie press the arrow buttons to highlight the file and press Enter Note If any file names are longer than the display area or include unsupported symbols the file names may be shortened or changed only in the screen display If you want to play back all the movies in a folder in sequence select the Slideshow option at the bottom of the screen 4 To stop movie playback press t...

Страница 130: ...les in date order Sort Order In Ascending Sorts files in first to last order In Descending Sorts files in last to first order Continuous Play On Displays a slideshow continuously Off Displays a slideshow one time through Screen Switching Time No Does not display the next file automatically 1 Second to 60 Seconds Displays files for the selected time and switches to the next file automatically high ...

Страница 131: ... project images or other content from an external storage device using Content Playback mode You can also add color or effects to the projected image Switching to Content Playback Mode Projecting a Playlist in Content Playback Mode Creating a Playlist Using Epson Web Control Adding Effects to the Projected Image Parent topic Using Basic Projector Features Switching to Content Playback Mode Make su...

Страница 132: ...he projector again to enable Content Playback mode You can press the Home button to make sure Content Playback mode is enabled Note You cannot perform the following operations in Content Playback mode Color Temp when Warm White or Cool White is selected as Color Filter Blanking Split Screen Log Save Destination Screen Type Screen Detecting the input signal automatically Remote Password PC Free ...

Страница 133: ...vice using the Epson Projector Content Manager software Note See the Epson Projector Content Manager Operation Guide for more information 2 Turn on the projector 3 Insert the USB device containing the playlist to the projector s USB A port 4 Press the USB button on the remote control to project the playlist The playlist that was played last is projected If a timetable is assigned the playlist will...

Страница 134: ...h drive from the projector or disconnect the projector s power cord while creating playlists Data saved on the USB flash drive may be damaged 1 Make sure the projector is in Content Playback mode 2 Make sure your computer or device is connected to the same network as the projector 3 Connect a USB device to the projector s USB A port 4 Start your web browser on your computer or device 5 Enter the p...

Страница 135: ...1 Select Finish when you are done editing the playlist You can play the playlist from the Remote or Playlist screen If you want to specify when the playlist starts and finishes schedule the playlist using the Epson Projector Content Manager software See the Epson Projector Content Manager Operation Guide for details Parent topic Projecting in Content Playback Mode Related references Projector Feat...

Страница 136: ...ct On 6 Select the Shape Filter setting and adjust the options as necessary Shape select a circle rectangle or other shape effect Filter Effect select an option to mask the inside or outside of the shape Size set the shape size Position set the shape position 7 Select the Color Filter setting and adjust the options as necessary Color Filter select the color Custom adjust red green or blue individu...

Страница 137: ... adjust the brightness level 9 Press the Menu button to exit Parent topic Projecting in Content Playback Mode Related references Projector Feature Settings Settings Menu Projector Reset Options Reset Menu Related tasks Using the Home Screen ...

Страница 138: ...and Sound Temporarily You can temporarily turn off the projected picture and sound if you want to redirect your audience s attention during a presentation Any sound or video action continues to run however so you cannot resume projection at the point that you stopped it Note If the picture and sound are off for more than 30 minutes the power automatically turns off You can turn the A V Mute Timer ...

Страница 139: ...to run however so you cannot resume projection at the point that you stopped it 1 Press the Freeze button on the remote control to stop the video action 2 To restart the video action in progress press Freeze again Parent topic Adjusting Projector Features Zooming Into and Out of Images You can draw attention to parts of a presentation by zooming into a portion of the image and enlarging it on the ...

Страница 140: ...nt topic Adjusting Projector Features Related references Image Quality Settings Image Menu Projector Security Features You can secure your projector to deter theft or prevent unintended use by setting up the following security features Password security to prevent the projector from being turned on and prevent changes to the startup screen and other settings Button lock security to block operation...

Страница 141: ...rojector s owner Network Protection password prevents anyone from changing the network settings in the projector menus Schedule Protection password prevents anyone from changing the projector s time or schedule settings Setting a Password Selecting Password Security Types Entering a Password to Use the Projector Saving a User s Logo Image to Display Parent topic Projector Security Features Related...

Страница 142: ...ld down the Num button on the remote control and use the numeric buttons to set a four digit password The password displays as as you enter it Then you see the confirmation prompt 5 Enter the password again You see the message Password accepted 6 Press Esc to return to the menu 7 Make a note of the password and keep it in a safe place in case you forget it Parent topic Password Security Types Rela...

Страница 143: ...gs select User s Logo Protection press Enter select On press Enter again and press Esc To prevent changes to network settings select Network Protection press Enter select On press Enter again and press Esc To prevent changes to the projector s time or schedule settings select Schedule Protection press Enter select On press Enter again and press Esc You can attach the Password Protect sticker to th...

Страница 144: ...r You must enter the correct password to use the projector 1 Press and hold down the Num button on the remote control while you enter the password using the numeric buttons Note The default password is 0000 The password screen closes 2 If the password is incorrect the following may happen You see a wrong password message and a prompt to try again Enter the correct password to proceed ...

Страница 145: ...urity Types Related references Where to Get Help U S and Canada Where to Get Help Latin America Solutions to Password Problems Saving a User s Logo Image to Display You can transfer an image to the projector and then display it whenever the projector turns on You can also display the image when the projector is not receiving an input signal or when you temporarily stop projection using the A V Mut...

Страница 146: ...s and press Enter You see a completion message 7 Press Esc to return to the Extended menu 8 Select Display and press Enter 9 Select when you want to display the User s Logo screen To display it whenever there is no input signal select Display Background and set it to Logo To display it whenever you turn the projector on select Startup Screen and set it to On To prevent anyone from changing the Use...

Страница 147: ...sing the remote control 1 Press the Menu button 2 Select the Settings menu and press Enter 3 Select Lock Setting and press Enter 4 Select the Control Panel Lock setting and press Enter 5 Select one of these lock types and press Enter To lock all of the projector s buttons select Full Lock To lock all buttons except the power button select Partial Lock You see a confirmation prompt 6 Select Yes and...

Страница 148: ...the Settings menu Parent topic Locking the Projector s Buttons Related references Projector Feature Settings Settings Menu Locking the Remote Control Buttons You can lock some of the buttons on the remote control To lock the remote control buttons shown here press and hold the Home button on the remote control for approximately 5 seconds To unlock the buttons press and hold the Home button again f...

Страница 149: ...s of security cables on the projector to deter theft Use the security slot on the projector to attach a Kensington lock See your local computer or electronics dealer for purchase information Use the security cable attachment point on the projector to attach a wire cable and secure it to a room fixture or heavy furniture Note Do not pass drop prevention cables through the security cable attachment ...

Страница 150: ...imultaneously project two images from different image sources next to each other You can control the split screen feature using the remote control or the projector menus Note You cannot use split screen with the following input source combinations Computer1 and Computer2 USB and LAN ...

Страница 151: ...ing press Enter select the input source select Execute and press Enter You can also change image sources if necessary 4 To switch the images select the Swap Screens setting and press Enter 5 To change the image sizes select the Screen Size setting press Enter select a sizing option press Enter and press Menu to exit Note Depending on the video input signals the images may not appear at the same si...

Страница 152: ...justing the Color Tone Color Uniformity Matching the Screens Manually Adjusting RGBCMY Scaling an Image Parent topic Adjusting Projector Features Multiple Projector Adjustment Overview If you are combining images from multiple projectors you can adjust the brightness and color tone difference between each image In some cases the brightness and color tone may not match completely even after correct...

Страница 153: ...ultiple Projector Control You can operate multiple projectors using one remote control for more elaborate presentations To do this you assign an identification number to each projector and to the remote control Then you can operate all the projectors at once or individually Setting the Projector ID Setting the Remote Control ID Parent topic Using Multiple Projectors Setting the Projector ID If you...

Страница 154: ...ctor s ID on the screen Parent topic Projector Identification System for Multiple Projector Control Setting the Remote Control ID The remote control s ID is set to zero by default so it can operate any compatible projector If you want to set the remote control to operate only a particular projector you need to set the remote control s ID to match the projector s ID 1 Turn on the projector you want...

Страница 155: ...e remote control for an extended period the remote control ID returns to its default setting If you use multiple remote controls at the same time you may not be able to operate the projectors as intended due to infrared interference Parent topic Projector Identification System for Multiple Projector Control Related tasks Replacing the Remote Control Batteries Adjusting the Color Tone Color Uniform...

Страница 156: ...8 Press the right and left arrow buttons to adjust the level and press Esc 9 Select the Start Adjustments setting and press Enter 10 Select the area of the screen that you want to adjust and press Enter Note Adjust the outer areas first then adjust the entire screen 11 Select the color Red Green or Blue you want to adjust and use the left arrow button to weaken the color tone and the right arrow b...

Страница 157: ...ter You see this screen 5 Press the left or right arrow buttons to select a value for the Adjustment Level setting To start set the Adjustment Level to 8 Note There are eight adjustment levels ranging from white to black and you can adjust each level individually 6 Press the left or right arrow buttons to adjust the color tone for the Red Green and Blue settings 7 Press the left or right arrow but...

Страница 158: ...color components Turn on all the projectors and select the RGBCMY setting in each projector s Extended menu so that the color tone on the combined screen becomes entirely even 1 Press the Menu button 2 Select the Extended menu and press Enter 3 Select the Multi Projection setting and press Enter 4 Select the RGBCMY setting and press Enter 5 Select the color you want to adjust and press Enter ...

Страница 159: ... Press the left or right arrow buttons to adjust the Hue Saturation and Brightness settings 7 Repeat the previous three steps as necessary to adjust each color 8 Press Menu or Esc to exit the menus Parent topic Using Multiple Projectors Related references Projector Setup Settings Extended Menu Scaling an Image You can project the same image from multiple projectors and use the Scale feature to cro...

Страница 160: ...rrow buttons to adjust each of the following scale options as necessary Select or to scale the image horizontally and vertically at the same time Select Scale Vertically to scale the image vertically only Select Scale Horizontally to scale the image horizontally only 7 Select the Clip Adjustment setting and use the arrow buttons to adjust the coordinates and size of each image as you view the scre...

Страница 161: ...tion may not start in the following conditions Within 20 minutes of turning on the projector When using direct power shutdown When you have used the projector continuously for over 24 hours When the brightness is automatically dimmed due to high temperatures Note To perform a light source calibration the projector must have been on for at least 20 minutes and the projector brightness must not be a...

Страница 162: ...hen you are finished press the Menu button to exit the menus Parent topic Adjusting Projector Features Related references Projector Reset Options Reset Menu Saving Settings to Memory and Using Saved Settings You can save customized settings for each of your video inputs and then select the saved settings whenever you want to use them Note You can save the Image settings and the Color Matching sett...

Страница 163: ...icated by a blue mark Saving over a previously saved memory overwrites the settings with your current settings Erase Memory Erases the selected memory settings Rename Memory Renames a saved memory 6 Press Esc to exit Parent topic Adjusting Projector Features Scheduling Projector Events You can save a projector command such as turning the projector on or off or switching input sources as an event Y...

Страница 164: ...s Saving a Scheduled Event You can select projector commands you want to perform and schedule them as an event Note Light Source Calibration events do not start if the projector is not used continuously for at least 20 minutes if the projector has been running for more than 24 hours or if the projector is regularly turned off by shutting off the power outlet Set Light Source Calibration events to ...

Страница 165: ... you are finished select Save and press Enter 10 To schedule more events repeat the previous steps as necessary 11 Select Setup complete and select Yes to save your changes Parent topic Scheduling Projector Events Related tasks Setting the Date and Time Selecting Password Security Types Running Light Source Calibration Viewing Scheduled Events You can view your scheduled events on the calendar dis...

Страница 166: ...event press the left and right arrow buttons on the remote to select a day The screen displays the details of the events scheduled for that day A blue icon indicates an enabled event a gray icon indicates a disabled event and the icon indicates a repeating event Parent topic Scheduling Projector Events Editing a Scheduled Event You can edit any currently scheduled event 1 Press the Menu button 2 S...

Страница 167: ...ew to add a new scheduled event 7 When you are finished select Return and press Enter 8 Select Setup complete and select Yes to save your changes Note To delete all scheduled events select Schedule Reset and select Yes Parent topic Scheduling Projector Events Copying Menu Settings Between Projectors After you select menu settings for your projector you can transfer them to another projector of the...

Страница 168: ...etwork using the Epson Projector Management software See the online Epson Projector Management Operation Guide for instructions You can download the latest software and documentation from the Epson website Saving Settings to a USB Flash Drive Transferring Settings from a USB Flash Drive Saving Settings to a Computer Transferring Settings from a Computer Parent topic Adjusting Projector Features Re...

Страница 169: ...e Esc button The lights flash to indicate that settings are transferring to the flash drive When the lights stop flashing the On Standby light turns blue and the projector enters standby mode Caution Do not unplug the power cord or remove the flash drive while the lights are flashing This could damage the projector 5 Once the projector enters standby mode remove the flash drive Note If the project...

Страница 170: ...rojector of the same model The settings are contained in a file called pjconfdata bin If the drive contains other files the transfer may not complete correctly Do not adjust image settings on a projector until after you transfer settings to it Otherwise you may have to repeat your adjustments 1 Turn off the projector and unplug the power cord from the projector s power inlet 2 Insert the flash dri...

Страница 171: ...r remove the flash drive while the lights are flashing This could damage the projector 5 Once the projector enters standby mode remove the flash drive Note If the projector does not enter standby mode and the lights continue flashing see the link below for a solution Parent topic Copying Menu Settings Between Projectors Related references Projector Light Status Related tasks Connecting to a USB De...

Страница 172: ... Service port 3 Connect the other end to any available USB port on your computer 4 Press and hold the Esc button on the control panel or remote control as you connect the power cord to the projector s power inlet 5 When all of the projector lights turn on release the Esc button The projector shows up as a removable disk on your computer 6 Open the removable disk and copy the pjconfdata bin file to...

Страница 173: ... topic Copying Menu Settings Between Projectors Related references Projector Light Status Related tasks Connecting to a USB Device Transferring Settings from a Computer After saving projector settings to a computer you can transfer them to another projector of the same model Your computer must be running one of the following operating systems Windows 7 Windows 8 x Windows 10 OS X 10 11 x macOS 10 ...

Страница 174: ...he pjconfdata bin file from your computer to the removable disk Note Do not copy any other files to the removable disk 7 Once the file has copied do one of the following Windows Open the My Computer Computer Windows Explorer or File Explorer utility Right click the name of your projector listed as a removable disk and select Eject Mac Drag the removable disk icon for your projector from the deskto...

Страница 175: ...his could damage the projector Note If the projector does not turn off and the lights continue flashing see the link below for a solution Parent topic Copying Menu Settings Between Projectors Related references Projector Light Status Related tasks Connecting to a USB Device ...

Страница 176: ...or Feature Settings Settings Menu Projector Setup Settings Extended Menu Projector Network Settings Network Menu Projector Information Display Info Menu Projector Reset Options Reset Menu Using the Projector s Menus You can use the projector s menus to adjust the settings that control how your projector works The projector displays the menus on the screen 1 Press the Menu button on the control pan...

Страница 177: ...the bottom of the menu screens 6 To return all the menu settings to their default values select Reset 7 When you finish changing settings on a menu press Esc 8 Press Menu or Esc to exit the menus Parent topic Adjusting the Menu Settings Image Quality Settings Image Menu Settings on the Image menu let you adjust the quality of your image for the input source you are currently using The available se...

Страница 178: ...ce of green to magenta tones in the image Sharpness Varying levels available Adjusts the sharpness of image details White Balance Color Temp G M Correction Customized Adjusts the overall tint of the image Color Temp sets the color tone based on color temperature G M Correction higher values tint the image blue and lower values tint the image red Customized lets you adjust the offset and gain of ea...

Страница 179: ...s Film Auto for movies computer graphics and animation Dynamic Contrast Off Normal High Speed Adjusts the projected luminance based on the image brightness when certain Color Modes are selected Normal for standard brightness adjustment High Speed to adjust brightness as soon as the scene changes Note The Noise Reduction setting is not available if you have selected an interlaced 480i 576i 1080i in...

Страница 180: ...the Signal menu The available settings depend on the currently selected input source Note You can restore the default settings of the Position Tracking and Sync settings by pressing the Auto button on the remote control Note Available settings depend on the current input source To change settings for an input source make sure the source is connected and select that source ...

Страница 181: ...or the selected input source Tracking Varying levels available Adjusts signal to eliminate vertical stripes in images from an analog RGB computer connection Sync Varying levels available Adjusts signal to eliminate fuzziness or flickering in images from an analog RGB computer connection Position Up down left right Adjusts the image location on the screen Auto Setup On Off Automatically optimizes i...

Страница 182: ...signals automatically RGB corrects color for computer RGB video inputs Component corrects color for component video inputs EDID Describes the display capabilities of the projector to HDMI or HDBaseT video sources Scale Varying levels available Adjusts the scale of the image displayed by each projector when using multiple projectors to display one image Parent topic Adjusting the Menu Settings Rela...

Страница 183: ... size of the projected image Geometry Correction Off H V Keystone Quick Corner Arc Correction Adjusts the projected image shape H V Keystone lets you manually correct the angles of the horizontal and vertical sides Quick Corner select to adjust the position of the four corners Arc Correction select to correct image distortion when projecting on a curved surface Split Screen Divides the viewing are...

Страница 184: ...k enables or disables the HDMI Link function Audio Out Device selects whether to output audio from the internal speakers or a connected audio video system Power On Link controls the projector or a linked device PJ Device or Bidirectional turns on the linked device when the projector is turned on Device PJ or Bidirectional turns on the projector when the linked device is turned on Power Off Link co...

Страница 185: ...ustom Brightness Level adjusts the brightness when Light Source Mode is set to Custom Constant Brightness maintains a constant brightness level when Light Source Mode is set to Custom Remote Receiver Front Rear Front Rear Off Limits reception of remote control signals by the selected receiver Off turns off all receivers User Button Various options available Assigns a menu option to the User button...

Страница 186: ...e Blending is set to On USB Viewer selects a specific playlist from a USB device connected to the projector when Content Playback is set to On Reset Resets all the Settings menu settings to their defaults except the following E Zoom Audio Out Device Power On Link Power Off Link Link Buffer User Button Memory Parent topic Adjusting the Menu Settings Related tasks Setting the Screen Type Correcting ...

Страница 187: ... Switching to Content Playback Mode Locking the Remote Control Buttons Projector Setup Settings Extended Menu Settings on the Extended menu let you customize various projector setup features that control its operation Note Available settings depend on the current input source ...

Страница 188: ...Custom Function 1 Custom Function 2 lets you customize the options displayed on the Home Screen and save your settings as a preset Display See the Display settings table in this topic User s Logo Creates a screen that the projector displays to identify itself and enhance security Projection Front Front Ceiling Rear Rear Ceiling Selects the way the projector faces the screen so the image is oriente...

Страница 189: ...r ports HDMI1 Audio Output HDMI2 Audio Output select the audio source to output when projecting images from the HDMI1 or HDMI2 ports Standby Mode Communication On Communication Off Port Enable this setting to allow the following operations to occur when the projector is in standby mode Monitor and control the projector over a network Output audio and video to an external device A V Output must be ...

Страница 190: ...er or switcher Control Communications enables or disables communication from the Ethernet and serial ports on the transmitter turning on this setting disables the projector s LAN RS 232C and Remote ports Extron XTP must be turned off to use this setting Extron XTP set to On when you connect an Extron XTP transmitter or switcher to the HDBaseT port ...

Страница 191: ...jectors Color Matching corrects the difference between the tint and brightness of each projected image Color Uniformity adjusts the color tone balance RGBCMY adjusts the hue saturation and brightness for each color Schedule Settings Various scheduling options Lets you schedule various projector tasks Language Various languages available Selects the language for projector menu and message displays ...

Страница 192: ...s when the projector starts up Air Filter Notice Displays a message when a clog in the air filter is detected Screen Sets the aspect ratio and position of the projected image according to the type of screen being used this setting is unavailable when projecting images from a computer over a network Color Uniformity Adjusts the color tone balance OSD Rotation Rotates the menu display 90 Operation s...

Страница 193: ...period in which you want to use Quick Start mode which lets you restart the projector within five seconds of turning it off You can select 20 60 or 90 minutes of Quick Start time Press the power button to quickly restart the projector in this mode Monitor Out Port Changes the input and output for the Computer2 Monitor Out port A V Mute Settings Adjusts the A V Mute settings A V Mute Timer turns of...

Страница 194: ...ant to save projector operation log files Batch Setup Range select which projector menu settings to copy using the batch setup feature select All or select Limited to not copy the EDID settings all Network menu settings or the Password Protection settings Date Time Adjusts the projector s time and date settings Parent topic Adjusting the Menu Settings Related tasks Changing the Projection Mode Usi...

Страница 195: ...rk Settings Network Menu Settings on the Network menu let you view network information and set up the projector for monitoring and control over a network Note Available settings depend on the current input source Setting Options Description Wireless LAN Power On Off Turns on wireless LAN mode ...

Страница 196: ...s and details Net Info Wired LAN Projector Name DHCP IP Address Subnet Mask Gateway Address MAC Address IPv6 Address Manual IPv6 Address Auto Displays wired network status and details Display the QR Code Displays a QR code for connecting with iOS or Android devices using the Epson iProjection app Network Configuration Accesses additional network menus Configures your network settings Parent topic ...

Страница 197: ...Using SNMP Using a QR Code to Connect a Mobile Device Setting Up Crestron Connected Importing a Web Server Certificate Using the Projector Menus Projector Information Display Info Menu You can display information about the projector and input sources by viewing the Info menu However you cannot change any settings in the menu Note Available information depends on the current input source ...

Страница 198: ...nfo Displays information that may be needed by a service technician Status Displays information about projector problems that may be needed by a service technician Serial Number Displays the projector s serial number Event ID Displays the Event ID number corresponding to a specific projector problem see the list of Event ID codes HDBaseT Signal Level Displays the image signal information from the ...

Страница 199: ... The network software did not start Turn the projector off and then on again 0435 0433 Cannot display the transferred images Restart the network software 0434 Unstable network communication Check the network communication status wait a few moments and try connecting to the network again 0481 0482 0485 0483 The network software quit unexpectedly Check the network communication status then turn the ...

Страница 200: ... Epson for help 089A The EAP authentication type does not match the network Check the wireless LAN security settings and make sure that the security certificate is installed correctly 089B EAP server authentication failed Check the wireless LAN security settings and make sure that the security certificate is installed correctly 089C EAP client authentication failed Check the wireless LAN security ...

Страница 201: ...he saved names and settings in the Save Memory list Refresh Mode Timer Messages Start Select Start to clear an afterimage that remains in the projected image and turn off the projector after the time specified in the Timer screen Press any button to cancel Refresh Mode Set Messages to On to display a message that the projector is in Refresh Mode ...

Страница 202: ...to start calibration depending on the environmental temperature Run Periodically Select On to perform calibration every 100 hours of usage Schedule Settings Goes to the Schedule Settings screen Last Run Displays the date and time of the last light source calibration Reset All Config Resets most of the projector settings to their defaults Reset All Factory Default Resets all projector settings to t...

Страница 203: ... Hours Password Password Protection settings You cannot reset the following settings using the Reset All Factory Default option Date Time Light Source Hours Password Password Protection settings Parent topic Adjusting the Menu Settings Related tasks Adding Effects to the Projected Image Running Light Source Calibration ...

Страница 204: ...led laser light source which does not need servicing and cannot be replaced Warning Before cleaning any part of the projector turn it off and unplug the power cord Never open any cover on the projector except as specifically explained in this manual Dangerous electrical voltages in the projector can injure you severely Warning Do not try to service this product yourself except as specifically expl...

Страница 205: ...on the projector Caution Do not use wax alcohol benzine paint thinner or other chemicals to clean the projector case These can damage the case Do not use canned air or the gases may leave a flammable residue Parent topic Projector Maintenance Air Filter and Vent Maintenance Regular filter maintenance is important to maintaining your projector Your Epson projector is designed with an easily accessi...

Страница 206: ...situations The filter or vents get dusty You see a message telling you to clean it The projector s Filter light flashes orange Note It is recommended that you clean the air filter every 20 000 hours Clean it more often if the projector is in a dusty environment 1 Turn off the projector and unplug the power cord 2 Carefully remove the dust from the air filter cover with a vacuum or brush 3 Turn the...

Страница 207: ...207 4 Loosen the screws and remove the air filter cover 5 Pull the air filter out of the projector ...

Страница 208: ...not rinse the air filter in water or use any detergent or solvent to clean it Do not use canned air the gases may leave a residue or push dust and debris into the projector s optics or other sensitive areas 7 Vacuum the front of the air filter the side with the tabs to remove any remaining dust Note If dust is difficult to remove or the air filter is damaged replace the air filter ...

Страница 209: ...lter back in the projector as shown 9 Replace the air filter cover and tighten the screws as shown Parent topic Air Filter and Vent Maintenance Related references Projector Light Status Related tasks Replacing the Air Filter ...

Страница 210: ...lace it After cleaning the air filter the projector s Filter light continues to flash orange The air filter is torn or damaged You can replace the air filter while the projector is mounted to the ceiling or placed upside down on a table 1 Turn off the projector and unplug the power cord 2 Loosen the screws securing the air filter cover and remove the air filter cover ...

Страница 211: ...211 3 Pull the air filter out of the projector Note Air filters contain polypropylene Dispose of used air filters according to local regulations 4 Place the new air filter in the projector as shown ...

Страница 212: ...al Equipment and Replacement Parts Latin America Projector Light Status Related tasks Cleaning the Air Filter Replacing the Remote Control Batteries The remote control uses two AA manganese or alkaline batteries Replace the batteries as soon as they run out Caution Use only the type of batteries specified in this manual Do not install batteries of different types or mix new and old batteries ...

Страница 213: ...void getting the fluid on your hands If it gets on your hands wash them immediately to avoid injury 3 Insert the batteries with the and ends facing as shown Warning Make sure the batteries are inserted in the correct positions If the batteries are not inserted correctly they could explode or leak causing a fire injury or damage to the product ...

Страница 214: ...delines to transport ship or store the projector safely Remove any equipment connected to the projector Attach the protective lens cover that was included with the projector When transporting the projector a long distance or as checked luggage pack it in a firm box with cushioning around it and mark the box Fragile When shipping the projector for repairs place it in its original packing materials ...

Страница 215: ...anada Where to Get Help Latin America Projection Problem Tips If the projector is not working properly try turning it off and unplugging it Then plug it back in and turn it on If this does not solve the problem check the following The lights on the projector may indicate what the problem is The Help option on the Home screen can display information about common problems if the projector is operati...

Страница 216: ...color of the lights and look for a solution in the table here 1 WLAN wireless LAN light 2 Filter light 3 Temp temperature light 4 Laser light 5 Status light 6 On Standby power light On Standby power light Status light Laser light Temp light Filter light Status and solution Blue Off Off Off Off Standby sleep mode or network monitoring and control ...

Страница 217: ...off the projector unplug it from the electrical outlet and contact Epson for help Off Flashing blue Off Flashing orange Off A fan or sensor has a problem Turn the projector off unplug it and contact Epson for help Off Flashing blue Off Orange Off Projector has overheated and turned off Leave it turned off to cool down for five minutes Make sure that the vents and air filter are not clogged with du...

Страница 218: ... dust or obstructed by nearby objects Clean or replace the air filter If the problem persists unplug the projector and contact Epson for help Varies Varies Flashing orange Varies Varies The projector is unable to maintain constant brightness The Constant Brightness setting is disabled Varies Flashing blue Flashing orange Varies Varies Refresh mode is in progress Flashing blue Varies Varies Flashin...

Страница 219: ...on for help Varies Varies Varies Varies Flashing orange It is time to clean the air filter Flashing orange fast Flashing orange fast The batch setup file may be corrupt or the USB flash drive may not be connected correctly Disconnect the USB flash drive unplug the projector s power cord and try again Flashing blue fast Flashing blue fast Flashing orange fast Flashing orange fast Writing the settin...

Страница 220: ...ransferring Settings from a USB Flash Drive Saving Settings to a Computer Transferring Settings from a Computer Cleaning the Air Filter Replacing the Air Filter Viewing Projector Status Information You can monitor the projector s status and view error information on the projected screen 1 Turn on the projector 2 Press the right arrow button on the control panel 3 Press the left or right arrow butt...

Страница 221: ...isplays the settings for on screen displays When turned off menus or messages are not displayed on the projected images A V Mute Displays the A V Mute status Intake Air Temp Displays the air intake temperature Internal Temp Lv Displays the projector s internal temperature Laser Status Displays the operating status of the light source Source category Information Description Source Displays the sour...

Страница 222: ... H Frequency Displays the horizontal frequency of the current input signal V Frequency Displays the vertical frequency of the current input signal Stable Time Displays the amount of operating time since the input source was determined HDCP Status Displays the HDCP status HDCP Ver Displays the HDCP version AVI VIC Displays the VIC information AVI of the current input signal AVI Checksum Displays th...

Страница 223: ...ys the name used to identify the projector when connected to a network Connection Mode Displays the connection mode to use when connecting the projector and a computer over a wireless LAN SSID Display Displays the SSID display settings SSID Displays the SSID DHCP Displays the DHCP settings IP Display Displays the IP address display settings IP Address Displays the IP address MAC Address Displays t...

Страница 224: ...projector is in standby mode Cool Down The projector is cooling down Temp Error A high temperature error occurred Fan Error A fan error occurred Sensor Error A sensor error occurred Power Error A power error occurred Internal Error An internal error occurred Airflow Error A filter airflow error occurred Temp Warning A high temperature warning occurred Internal Warning A warning regarding the inter...

Страница 225: ... to select Help 4 Press Enter You see the Help menu 5 Press the up and down arrow buttons to highlight the problem you want to solve 6 Press Enter to view the solutions 7 When you are finished do one of the following To select another problem to solve press Esc To exit the help system press Home Parent topic Solving Problems Solving Image or Sound Problems Check the solutions in these sections if ...

Страница 226: ...or Out Port setting to Computer2 Press the projector s power button to wake it from standby or sleep mode Also see if your connected computer is in sleep mode or displaying a blank screen saver If the projector does not respond when you press any buttons on the projector an internal error may have occurred in the projector Contact Epson for help Adjust the Brightness setting on the Image menu Adju...

Страница 227: ...ation if necessary Check the connection from the projector to your video sources If you are projecting from a laptop computer make sure it is set up to display on an external monitor If necessary turn the projector and the connected computer or video source off and then on again If you are projecting from an HDMI source replace the HDMI cable with a shorter one Try a different video cable If the o...

Страница 228: ...3 If necessary check your video card settings and set the multiple display option to Clone Mirror or Duplicate Parent topic Solutions When No Signal Message Appears Displaying From a Mac Laptop If you see the No Signal message when you display from a Mac laptop you need to set up the laptop for mirrored display See your laptop manual for details 1 Open the System Preferences utility and select Dis...

Страница 229: ...etting in the Signal menu is turned off Make sure the Resolution setting in the Signal menu is set correctly for the input signal Try adjusting the image position using the Screen Position menu setting Press the Aspect button on the remote control to select a different image aspect ratio Check the Blanking setting in the Signal menu If you zoomed into or out of the image using the E Zoom buttons p...

Страница 230: ...t topic Solving Image or Sound Problems Related references Supported Video Display Formats Related tasks Correcting Image Shape with H V Keystone Correcting Image Shape with Quick Corner Solutions When the Image Contains Noise or Static If the projected image seems to contain electronic interference noise or static try the following solutions Check the cables connecting your computer or video sour...

Страница 231: ...age focus Clean the projector lens Note To avoid condensation on the lens after bringing the projector in from a cold environment let the projector warm up to room temperature before using it Position the projector close enough to the screen Position the projector so the keystone adjustment angle is not so wide that it distorts the image Adjust the Sharpness setting to improve image quality If you...

Страница 232: ...ideo Range or EDID setting on the Signal menu if available for your image source Make sure all the cables are securely connected to the projector and your video device If you connected long cables try connecting shorter cables Make sure the Brightness Settings options in the Settings menu are set correctly Position the projector close enough to the screen When using multiple projectors make sure L...

Страница 233: ... from an HDMI source set the connected device to PCM output Make sure any connected audio cables are labeled No Resistance If you are using a Mac and you do not hear sound from an HDMI source make sure your Mac supports audio through the HDMI port If not you need to connect an audio cable If you want to use a connected audio source when the projector is off set the Standby Mode option to Communica...

Страница 234: ...and H 265 H 265 only supports Main Profile You cannot play audio saved with an audio codec other than LPCM and AAC LC Parent topic Solving Image or Sound Problems Related topics Projecting a PC Free Presentation Solving Projector or Remote Control Operation Problems Check the solutions in these sections if you have problems operating the projector or remote control Solutions to Projector Power or ...

Страница 235: ...wakes from standby status the fans may cause an unexpected noise This is not a malfunction Parent topic Solving Projector or Remote Control Operation Problems Related references Projector Light Status Projector Setup Settings Extended Menu Projector Feature Settings Settings Menu Related tasks Unlocking the Projector s Buttons Solutions to Remote Control Problems If the projector does not respond ...

Страница 236: ...s Setting the Projector ID Replacing the Remote Control Batteries Solutions to Password Problems If you cannot enter or remember a password try the following solutions You may have turned on password protection without first setting a password Try entering 0000 using the remote control If you lose the remote control you cannot enter a password Order a new one from Epson If you have entered an inco...

Страница 237: ...eless Authentication Fails Solutions When You Cannot Access the Projector Through the Web Solutions When Network Alert E Mails are Not Received Solutions When the Image Contains Static During Network Projection Parent topic Solving Problems Solutions When Wireless Authentication Fails If you cannot authenticate a wireless connection try the following solutions If the wireless settings are correct ...

Страница 238: ...s LAN with the Connection Mode setting set to Advanced Note The user ID and password are case sensitive Parent topic Solving Network Problems Related references Projector Network Settings Network Menu Solutions When Network Alert E Mails are Not Received If you do not receive an e mail alerting you to problems with a projector over the network try the following solutions Make sure the projector is...

Страница 239: ...he following solutions Check the following on all projectors All projectors are the same model If any of the projectors are a different model or have a different resolution synchronized playback may not be performed properly Make sure the name date and time settings are correct Make sure all projectors are connected to the same network Make sure the Content Playback setting is turned on in the Set...

Страница 240: ...he CEC function is set for the connected device You may need to restart the device Connect no more than three devices that support HDMI CEC at the same time If you have connected a speaker or receiver set the output to PCM Parent topic Solving Problems Where to Get Help U S and Canada If you need to contact Epson for technical support services use the following support options Internet Support Vis...

Страница 241: ...sonstore ca Canadian sales To purchase a replacement remote control call 562 276 4394 U S or 905 709 3839 for dealer referral in Canada Parent topic Solving Problems Where to Get Help Latin America If you need to contact Epson for technical support services use the following support options Internet Support Visit Epson s support website at latin epson com support and select your product for soluti...

Страница 242: ...000 915235 Costa Rica 800 377 6627 Dominican Republic 1 888 760 0068 Ecuador 1 800 000 044 El Salvador 800 6570 Guatemala 1 800 835 0358 Mexico Mexico City 52 55 1323 2052 Other cities 01 800 087 1080 Nicaragua 00 1 800 226 0368 Panama 00 800 052 1376 Paraguay 009 800 521 0019 Peru Lima 51 1 418 0210 Other cities 0800 10126 Uruguay 00040 5210067 Venezuela 58 212 240 1111 Contact your local phone c...

Страница 243: ...fice in the nearest country Purchase Supplies and Accessories You can purchase optional accessories and replacement parts from an Epson authorized reseller To find the nearest reseller go to latin epson com Or you can contact your nearest sales office as described in Where to Get Help Parent topic Solving Problems ...

Страница 244: ...pixels WXGA x 3 Lens F 1 5 to 2 0 Focal length 18 2 to 29 2 mm Color reproduction Up to 1 07 billion colors Brightness Note Color brightness color light output and white brightness white light output will vary depending on usage conditions Color light output measured in accordance with IDMS 15 4 white light output measured in accordance with ISO 21118 Normal High power consumption mode White light...

Страница 245: ...iet power consumption mode Keystone correction angle Vertical 30 Horizontal 30 USB Type B port compatibility USB 2 0 compliant port for batch settings and service USB Type A port compatibility One USB 1 1 and 2 0 compliant port for USB device input Epson document camera display or wireless LAN unit Parent topic Technical Specifications Projector Light Source Specifications Type Laser diode Light s...

Страница 246: ...ganese AA Parent topic Technical Specifications Projector Dimension Specifications Height excluding feet 4 8 inches 122 mm Width 17 3 inches 440 mm Depth 12 0 inches 304 mm Weight approximate 16 1 lb 7 3 kg Parent topic Technical Specifications Projector Electrical Specifications Rated frequency 50 60 Hz Power supply 100 to 240 V AC 10 3 1 to 1 4 A Power consumption 100 to 120 V Operating Normal p...

Страница 247: ...o 7500 feet 2286 m Operating 32 to 104 F 0 to 40 C Multiple projectors over 7500 feet 2286 m Operating 32 to 95 F 0 to 35 C Storage 14 to 140 F 10 to 60 C Light source brightness automatically dims if the surrounding temperature gets too high approximately 95 F 35 C at an altitude of 0 to 7 500 feet 2 286 m and approximately 86 F 30 C at an altitude above 7 500 feet 2 286 m This may vary depending...

Страница 248: ...ur projector includes Epson s SizeWise chip that supports other computer display resolutions so your image will be resized to fit automatically Your computer s monitor port or video card refresh rate vertical frequency must be compatible with the projector See your computer or video card manual for details The table here lists the compatible refresh rate and resolution for each compatible video di...

Страница 249: ...1600 1200 1920 1080 50 60 1920 1080 Component video SDTV 480p 59 94 720 480 SDTV 576p 50 720 576 HDTV 720p 50 59 94 60 1280 720 HDTV 1080p 50 59 94 60 1920 1080 HDMI HDBaseT Control input signals VGA 60 640 480 SVGA 60 800 600 XGA 60 1024 768 WXGA 60 1280 800 60 3 1366 768 WXGA 60 1440 900 WXGA 60 1600 900 WSXGA 60 1680 1050 SXGA2 60 1280 960 SXGA3 60 1280 1024 SXGA 60 1400 1050 UXGA 60 1600 1200 ...

Страница 250: ...60 2560 1440 WQXGA Reduced Blanking 60 2560 1600 SDTV 480i 480p 59 94 720 480 SDTV 576i 576p 50 720 576 HDTV 720p 50 59 94 60 1280 720 HDTV 1080i 50 59 94 60 1920 1080 HDTV 1080p 23 98 24 29 97 30 50 59 94 60 1920 1080 Only compatible when Image Resolution is set to Wide Parent topic Technical Specifications ...

Страница 251: ...ion Warning Never look into the projector lens when the laser is on This can damage your eyes and is especially dangerous for children and pets Before cleaning any part of the projector turn it off and unplug the power cord Never open any cover on the projector except as specifically explained in this manual Dangerous electrical voltages in the projector can injure you severely Warning The project...

Страница 252: ...could catch fire When turning on the projector at a distance using the remote control make sure no one is looking into the lens Do not allow small children to operate the projector Children must be accompanied by an adult Do not apply optical devices such as a magnifying glass or reflector to the projected image Using the projector may result in physical harm fire or an accident Do not block the l...

Страница 253: ... instructions when setting up and using the projector Do not look into the lens when the projector is on The bright light can damage your eyes Avoid standing in front of the projector so the bright light does not shine into your eyes When turning on the projector at a distance using the remote control make sure there is no one looking into the lens Do not place the projector on an unstable cart st...

Страница 254: ... high humidity and dust such as on a kitchen counter in the kitchen or near a humidifier or in locations exposed to oil smoke or steam Doing so could cause fire or electric shock The projector s case could also deteriorate and be damaged causing the projector to fall from the mount Examples of environments that could cause the projector to fall due to case deterioration Locations subject to excess...

Страница 255: ...any openings in the projector Do not leave objects especially flammable objects near the projector Never spill liquid of any kind into the projector If you are using two or more projectors side by side leave at least 59 inches 150 cm of space between the projectors to allow for proper ventilation You may need to clean the air filter and vent A clogged air filter or vent can block ventilation neede...

Страница 256: ...2 to 104 F 0 to 40 C at an altitude of 7500 to 10000 feet 2286 to 3048 m When using multiple projectors at the same time 32 to 104 F 0 to 40 C at an altitude of 7500 feet 2286 m or less or 32 to 95 F 0 to 35 C at an altitude of 7500 to 10000 feet 2286 m to 3048 m Doing so may cause an unstable display and could lead to projector damage Do not use or store the projector where it may be exposed to s...

Страница 257: ... safety such as aerospace equipment main communication equipment nuclear power control equipment or medical equipment related to direct medical care please make your own judgment on this product s suitability after a full evaluation Parent topic Important Safety Instructions List of Safety Symbols corresponding to IEC60950 1 A2 The following table lists the meaning of the safety symbols labeled on...

Страница 258: ...957 For indoor use only To identify electrical equipment designed primarily for indoor use 8 IEC60417 No 5926 Polarity of DC power connector To identify the positive and negative connections the polarity on a piece of equipment to which a DC power supply may be connected 9 Polarity of DC power connector To identify the positive and negative connections the polarity on a piece of equipment to which...

Страница 259: ...electric shock in case of a fault or the terminal of a protective earth electrode 14 IEC60417 No 5017 Earth To identify an earth ground terminal in cases where neither the symbol No 13 is explicitly required 15 IEC60417 No 5032 Alternating current To indicate on the rating plate that the equipment is suitable for alternating current only to identify relevant terminals 16 IEC60417 No 5031 Direct cu...

Страница 260: ...ate that the marked item don t place anything on projector 22 ISO3864 IEC60825 1 Caution laser radiation To indicate the equipment has a laser radiation part 23 ISO 3864 Disassembly prohibition To indicate a risk of injury such as electric shock if the equipment is disassembled 24 IEC60417 No 5266 Standby partial standby To indicate that part of the equipment is in the ready status 25 ISO3864 IEC6...

Страница 261: ...be used in residential areas To indicate that the electrical equipment device is not suitable for use in residential area Parent topic Notices FCC Compliance Statement For United States Users This equipment has been tested and found to comply with the limits for a Class B digital device pursuant to Part 15 of the FCC Rules These limits are designed to provide reasonable protection against harmful ...

Страница 262: ...terface connector do not leave cables connected to unused interfaces Changes or modifications not expressly approved by the manufacturer could void the user s authority to operate the equipment For Canadian Users CAN ICES 3 B NMB 3 B Parent topic Notices Binding Arbitration and Class Waiver 1 DISPUTES BINDING INDIVIDUAL ARBITRATION AND WAIVER OF CLASS ACTIONS AND CLASS ARBITRATIONS 1 1 Disputes Th...

Страница 263: ...Notice of the Dispute shall include the sender s name address and contact information the facts giving rise to the Dispute and the relief requested the Dispute Notice Following receipt of the Dispute Notice Epson and you agree to act in good faith to resolve the Dispute before commencing arbitration 1 4 Small Claims Court Notwithstanding the foregoing you may bring an individual action in the smal...

Страница 264: ...residence or in Orange County California at your option a Initiation of Arbitration Proceeding If either you or Epson decides to arbitrate a Dispute both parties agree to the following procedure i Write a Demand for Arbitration The demand must include a description of the Dispute and the amount of damages sought to be recovered You can find a copy of a Demand for Arbitration at http www jamsadr co...

Страница 265: ...ove all other terms shall continue to apply including the requirement to provide notice prior to litigation 1 8 Amendments to Section 1 Notwithstanding any provision in this Agreement to the contrary you and Epson agree that if Epson makes any future amendments to the dispute resolution procedure and class action waiver provisions other than a change to Epson s address in this Agreement Epson will...

Страница 266: ...es and areas General Notice Other product names used herein are for identification purposes only and may be trademarks of their respective owners Epson disclaims any and all rights in those marks Parent topic Notices Copyright Notice All rights reserved No part of this publication may be reproduced stored in a retrieval system or transmitted in any form or by any means electronic mechanical photoc...

Страница 267: ...right Attribution Parent topic Notices A Note Concerning Responsible Use of Copyrighted Materials Epson encourages each user to be responsible and respectful of the copyright laws when using any Epson product While some countries laws permit limited copying or reuse of copyrighted material in certain circumstances those circumstances may not be as broad as some people assume Contact your legal adv...

Отзывы: