background image

PictureMate PM 215

Preparing to Print

13

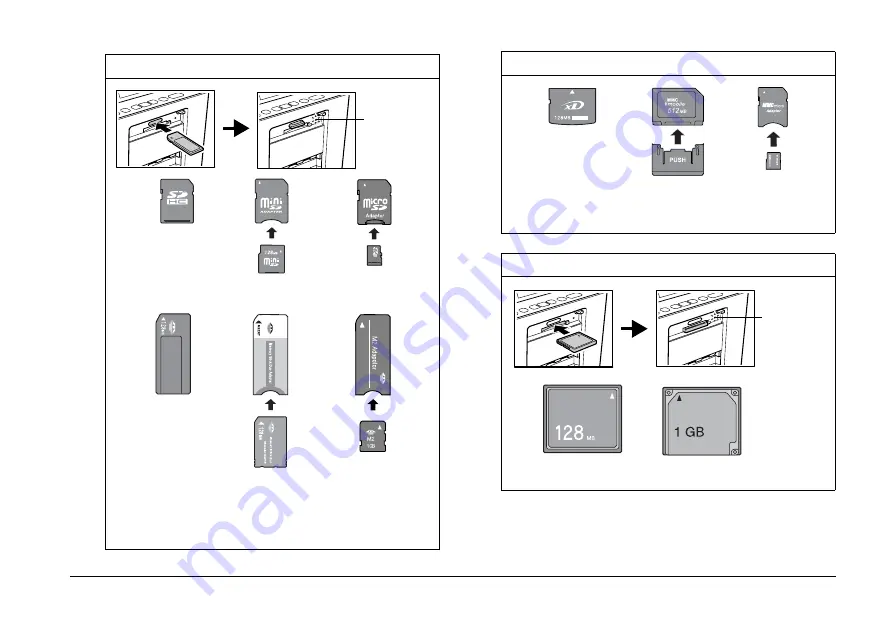
Upper slot

Memory 
card light 
turns on

Memory Stick
MagicGate Memory Stick
Memory Stick PRO

miniSDHC card *
miniSD card *

SDHC Memory Card
SD Memory Card
MultiMediaCard
MMCplus

Memory Stick Duo *
Memory Stick PRO Duo *
Memory Stick PRO-HG Duo *
MagicGate Memory Stick Duo *

 * Adapter required

microSDHC card *
microSD card *

Memory Stick Micro *

Lower slot

Upper slot

xD-Picture Card
xD-Picture Card Type M

+

xD-Picture Card Type H

MMCmobile *

MMCmicro *

 * Adapter required

Memory 
card light 
turns on

Microdrive

CompactFlash

Содержание PictureMate PM 215

Страница 1: ...Printed in XXXXXX ...

Страница 2: ......

Страница 3: ...the View of Photos on the LCD Screen 18 Printing Selected Photos 18 Printing Groups of Photos 18 Printing Camera Selected DPOF Photos 19 Printing on Photo Stickers 20 Printing Options Making Paper and Print Layout Settings 21 Editing Your Photo 21 Printing From an External Device Printing From a PictBridge Enabled Camera 24 Printing From a Bluetooth Device 25 PictureMate Preferences Making Setting...

Страница 4: ...ng Error Warning Messages 40 Printer Power Problems 41 Print and Noise Problems 42 Photo Quality Problems 42 Problems With Paper Feeding 44 Miscellaneous Printout Problems 45 Contacting Customer Support Regional Customer Services 46 Photo Cartridge Paper and Options Photo Cartridge and Paper 48 Options 48 Printer Specifications 49 Summary of Panel Settings 53 Index 55 ...

Страница 5: ... Products by Seiko Epson Corporation Seiko Epson Corporation shall not be held liable for any damage resulting from electromagnetic interference that occurs from the use of any interface cables other than those designated as Epson Approved Products by Seiko Epson Corporation EPSON is a registered trademark and PictureMate and Exceed Your Vision are trademarks of Seiko Epson Corporation PRINT Image...

Страница 6: ... the printer in all directions If you place the printer by the wall leave more than 10 cm between the back of the printer and the wall The printer will not operate properly if it is tilted at an angle When storing or transporting the printer do not tilt it stand it on its side or turn it upside down Otherwise ink may leak from the cartridge Leave enough space in front of the printer for the paper ...

Страница 7: ... type of power source indicated on the AC adapter s label and always supply power directly from a standard domestic electrical outlet with the AC power cord that meets the relevant local safety standards w Warning Refer to the rating plate for the voltage and check that the appliance voltage corresponds to the supply voltage Avoid using outlets on the same circuit as photocopiers or air control sy...

Страница 8: ...ug Use a 2 pin mains plug that is certified to IEC 83 Standard C5 Flexible cord Use a double insulated flexible cord that is certified to the relevant IEC or BS standards Appliance connector Use an appliance connector certified to the relevant IEC320 certified by member of IECEE CB Scheme When using the printer Observe the following when using the printer If you use the printer in places where the...

Страница 9: ...apter Refer to the Bluetooth Photo Print Adapter s documentation for the safety instructions When handling photo cartridges Observe the following when handling photo cartridges Do not shake photo cartridge after removing it from the bag this can cause leakage Do not remove or tear the label on the cartridge this can cause leakage Use the photo cartridge before the date printed on the cartridge car...

Страница 10: ...ess to enter the Menu mode for the print settings or maintenance options 3 Display button Press to change the view of the screen 4 OK button Functions as shown in the LCD screen 5 l r 2 way scroll button Press to move the cursor on the LCD screen 6 Stop Clear button Press to cancel printing or to clear the number of copies and cancel selecting photos by date 7 z Print button Press to start printin...

Страница 11: ...ing stage for this job 2 Appears when ink is low 3 The total number of photos you selected to print 4 The number of copies for the selected photo 5 The number for the current photo 6 Total number of photos 7 Guidance The icons show the buttons to press 8 Appears when you select Frame as the layout setting ...

Страница 12: ...Mate PM 215 Printer Parts Top cover Edge guides Paper feeder Memory card light Memory card slots Output tray DC inlet USB port for computer EXT I F USB port Photo cartridge lever Photo cartridge Cartridge compartment cover LCD screen Handle ...

Страница 13: ...Mate PM 215 Preparing to Print 11 Preparing to Print Inserting a Memory Card 1 Move the handle to the back Then open the top cover 2 Raise and adjust the LCD screen so that you can see it well Handle Top cover ...

Страница 14: ...nter memory card or both If you insert a card incorrectly you see an error message on the LCD screen Remove the memory card and insert it correctly Do not press the button on the right side of the lower card slot when you insert a CompactFlash card or you cannot remove the card If the CompactFlash card is not recognized remove the card and insert it again Make sure you fit mini memory cards with t...

Страница 15: ...emory Card MultiMediaCard MMCplus Memory Stick Duo Memory Stick PRO Duo Memory Stick PRO HG Duo MagicGate Memory Stick Duo Adapter required microSDHC card microSD card Memory Stick Micro Lower slot Upper slot xD Picture Card xD Picture Card Type M xD Picture Card Type M xD Picture Card Type H MMCmobile MMCmicro Adapter required Memory card light turns on Microdrive CompactFlash ...

Страница 16: ...photos you want to print See Choosing a Group of Photos on page 16 For the latest information on memory cards available for your printer contact your dealer or regional Epson sales office Removing the memory card When you are ready to remove a memory card make sure the memory card light is not flashing then remove the memory card from the slot c Caution Do not remove a card while the memory card l...

Страница 17: ...th the glossy side up Note Make sure paper is glossy side up to prevent smearing 3 Slide the edge guides against the paper Make sure they are snug but not so tight that paper cannot move Note You can load up to a maximum of 20 sheets for photo papers or 1 sheet for Photo Sticker When you need more paper order a PictureMate PicturePack See Photo Cartridge Paper and Options on page 48 for more infor...

Страница 18: ... Epson recommends placing your printouts in glass frames to preserve the colors in your image Avoid displaying your printouts outdoors or in a place exposed to direct sunlight to prevent fading Note For best results allow your prints to dry thoroughly for 24 hours before framing Choosing a Group of Photos If your memory card contains 1000 photos or more PictureMate sorts them by file name and divi...

Страница 19: ...PictureMate PM 215 Preparing to Print 17 Note You can switch which group of photos to load at any time by selecting Select Group from the Select Photos menu ...

Страница 20: ...for additional photos 4 If you want to make optional settings such as color effects see Editing Your Photo on page 21 5 Press z to preview the photo you want to print If you want to change the paper size or layout press x Menu and then select Basic Print Settings Select the paper size and the layout you want to use from the Paper Size and the Layout settings For details see Making Paper and Print ...

Страница 21: ...rinting with DPOF then insert your memory card in PictureMate PictureMate automatically reads your preselected photos 1 Load paper and a memory card that contains DPOF data The screen below appears on the LCD screen 2 Select Yes and then press OK to confirm the paper size and layout Press z Note If you want to print all of the photos on the memory card select No and then press OK to cancel DPOF in...

Страница 22: ...press OK 4 Select Paper Size and then press OK 5 Select PhotoSticker and then Press OK 6 Press l or r to select the layout you want and then press OK 7 Select the photo you want to print set the number of copies you want to and print them See Printing Selected Photos on page 18 Note To adjust the print position of pre cut 16 up Photo Stickers See Setup on page 30 Photo Sticker Loading Support Shee...

Страница 23: ...ons Note The Frame layout is displayed when your memory card contains frame data Editing Your Photo 1 Press x Menu 2 Select Basic Print Settings or Advanced Print Settings from the Setup menu and then press OK 10 15 cm 4 6 Borderless 4 Per Print Border Frame 2 Per Print PhotoSticker 1 Photo 16Pht B less 16 Photos 4 Photos Frame 9 Photos PhotoSticker ...

Страница 24: ...rint Layout Settings on page 21 Fix Photos Enhance Use this if a print does not look good for example this may correct images that are too dark too bright or backlit P I M Process images according to the PRINT Image Matching informationorExifPrintinformation in your digital files This information helps to ensure an accurate image reproduction Off Prints photos as is or bypasses P I M or Exif Print...

Страница 25: ... camera Note This function is only available for specific digital cameras that allow you to add text to photos Check your camera s documentation Depending on the size of the characters the maximum number of printable characters changes For example for large characters such as a string of upper case W the number of printable characters is 32 for 10 15 size You can print up to 20 lines of text depen...

Страница 26: ...re are no memory cards in PictureMate s slots The memory card light should be off Note If a memory card is inserted the printer will read photos from the card not from a camera 3 Use the PictureMate s control panel to adjust the print settings For example Layout and Color Effect 4 Connect your camera s USB cable to your camera and the EXT I F port on the back of PictureMate 5 Use the digital camer...

Страница 27: ...ote While this product complies with the Bluetooth Specification it is not guaranteed to work with all devices enabled with Bluetooth wireless technology The communication range of this product is approximately 10 meters however this may vary depending on conditions including obstacles between devices signal quality magnetic fields static electricity and electromagnetic interference software opera...

Страница 28: ...operating Doing so may cause the printer to malfunction 2 The Adapter s light comes on for one second If the LED does not turn on disconnect the Adapter from PictureMate then reconnect it Next make the settings for Bluetooth wireless communication See Bluetooth settings on page 27 Basic Printing Profile BPP Basic Imaging Profile BIP Printable file size is up to 2 5 MB Up to 10 jobs can be queued M...

Страница 29: ...remove this product by pulling on its upper section Doing so may damage the product Bluetooth settings Use the LCD screen on PictureMate to make settings for Bluetooth wireless communication See Making settings on page 28 Outline of settings Setting Choices Description Printer ID printer name number Default 1 If multiple printers enabled with Bluetooth are in the same communication range distingui...

Страница 30: ...nter To print in this mode first search for the printer once in Discoverable mode After your device has discovered the printer in Discoverable mode once it will subsequently be able to communicate with and print from it in this mode Pairing This mode requires that the four digit Passkey be entered into a device before it can communicate with and print from the printer Encryption On Off Default Off...

Страница 31: ...king Bluetooth settings see Bluetooth settings on page 27 2 Use the PictureMate s control panel to adjust the print settings For example Layout and Color Effect Note The settings available may vary among Bluetooth wireless capable devices For more information refer to your device s documentation 3 Print the data from your Bluetooth enabled device For more information about printing from Bluetooth ...

Страница 32: ...to 10 15 cm 4 6 in If you select photos using Select By Date or Select Group only selected photos are printed Custom ID Print Adjust the size of ID photos and then print page 31 Advanced Print Settings Make advanced print settings page 23 Confirm Print Preview Turn this On to display the print preview screen so that you can confirm your image before printing Sticker Position Adjust the printing po...

Страница 33: ...ess OK 5 Press l or r to set Height and then press OK Note If you want to change the units press the Display button and select mm or inch 6 Press l or r to set Width and then press OK 7 Press l or r to select the photo you want to print and then press OK A frame is displayed on the selected photo 8 Move the frame using l or r to set the area you want to print Note If you want to rotate the frame p...

Страница 34: ...ge status at any time 1 Press x Menu 2 Select Maintenance and then press OK 3 Select Photo Cartridge Status and then press OK 4 A screen is displayed showing the photo cartridge status Press OK to close the screen Replacing the Photo Cartridge When the photo cartridge needs replacement you see a message on the LCD screen w Warning Keep photo cartridges out of the reach of children Do not allow chi...

Страница 35: ...o not refill photo cartridges Other products not manufactured by Epson may cause damage that is not covered by Epson s warranties and under certain circumstances may cause erratic printer behavior Note PictureMate uses photo cartridge equipped with an IC chip The IC chip monitors the photo cartridge status In addition to the ink used while printing an image ink is also used during the print head c...

Страница 36: ...se it may leak 5 Remove the replacement photo cartridge from its package c Caution Do not touch the green IC chip on the side of the cartridge This can damage the photo cartridge If you remove the photo cartridge for later use be sure to protect the ink supply ports from dirt and dust store it in the same environment as the printer Note that there is a valve in the ink supply ports making covers o...

Страница 37: ...h it in until you feel resistance and hear the cartridge faintly click into place 7 Set the lever to the Lock position by sliding it to the right Note Once the photo cartridge is installed DO NOT release or adjust the photo cartridge lever If you move the lever accidentally remove the cartridge and reinstall it 8 Close the cartridge compartment cover Note If you cannot close the cartridge compartm...

Страница 38: ...he power cord from the electrical outlet 3 Remove paper from the paper feeder and output tray 4 Close the LCD screen 5 Close the top cover and output tray 6 Disconnect the power cord and any connected USB cable from the back of PictureMate 7 Pack the power cord AC adapter paper spare photo cartridge and this manual in the travel case 8 Pack PictureMate and the travel case in the box that PictureMa...

Страница 39: ...hat the print head needs to be cleaned This saves ink If a message on the LCD screen tells you that the cartridge needs replacement or is low on ink you cannot clean the print head You must first replace the photo cartridge 1 Make sure that PictureMate is turned on and no warnings or errors are displayed on the LCD screen 2 Load a sheet of paper See Loading Paper on page 15 3 Press x Menu 4 Select...

Страница 40: ...er cleaning about two times check the solutions beginning on page 42 You can also turn the printer off and wait for at least 6 hours this allows any dried ink to soften and then try cleaning the print head again Aligning the Print Head If you have moved PictureMate and the print quality is not as good as it was before for example you see misaligned vertical lines or light or dark horizontal bandin...

Страница 41: ...roughly several times a year as follows 1 Turn off PictureMate and unplug the power cord 2 Remove any paper from the paper feeder 3 Use a soft brush to carefully clean away all dust and dirt from the paper feeder 4 If the outer case or the inside of the paper feeder is dirty wipe it with a soft clean cloth dampened with mild detergent Keep the output tray closed to prevent water from getting insid...

Страница 42: ...low Replace Photo Cartridge soon T5852 Press OK to clear the error Prepare the new photo cartridge If you tried to clean the print head replace the photo cartridge first See Replacing the Photo Cartridge on page 32 Replace Photo Cartridge now For best results use a genuine PictureMate Photo Cartridge T5852 Replace the photo cartridge with a new one See Replacing the Photo Cartridge on page 32 The ...

Страница 43: ...t to replace ink tubes before the end of their service life When the ink tubes reach the end of their service life the printer stops and Epson support is required to continue printing See Contacting Customer Support on page 46 The printer s ink tubes are at the end of their service life Please contact Epson support Contact Epson support to replace ink tubes See Contacting Customer Support on page ...

Страница 44: ...ctureMate will not work properly if it is tilted or at an angle Place it on a flat stable surface that extends beyond the printer base in all directions Make sure paper is not jammed and is loaded correctly so it can feed into PictureMate Make sure the handle is not resting on the paper See Preparing to Print on page 11 The memory card does not work correctly Make sure you are using a compatible m...

Страница 45: ...lossy side face up Make sure your paper is not damp or curled or loaded face down the glossy side should be face up If it is damp or curled load a new stack of paper Your printout is faint or has gaps in the image The print head may need aligning see Aligning the Print Head on page 38 The print head nozzles may need cleaning see Checking and Cleaning the Print Head Nozzles on page 37 for instructi...

Страница 46: ...hould be back of PictureMate Make sure the handle is not resting on the paper See Preparing to Print on page 11 If paper does not feed remove it from paper feeder reload it in the center then slide both edge guides against the paper but not too tightly If multiple pages feed at once remove the paper from the paper feeder separate the sheets and carefully reload it If paper jams remove the paper th...

Страница 47: ...der on one side of your photo but not the other make sure the paper is placed in the center of the paper feeder Slide the edge guides against the paper If the subject of your photo is very close to the edge of the image you can change the amount of cropping around the edge of the image for Borderless printing by using Expansion from the Advanced Print Settings menu If you see a white line around t...

Страница 48: ...the following information Product serial number The serial number label is usually on the back of the product Product model Product software version Click About Version Info or similar button in the product software Brand and model of your computer Your computer operating system name and version Names and versions of the software applications you normally use with your product Note For more inform...

Страница 49: ...1 5477837 Medan 62 61 4516173 Telephone Yogyakarta 62 274 565478 Makassar 62 411 350147 411 350148 Hong Kong URL http www epson com hk Phone 852 2827 8911 Fax 852 2827 4383 Malaysia URL http www epson com my Phone 603 56288333 India URL http www epson co in Phone 080 30515000 FAX 30515005 Philippines URL http www epson com ph Phone 63 2 813 6567 Fax 63 2 813 6545 E mail epchelpdesk epc epson com p...

Страница 50: ...find the part numbers for the above Epson special paper on the Epson Web site See Contacting Customer Support on page 46 If you want to use paper other than the types listed above refer to the online User s Guide manual Options Bluetooth Photo Print Adapter 2 C12C82438 For details on using the Bluetooth Photo Print Adapter see Printing From a Bluetooth Device on page 25 Note The asterisk is a subs...

Страница 51: ...es Height 265 mm 10 4 inches Printable area Border printing 3 mm margin for all sides of photo paper and 17 mm margin on the bottom and 3 mm margin on the other sides for Photo Sticker Borderless printing 0 mm margin Paper tray capacity Photo paper 20 sheets Photo Sticker 1 sheet Weight Approx 2 2 kg 4 9 lb without AC adapter and photo cartridge AC adapter operated Input DC 20 V 0 6 A Model A381H ...

Страница 52: ...0 C 4 to 104 F 1 month at 40 C 104 F Humidity Operation 20 to 80 RH Compatible memory cards CompactFlash Memory Stick Memory Stick PRO Memory Stick Duo Memory Stick PRO Duo Memory Stick PRO HG Duo Memory Stick Micro MagicGate Memory Stick MagicGate Memory Stick Duo Microdrive SDHC Memory Card SD Memory Card miniSDHC card miniSD card microSDHC card microSD card MultiMediaCard MMCplus MMCmobile MMCm...

Страница 53: ...ot refill the photo cartridge Other products not manufactured by Epson may cause damage that is not covered by Epson s warranties and under certain circumstances may cause erratic printer behavior Note The photo cartridge packaged with your printer is partly used during initial setup In order to produce high quality printouts the print head in your printer will be fully charged with ink This one o...

Страница 54: ...nt quality and to help protect your print head a variable ink safety reserve remains in the cartridge when your printer indicates to replace the cartridge The yields quoted for you do not include this reserve Interface Standards and Approvals Printer Australian model AC Adapter Australian model USB 2 0 Hi Speed for PictBridge compliant devices Bluetooth Ver 2 0 EDR compliant Option EMC AS NZS CISP...

Страница 55: ...rless 4 Photos Border 9 Photos 2 Per Print 16Pht B less 4 Per Print 16 Photos 1 Photo Frame Fix Photos Enhance P I M Off Scene Detection Standard People Landscape Night Scene Date Stamp On Off Color Effect None B W Sepia Improve Print Quality Lines in printout Color is wrong Printout is blurred The ink runs Quick Guide Insert memory card Eject memory card Load paper Change Photo Cartridge Wrong ca...

Страница 56: ... Cartridge Status Auto Cleaning Cleaning Sheet Head Alignment Slide Show Print Proof Sheet Custom ID Print Advanced Print Settings Expansion Standard Middle Minimum Camera Text On Off Fix Red Eye On Off Confirm Print Preview On Off Sticker Position Language Bluetooth Bluetooth Setup Printer ID Communication Mode Encryption Passkey Device Address Restore Default Settings ...

Страница 57: ...sumables 48 Control panel 8 Customer support 46 D Date Printing 19 Date Stamp 22 Device external 24 to 25 DPOF Digital Print Order Format 19 E Edge guide 15 Edit 22 23 Error Messages 40 Expansion 23 F Faint images 43 Fix Photos 22 Fix Red Eye 23 G Gaps in image 43 I Image quality 42 to 44 Incorrect colors 44 Ink 48 J Jams paper 44 L Language 30 Layout 21 LCD screen 9 messages 40 Loading Paper 15 M...

Страница 58: ...Photo Cartridge buying 48 replacing 32 to 35 safety instructions 7 PictBridge 24 PictureMate PicturePack 48 Power cable 36 Problems memory card 42 missing colors 44 paper feeding 44 paper jam 44 print quality 42 to 44 Q Quality 42 to 44 R Removing memory card 14 photo cartridge 32 S Scene Detection 22 Setup problems 42 Smears 43 Spec 49 T Technical support 46 Transporting PictureMate 36 Troublesho...

Страница 59: ......

Страница 60: ...Printed in XXXXXX ...

Отзывы: