background image

Specifications  C-5

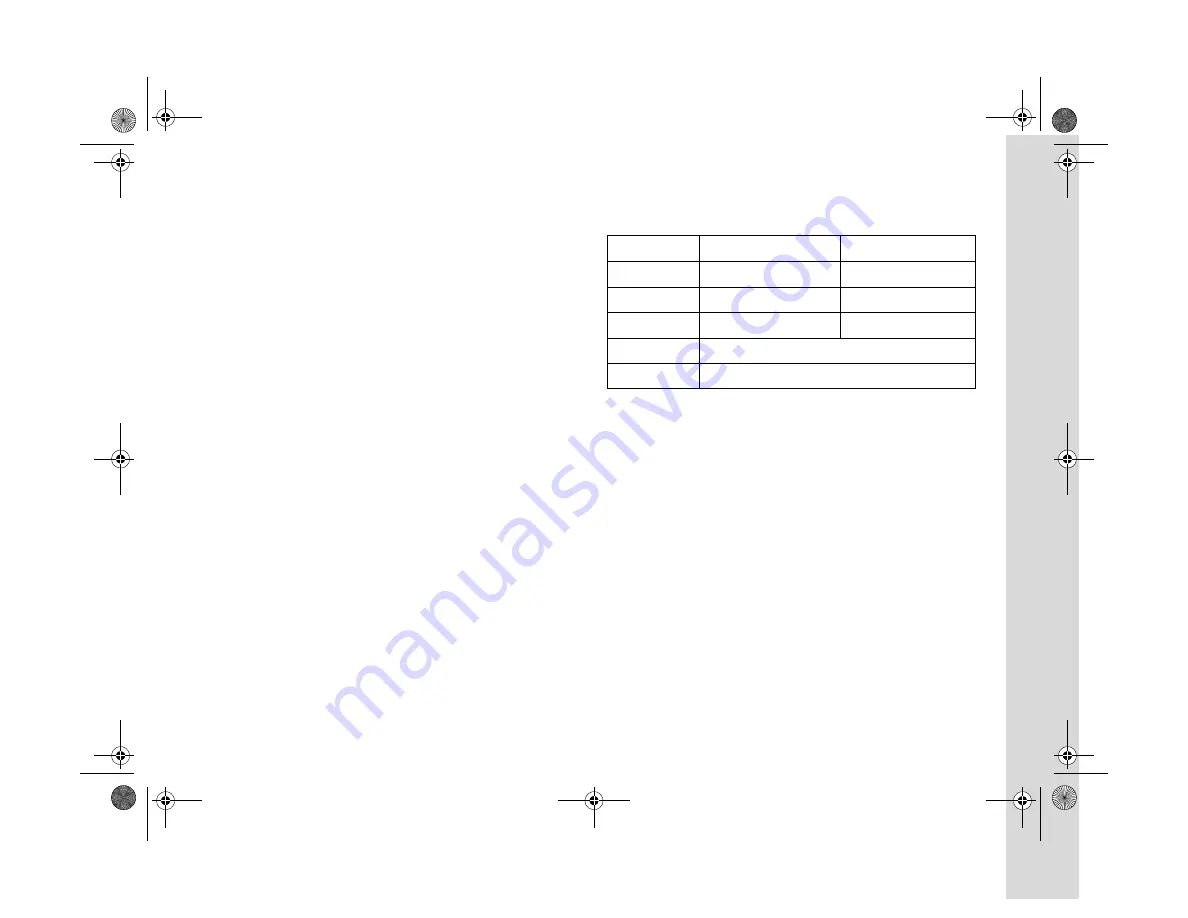
CompactFlash Memory Card

Density

16MB 

Physical Dimensions

Approximate Photo Capacity

*

For HyPict JPEG images, the compression always remains the same. Tiff 
images are always uncompressed. 

** If there are video clips and/or sound recordings on the card, or if the images 

are complex, the quantity of photos may vary.

Optional NiMH Battery Charger 

Physical Dimensions

Width

1.7 inches (42.8 mm)

Height

1.5 inches (36.8 mm)

Depth

0.13 inch (3.3 mm)

Image Mode

Standard compression

Low compression

Standard

199

122

Fine

56

29

Super Fine

29

15

HyPict*

12

Tiff*

1

Width

3.0 inches (76 mm)

Height

4.5 inches (115 mm) 

Depth

1.1 inch (28 mm)

Weight

Approximately 4.6 oz (130 g)


Содержание PhotoPC 3100Z

Страница 1: ...CPD 12422 User s Guide User s Guide ...

Страница 2: ...ew shutter button lens cameradial neck strap holder diopter dial USB port video audio out port AC adapter port hot shoe camera dial POWER button shutter button image quality button flash button self timer button top view viewfinder ...

Страница 3: ...ck view MENU button neck strap holder microphone status display panel speaker photo capture light zoom controls camera control buttons camera status light bottom view battery cover lock tripod socket battery cover print button ...

Страница 4: ...ice TRADEMARKS EPSON and EPSON Stylus are registered trademarks and PRINT Image Matching is a trademark of SEIKO EPSON CORPORATION PhotoPC is a registered trademark and HyPict and BorderFree are trademarks of Epson America Inc Image Expert and Camio are trademarks of Sierra Imaging Inc in the United States and other countries and are used under license CompactFlash is a trademark of SanDisk Corpor...

Страница 5: ...Case 1 6 Using the Camera Dial and Turning On the Camera 1 7 Setting the Date and Time 1 8 Formatting Your CompactFlash Memory Card 1 9 Choosing Your User Mode 1 10 Removing a CompactFlash Memory Card 1 11 Installing a CompactFlash Memory Card 1 12 2 Taking Pictures Taking Pictures With the Viewfinder 2 1 Taking Pictures With the LCD Screen 2 3 Playing Back Images from the View Menu 2 6 Setting Re...

Страница 6: ...l Shots Recording Video Clips 3 1 Continuous Shooting 3 3 Continuous Shooting Using the Timer 3 4 Interval Shooting 3 5 4 Framing Focusing and Zooming Using Digital Zoom 4 1 Enabling Digital Zoom 4 2 Taking Digital Zoom Pictures 4 2 Taking Close Ups With Macro Mode 4 4 Adjusting the Focus Manually 4 5 Capturing Panoramas 4 6 5 Adjusting Exposure and Color Settings Adjusting Exposure 5 2 Changing t...

Страница 7: ...n or Off 7 3 Setting the Camera Volume 7 4 Setting the Language 7 4 Adjusting the LCD Brightness 7 5 Adjusting the Viewfinder Focus 7 5 8 Selecting Images for Printing About the DPOF Standard 8 2 About PRINT Image Matching 8 2 Selecting Photos to Print 8 2 Deselecting All Photos 8 3 Adjusting Photos for Printing 8 3 Enabling an Index Print 8 4 Section 2 Using Your Camera With Your Computer or Vide...

Страница 8: ...ting Video Clips 11 8 Importing Photos Into Web Pages 11 8 12 Printing Your Photos Printing a Single Photo 12 1 Printing Photos from an Album 12 3 Printing Size Guidelines 12 4 13 Stitching Panoramas Importing and Aligning Pictures in Windows 13 1 Importing and Aligning Pictures On a Macintosh 13 3 Stitching a Big Plane Panorama 13 3 Stitching a Cylinder Panorama 13 5 Viewing and Printing Panorama...

Страница 9: ...Optional AC Adapter B 2 Using a Tripod B 4 Attaching an Optional Converter Lens or Filter B 4 Attaching an Optional Flash B 5 Using a PC Card Adapter B 6 Installing the PC Card Adapter B 7 Transferring Photos With the Adapter B 7 Photo Printers B 8 C Specifications Camera C 1 CompactFlash Memory Card C 5 Optional NiMH Battery Charger C 5 Optional NiMH Batteries C 6 Optional Universal AC Adapter C ...

Страница 10: ...tographers a programmed mode for specific shots and time savings and a fully automatic point and shoot mode for no fuss photography The PhotoPC 3100Z comes with a built in microphone and speaker that let you add and play back voice messages You can also capture full motion video with digital zooming and sound Your camera puts you in control of all your shots with exposure flash white balance meter...

Страница 11: ...memory card It also includes a CD ROM with software and utilities for downloading uploading editing organizing stitching and printing your pictures Software The PhotoPC 3100Z software suite includes the following Windows and Macintosh applications USB storage driver for transferring your pictures Sierra Imaging Image Expert software for transferring organizing editing and printing your pictures Al...

Страница 12: ... Your Documentation Your EPSON PhotoPC 3100Z documentation gives you all the information you need to use your camera and software Your Quick Reference Guide is a handy portable guide that explains basic settings and how to take pictures You can find instructions for using Image Expert in your electronic Image Expert User s Guide See Chapter 9 for details on reading the electronic guide This User s...

Страница 13: ...is section 1 Setting Up Your Camera 2 Taking Pictures 3 Capturing Video Clips and Special Shots 4 Framing Focusing and Zooming 5 Adjusting Exposure and Color Settings 6 Playing Back Photos 7 Adjusting Camera Settings 8 Selecting Images for Printing When you re ready to load your photos into your computer or if you want to use your camera with your TV or other video device or to stitch your photos ...

Страница 14: ...5 Using the Camera Case 1 6 Using the Camera Dial and Turning On the Camera 1 7 Setting the Date and Time 1 8 Formatting Your CompactFlash Memory Card 1 9 Choosing Your User Mode 1 10 Removing a CompactFlash Memory Card 1 11 Installing a CompactFlash Memory Card 1 12 1 Unpacking Your PhotoPC 3100Z Make sure you have all the items shown below software CompactFlash card 16MB installed in camera vide...

Страница 15: ...own the battery cover lock and slide the cover out to open it 3 Insert four batteries into the compartment positioning the and ends as shown below 4 Lower the battery cover and slide it in as shown below When the battery power is almost out a low battery icon appears on the camera s display panel Be sure to replace all four batteries at the same time battery cover lock ...

Страница 16: ... not mix different types of batteries this can cause fire or explosion Replace all four batteries at the same time Do not mix old and new batteries Do not drop puncture disassemble or mutilate batteries Do not get them wet or expose them to fire When the camera is not used for long periods of time remove the batteries and store them at a low temperature in a dry location Store away from the reach ...

Страница 17: ...ing the camera about Keep the strap away from children Do not pull or tighten the strap too firmly while wearing it around your hand or neck this can cause serious injury To attach the neck strap 1 Unscrew the screw sleeve on the triangular fastener at one end of the strap 2 Attach the fastener to one side of the camera by passing it through the eyelet 3 Tighten the screw sleeve on the fastener as...

Страница 18: ... the other end of the strap to the other side of the camera Attaching the Lens Cap To secure the lens cap to the camera 1 Pass the end of the string with the shorter loop through the eyelet on the edge of the lens cap 2 Then pass the end of the string with the longer loop through the shorter loop 3 Pull the end of the string with the longer loop all the way through ...

Страница 19: ...onto the camera It should snap into place To remove the lens cap press in the lens cap release tabs on the sides as you pull the cap off of the camera Using the Camera Case Place the camera in the case upright with the front of the camera facing the front of the camera case Secure the top of the case with the velcro flap Place the camera case strap over the neck strap and close the snap to secure ...

Страница 20: ...uous shooting interval shooting and panorama stitching See Chapter 3 for details Use this setting to take photos with the LCD screen See page 2 3 for details Use this setting to take photos with the optical viewfinder See page 2 1 for details Use this setting to play back and delete photos and video clips and add audio recordings to your photos See Chapter 6 for details Use this setting whenever y...

Страница 21: ...e POWER button to turn on the camera 2 You see the clock setting screen with the month highlighted in red 3 Press the button next to the up or down arrows to increase or decrease the number until the month is correct 4 Press the button below the right arrow to select the day year and time military time format Make adjustments as described in the previous step 5 Press the button next to the date di...

Страница 22: ... to and press the POWER button You see the SETUP menu 2 Press the button below Memory SETUP The Memory Card Format menu appears if a memory card is correctly installed in the camera CAUTION When you format your memory card all the data is lost including any photos stored on your card 3 Press the button next to MEMORY CARD FORMAT to format the card You see a message warning you that all data on the...

Страница 23: ...te control over the camera s wide array of settings and features In addition to changing sensitivity and white balance you can adjust the shutter speed and aperture choose a spot or matrix metering system take pictures with an optional external flash and focus the camera to three feet ten feet or infinity Full Auto In this mode the camera chooses most settings for you You can simply point and shoo...

Страница 24: ...turn off the camera if it is on CAUTION Never remove a card while the camera is on Data in the card may be lost or damaged 2 Place your finger behind the memory card cover latch and pull the cover open 3 Push in the eject button to release the card Then pull out the card and close the cover memory card cover latch eject button ...

Страница 25: ...ve a card while the camera is on Data in the card may be lost or damaged 2 Place your finger behind the memory card cover latch and pull the cover open 3 Make sure the front of the card is facing the same direction as the front of the camera and the arrow on the card s label is pointing in 4 Insert the card all the way into the memory card slot As you insert the card the eject button pops up CAUTI...

Страница 26: ... 2 14 Adding Sound to Pictures 2 14 Using Instant Playback and Delete 2 16 Reading the Status Display Panel 2 17 2 Taking Pictures With the Viewfinder You can capture an image as you would with any point and shoot auto focus camera look through the optical viewfinder and press the two step shutter 1 Make sure you are at least 20 inches 50 cm away from your subject To get closer use macro mode with...

Страница 27: ... angle button to zoom out 8 Hold the shutter button halfway down to lock the camera s settings The photo capture light flashes until the lens locks in focus and the camera determines the exposure While holding down the shutter button you can reframe your picture to move the subject off center if you want 9 Press the shutter button the rest of the way down to take the picture 10 After the shutter s...

Страница 28: ...se macro mode as described on page 4 4 NOTE See Chapter 3 to take special shots including video clips and time lapse interval shots see Chapter 4 for framing focusing and zooming shots including panorama stitching or see Chapter 5 for color and exposure settings 2 Remove the lens cap and press the POWER button 3 Turn the camera dial to to see the View menu Wait until the camera photo capture light...

Страница 29: ...s to change the image quality flash setting or timer See the following sections for details on these settings 5 Push the T telephoto button to zoom in on your subject or the W wide angle button to zoom out You see a display with green zoom steps and the current zoom position in yellow NOTE If digital zooming is enabled the slider pauses in the middle If you keep zooming beyond the midpoint of the ...

Страница 30: ...delete the image Press the button next to Rec Sound and record a 10 second message into the camera s microphone Press the button next to to instantly play back your images Press the button under BACK to return to the View menu NOTE You enable the confirmation screen in the Shot SETUP menu See page 2 14 for detailed instructions When the camera stops processing the image you re ready to take anothe...

Страница 31: ...HANGE Then press the button next to the icon You see the quick playback screen displaying the last picture you took 3 Press the button next to the right arrow to display the earliest picture taken and to view your pictures in order Press the button next to the left arrow to move backward through your pictures 4 Press the button under Multi once if you want to display four images on the screen at o...

Страница 32: ... can take at each resolution setting see page C 5 Standard JPEG Produces color or black and white images at 640 480 pixels Images include less detail when enlarged This setting is good for pictures that are viewed on the screen or Internet Fine JPEG Produces color or black and white images at 1600 1200 pixels Your pictures include ample detail Super Fine JPEG Produces color or black and white imag...

Страница 33: ...Shot SETUP menu 3 Press the button under Image JPEG to change the setting to Image Tiff Press the same button to change the setting back If your CompactFlash card has too little space to store a Tiff image you see a message warning you to use a card with at least 9 1MB of free space 4 Press the button under BACK to return to the SETUP menu NOTE To capture Tiff photos make sure the image quality is...

Страница 34: ...on is lost Low Compression images retain information and look better but the file size is larger 4 Press the button under BACK to return to the SETUP menu Using the Flash Your camera has a built in flash or you can use the hot shoe to attach an optional external flash See Appendix B for more information on purchasing and attaching an external flash After you take a picture with the flash the flash...

Страница 35: ... source Flash Off The flash is disabled even when lighting is inadequate Use this setting for special effects where flash photography is prohibited or for macro close ups Red eye Reduction Use this setting to eliminate the red eye effect the reddish reflection of the flash in your subjects pupils that flash photography often produces Slow Synchronized Flash Slow synchronized flash causes the apert...

Страница 36: ...Program or Manual user modes If you are using your camera in Manual mode make sure you don t set the flash mode to Ext Flash See page 1 10 for information about changing the user mode Selecting Color or Black and White Mode You use the SETUP menu to switch between color and black and white pictures 1 Turn the camera dial to You see the SETUP menu 2 Press the button next to Monochrome or Color to s...

Страница 37: ...e camera s dial to or Then wait until the photo capture light stops flashing and remains a steady green 3 Press the timer button on the top of the camera The timer icon appears in the status display panel 4 Press the shutter button all the way down The timer icon and the red timer light on the front of the camera flash slowly for eight seconds Then they flash rapidly for two seconds before the shu...

Страница 38: ...l to You see the View menu To take a picture with the viewfinder turn the camera dial to Then press the MENU button You see the Viewfinder menu 4 Press the button under the Program setting to cycle through the four subject settings 5 Take your picture See page 2 1 or 2 3 for details Normal Appropriate for most photographs Settings auto exposure and matrix metering Sports Recommended for action pho...

Страница 39: ...menu with the current confirmation setting 3 Press the button next to Confirmation to change the setting to Off or On 4 Press the button under BACK to return to the SETUP menu Adding Sound to Pictures Your camera has a built in microphone that lets you add an audio recording of up to 10 seconds to each photo You can record audio in any user mode immediately after shooting a photo as described here...

Страница 40: ...tter button halfway down to lock the auto focus 4 When the photo capture light stops flashing and you see a green circle on the screen press the shutter button the rest of the way down 5 After the shutter snaps release the shutter button You see the confirmation screen 6 Press the button next to Rec Sound You see the message Recording sound and a countdown of the recording time 7 Speak clearly int...

Страница 41: ...he shutter button You see the confirmation screen 6 To delete the image press the button next to Delete Your image is deleted and the camera returns to the View menu 7 To play back an image press the button next to the icon You see the instant playback screen From the instant playback screen you can Press the button under Multi to view multiple images at once See page 6 2 for details Press the but...

Страница 42: ...o use the camera You need to recharge or replace your batteries or use the optional universal AC adapter when you see this icon Although you may be able to use the camera with low batteries it needs full battery power to operate reliably NOTE Several factors can affect battery life including the surrounding temperature and the type of batteries you use Low temperatures especially below 50 F 10 C d...

Страница 43: ...images on the memory card See page 6 3 for instructions If you want to save your photos before you delete them connect the camera to your computer as described in Chapter 9 then transfer the pictures as described in Chapter 10 Checking Other Status Information Instead of the number of pictures remaining you may see one of the following in the lower right corner of the status display panel In Progr...

Страница 44: ...mputer in the QuickTime Movie format Sections in this Chapter Recording Video Clips 3 1 Continuous Shooting 3 3 Interval Shooting 3 5 3 NOTE Hold the camera upright when capturing video clips If you hold the camera sideways your video will play back sideways You can t rotate video clips without a separate video editing program If you want to adjust any camera settings such as white balance sensiti...

Страница 45: ...tton again You see the red letters REC on the screen and a time countdown appears while your camera is recording If digital zooming is enabled you can digitally zoom in on your subject while you are recording Push the T telephoto button to zoom in on your subject or the W wide angle button to zoom out See page 4 1 to enable digital zooming When the recording is done the camera displays Please wait...

Страница 46: ...ngs See Chapters 4 and 5 for details To take a sequence of pictures 1 Turn the camera dial to Wait until the photo capture light stops flashing and remains a steady green 2 Press the button under MODE CHANGE to change to Continuous Shooting mode You see a preview of your picture with a red frame around the LCD screen CONTINUOUS appears on the screen 3 Frame your subject 4 Press and hold the shutte...

Страница 47: ...e camera and wait until the photo capture light stops flashing and remains a steady green 3 Press the button under MODE CHANGE to change to Continuous Shooting mode You see a preview of your picture on the LCD screen with a red frame around it CONTINUOUS appears on the screen 4 Center your subject in the red frame 5 Press the timer button The timer iconappears on the status display panel to indica...

Страница 48: ...era dial to to see the View menu and adjust the settings See Chapters 4 and 5 for more information To capture time lapse shots in interval mode 1 Secure the camera on a flat surface or on a tripod See page B 4 for information on attaching the camera to a tripod 2 Turn the camera dial to Press the POWER button to turn on the camera and wait until the photo capture light stops flashing and remains a...

Страница 49: ...ected interval to take the next photo While the camera is standing by between shots Int appears in the display panel 7 To stop taking pictures press the POWER button to turn off the camera The number of photos you can take is limited by the space on the CompactFlash memory card With a higher density card you can store more pictures See Appendix B for more information TIP You can use a movie editin...

Страница 50: ...macro mode You can also manually focus the camera to a fixed point Using Digital Zoom Digital zoom pictures are magnified up to two times 2 beyond the maximum optical zoom The automatic cropping effect makes file sizes smaller Enabling digital zoom also allows you to zoom when capturing video clips Sections in this Chapter Using Digital Zoom 4 1 Taking Close Ups With Macro Mode 4 4 Adjusting the F...

Страница 51: ...e same button if you want to turn digital zooming off again 4 Press the button under BACK to return to the Setup menu Taking Digital Zoom Pictures 1 Turn the camera dial to You see the View menu NOTE This example shows the View menu when the user mode is set to Program Depending on the user mode setting your View menu may look different 2 Push the T telephoto button to zoom in on your subject with...

Страница 52: ...ly 4 Press the shutter button halfway to lock the auto focus and exposure When the camera locks its settings the photo capture light stops flashing and you see a green circle and flash and exposure settings on the screen If you want you can reframe your picture while holding the button down 5 Press the button all the way down to capture the image NOTE Since the digital zoom mode magnifies the imag...

Страница 53: ... can t zoom out any further To take a picture in macro mode 1 Turn the camera dial to You see the View menu NOTE This View menu illustrates what you see if your user mode is set to Manual Your View menu will look different if the user mode is set to Full Auto or Program 2 Press the button next to Off macro mode off to change the setting to On macro mode on A green frame appears around the preview ...

Страница 54: ... setting If the camera is set to Off macro mode off you can choose from the following settings AF The camera determines the focus automatically Focal point is about three feet Focal point is about 10 feet Focus is infinity If you re using the On macro mode on you can choose one of the following settings AF The camera determines the focus automatically M1 Focal point is about 8 inches M2 Focal poin...

Страница 55: ...software application included on your CD ROM 1 Turn the camera dial to NOTE If you want to adjust any camera settings such as white balance sensitivity or macro mode turn the camera dial to to see the View menu and adjust the settings then turn the camera dial back to You see the VIDEO CLIP menu 2 Press the button under MODE CHANGE three times You see the panorama stitching menu with the word STIT...

Страница 56: ...r all the images in the first row of your panorama 7 If you are taking only a single row of images press the button next to Finish when you are done If you are taking two rows of images continue with step 8 8 The second row of images goes from right to left directly under the first row of images Press the button under the image number with the down arrow in the bottom left corner of the LCD screen...

Страница 57: ...n next to Finish when you are done capturing pictures TIP To capture a tall image such as a building or a waterfall turn the camera sideways After you stitch your image in Panorama Stitcher you ll need to rotate the final image in Image Expert or a similar program See Chapter 10 to load your pictures onto your computer and Chapter 13 to stitch your images together using Panorama Stitcher ...

Страница 58: ...te control over exposure color and other lighting condition settings NOTE The settings in this chapter require that you set your user mode to Manual or Program See page 1 10 to change the user mode Sections in this Chapter Adjusting Exposure 5 2 Adjusting the Sensitivity Setting 5 7 Adjusting the White Balance Setting 5 8 Changing the Metering Method 5 11 Exposure and Color Tips 5 12 Adjusting Exp...

Страница 59: ...ure manually by setting the shutter speed and aperture setting Changing the Automatic Exposure Value The Exposure Value EV is a combination of aperture shutter speed and flash settings that adjust the camera s automatic exposure to lighten or darken the image NOTE The flash is not affected by the exposure value setting when it is set to forced flash or flash off or when you re using an optional ex...

Страница 60: ...n Program mode you can select from nine settings in increments of 0 5 from 2 0 to 2 0 EV In Manual mode make sure the exposure setting is Auto Exposure Aperture Priority or Shutter Priority You can choose from 21 settings in increments of 0 2 from 2 0 to 2 0 EV The setting appears in the status display panel LCD Screen Viewfinder LCD Screen Viewfinder exposure setting ...

Страница 61: ... the button next to the exposure mode to change it to Manual Exposure 4 Press the button next to the up arrow to increase shutter speed or the button next to the down arrow to decrease it You can select shutter speeds between 1 1000 and 8 The range varies depending on your aperture setting 5 Press the buttons under the left and right arrows to change the aperture setting You can choose F2 F2 3 F2 ...

Страница 62: ...ils 2 Turn the camera dial to or If you are taking pictures using the viewfinder with the camera dial set to press the MENU button If you are taking pictures with the LCD screen you see the View menu 3 Press the button next to the exposure mode to change the setting to Aperture Priority 4 Press the buttons under the right and left arrows to change the aperture setting You can choose F2 F2 3 F2 8 F...

Страница 63: ...the aperture setting 1 Make sure that the camera is set to Manual user mode See page 1 10 for details 2 Turn the camera dial to You see the View menu 3 Press the button next to the exposure mode twice to change the setting to Shutter Priority 4 Press the buttons under the right and left arrows to change the shutter speed setting You can choose from a range of settings between 1 500 and 8 When you ...

Страница 64: ...ctures The high sensitivity setting is equivalent to ISO 200 The super high sensitivity setting is equivalent to ISO 400 NOTE Image quality is lower when you use high sensitivity settings To adjust the sensitivity setting 1 Make sure the camera is set to Program or Manual user mode See page 1 10 for instructions 2 Turn the camera dial to or If you are taking pictures using the viewfinder with the ...

Страница 65: ...al effects You can select the following white balance settings AUTO Adjusts the white balance of your pictures automatically This is the recommended setting for most pictures FIX Locks the white balance setting at 5200 K This setting gives your pictures a warmer appearance under fluorescent lighting It s also a good choice for retaining the reds in a sunset or sunrise CUST Lets you customize the w...

Страница 66: ...ne of the following If the user mode is set to Program press the button under the W B setting to select FIX or CUST custom If the user mode is set to Manual press the button under MENU CHANGE You see one of the following screens Press the button under the W B setting to select FIX or CUST The white balance setting which appears in the status display panel next to the W B mark remains in effect unt...

Страница 67: ...nu 4 Press the button below New W B 5 You see a screen asking you if you want to save a new setting Press the button next to Yes to save a new custom white balance setting The camera s lens moves out if it isn t already out You see a message and a framed area that the camera s lens uses to set the white balance 6 Focus the camera on a piece of white paper or some other object by which to set the w...

Страница 68: ... 10 for details 2 Turn the camera dial to or If you are taking pictures using the viewfinder with the camera dial set to press the MENU button to see the Viewfinder menu If you are taking pictures with the LCD screen you see the View menu with a preview of your image 3 Press the button under MENU CHANGE You see one of the following screens The current metering setting is in the lower right corner ...

Страница 69: ... If there is complete cloud cover avoid taking landscape photos Portraits and closer shots are better choices under cloudy conditions If you are capturing a sunset or sunrise Use the fixed white balance setting Adjust exposure settings for different effects Take several shots at different times to capture the changing colors To do this automatically set up interval shooting as described in Chapter...

Страница 70: ...rait under fluorescent or other unflattering indoor light use the fixed or user defined white balance If you are taking portrait photos Try using spot metering Make sure you center your subject when you lock the exposure with the two step shutter Then you can move the subject off center while you are holding the shutter button down Try using the Portrait setting in Program mode Be aware of lightin...

Страница 71: ...back and delete video clips and sounds Sections in this Chapter Playing Back Pictures One by One 6 2 Playing Back Multiple Pictures 6 2 Locking and Unlocking Photos 6 3 Deleting Pictures 6 3 Adding Audio Recordings 6 5 Playing Back Audio Recordings 6 6 Deleting Audio Recordings 6 6 Magnifying a Picture 6 7 Playing Back Video Clips 6 8 Viewing Picture Information 6 10 Playing Your Pictures as a Sli...

Страница 72: ... button on the back of the camera to wake the camera If you are using the AC adapter the camera shuts off after 15 minutes Playing Back Multiple Pictures You can play back your pictures in Multi mode to view small thumbnail versions of either four or nine pictures at once 1 Turn the camera dial to and press the POWER button You see the last picture you took on the screen 2 Press the button below M...

Страница 73: ...select and lock any additional images 4 To unlock a photo press the button under Unlock The lock icon disappears from the top left corner of the screen and the word Unlock changes back to Lock Select any additional locked images and repeat this step to unlock them Deleting Pictures The LCD screen provides different methods for deleting images as you play them back Delete the currently displayed pi...

Страница 74: ...mage or the button next to No to cancel Deleting All Pictures 1 Set the camera dial to and press the POWER button 2 Press the button next to Select Image 3 Press the button next to Delete All to delete all the images in your card A confirmation message appears 4 Press the button next to Yes to delete the images or the button next to No to cancel NOTE If any images are locked you see a screen like ...

Страница 75: ...n under SOUND You see the Sound menu 4 Press the button next to Sound Rec A ten second countdown of the recording time appears on the screen NOTE If there s already a recording on the selected photo a confirmation message appears To erase the old recording and make a new one press the button next to Yes Or press the button next to No to cancel 5 Speak clearly into the microphone on the back of the...

Страница 76: ...Sound Stop 6 Press the button under BACK twice to return to the main playback menu TIP To adjust the volume on your camera see page 7 4 Deleting Audio Recordings You can also delete audio recordings that you ve added to the pictures on your memory card 1 Set the camera dial to and press the POWER button 2 Use the buttons next to the right and left arrows to select an image You ll see a microphone ...

Страница 77: ...an zoom in to enlarge your image on the LCD screen and view it in greater detail You can also use the camera s buttons to scroll the image 1 Turn the camera dial to and press the POWER button You see the camera s playback menu 2 Use the buttons next to the right and left arrows to select the image you want to enlarge then press the T button to zoom in A magnified view of the picture appears An ico...

Страница 78: ...ck controls 1 Turn the camera dial to You see the last picture you took on the LCD screen If you haven t taken any photos you see a gray screen with the following message There is no image 2 Press the button under MENU CHANGE 3 Press the button next to VIDEO CLIP You see the video clip playback screen 4 Press the buttons next to the left and right arrows to select a video clip 5 If you want to vie...

Страница 79: ...e video release the button to play 10 To pause the video press the button under Pause You can do the following while the video is paused Press the button next to Fwd to move the clip forward one frame Press the button under Rev to move the clip backward one frame Press and hold the button next to the right arrows to fast forward release the button to pause Press and hold the button next to the lef...

Страница 80: ...lected video clip 6 You see a confirmation screen Press the button next to Yes to delete the video clip Press the button next to No if you don t want to delete it Viewing Picture Information You can use the LCD screen to view detailed information about individual images including date and time taken shutter speed exposure settings aperture and white balance settings and flash settings To display i...

Страница 81: ...to the right press the button under Rotate twice To rotate the image back to its original orientation press the button under Rotate a third time Select any other images and repeat this step to rotate them 5 Press the button next to Start to begin the slide show To pause the slide show press the button under Pause Press the same button under Restart to restart it While the slide show is paused you ...

Страница 82: ...ng the Language 7 4 Adjusting the LCD Brightness 7 5 Adjusting the Viewfinder Focus 7 5 7 Setting the Time and Date The camera remembers the time and date settings you made when you first set up your camera unless it goes without battery power for an extended period of time NOTE The camera does not automatically adjust the time for changes between daylight savings time and standard time To reset t...

Страница 83: ...next to the date display format to change it to M D Y 12 31 2001 D M Y 31 12 2001 Y M D 2001 12 31 6 When you re done press the button under BACK to save the settings and return to the SETUP menu Setting the Auto Power Off Time The automatic power off feature saves battery power by automatically putting the camera into sleep mode when it s idle for a designated period of time You can set the camer...

Страница 84: ...r it shuts off after 15 minutes Turning Camera Sounds On or Off The camera clicks to let you know when an image has been captured and beeps whenever you press any of its buttons To change the sound settings 1 Turn the camera dial to to display the SETUP menu 2 Press the button under Camera SETUP You see the Camera SETUP menu 3 Press the button under Beep to cycle through these choices Shutter The ...

Страница 85: ...to Volume to change the setting to Hi or Low 4 Press the button under BACK to return to the SETUP menu Setting the Language You can choose from eight languages for information displayed on the LCD screen 1 Turn the camera dial to to display the SETUP menu 2 Press the button under the icon to go to the Language Signal setup menu 3 Press the buttons under the arrows to highlight your desired languag...

Страница 86: ...ons next to the up and down arrows to adjust the screen brightness 4 Press the button under BACK to return to the SETUP menu Adjusting the Viewfinder Focus You can adjust the viewfinder s focus using the diopter This is useful if you wear glasses and want to remove them to take pictures with the viewfinder To adjust the focus simply look through the viewfinder and move the diopter dial up or down ...

Страница 87: ...e DPOF Standard 8 2 About PRINT Image Matching 8 2 Selecting Photos to Print 8 2 Deselecting All Photos 8 3 Adjusting Photos for Printing 8 3 Enabling an Index Print 8 4 8 without even turning on your computer To print all you need to do is insert your CompactFlash memory card into a printer with a card reader that recognizes DPOF or PRINT Image Matching files select the paper size and type using ...

Страница 88: ... commands designed specifically for your camera s output To use this feature you must have a PRINT Image Matching enabled printer NOTE PRINT Image Matching is available for JPEG photos only If you don t have a printer that reads PRINT Image Matching data the data is ignored Selecting Photos to Print You can select photos when you view them in any of the camera s playback menus 1 Turn the camera di...

Страница 89: ... removed when you deselect all the images To remove these adjustments set them back to the standard setting as described in the next section The numbers are set to 0 and the images appear in black and white You can re select images by pressing the t print button as described in the previous section Adjusting Photos for Printing You can adjust the brightness and sharpness of your JPEG photos for pr...

Страница 90: ...button next to the down arrow to decrease the number of copies 6 Press the button under BACK to return to the main PRINT IMAGE menu You see a yellow icon next to the number of copies in the corner of the image The icon does not appear if both settings are Std Enabling an Index Print 1 Set the camera dial to and press the POWER button 2 You see the PRINT IMAGE menu 3 Press the button next to the in...

Страница 91: ...levision VCR or other device The following chapters are included in this section 9 Installing Software and Connecting 10 Getting Photos Into Your Computer 11 Getting Your Photos Into Documents 12 Printing Your Photos 13 Stitching Panoramas 14 Presenting Your Photos For troubleshooting maintenance and reference information including specifications see the next section Troubleshooting and Reference ...

Страница 92: ...er 9 6 Reading Your Image Expert User s Guide 9 9 9 The PhotoPC 3100Z CD ROM includes this software A USB storage driver which lets you download photos in Windows 98 Mac OS 8 6 or Mac OS 8 5 1 If you have a newer version of the Mac OS or Windows you don t need to install the USB storage driver Sierra Imaging Image Expert with the QuickTime Player and Adobe Acrobat Reader which lets you transfer or...

Страница 93: ...OS 9 0 through Mac OS 9 1 you don t need to install the storage driver go to Installing Camera Software on page 9 3 Installing the Driver in Windows 98 1 Insert the PhotoPC 3100Z CD ROM in your computer s CD ROM or DVD drive 2 Double click My Computer Then double click the PhotoPC 3100Z CD ROM icon 3 Double click the EPSON icon 4 When you see the following screen click USB Storage Driver 5 Follow ...

Страница 94: ... software as described below Installing Camera Software You can install the software on your Windows 98 Windows Me system Windows 2000 system or on your Macintosh with Mac OS 8 5 1 through 9 1 See page C 7 for minimum system requirements NOTE If you are asked to restart your computer after any installation you can cancel and wait to restart until you have installed all of the PhotoPC 3100Z applica...

Страница 95: ...ollow the steps on the screen to install it 7 The QuickTime Player installation starts Follow the steps on the screen When you see the QuickTime registration screen leave the fields blank and click Next You only need to register if you upgrade see page 11 8 8 When the installation is complete you return to the Install Camera Software screen 9 Click Panorama Stitcher and follow the instructions on ...

Страница 96: ...s blank and click Continue You only need to register if you upgrade see page 11 8 7 When the installation is complete click Quit You return to the Install Camera Software screen 8 Click Panorama Stitcher and follow the instructions on the screen if you want to install it NOTE Panorama Stitcher requires Mac OS 8 6 or later 9 Click EPSON File Converter and follow the instructions on the screen if yo...

Страница 97: ... not exposed to sources of electromagnetic interference such as stereo speakers or the base units of cordless telephones 1 Locate the USB cable that came with the camera 2 Plug the connector on the USB cable into the USB port on your computer or into a port on a USB hub NOTE Although you can use a USB hub it s recommended that you connect the camera directly to the computer s USB port 3 Open the c...

Страница 98: ...rd Follow the steps in the wizard to let your computer recognize the camera You may need to insert your Windows 98 system disk during the installation 1 Insert the PhotoPC 3100Z CD ROM in your computer s CD ROM or DVD drive 2 At the first screen in the Add New Hardware Wizard click Next 3 Select Search for the best driver for your device Then click Next 4 Select Specify a location 5 Click Browse a...

Страница 99: ...cates the driver 8 Click Next to install the driver 9 When installation is complete click Finish 10 If you see this screen after you complete the Add New Hardware Wizard click Cancel and install the USB Storage Driver from your CD ROM following the steps on page 9 2 ...

Страница 100: ... Expert User s Guide To read the manual on a Macintosh double click the Image Expert User s Guide icon on the PhotoPC 3100Z CD ROM You can also copy the manual to your hard drive When you open a manual in Acrobat Reader you see a toolbar like this With Acrobat Reader you have several ways to navigate through text Use the navigation window on the left side of the screen to move quickly to the topic...

Страница 101: ...is Chapter Copying Files Directly From Your Memory Card 10 1 Transferring Files With Image Expert 10 3 10 Copying Files Directly From Your Memory Card Whether you connect your camera with USB insert your memory card into a PC card slot with an adapter or insert your card into a memory card reader your computer sees your CompactFlash card as an additional drive This lets you copy your files directl...

Страница 102: ...en double click the 100Epson folder to access your photo files and associated sound files Double click the Movie folder to access any QuickTime movie files that you captured 4 Click any files you want to copy to the computer and drag them to the folder where you want to store them To select multiple files hold down the Shift or Ctrl key in Windows or the Shift key on a Macintosh CAUTION If you del...

Страница 103: ... computer as described on page 9 6 Turn the camera dial to 2 In Windows click Start point to Programs Image Expert and click Image Expert PhotoPC 3100Z If you see the Image Expert Quick Tour screen click Close On a Macintosh open the Image Expert PhotoPC 3100Z folder and double click the Image Expert icon You see a window like the following 3 In Windows click View Pictures in the Camera On a Macin...

Страница 104: ...on to transfer all the images to your hard drive To transfer a single image click it to select it then click the button NOTE To select more than one image hold down the Ctrl key in Windows or the Shift key on your Macintosh while you click To deselect an image or images click another image You must click the button to transfer images When you view images on your computer they are not yet transferr...

Страница 105: ...r than JPEG files 7 When you re finished close the camera filmstrip window 8 You see a confirmation message asking if you want to delete all the photos you transferred from your camera s memory card 9 Click Yes to erase the image s from the camera s memory card or No to save the images on the memory card Click Cancel if you want to keep the camera filmstrip window open From your album you can doub...

Страница 106: ...e and make sure the connections are secure 3 Make sure your batteries have enough power or your AC adapter is connected 4 Click Retry If you see the Connection Failed message again click Connection You see the following dialog box 5 Select another image source from the Connect Via list if necessary If you are connecting the camera with USB select USB Mounted Drive for the Connect Via setting If yo...

Страница 107: ...o import an image into your application or copy and paste it With Windows you can use the Camio Viewer to drag a picture directly from the camera and drop it into your project Sections in this Chapter Importing Images Into Documents 11 2 Getting Images With Copy and Paste 11 3 Using Drag and Drop From an Album Windows Only 11 4 Getting Images With the Camio Viewer Windows 11 5 Sharing Your Photos ...

Страница 108: ...correctly To import a PhotoPC 3100Z picture into your document 1 Start your application 2 Open the document where you want to use the picture 3 Select the point where you want to place your picture NOTE In some applications you can add a frame around the picture if you want to move it or resize it In other applications you create a frame first and then place the picture in it For instructions see ...

Страница 109: ...lace a picture in just about any type of document or project You should already have transferred your picture from the camera to your hard disk To copy and paste images 1 In Windows click Start Programs Image Expert Image Expert PhotoPC 3100Z If you see the Image Expert Quick Tour screen click Close On a Macintosh open the Image Expert PhotoPC 3100Z folder and double click the Image Expert icon 2 ...

Страница 110: ... application s Edit menu A copy of the picture appears in your document Using Drag and Drop From an Album Windows Only Once you have transferred your photos you can easily drag and drop them from Image Expert albums into documents or other projects NOTE Dragging and dropping an image into a document works only with OLE 2 0 compliant applications such as Microsoft Word PowerPoint WordPerfect or Lot...

Страница 111: ...age you want 6 While holding down the mouse button drag the image to the location where you want it in your document 7 Release the mouse button The picture appears in your document If you want to edit or modify the picture just double click it in the Image Expert window to bring up the Image Expert menus and toolbar Getting Images With the Camio Viewer Windows The Camio Viewer a component of Image...

Страница 112: ... You can then select an image to drag and drop into a document or presentation The image is embedded in your document and is not available as a separate file Copy all images from the Camera to the Computer Transfers your pictures to an album folder on your hard drive You can then select an image to drag and drop Copy all images and delete them from the Camera Transfers your pictures to an album fo...

Страница 113: ... Expert menus and toolbar For more information about the Camio Viewer see your electronic Image Expert User s Guide NOTE When you drag and drop with the Camio Viewer your picture is not saved as a separate image file on your hard drive You have to transfer your image first if you want it to be available as a separate image file Transferring Images Before Placing Them If you chose Copy all images f...

Страница 114: ...u may not be able to import video clips into some applications Not all applications recognize the camera s movie file format If you upgrade your QuickTime Player to QuickTime Pro you can use that program to save your file in a format that your application recognizes You can also use QuickTime Pro to edit your video clips Go to http www apple com quicktime on the Internet for details Importing Phot...

Страница 115: ...l the pictures in your camera or several copies of your photos with different layouts and print settings Printing a Single Photo 1 Start Image Expert In Windows click Start Programs Image Expert Image Expert PhotoPC 3100Z Sections in this Chapter Printing a Single Photo 12 1 Printing Photos from an Album 12 3 Printing Size Guidelines 12 4 Printing Your Photos ...

Страница 116: ...umentation for instructions Make sure you select the paper size that you have loaded in your printer This affects the appearance of your print layout When you re done close the printer settings window and click OK 5 Select a print layout from the list You can print a single large copy of your photo several small copies or a combination of different sizes 6 To add text click the Edit Text button an...

Страница 117: ...Open Album button and select your album The album opens 3 Click the Print Layout button Your photos open in the Print Layout window 4 Click the Print Setup button and click Properties Windows or Options Macintosh to open your printer settings see your printer documentation Make sure you select the paper size that you have loaded in your printer This affects the appearance of your print layout When...

Страница 118: ... the page 7 To add text click the Edit Text button and type in the text you want to include then click OK 8 Click the Print button to print your photos Printing Size Guidelines Here are image size guidelines to follow for the best print quality when printing photos Print images captured at 640 480 pixels as small prints 4 6 inches or smaller Print images captured at 2048 1536 pixels as larger prin...

Страница 119: ...ing a Cylinder Panorama 13 5 Viewing and Printing Panoramas 13 6 13 You can stitch cylindrical panoramas for when you ve taken photos of 360 views or panned images You can save the cylindrical panoramas as 3D virtual reality scenes that you view with the QuickTime VR Player Or you can stitch big plane panoramas when you want a single long panorama that extends from a central base image You can pri...

Страница 120: ...titch them properly If your panorama is two rows high keep the images in the order in which they are saved 5 Use the Rotate All button to rotate images 6 If you are creating a big plane panorama select a base image and click the Set Base Image button 7 Click the Automatic Alignment button then click OK Panorama Stitcher aligns the images in the automatic alignment window 8 Click and drag images to...

Страница 121: ... in the Alignment window 5 To remove an image click it a red frame appears around the image and then select Clear from the Edit menu 6 Align your images manually by clicking and dragging them or click the Auto Align button 7 If you are creating a big plane panorama click a base image to select it and choose Set Base from the View menu Now you are ready to create your panorama to stitch a big plane...

Страница 122: ...rph them into a single image 3 Choose Image Size Blending Focal Length and Background Color settings for your stitch If you plan to print your image choose Large as your Image Size 4 Click the Big Plane button to stitch your image 5 Your stitched image appears Drag the marquee to select the area you want to include in your panorama and click the Trimming button Macintosh Windows ...

Страница 123: ...view in the QuickTime VR Player 1 Click the Stitch button 2 You see the Stitch window For a simple stitch image blending click the Simple Stitch checkbox Otherwise the software will match and adjust features tomorphtheminto a single image 3 Choose Image Size Blending Focal Length and Background Color settings for your stitch 4 Click the 360 degree box if you want to create a 360 VR panorama 5 Clic...

Страница 124: ...s You can view your 360 VR panorama movies in the QuickTime VR Player Find the VR movie mov file that you saved on your computer and double click it to open the file in QuickTime To navigate the file click and drag the mouse in the direction you want to move See the On line QuickTime Player Help for more information You can print on special panoramic photo paper or roll paper if your printer suppo...

Страница 125: ...ter Sections in this Chapter Uploading Images to the Camera 14 1 Converting Presentations 14 7 Connecting the Camera to a Video Device 14 10 14 Uploading Images to the Camera The EPSON File Converter software allows you to convert any image or presentation slide on your computer to the EPSON Photo file format so you can upload it to your CompactFlash memory card You can leave images in their actua...

Страница 126: ...Double click the folder to select it The images in the folder are listed in the File Name box 3 Select the format of the images you want to upload from the Files Type list 4 Select the images you want to upload in the File Name list Then click the button If you want to upload all the images in the list at once click the button As you select files they appear in the Selected Files List in the order...

Страница 127: ...File Converter resizes your files to a size the camera can read keeping them as close to the original size as possible 6 If you want to upload an audio recording with a file highlight the file name in the Selected Files List and click the Select Sound button 7 From the Open dialog box select your sound file and click Open If you want click the Play Sound button to play the sound or the Delete Soun...

Страница 128: ...ick Add The Select Files dialog box appears 3 Double click the folder containing the images you want to upload then select each file you want to upload and click Select If you want to preview a selected image click the Preview checkbox It takes a few seconds longer to select images with previews displayed 4 When you finish selecting image files click Done to close the Select Files dialog box ...

Страница 129: ...udio recording with a file highlight the image file name in the Selected Files List and click Select Sound Find the folder where your sound file is located and select the sound you want to associate with your file Then click Open 7 If you want click Play Sound to play the sound or click Delete Sound to remove it 8 Click the Start button Select the folder where you want to save your converted files...

Страница 130: ...n on your desktop Double click the drive icon 3 You see two or more folders Double click the DCIM folder then double click the 100Epson folder 4 Open the folder on your computer where your converted files are stored and drag them to the 100Epson folder To select multiple files hold down the Shift key or the Ctrl key CAUTION If you delete any files in the 100Epson folder they are deleted from the c...

Страница 131: ...res from within the EPSON File Converter utility Macintosh users need to use the standard Macintosh screen capture function Capturing Windows Screens 1 Click Start point to Programs EPSON Camera EPSON File Converter then click EPSON File Converter You see the EPSON File Converter window 2 Click the Screen Capture tab The Screen Capture dialog box appears 3 Use the Drive and Folder lists to select ...

Страница 132: ...creen is captured not just the active window Make sure you maximize your presentation before you capture it If you set your application to slide show mode or the equivalent you can capture just the image you want without menus and other screen elements See your application s documentation for instructions Presentations using large font sizes at least 18 points work best 7 Press the hot key combina...

Страница 133: ...e sure you maximize your presentation before you capture it If you set your application to slide show mode or the equivalent you can capture just the image you want without menus and other screen elements See your application s documentation for instructions Presentations using large font sizes at least 18 points work best 2 To capture the entire desktop press the J Shift and 3 keys on your comput...

Страница 134: ...formation You need the video cable that came with your PhotoPC 3100Z to connect to your video device Setting the Broadcast Signal System If you will use your camera with a television make sure the camera has the correct broadcast signal setting 1 Turn the camera dial to to display the SETUP menu 2 Press the button under the icon to go to the Language Signal setup menu 3 If necessary press thebutto...

Страница 135: ...to the AV Out port as shown below 3 Connect the yellow end of the video cable to the VIDEO IN port and the white end of the cable to the AUDIO IN port on the TV VCR projector or other device 4 Turn on the video device and switch to video mode 5 Turn the camera dial to The last image that you uploaded to the camera is projected If you are using the optional AC adapter you can also see the image on ...

Страница 136: ...back features to show your presentation see Chapter 6 for details 6 When you re done playing back pictures turn off your camera and turn off your video device 7 Disconnect the cables TIP You can videotape your pictures sounds and videos to share them without using a computer After you connect the camera to a VCR press the Record button on the VCR to play back a video clip see page 6 8 or use the c...

Страница 137: ...otoPC 3100Z optional accessories available for the camera specifications and warranty information This section includes the following appendices A Maintenance and Troubleshooting B Optional Accessories C Specifications D Notices There is an Index following this section of the book Troubleshooting and Reference ...

Страница 138: ...Problems A 7 Solving Picture Problems A 11 Where To Get Help A 15 A Handling the Camera To avoid damaging the optics of the camera do not expose the lens to direct sunlight for extended periods of time NOTE To further protect the lens from bright sunlight you can attach an optional UV filter with your camera s lens adapter See Appendix B for instructions Make sure you replace the lens cap on the c...

Страница 139: ...the lens don t press too hard If necessary clean the battery contacts with a dry cloth If the LCD screen gets fingerprints or smudges on it use a soft damp cloth to lightly wipe the screen Storing the Camera When you re not using the camera make sure the camera is turned off and the lens is retracted Attach the lens cap to protect the lens When the camera is not used for long periods of time remov...

Страница 140: ...You can t take a picture with the camera Make sure you ve installed the CompactFlash memory card in your camera If it s already installed you may need to format it see Chapter 1 Check to see if a message is displayed on the camera s LCD screen The CompactFlash memory card may be full check the picture counter on the display panel Try setting the camera to a lower image quality setting there may be...

Страница 141: ...e large files 9 1MB and take approximately 22 seconds to process To capture large high quality images that you can print try setting the camera to HyPict JPEG mode instead of Tiff mode see page 2 8 The flash doesn t work Make sure the flash is not set to the flash off setting Check the batteries and make sure they re installed correctly Replace the batteries if necessary If you are using one of th...

Страница 142: ...ck of the camera to turn the power on You can also press the POWER button to turn the camera off and then press it again to turn the camera back on Make sure the camera is not in viewfinder mode if you want to use the LCD screen The LCD screen turns off automatically when the camera is connected to and communicating with a computer or video device The lens is still out even though the camera is tu...

Страница 143: ... to Manual See page 1 10 for details on changing your user mode and Appendix B to use an external flash The pictures remaining number on the display panel doesn t decrease after you take a picture Your camera is operating correctly The total number of pictures you can store depends on your pictures content The number doesn t always change especially when you re using standard image quality To conf...

Страница 144: ...d then erase them see Chapter 10 Or replace your memory card with a new one see Chapter 1 If you have sound turned on you can capture a video clip that is 25 seconds Turn sound recording off to capture a 35 second video clip Solving Connection and Software Problems If you are having trouble connecting your camera to a computer or video device or installing or using the software check the suggestio...

Страница 145: ...error message when you re using your PhotoPC 3100Z software with the camera connected to your computer Make sure the cable is connected correctly as described in Chapter 9 Make sure your camera is not turned off and the batteries have power or connect the AC adapter If your camera is connected to a USB hub try connecting the camera directly to your computer From the error screen click Connection a...

Страница 146: ...transfer speed may be slow Try using virtual memory See your computer documentation or help for more information You can t find your video clips or photos Your camera stores photos and video clips in different folders on the camera s memory card The photos and associated sound files are stored in the DCIM 100Epson folder The movies are stored in the Movie folder You are unable to format or use a C...

Страница 147: ...sh memory card in your PC card PCMCIA drive the camera can t access the images You have to use the EPSON File Converter to convert your images before you upload them See Chapter 14 for details You can t install software in Windows 2000 If you see an error message or the software doesn t install correctly you may not have software installation privileges Contact your System Administrator You can t ...

Страница 148: ...lity Also see your printer manual to change your print settings if necessary If you used drag and drop to insert your pictures they may appear grainy Try importing them into your documents instead When you preview images on your computer they look distorted If you are using an STB Velocity 128 video card and have a screen resolution of 800 600 or 640 480 you may notice this phenomenon Slowing down...

Страница 149: ... close ups make sure you have adequate lighting Using a tripod will help you capture sharp pictures Make sure that your subject isn t moving and that you hold the camera steady after you press the shutter button until the camera status light or photo capture light starts flashing If you want to photograph a moving subject try increasing the shutter speed See Chapter 5 for information about how to ...

Страница 150: ...e and letting the camera choose the shutter speed with Aperture Priority mode see Chapter 5 If you re using the macro mode to take a close up photo be sure to provide adequate lighting for your subject If you re taking a picture at night and you want to light up the background as well as your subject use the camera s slow synchronized flash mode If you need more light attach an optional external f...

Страница 151: ...eries in your camera you may need to reset the clock in the SETUP menu See Chapter 7 for more information Your pictures don t look as good as they used to Your camera s lens may be dirty or dusty Try cleaning it by following the instructions on page A 2 The area captured in the photo is different from what you saw in the viewfinder Make sure you look straight through the viewfinder If you re takin...

Страница 152: ...t name EPSON PhotoPC 3100Z Product serial number located on the bottom of the camera Proof of purchase such as a store receipt and date of purchase Computer configuration Description of the problem Service Access World Wide Web From the Internet you can reach EPSON Support at http support epson com At this site you can download drivers and other files look at product documentation access troublesh...

Страница 153: ...epsonstore com U S sales only In Canada please call 800 873 7766 for dealer referral Software Licensing You can install EPSON File Converter and the USB storage driver on multiple computer systems If you want to install Image Expert on multiple computer systems please contact Sierra Imaging at 800 501 8902 regarding the licensing fee ...

Страница 154: ...e YPhotoPC 3100Z to enhance its capabilities and convenience Sections in this Appendix Using the Optional AC Adapter B 2 Using a Tripod B 4 Attaching an Optional Converter Lens or Filter B 4 Attaching an Optional Flash B 5 Using a PC Card Adapter B 6 Photo Printers B 8 Optional Accessories ...

Страница 155: ...ilable from the various manufacturers such as Lexar Media 800 789 9418 SanDisk 408 542 0595 Delkin Devices 858 586 0123 Make sure you purchase the correct size card The PhotoPC 3100Z will accept ATA compatible Type I CompactFlash cards up to 256MB Using the Optional AC Adapter The universal AC adapter allows you to connect your PhotoPC 3100Z to any standard 110 230 V outlet You should use the AC a...

Страница 156: ...esn t fit your outlet have a proper outlet installed by a qualified electrician To avoid radiation danger do not expose or remove the ferrite core To avoid losing any images or settings make sure the camera has finished processing and is turned off before you connect or disconnect the AC adapter To connect the adapter 1 Open the connector cover on the side of the camera 2 Plug the adapter cable in...

Страница 157: ...d to view your subject as desired Attaching an Optional Converter Lens or Filter You can attach a 49 mm telephoto or wide angle converter lens to the camera using the lens adapter that came with your camera You can also use 49 mm close up lenses and filters You can order accessory Tiffen lenses and filters from DC Pro Digital Camera Accessories at 800 522 7835 or 516 434 8800 or visit www dcprodir...

Страница 158: ...Metz Model 32Z 2 NOTE The camera must be in the Manual user mode to enable the external flash See page 1 10 to change your user mode to Manual To attach the flash and set up your camera to use it 1 Make sure the camera and flash are both turned off 2 If necessary insert batteries into the flash unit as described in the manufacturer s instructions 3 Slide the flash onto the top of the camera s hot ...

Страница 159: ...f your desktop or notebook computer has a Type II PC card PCMCIA slot you can use a PC card adapter to access images stored on CompactFlash cards NOTE If you don t have an adapter you can use Image Expert to transfer photos to your computer Or you can use the USB Storage driver to copy your photos to your hard drive See Chapter 10 If you can t access a card in your notebook computer contact the co...

Страница 160: ...and card are installed in your computer s PC card PCMCIA slot you can transfer photos by simply copying them to your hard drive The photos are stored in the DCIM 100Epson folder on the card and the video clips are stored in the Movie folder In Windows use My Computer or the Windows Explorer to drag and drop image files to your hard drive On a Macintosh use the Finder to drag and drop image files t...

Страница 161: ...r support and 6 color BorderFree photo quality printing This printer has a 2880 720 dpi resolution and prints with lightfast inks EPSON Stylus Photo 1280 This printer features true photo reproduction quality It creates wide printouts up to 13 44 inches and BorderFree photos The EPSON Stylus Photo 1280 also supports roll paper printing and long lasting prints with lightfast inks NOTE The EPSON Styl...

Страница 162: ... NiMH Battery Charger C 5 Optional NiMH Batteries C 6 Optional Universal AC Adapter C 6 Minimum System Requirements C 7 C Camera Physical Dimensions Width 4 3 inches 108 mm Height 3 5 inches 89 mm Depth 2 6 inches 65 mm Weight 12 6 oz 358 g without batteries strap lens cap and CompactFlash memory card Specifications ...

Страница 163: ...type Digital still auto focus camera with LCD screen CCD 1 1 8 inch color area CCD 3 34 megapixels Image resolution 2544 1904 pixels HyPict 2048 1536 pixels uncompressed Tiff 2048 1536 pixels super fine 1600 1200 pixels fine 640 480 pixels standard File formats Still images JPEG DCF EXIF Tiff Video clips QuickTime Motion JPEG Sound files wav Bit depth 16 million colors 24 bit USB cable Small size ...

Страница 164: ...s f 7 to 21 mm equivalent to a 34 to 102 mm lens on a 35 mm camera Brightness F2 0 W to 2 5 T Auto focus range 20 inches 50 cm to infinity normal 8 to 20 inches 20 to 50 cm macro mode 2 36 to 20 inches 6 to 50 cm macro mode wide angle Manual focus range Three settings approx 3 feet 10 feet and infinity for normal mode and two settings for macro mode LCD screen 1 8 inch TFT color LCD 110 000 pixels...

Страница 165: ...eed range varies based on aperture setting Viewfinder Real image optical with centering cross hair view range approximately 83 Adjustable focus with diopter Aperture F2 F2 3 F2 8 F4 F5 6 F8 aperture range varies depending on shutter speed setting Flash Built in automatic luminance control flash Hot shoe for optional external flash Flash modes Automatic flash red eye reduction forced flash flash of...

Страница 166: ...d or sound recordings on the card or if the images are complex the quantity of photos may vary Optional NiMH Battery Charger Physical Dimensions Width 1 7 inches 42 8 mm Height 1 5 inches 36 8 mm Depth 0 13 inch 3 3 mm Image Mode Standard compression Low compression Standard 199 122 Fine 56 29 Super Fine 29 15 HyPict 12 Tiff 1 Width 3 0 inches 76 mm Height 4 5 inches 115 mm Depth 1 1 inch 28 mm We...

Страница 167: ... maximum initial charge 2 1 2 hours average subsequent charges Power consumption Approximately 8W Charging temperature 41 to 95 F 5 to 35 C Storage temperature 4 to 86 F 20 to 30 C Type Cylindrical sealed Nickel Metal Hydride rechargeable battery Size AA Output DC 1 2 V Width 1 7 inches 43 mm Height 1 22 inches 31 mm Depth 4 1 inches 104 mm Output DC 7 V 2 0 A Input 100 to 240 V AC 50 to 60 Hz ...

Страница 168: ... Built in USB port QuickTime 4 1 2 or later included on CD ROM Macintosh Systems At least 32MB RAM 64MB recommended At least 30MB free hard disk space CD ROM drive VGA monitor with minimum resolution of 640 480 Mouse or other pointing device 16 bit sound card and speakers iMacTM or Power Macintosh G3 or G4 with Mac OS 8 5 1 through Mac OS 9 1 Panorama Stitcher requires Mac OS 8 6 or later Built in...

Страница 169: ...dix Safety Instructions D 1 Declaration of Conformity D 3 FCC Compliance Statement D 4 Warranty D 5 D To prevent fire or explosion do not use the camera where inflammable or volatile gas is stored If the camera shows unusual signs such as noise odor or smoke turn it off immediately Remove the batteries and or disconnect the AC adapter and unplug the AC adapter from the electrical outlet To avoid d...

Страница 170: ... the following conditions if the power cord or plug is damaged if liquid has entered the camera if the camera has been dropped or its exterior has been damaged if the camera or its optional accessories do not operate normally or exhibit a distinct change in performance Adjust only those controls that are covered by the operating instructions Do not attempt to service the camera yourself Refer all ...

Страница 171: ...quipment being produced can be expected to be within the variation accepted due to quantity production and testing on a statistical basis as required by 47CFR 2 909 Operation is subject to the following two conditions 1 this device may not cause harmful interference and 2 this device must accept any interference received including interference that may cause undesired operation Trade Name EPSON Ty...

Страница 172: ...more of the following measures Reorient or relocate the receiving antenna Increase the separation between the equipment and receiver Connect the equipment into an outlet on a circuit different from that to which the receiver is connected Consult an experienced radio TV technician for help WARNING The connection of a non shielded equipment interface cable to this equipment will invalidate the FCC C...

Страница 173: ...ed by parts or supplies not manufactured distributed or certified by EPSON This warranty does not cover third party parts components or peripheral devices added to the EPSON product after its shipment from EPSON EPSONis not responsible for warranty service should the EPSONlabel or logo or the rating label or serial number be removed or should the product fail to be properly maintained or fail to f...

Страница 174: ...ragging pictures from 11 4 to 11 5 printing 12 3 to 12 4 saving files in 10 3 10 5 Alert sounds setting 7 3 Annotation audio 2 14 to 2 15 Aperture priority 5 5 setting 5 4 to 5 5 Attaching lens cap 1 5 to 1 6 neck strap 1 4 to 1 5 options B 4 to B 6 Audio adding 2 14 to 2 15 6 5 converting 14 2 to 14 5 deleting 6 6 to 6 7 downloading to computer 10 1 to 10 5 in interval shots 3 6 in video clips 3 ...

Страница 175: ...ro 3 1 2 safety instructions D 1 to D 2 specifications C 2 Battery charger safety instructions D 1 to D 2 specifications C 5 Beep enabling and disabling 7 3 Big plane panorama 13 3 to 13 5 Black and white pictures taking 2 11 Blurry pictures A 12 viewfinder A 4 Bright conditions 5 2 5 12 Brightness LCD setting 7 5 picture A 13 PRINT Image Matching setting 8 3 to 8 4 Broadcast signal 14 10 A 7 Butt...

Страница 176: ... unable to take picture A 3 unpacking 1 1 uploading images 14 6 volume setting 7 4 waking 2 4 warranty D 5 Camera mode continuous shooting 3 3 to 3 4 Full Auto 1 10 interval shooting 3 5 to 3 6 macro 4 4 Manual 1 10 manual focus 4 5 monochrome 2 11 panorama stitching 4 6 to 4 8 Program 1 10 sleep 2 4 Tiff 2 8 viewfinder 2 1 to 2 2 Camera status light 2 18 Camio Viewer 11 5 to 11 7 Cap lens 1 5 Cap...

Страница 177: ...tion screen adding sound 2 14 to 2 15 enabling 2 14 options 2 5 quick delete 2 16 quick playback 2 16 Connecting camera 9 6 optional AC adapter B 2 to B 3 problems A 7 to A 8 USB cable 9 6 video cable 14 10 to 14 12 Continuous shooting problems A 4 taking pictures 3 3 to 3 4 with the timer 3 4 Contrast A 13 Converter lens B 4 Converting files for uploading 14 2 to 14 5 Copy and paste 11 3 to 11 4 ...

Страница 178: ... files 8 2 to 8 3 description 8 2 deselecting photos 8 2 to 8 3 Digital zoom 3 2 4 3 Diopter 7 5 A 4 Directly copying files 10 1 to 10 2 Disabling flash 2 10 Display panel 2 17 to 2 18 Display LCD see LCD screen Distorted pictures A 11 Documentation using Intro 3 9 9 Documents copying pictures into 11 3 to 11 4 getting pictures into 11 1 to 11 7 Downloading audio recordings 10 1 to 10 5 11 7 pictu...

Страница 179: ... 2 to 5 6 aperture setting 5 4 to 5 5 automatic exposure value 5 2 to 5 3 checking settings 2 18 locking with shutter button 2 2 2 4 predefined settings 5 2 to 5 3 problems A 6 A 13 shutter speed setting 5 4 to 5 6 tips 5 12 to 5 13 External flash attaching B 5 enabling B 5 problems A 4 A 6 F Fast forwarding video clips 6 9 Fast shooting 3 3 to 3 4 FCC Compliance Statement D 4 Features camera Intr...

Страница 180: ...6 problems A 4 to A 5 range A 13 red eye reduction mode 5 13 settings 2 9 to 2 11 slow synchronized mode 5 12 A 13 troubleshooting A 13 Fluorescent lighting 5 8 5 13 Focus locking 2 2 2 4 problems A 12 setting 4 5 viewfinder adjustment 7 5 Folders on camera A 9 Formats EPSON Photo file 14 1 JPEG 2 7 Motion JPEG 3 1 QuickTime Movie 3 1 A 10 Tiff 2 8 A 4 Formatting memory card 1 9 Framing close shot...

Страница 181: ...al 9 9 opening pictures and video clips 10 5 printing 12 1 to 12 4 problems A 8 transferring pictures 11 5 to 11 7 Image quality setting 2 7 to 2 8 Images see Pictures Importing photos 11 2 A 9 Index print DPOF 8 4 Image Expert 12 3 to 12 4 PRINT Image Matching 8 4 Indoor pictures 5 7 Information displaying 6 10 Installing batteries 1 2 memory card 1 12 PC card adapter B 7 software 9 1 to 9 5 9 7 ...

Страница 182: ...aching 1 5 to 1 6 removing 1 6 Lenses optional B 4 Licensing software A 16 Light metering 5 11 Lighting conditions bright 5 12 dim 5 7 5 12 A 13 direct 5 13 excessive A 13 fluorescent 5 8 5 13 portraits 5 13 sunset sunrise 5 8 Lights camera status 2 18 photo capture 2 2 2 4 Limited warranty D 5 Lines on pictures A 14 Locked pictures deleting 6 4 Locking pictures 6 3 Low battery power checking 2 17...

Страница 183: ... 11 2 14 View 2 3 Messages Image Expert 10 6 Metering method changing 5 11 Microphone 2 14 Military time format 1 8 Minimum system requirements C 7 Missing menus A 5 Mode continuous shooting 3 3 to 3 4 Full Auto 1 10 interval shooting 3 5 to 3 6 Manual 1 10 manual focus 4 5 monochrome 2 11 panorama stitching 4 6 to 4 8 Program 1 10 Tiff 2 8 Monitor LCD see LCD screen Monochrome pictures taking 2 1...

Страница 184: ...es 2 13 Overexposed pictures 5 4 A 13 P PAL 14 10 Panorama Stitcher aligning pictures 13 1 to 13 3 importing pictures 13 1 to 13 3 installing 9 1 to 9 5 stitching pictures 13 3 to 13 6 Panoramas printing 13 6 stitching 4 6 to 4 8 13 3 to 13 6 viewing 13 6 VR movies 13 1 13 5 to 13 6 Panoramic pictures 4 6 to 4 8 13 1 to 13 6 Parts 1 1 Pasting pictures into documents 11 3 to 11 4 Pausing slide show...

Страница 185: ...o 11 4 playing back 2 16 6 1 to 6 11 printing 12 1 to 12 4 problems A 11 to A 14 problems taking A 3 A 6 Pictures continued slide shows 6 11 slow processing A 4 taking with LCD screen 2 3 to 2 5 taking with viewfinder 2 1 to 2 2 transferring from camera 11 5 to 11 7 unlocking 6 3 uploading 14 6 zoom digital 4 3 Pictures remaining incorrect A 6 Placing photos in documents 11 2 Playing back audio 6 ...

Страница 186: ...ower Pak ordering Intro 3 B 2 Precautions safety D 1 to D 2 Presentations converting 14 7 to 14 9 using camera for 14 1 to 14 12 Preview LCD screen 2 3 PRINT Image Matching adjusting settings 8 3 to 8 4 brightness 8 3 to 8 4 compatible printers B 8 description 8 2 deselecting photos 8 2 to 8 3 index print 8 4 selecting photos 8 2 to 8 3 sharpness 8 3 to 8 4 Printers photo B 8 Printing album 12 3 t...

Страница 187: ...deo clips A 9 overexposed pictures A 13 picture A 11 to A 14 playing pictures on television A 7 power A 3 Problems continued settings A 6 slow image processing A 4 software A 7 to A 10 sound A 7 status display panel A 5 A 6 underexposed pictures A 13 uploading A 10 video clips A 7 A 10 A 14 Processing time A 4 Program mode description 1 10 using programmed subject settings 2 13 Projector 14 10 to ...

Страница 188: ...aining pictures 2 18 Removing memory card 1 11 Resolution 2 7 to 2 8 Restarting slide show 6 11 video clip 6 9 Reversing video clip playback 6 8 Rewinding video clips 6 9 Rotating slide show pictures 6 11 S Safety instructions D 1 to D 2 specifications C 3 Screen captures Macintosh 14 9 Windows 14 7 to 14 9 Screen LCD see LCD screen selecting photos 8 2 to 8 3 Self timer using 2 12 Sensitivity pro...

Страница 189: ...ctures 4 6 to 4 8 problems A 6 programmed subject settings 2 13 sensitivity 5 7 to 5 8 shutter speed and aperture 5 4 to 5 6 time and date 7 1 to 7 2 user mode 1 10 Settings continued viewfinder 2 2 viewing in playback mode 6 10 white balance 5 8 to 5 10 Shady conditions 5 12 Sharpness 8 3 to 8 4 Shot SETUP menu 2 8 2 11 2 14 Shutter adjusting speed 5 4 to 5 6 click sound 7 3 locking settings 2 2 ...

Страница 190: ...rts 7 3 converting 14 2 to 14 5 deleting 6 6 to 6 7 downloading to computer 10 1 to 10 5 in interval shots 3 6 Sound continued in video clips 3 2 playing back 2 16 6 6 playing in slide show 6 11 problems A 7 uploading 14 6 volume setting on camera 7 4 Specifications AC adapter C 6 battery charger C 5 environmental C 3 memory card C 5 photographic C 3 to C 4 physical dimensions C 1 power C 2 safety...

Страница 191: ...with the timer 2 12 with the viewfinder 2 1 to 2 2 Technical specifications C 2 Technical support A 15 to A 16 Telephoto optional lenses B 4 setting 2 2 2 4 3 2 Television 14 10 to 14 12 A 7 Thumbnails playing back 6 2 to 6 3 Tiff files 11 2 problems A 4 A 6 setting 2 8 Time and date problems A 6 A 14 setting 1 8 7 1 to 7 2 Time lapse pictures 3 5 to 3 6 Timer using 2 12 3 4 Trailing flash setting...

Страница 192: ...12 A 7 Video cable 14 10 to 14 12 A 7 Video card A 11 Video clip changing playback speed 6 9 deleting 6 10 digital zooming 3 2 downloading to computer 10 1 to 10 5 fast forwarding 6 9 format 11 8 frame by frame playback 6 9 pausing 6 9 playing back 6 8 to 6 10 playing backward 6 8 playing forward 6 8 problems A 4 A 7 A 9 A 10 A 14 recording 3 1 to 3 2 restarting 6 9 rewinding 6 9 sideways A 14 VID...

Страница 193: ...13 5 to 13 6 W Waking camera 2 4 6 11 Warranty D 5 Weight camera C 1 White balance adjusting 5 8 to 5 10 custom 5 10 fixed 5 8 problems A 6 user defined setting 5 10 Wide angle 2 2 2 4 3 2 4 4 optional lenses B 4 Windows capturing screens 14 7 to 14 9 connecting with USB cable 9 6 converting pictures 14 2 to 14 3 installing software 9 2 to 9 4 9 7 to 9 8 system requirements C 7 USB problems A 10 W...

Отзывы: