background image


Home

 > 

Scanning Your Originals


Selecting File Save Settings

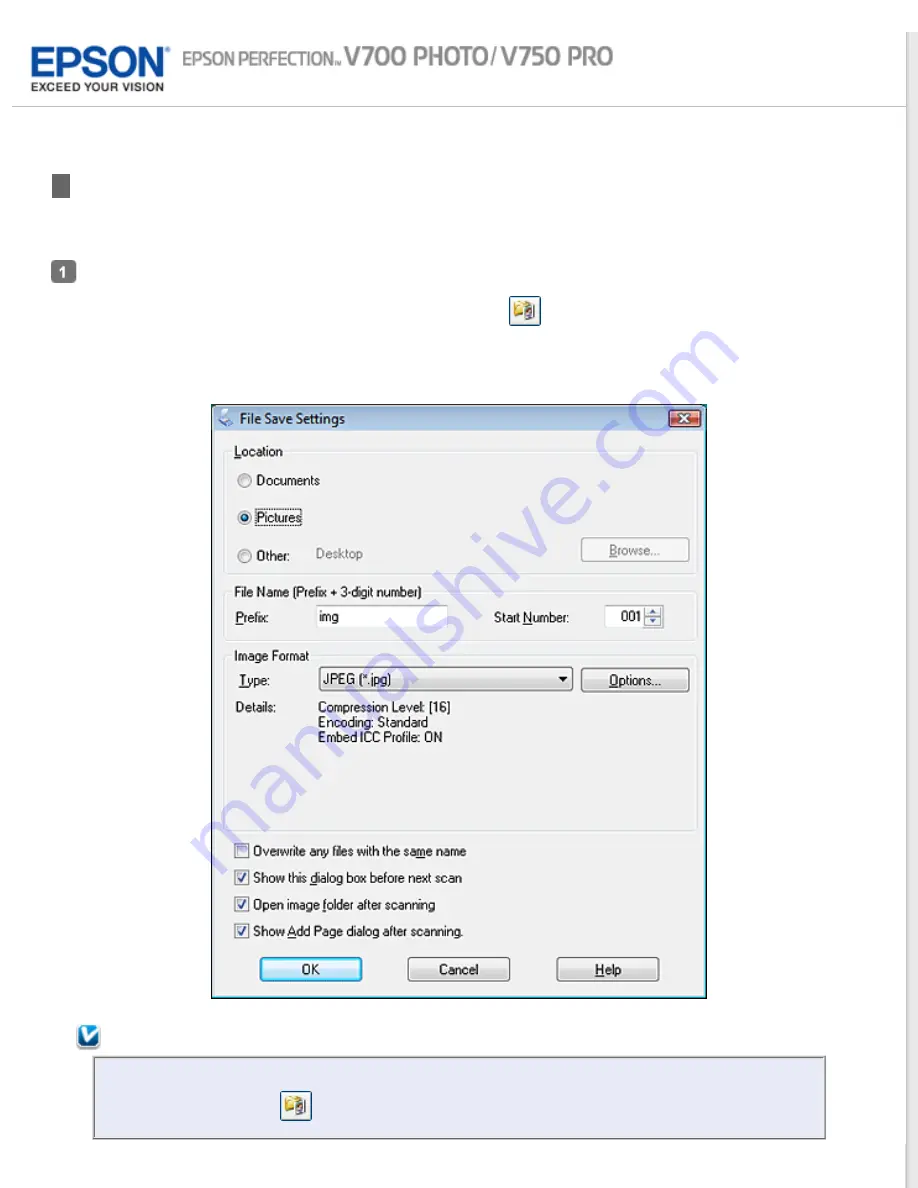
When you see the File Save Settings window, you can select the location, name, and format of the scanned image file.

Full Auto Mode:

 Click 

Customize

, then click 

File Save Settings

.

Office Mode

Home Mode

, or 

Professional Mode:

 Click the 


File Save Settings

 icon to the right of the 

Scan button.

The File Save Settings window appears.

Note:

If you start Epson Scan from a TWAIN-compliant program, such as Adobe Photoshop Elements, the File 

Save Settings button and 

 File Save Settings icon do not appear.

Содержание Perfection V700 Series

Страница 1: ...ollow the step by step instructions here to scan your original documents or photos using any of the available scanning methods Scanning Special Projects Follow the instructions here for specific scanning projects you may need to create Maintenance Follow the guidelines here to maintain and transport your scanner Solving Problems If you have a problem using your scanner or its software check here f...

Страница 2: ...ew of Your Scanner Features These features help you create the best possible scans no matter what shape your original is in Color Restoration Dust Removal DIGITAL ICE Technology and DIGITAL ICE Lite Technology Backlight Correction Text Enhancement ...

Страница 3: ...Home Guide to the Scanner Parts Guide to the Scanner Parts Check these sections to identify the parts of your scanner Scanner Parts Lights and Start Button ...

Страница 4: ...riginals on the Scanner Placing Originals on the Scanner Follow the steps in the sections here to place your original documents photos film or slides on the scanner Placing Documents or Photos Placing Film or Slides ...

Страница 5: ...al documents photos film or slides using any of the available scanning methods Starting Epson Scan Selecting an Epson Scan Mode Changing the Scan Mode Scanning in Full Auto Mode Scanning in Office Mode Scanning in Home Mode Scanning in Professional Mode Selecting File Save Settings Detailed Setting Instructions Finishing the Scan ...

Страница 6: ...ng Color Removing Dust Marks with the Dust Removal Feature Removing Dust and Scratch Marks from Originals Using DIGITAL ICE Technology Fixing Backlit Photos Text Enhancement Using the Scanner as a Copier Scanning to a PDF File Converting Scanned Documents Into Editable Text Scanning Color Accurate Images Assigning a Program to the Start Button ...

Страница 7: ...Home Maintenance Maintenance Follow the guidelines here to maintain and transport your scanner Cleaning the Scanner Replacing the Scanner Light Source Power Off Timer Setting Transporting the Scanner ...

Страница 8: ...ing If you have a problem using your scanner or its software check here for solutions Scanner Problems Scanning Problems Scan Quality Problems Uninstalling Your Scanning Software Where To Get Help Epson Technical Support Other Software Technical Support ...

Страница 9: ...for technical details about your scanner and its accessories System Requirements Scanner Specifications Note Epson offers a recycling program for end of life products Please go to www epson com recycle for information on how to return your products for proper disposal ...

Страница 10: ...s The AC power cord should be placed to avoid abrasions cuts fraying crimping and kinking Do not place objects on top of the AC power cord and do not allow the AC adapter or the power cord to be stepped on or run over Be particularly careful to keep the AC power cords straight at the end and the point where it enters the AC adapter Use only the AC adapter that comes with your scanner Using any oth...

Страница 11: ...r before cleaning Clean with a damp cloth only Do not use liquid or aerosol cleaners If you are not going to use the scanner for a long period be sure to unplug the AC adapter from the electrical outlet Warning The film holders included with this scanner contain small parts Keep out of the reach of children Restrictions on Copying Observe the following restrictions to ensure responsible and legal ...

Страница 12: ...crosoft Corporation Adobe Adobe Reader Acrobat Photoshop and Photoshop Elements are either registered trademarks or trademarks of Adobe Systems Incorporated in the United States and or other countries Apple ColorSync Mac and Mac OS are registered trademarks of Apple Inc ABBYY and ABBYY FineReader names and logos are registered trademarks of ABBYY Software House PRINT Image Matching and the PRINT I...

Страница 13: ...SIBILITY OF DAMAGE AND ON ANY THEORY OF LIABILITY ARISING OUT OF OR IN CONNECTION WITH THE USE OR PERFORMANCE OF THIS SOFTWARE Digital ICE is a trademark of Kodak General Notice Other product names used herein are for identification purposes only and may be trademarks of their respective owners Epson disclaims any and all rights in those marks This information is subject to change without notice 5...

Страница 14: ...s 7 Home Basic Windows 7 Home Premium Windows 7 Professional and Windows 7 Ultimate Windows Vista refers to Windows Vista Home Basic Edition Windows Vista Home Premium Edition Windows Vista Business Edition Windows Vista Enterprise Edition and Windows Vista Ultimate Edition Windows XP refers to Windows XP Home Edition Windows XP Professional x64 Edition and Windows XP Professional Mac refers to Ma...

Страница 15: ...ion Using the Color Restoration feature in Epson Scan you can transform an old faded or badly exposed photo into one with true to life color and sharpness Original image Color Restoration applied For instructions on using this feature see Restoring Color ...

Страница 16: ...l Using the Dust Removal feature in Epson Scan you can virtually clean the dust marks from your originals as you scan them Original image Dust Removal applied For instructions on using this feature see Removing Dust Marks with the Dust Removal Feature ...

Страница 17: ...tos film or slides Original image DIGITAL ICE Technology applied DIGITAL ICE Technology can remove dust marks that the Dust Removal feature cannot However it takes longer to scan using DIGITAL ICE Technology and also uses more of your system resources It is best to try removing dust marks using Dust Removal before using DIGITAL ICE Technology For instructions on using this feature see Removing Dus...

Страница 18: ...rrection Using the Backlight Correction feature in your scanning software you can remove shadows from photos that have too much background light Original image Backlight Correction applied For instructions on using this feature see Fixing Backlit Photos ...

Страница 19: ... Enhancement When you scan documents you can sharpen the text and increase accuracy by using the Text Enhancement feature in Epson Scan Original Text Enhancement Off Text Enhancement On For instructions on using this feature see Text Enhancement ...

Страница 20: ...Home Guide to the Scanner Parts Scanner Parts Note Your product may look different from the illustrations in this guide but the instructions are the same a scanner cover b Start button c power button ...

Страница 21: ...a document mat b transparency unit transportation lock c document table d carriage a option interface connector b USB interface connector c DC inlet d cover cable e scanner transportation lock ...

Страница 22: ... above the power button and the scanner cover light is on the top of the scanner cover Light Color Indicator Status Meaning Scanner light Green On Ready to scan images Flashing Initializing or scanning Red Flashing An error has occurred See The Status Light Is Flashing for more information Off The scanner is off Scanner cover light Blue On Scanning transparencies such as film or slides Off Scannin...

Страница 23: ...e sure you have installed Epson Scan Button Function Start Epson Scan starts See Using the Scanner Button Note for Mac OS X 10 5 8 users The Start button is not supported To start Epson Scan see Using the Epson Scan Icon for instructions Top ...

Страница 24: ...ck Documents Caution Do not place heavy objects on the document table glass and do not press the glass with too much force Placing Documents or Photos on the Document Table Open the scanner cover Make sure the document mat is installed inside the cover If it is not installed see Replacing the Document Mat for instructions a document mat ...

Страница 25: ...the document or photo is against the upper right corner of the document table next to the arrow mark Note If you are scanning multiple photos at once position each photo at least 20 mm 0 8 inch apart from the others Close the scanner cover gently so that your original does not move ...

Страница 26: ...xtended period of time as they may stick to the glass To start scanning see Starting Epson Scan for instructions Top Placing Large or Thick Documents When you scan a large or thick document you can remove the scanner cover Turn off the scanner using its power button Disconnect the cover cable ...

Страница 27: ...Open the scanner cover Pull the scanner cover straight up and off the scanner ...

Страница 28: ...r using its power button Note When scanning without the scanner cover gently press down on your document to flatten it When you are finished scanning replace the scanner cover in the reverse order that you removed it Top ...

Страница 29: ...s you need to remove the document mat from the scanner cover This uncovers the transparency unit so your scanner can use it to scan your film or slides Make sure the cover cable is connected to the scanner s OPTION port Note Before connecting or disconnecting the cover cable turn off the scanner using its power button Open the scanner cover and gently slide up the document mat to remove it Also ma...

Страница 30: ...Use a soft cloth to wipe the transparency unit window and the document table before placing your film or slides ...

Страница 31: ...es up as shown by the illustration on the film holder Note Hold the edge of the film gently or use gloves to touch the film otherwise you may damage the film Make sure the white stickers on the back of the film holder and the areas around them are not scratched dusty or covered in any way If the areas are obscured the scanner may have trouble recognizing your film in Full Auto Mode Do not cover an...

Страница 32: ...document mat See Removing the Document Mat Close the scanner cover To scan your film see Starting Epson Scan When you are finished scanning film be sure to replace the document mat before scanning documents or photos See Replacing the Document Mat Placing Medium Format Film Open the cover on the medium format film holder ...

Страница 33: ...u may damage the film Make sure the white stickers on the back of the film holder and the areas around them are not scratched dusty or covered in any way If the areas are obscured the scanner may have trouble recognizing your film in Full Auto Mode Do not cover any of the tiny holes in the film holder or the scanner may have trouble recognizing which film holder you are using Close the cover over ...

Страница 34: ...o replace the document mat before scanning documents or photos See Replacing the Document Mat Placing 4 5 inch Film Open the covers on the 4 5 inch film holder Place the film into the film holder with the shiny base side facing down Your images and any wording on the film should appear backwards on the side that faces up as shown by the illustration on the film holder Make sure the entire image fr...

Страница 35: ... the areas are obscured the scanner may have trouble recognizing your film in Full Auto Mode Do not cover any of the tiny holes in the film holder or the scanner may have trouble recognizing which film holder you are using Close the cover over the film and press it down until it clicks Then press down on all the edges of the cover to secure it Place the film holder on the document table so that it...

Страница 36: ...ting Epson Scan Note You cannot use Full Auto Mode to scan 4 5 inch film When you are finished scanning film be sure to replace the document mat before scanning documents or photos See Replacing the Document Mat Top Placing Slides in the Holder You can scan up to twelve 35 mm slides at a time using the slide holder Note ...

Страница 37: ...the tiny holes in the film holder or the scanner may have trouble recognizing which film holder you are using Place up to twelve slides in the 35 mm slide holder with the shiny base side facing down Your image should appear backwards on the side that faces up as shown by the illustration on the film holder The top of your images should face the open end of the film holder as shown below Place the ...

Страница 38: ... film using the film area guide in Professional Mode When scanning film using the film area guide always select Film with Film Area Guide as the Document Type Note You cannot use DIGITAL ICE Technology when scanning film with the film area guide If you scan 8 10 inch film at 4800 dpi resolution and 24 bit color as the Image Type do not save it in BMP Tiff or JPEG format When scanning using the fil...

Страница 39: ...de of the scanner Place the film in the film area guide up to 8 10 inch film with the shiny base side facing down Your images and any wording on the film should appear backwards on the side that faces up Make sure the entire image frame is positioned in the film area guide opening ...

Страница 40: ...Note Leave the part of the film area guide circled below uncovered or colors in your scans will be affected ...

Страница 41: ...Mode Office Mode or Home Mode when scanning film with the film area guide When you are finished scanning film be sure to replace the document mat before scanning documents or photos See Replacing the Document Mat Top Replacing the Document Mat Replace the document mat by sliding it into the notches in the scanner cover Make sure the white surface faces outwards Top ...

Страница 42: ...on Scan window automatically opens See Selecting an Epson Scan Mode for instructions on selecting an Epson Scan mode Note for Mac OS X 10 5 8 users The Start button is not supported To start Epson Scan see Using the Epson Scan Icon for instructions Top Using the Epson Scan Icon You can start Epson Scan by double clicking the EPSON Scan icon Windows 8 Double click the EPSON Scan icon on the desktop...

Страница 43: ...TWAIN compliant scanning program Double click the program icon on the desktop if it is available or do one of the following Windows 8 Navigate to the Start screen and select the program icon Windows other versions Select or Start Programs or All Programs program folder program icon Mac OS X Open the Applications in your hard drive select the program folder and double click the program icon Select ...

Страница 44: ...tings in Office Mode Home Mode lets you customize some scanning settings and check their effects with a preview image Home Mode is best when you want to preview images of your originals before scanning them You can size the image as you scan adjust the scan area and adjust many image settings including color restoration dust removal and backlight correction See Changing the Scan Mode for instructi...

Страница 45: ...elect the mode you want to use from the list that appears Note The mode you select remains in effect when you start Epson Scan next time For instructions on scanning using these modes see one of these sections Full Auto Mode Scanning in Full Auto Mode Office Mode Scanning in Office Mode Home Mode Scanning in Home Mode Professional Mode Scanning in Professional Mode ...

Страница 46: ...it runs in Full Auto Mode and displays the Epson Scan Full Auto Mode window Note for film or slides In Full Auto Mode you can only scan 35 mm color film strips or color positive slides To scan other types of film use Home Mode or Professional Mode To change the scan mode see Changing the Scan Mode Note ...

Страница 47: ...lides Start Epson Scan See Starting Epson Scan for instructions Select Full Auto Mode from the Mode list See Changing the Scan Mode for instructions If you want to select a custom resolution restore faded colors or remove dust marks click Customize You see the Customize window Note If you started scanning from a TWAIN compliant program like Adobe Photoshop Elements the File Save Settings button do...

Страница 48: ... of each image in the Epson Scan window Note It takes a few minutes to scan a full film strip If you need to change any settings click Pause You will return to the Epson Scan Full Auto Mode window If you need to cancel scanning click Cancel when it appears What happens next depends on how you started your scan See Finishing the Scan for instructions ...

Страница 49: ... Mode you see the Epson Scan Office Mode window Place the original s on the document table See Placing Documents or Photos for instructions Start Epson Scan See Starting Epson Scan for instructions Select Office Mode in the Mode list See Changing the Scan Mode for instructions ...

Страница 50: ...riate resolution for your original See Selecting the Scan Resolution for instructions Click Preview to preview your image s The Preview window appears and displays your image See Previewing and Adjusting the Scan Area for instructions Modify the image quality if necessary See Adjusting the Color and Other Image Settings for instructions Click Scan What happens next depends on how you started your ...

Страница 51: ...e Mode When you select Home Mode you see the Epson Scan Home Mode window Place your original s on the document table See one of these sections for instructions Documents or photos Placing Documents or Photos Film or slides Placing Film or Slides ...

Страница 52: ...r purposes Epson Scan selects a default resolution setting based on the Destination setting you select If you selected Other as the Destination setting to select a specific resolution see Selecting the Scan Resolution for instructions Click Preview to preview your image s The Preview window appears and displays your image s See Previewing and Adjusting the Scan Area for instructions Modify the ima...

Страница 53: ...Home Scanning Your Originals Scanning in Professional Mode When you select Professional Mode you see the Epson Scan Professional Mode window ...

Страница 54: ... or B W Negative Film Click the arrow to open the Image Type list and select the detailed image type you are scanning Image Type setting Type of image you are scanning 48 bit Color Color photos that you may want to modify in a 48 bit image editing program 24 bit Color Color photos Color Smoothing Color graphics such as a chart or graph 16 bit Grayscale Black and white photos with many shades of gr...

Страница 55: ...settings in the Preview window Click the arrow to open the Target Size list to select the size you want of the scanned image s if necessary You can scan your images at their original size or you can reduce or enlarge their size by selecting Target Size See Selecting the Scan Size for instructions Modify the image quality if necessary See Adjusting the Color and Other Image Settings for instruction...

Страница 56: ...Full Auto Mode Click Customize then click File Save Settings Office Mode Home Mode or Professional Mode Click the File Save Settings icon to the right of the Scan button The File Save Settings window appears Note If you start Epson Scan from a TWAIN compliant program such as Adobe Photoshop Elements the File Save Settings button and File Save Settings icon do not appear ...

Страница 57: ...on and retouching are required Multi TIFF tif A TIFF format where multiple pages are saved to the same file You can also edit the scanned images before saving them See Epson Scan Help for details To open Multi TIFF files you need a program that supports it PDF pdf A document format that can be read on both Windows and Mac OS X systems platform independent To use PDF documents in Windows you need A...

Страница 58: ...r or the Mac OS X Finder to automatically open the folder where your scanned image file is saved when Epson Scan finishes scanning Show Add Page dialog after scanning Select this option if you want the Add Page Confirmation window to appear automatically after each scan in PDF or multi TIFF The Add Page Confirmation window includes the Add page Edit page and Save File buttons Click OK ...

Страница 59: ...DF 200 to 400 dpi Print using ink jet printer with normal quality 150 dpi Color or Grayscale 360 dpi Black White Print using ink jet printer with high quality 300 dpi Color or Grayscale 720 dpi Black White Print using page printer 200 dpi Color or Grayscale 600 dpi Black White Fax 200 dpi Enlarge after scanning at 100 Increase Resolution setting by same amount you will increase image size after sc...

Страница 60: ...ch at which you want to scan Selecting the Resolution in Home Mode To change the resolution first select Other as the Destination setting Click the arrow next to the Resolution list and select the number of dpi dots per inch at which you want to scan Selecting the Resolution in Office Mode or Professional Mode You can select the resolution you want at any time Office Mode ...

Страница 61: ...s your previewed image s in their entirety You must select the scan area and make any image quality adjustments manually Thumbnail preview displays your previewed image s as thumbnail s Epson Scan automatically locates the edges of your scan area applies automatic exposure settings to the image s and rotates the image s if necessary To preview your image follow the steps below Note If you are usin...

Страница 62: ... displayed image s will be displayed in the default preview mode If you preview with the Preview dialog displayed image s will be displayed in the preview mode that was displayed just before previewing Some of the settings that you change while previewing will be reset if you change the Preview mode Epson Scan prescans your image s and displays them in one of the following Preview windows Normal p...

Страница 63: ...ortioned to that size See Selecting the Scan Size for instructions You can then copy the marquee and place it on each image you will scan at that size To enlarge or reduce the preview image in the Normal preview resize the Preview window The image size changes corresponding to the Preview window size To zoom in on an image in the Normal preview click inside the scan area and click the Zoom button ...

Страница 64: ...e edges of your scan See Creating a Marquee on a Preview Image for instructions To adjust the image quality click the image s or scan area s you want to modify and make the adjustments See Adjusting the Color and Other Image Settings for instructions If you want to apply the adjustments you have made to all of your images click All Creating a Marquee on a Preview Image A marquee is a moving dotted...

Страница 65: ...click the auto locate icon to automatically draw a marquee then skip to step 3 Position the pointer in the area where you want to place the corner of your marquee and click Hold down the mouse button and drag the cross hairs over the image to the opposite corner of the desired scan area Then release the mouse button You see the moving dotted line of the marquee Do one of the following to adjust th...

Страница 66: ...lete marquee icon Note If you draw multiple marquees make sure you click All in the Preview window before you scan Otherwise only the area inside the last marquee you drew will be scanned Top Adjusting the Color and Other Image Settings Once you have previewed your image s and adjusted the scan area you can modify the image quality if necessary Epson Scan offers a variety of settings for improving...

Страница 67: ...cale The results of descreening do not appear in the preview only in your scanned image Image Option Text Enhancement Enhances text recognition when scanning text documents This setting is available when Image Option is selected When the Image Type is set to Black White the results of Text Enhancement do not appear in the preview only in your scanned image Auto Area Segmentation Makes images clear...

Страница 68: ...image area See Epson Scan Help for details Certain settings may not be available or may be automatically selected depending on the type of image you are previewing and other settings you have selected You can customize how certain Epson Scan settings behave by clicking Configuration and changing settings in the window that appears See Epson Scan Help for details To undo any image quality adjustmen...

Страница 69: ...tion Text Enhancement Enhances text recognition when scanning text documents This setting is available when you select Magazine Newspaper or Text Line Art as the Document Type setting and Image Option is selected Auto Area Segmentation Makes images clearer and text recognition more accurate by separating the text from the graphics This setting is available when you select Magazine Newspaper or Tex...

Страница 70: ...ustments and Other Image Settings in Professional Mode The table below describes the settings available in Professional Mode For details on adjusting these settings see Epson Scan Help Note You may need to scroll down to view the Adjustments area of the Professional Mode window If you are scanning multiple images at the same time and you want to apply the image adjustments to all of your images or...

Страница 71: ...s The results of descreening do not appear in the preview only in your scanned image The level of descreening is adjustable This setting is available when the Image Type is set to 48 bit Color 24 bit Color Color Smoothing 16 bit Grayscale or 8 bit Grayscale Color Restoration Restores the colors in faded photos automatically This setting is available when you select Photo as the Auto Exposure Type ...

Страница 72: ...n Top Selecting the Scan Size You can scan your images at their original size or you can reduce or enlarge their size as you scan them You do this using the Target Size setting If you are going to scan your image to a specific size you should select the Target Size setting after previewing it but before adjusting your scan area indicated by creating a marquee This sets the scan area to correct pro...

Страница 73: ...nter the size click Save then click OK Your new size appears in the Target Size list Once you have selected your scan size you can click and drag the marquee to the area in the image you want to scan For details see Creating a Marquee on a Preview Image The marquee proportions are retained as you adjust it If you need to rotate the marquee for a landscape or portrait image without changing its asp...

Страница 74: ... size from the Target Size list Click the arrow to open the list and select the size you want A marquee dotted line proportioned for that size appears on your preview image Documents or photos Film or Slides If you need to create a scan size that is not in the Target Size list you can create a custom size Click the arrow to open the list and select Customize You see the Target Size window ...

Страница 75: ... Help for details To unlock the proportions of your scan size click the lock icon Then adjust the marquee or enter new width height measurements Once you have selected your scan size you can click and drag the marquee to the area in the image you want to scan For details see Creating a Marquee on a Preview Image The marquee proportions are retained as you adjust it If you want to rotate the marque...

Страница 76: ...gram window If Epson Scan does not automatically close after scanning click Close to exit the Epson Scan window and view your image in the program window Office Mode Home Mode or Professional Mode If you started your scan by running Epson Scan from the EPSON Scan icon or by pressing the Start button on the scanner you see the File Save Settings window This lets you select the name and location of ...

Страница 77: ... in Full Auto Mode Office Mode This feature is not available in Office Mode Change the scan mode to Full Auto Mode Home Mode or Professional Mode See Changing the Scan Mode for instructions Home Mode Color Restoration in Home Mode Professional Mode Color Restoration in Professional Mode Color Restoration in Full Auto Mode Place your original s on the document table See one of these sections for in...

Страница 78: ...WAIN compliant program like Adobe Photoshop Elements the File Save Settings button does not appear When you finish making all the necessary settings click OK to return to the Full Auto Mode window Click Scan What happens next depends on how you started Epson Scan See Finishing the Scan for instructions Top Color Restoration in Home Mode Place your original s on the document table See one of these ...

Страница 79: ...toration feature to all of your images or scan areas click All in the Preview window before you click the check box Make any other necessary image adjustments See Adjusting the Color and Other Image Settings for details Size your image s as necessary See Selecting the Scan Size for details Click Scan What happens next depends on how you started Epson Scan See Finishing the Scan for instructions To...

Страница 80: ...ation feature to all of your images or scan areas click All in the Preview window before you click the check box Make any other necessary image adjustments See Adjusting the Color and Other Image Settings for details If you want to make more precise color adjustments click the Color Palette icon See Using the Color Palette Feature for Professional Mode Only for instructions Size your image s as ne...

Страница 81: ...t needs adjustment The color you selected is moved to the center cell in the Color Palette window with variations in hue in the surrounding cells Select the cell that contains the hue you would like to use to adjust the color in your image This color now becomes the color of the center cell and the color change is reflected in your image Note You can also use the cells to the right of the adjustme...

Страница 82: ...te icon When you are finished adjusting the color click Close to return to the Professional Mode window For further details on using the Color Palette feature see Epson Scan Help Applying a Color to an Image Click the Color Palette icon Select the cell that contains the hue you would like to use to adjust the color in your image This color now becomes the color of the center cell Note ...

Страница 83: ...s reflected in your image If you want to continue adjusting the color repeat steps 2 through 4 If you want to save the color for future scans click the save icon The color appears in the save area Note To load a previously saved color select the color and click the apply to palette icon When you are finished adjusting the color click Close to return to the Professional Mode window For further deta...

Страница 84: ...E Technology feature as described in Removing Dust and Scratch Marks from Originals Using DIGITAL ICE Technology If you still have dust marks after using the Dust Removal feature try scanning it again using DIGITAL ICE Technology as described in Removing Dust and Scratch Marks from Originals Using DIGITAL ICE Technology This feature is not available if DIGITAL ICE Technology check box is selected ...

Страница 85: ... use Home Mode or Professional Mode To change the scan mode see Changing the Scan Mode Start Epson Scan See Starting Epson Scan for instructions In the Full Auto Mode window click Customize The Customize window appears Click the Dust Removal check box If you want to select the file save settings click File Save Settings See Selecting File Save Settings for instructions Note If you started Epson Sc...

Страница 86: ...ing Epson Scan for instructions In the Professional Mode window select the Document Type Document Source Auto Exposure Type for scanning documents or photos or Film Type for scanning film or slides Image Type and Resolution settings For details see Scanning in Professional Mode Click Preview to preview your image s then select your scan area See Previewing and Adjusting the Scan Area for details S...

Страница 87: ...ll in the Preview window before you click the check box This feature is not available if DIGITAL ICE Technology check box is selected Make any other necessary image adjustments See Adjusting the Color and Other Image Settings for instructions Size your image s as necessary See Selecting the Scan Size for instructions Click Scan What happens next depends on how you started Epson Scan See Finishing ...

Страница 88: ...details Note You cannot use Dust Removal and DIGITAL ICE Technology at the same time Do not use DIGITAL ICE Technology to scan photos film or slides that do not contain dust or scratch marks otherwise your scanned image s may be distorted or blurred You cannot use DIGITAL ICE Technology when scanning film with the film area guide Images scanned with DIGITAL ICE Technology may appear softer than yo...

Страница 89: ...h is higher than the scan resolution you specify in Epson Scan Make sure your system resources meet these increased requirements You can use DIGITAL ICE Technology on the following types of film or slides Original DIGITAL ICE Technology DIGITAL ICE Lite Technology Photograph reflective Yes No Color negative film Yes Yes Color positive film or slides Yes Yes Monochrome negative film No No Monochrom...

Страница 90: ...t table See one of these sections for instructions Photos Placing Documents or Photos Film or slides Placing Film or Slides Start Epson Scan See Starting Epson Scan for instructions In the Home Mode window select the Document Type Image Type and Destination settings For details see Scanning in Home Mode Click Preview to preview your image s then select your scan area See Previewing and Adjusting t...

Страница 91: ...al Mode window select the Document Type Auto Exposure Type for scanning documents or photos Film Type for scanning film or slides Image Type Resolution and Document Size settings For details see Scanning in Professional Mode Click Preview to preview your image s then select your scan area See Previewing and Adjusting the Scan Area for details Scroll down to the Adjustments area and click the DIGIT...

Страница 92: ...pear in the images in the Preview window but apply to all of them You must scan the images to see the effects Make any other necessary image adjustments See Adjusting the Color and Other Image Settings for instructions Size your image s as necessary See Selecting the Scan Size for instructions Click Scan to scan and remove dust and scratch marks in your image s What happens next depends on how you...

Страница 93: ...ice Mode This feature is not available in Office Mode Change the scan mode to Home Mode or Professional Mode See Changing the Scan Mode for instructions Home Mode Backlight Correction in Home Mode Professional Mode Backlight Correction in Professional Mode Backlight Correction in Home Mode Place your original s on the document table See one of these sections for instructions Documents or photos Pl...

Страница 94: ...hese sections for instructions Documents or photos Placing Documents or Photos Film or slides Placing Film or Slides Start Epson Scan See Starting Epson Scan for instructions In the Professional Mode window select the Document Type Document Source Auto Exposure Type for scanning documents or photos or Film Type for scanning film or slides Image Type and Resolution settings For details see Scanning...

Страница 95: ... click All in the Preview window before you click the check box Make any other necessary image adjustments See Adjusting the Color and Other Image Settings for details Size your image s as necessary See Selecting the Scan Size for details Click Scan What happens next depends on how you started Epson Scan See Finishing the Scan for instructions Top ...

Страница 96: ...e Mode or Office Mode See Changing the Scan Mode for instructions Office Mode Text Enhancement in Office Mode Home Mode Text Enhancement in Home Mode Professional Mode This feature is not available in Professional Mode Change the scan mode to Home Mode or Office Mode See Changing the Scan Mode for instructions Note The instructions in these sections are for scanning to a PDF file but text enhancem...

Страница 97: ...nd Other Image Settings for details Click Scan The File Save Settings window appears Select File Save and PDF settings as necessary See Scanning to a PDF File in Office Mode for details Click OK Top Text Enhancement in Home Mode Place your document on the document table See Placing Documents or Photos for instructions Start Epson Scan See Starting Epson Scan for instructions In the Home Mode windo...

Страница 98: ...ny other necessary image adjustments See Adjusting the Color and Other Image Settings for details Size your image s as necessary See Selecting the Scan Size for details Click Scan The File Save Settings window appears Select File Save and PDF settings as necessary See Scanning to a PDF File in Home Mode for details Click OK Top ...

Страница 99: ...le See one of these sections for instructions Documents or photos Placing Documents or Photos Film or slides Placing Film or Slides Start the Copy Utility Windows 8 Navigate to the Start screen and select Copy Utility Windows other versions Select or Start Programs or All Programs Epson Software Copy Utility Mac OS X Select Applications Epson Software Copy Utility and double click the Copy Utility...

Страница 100: ...age s as you copy it click the Copy Size box select the enlargement reduction and click OK Note If you are printing on an Epson printer that supports borderless printing you can select options for Margins borders or No Margins borderless If you are copying a faded photo and want to restore the colors click the Color Restoration check box It is available only when the Source Type is Photo Negative ...

Страница 101: ...int click Copy Note If you want to preview your scan before printing it or select additional copy settings click Custom Copy at the bottom of the window Click Help in the Copy Utility for instructions on using the Custom Copy features ...

Страница 102: ...you have installed your scanning software as described in the Start Here sheet it has already been installed ABBYY FineReader may not be available in some countries See one of these sections to start scanning to a PDF file Full Auto Mode Select PDF as the Image Type setting in the File Save Settings window See Scanning in Full Auto Mode for instructions If you want to scan multiple document pages ...

Страница 103: ... window appears Select PDF as the Type setting The current Paper Size Orientation Margin and other settings are displayed below it Click Options You see the EPSON PDF Plug in Settings window To create a searchable PDF file click the Text tab select the Create searchable PDF check box then select your language from the Text Language list ...

Страница 104: ...eReader is installed If ABBYY FineReader is not available in your country you will not see the Text tab To specify the maximum number of pages that can be included in one PDF file click the General tab and adjust the Select number to make file setting ...

Страница 105: ... window see Epson Scan Help for details Select the settings that match your document and click OK You return to the File Save Settings window Make any other file save settings and click OK Epson Scan scans your document and displays the window below Note ...

Страница 106: ...n when you are ready to finish scanning and save the scanned pages into one PDF without editing them Then go to step 14 You see the Editing Page window displaying thumbnail images of each scanned page Use the tools below the Editing Page window to select rotate reorder and delete pages If you want to include all the document pages in your PDF files as they currently look go to step 13 If you want ...

Страница 107: ...or Slides Start Epson Scan See Starting Epson Scan for instructions In the Home Mode window select the Document Type Image Type and Destination settings For details see Scanning in Home Mode Click Preview to preview your image s then select your scan area For details see Previewing and Adjusting the Scan Area Make any other necessary image adjustments See Adjusting the Color and Other Image Settin...

Страница 108: ...ck Options You see the EPSON PDF Plug in Settings window To create a searchable PDF file click the Text tab select the Create searchable PDF check box then select your language from the Text Language list ...

Страница 109: ...eReader is installed If ABBYY FineReader is not available in your country you will not see the Text tab To specify the maximum number of pages that can be included in one PDF file click the General tab and adjust the Select number to make file setting ...

Страница 110: ... window see Epson Scan Help for details Select the settings that match your document and click OK You return to the File Save Settings window Make any other file save settings and click OK Epson Scan scans your document and displays the window below Note ...

Страница 111: ...n when you are ready to finish scanning and save the scanned pages into one PDF without editing them Then go to step 15 You see the Editing Page window displaying thumbnail images of each scanned page Use the tools below the Editing Page window to select rotate reorder and delete pages If you want to include all the document pages in your PDF files as they currently look go to step 14 If you want ...

Страница 112: ...Scan See Starting Epson Scan for instructions In the Professional Mode window select the Document Type Document Source Auto Exposure Type Image Type and Resolution settings For details see Scanning in Professional Mode Click Preview to preview your image s then select your scan area For details see Previewing and Adjusting the Scan Area Make any other necessary image adjustments See Adjusting the ...

Страница 113: ...ck Options You see the EPSON PDF Plug in Settings window To create a searchable PDF file click the Text tab select the Create searchable PDF check box then select your language from the Text Language list ...

Страница 114: ...eReader is installed If ABBYY FineReader is not available in your country you will not see the Text tab To specify the maximum number of pages that can be included in one PDF file click the General tab and adjust the Select number to make file setting ...

Страница 115: ... window see Epson Scan Help for details Select the settings that match your document and click OK You return to the File Save Settings window Make any other file save settings and click OK Epson Scan scans your document and displays the window below Note ...

Страница 116: ...n when you are ready to finish scanning and save the scanned pages into one PDF without editing them Then go to step 15 You see the Editing Page window displaying thumbnail images of each scanned page Use the tools below the Editing Page window to select rotate reorder and delete pages If you want to include all the document pages in your PDF files as they currently look go to step 14 If you want ...

Страница 117: ...ting your pages click OK The pages are saved in one PDF file in Pictures My Pictures or the location you selected in the File Save Settings window and you return to the Professional Mode window Click Close to exit Epson Scan Top ...

Страница 118: ... Handwritten characters Items that have been copied from other copies Faxes Text with tightly spaced characters or line pitch Text that is in tables or underlined Cursive or italic fonts and font sizes less than 8 points See one of these sections to scan and convert text using ABBYY FineReader Office Mode Converting into Editable Text in Office Mode Home Mode Converting into Editable Text in Home ...

Страница 119: ...window select your product and click OK Note Do not select a WIA option for your product it will not work correctly Select your scan settings Click Preview and adjust the area you want to scan if necessary Click Scan Note For each additional page that you want to scan place the document on the document table and click Scan When you are finished scanning click Close Your document is scanned and pro...

Страница 120: ...Y FineReader Sprint 8 0 You see this window Select your scanner from the Get Images From list Select the language used in the document you are going to scan as the Document Language setting Click the icon for the type of document you want to scan to Epson Scan starts in the last mode you used Change the scan mode to Office Mode if necessary See Changing the Scan Mode for instructions Select Color ...

Страница 121: ...ox or adjusting the Threshold setting See Adjusting the Color and Other Image Settings for instructions When you see the Document Conversion window with the finished message click Close in the Epson Scan window Follow the instructions in ABBYY FineReader Help to edit and save your document Top Converting into Editable Text in Home Mode Windows Place your document on the document table See Placing ...

Страница 122: ...k correctly Select your scan settings Click Preview and adjust the area you want to scan if necessary Click Scan Note For each additional page that you want to scan place the document on the document table and click Scan When you are finished scanning click Close Your document is scanned and processed into editable text then you see the Save As window Select a name and a file format for your docum...

Страница 123: ... in the document you are going to scan as the Document Language setting Click the icon for the type of document you want to scan to Epson Scan starts in the last mode you used Change the scan mode to Home Mode if necessary See Changing the Scan Mode for instructions Select Magazine Newspaper or Text Line Art as the Document Type setting Select Black White or Color as the Image Type setting Select ...

Страница 124: ... check box or adjusting the Threshold setting See Adjusting the Color and Other Image Settings for instructions When you see the Document Conversion window with the finished message click Close in the Epson Scan window Follow the instructions in ABBYY FineReader Help to edit and save your document Top Converting into Editable Text in Professional Mode Windows Place your document on the document ta...

Страница 125: ...k correctly Select your scan settings Click Preview and adjust the area you want to scan if necessary Click Scan Note For each additional page that you want to scan place the document on the document table and click Scan When you are finished scanning click Close Your document is scanned and processed into editable text then you see the Save As window Select a name and a file format for your docum...

Страница 126: ...in the document you are going to scan as the Document Language setting Click the icon for the type of document you want to scan to Epson Scan starts in the last mode you used Change the scan mode to Professional Mode if necessary See Changing the Scan Mode for instructions Select Reflective as the Document Type setting Select Document as the Auto Exposure Type setting Select Black White 24 bit Col...

Страница 127: ...lick Scan Your document is scanned and processed into editable text Note If the characters in your text are not recognized very well you can improve recognition by selecting the Text Enhancement check box or adjusting the Threshold setting See Adjusting the Color and Other Image Settings for instructions When you see the Document Conversion window with the finished message click Close in the Epson...

Страница 128: ...e one of these sections Home Mode Scanning in Home Mode Professional Mode Scanning in Professional Mode Note You cannot use Full Auto Mode or Office Mode for color management Click Configuration then click the Color tab and select ICM Windows or ColorSync Mac OS X For the Source Scanner setting select EPSON Standard If you have color management software and created a custom ICC profile select it a...

Страница 129: ...ion select sRGB Select Display preview using monitor compensation then click OK to return to the Epson Scan window Click Scan What happens next depends on how you started your scan See Finishing the Scan for instructions Note You can also optimize the color accuracy of your images using a photo editing application such as Adobe Photoshop Elements For help using Adobe Photoshop Elements click the H...

Страница 130: ...ent Manager to make scanning your projects even quicker Note for Mac OS X 10 5 8 users The Start button is not supported To start Epson Scan see Using the Epson Scan Icon for instructions Do one of the following to start Epson Event Manager Windows 8 Navigate to the Start screen and select Event Manager Windows other versions Select or Start Programs or All Programs Epson Software Event Manager Ma...

Страница 131: ...o close the Epson Event Manager window Now whenever you press the Start button the action you selected occurs Note If you need help using Epson Event Manager do one of the following Windows Click the icon in the upper right corner of the screen Mac OS X Click Help from menu then Epson Event Manager Help Top ...

Страница 132: ...echanism or electronic components This could permanently damage the mechanism and circuitry Do not spray lubricants inside the scanner Never open the scanner case Turn off the scanner using its power button Unplug the AC power cord from the scanner Disconnect the USB cable from the scanner Clean the outer case with a cloth dampened with mild detergent and water If the glass surface of the document...

Страница 133: ...a transparency unit window Make sure that no dust builds up on the surface of the document table or the transparency unit window Dust can cause spots in your scanned images ...

Страница 134: ... scanner light source declines over time If the light source breaks or becomes too dim to operate normally the scanner stops working and the Status light rapidly flashes When this happens the light source assembly must be replaced by a professional For details contact Epson ...

Страница 135: ...ow to adjust the time Make sure that the scanner is connected to your computer and that the scanner is turned on Start Epson Scan Settings Windows 8 Navigate to the Start screen and select EPSON Scan Settings Windows other versions Select or Start All Programs or Programs EPSON EPSON Scan EPSON Scan Settings Mac OS X Select Applications EPSON Software EPSON Scan Settings Click Power Off Timer Set ...

Страница 136: ...n the scanner turn on the scanner using its power button and wait until the carriage moves to the home position near the cover hinge While the scanner light is green turn off the scanner using its power button Open the scanner cover and slide the transparency unit transportation lock to the locked position Then close the scanner cover Disconnect the scanner s USB cable from your computer Disconnec...

Страница 137: ...ide the transportation lock to the locked position to secure the scanner carriage Attach the protective materials that came with the scanner then repack the scanner in its original box or a similar box that fits the scanner snugly ...

Страница 138: ...e the Start Here sheet for instructions on connecting the scanner to your computer Make sure the scanner software is fully installed See the Start Here sheet for instructions on installing the scanner software Make sure the scanner and or the transparency unit transportation lock is unlocked If it is locked slide the lock to the unlock position Turn off the scanner using its power button then turn...

Страница 139: ...as Adobe Photoshop Elements make sure that the correct scanner is selected as the Scanner or Source setting If you upgraded your computer s operating system you need to reinstall Epson Scan Uninstall Epson Scan as described in Uninstalling Your Scanning Software then reinstall it as described in the Start Here sheet For Windows only Make sure your scanner s name appears under Imaging device withou...

Страница 140: ...ee Previewing and Adjusting the Scan Area for instructions If you are scanning a large size document use normal preview and create marquees on the area you want to scan See Previewing and Adjusting the Scan Area for instructions Make sure the Document Type setting Home Mode or Document Type and Film Type settings Professional Mode are correct See Scanning in Home Mode or Scanning in Professional M...

Страница 141: ... Then use normal preview and create marquees on the area you want to scan See Previewing and Adjusting the Scan Area for instructions If you are scanning a large size document such as Letter switch to Office Mode Home Mode or Professional Mode To change the scan mode see Changing the Scan Mode Then use normal preview and create marquees on the area you want to scan See Previewing and Adjusting the...

Страница 142: ...ode or Film Type settings Professional Mode are set correctly for your film slide type See Scanning in Home Mode or Scanning in Professional Mode for instructions Make sure the cover cable is securely connected to the scanner s OPTION port Top ...

Страница 143: ...ur Original Are Not Scanned If you are scanning in Full Auto Mode or using thumbnail preview in Home Mode or Professional Mode move the document about 0 2 inch 5 1 mm away from the top or bottom edges or 0 21 inch 5 3 mm away from the side edges of the document table to avoid cropping If you are scanning using normal preview in Office Mode Home Mode or Professional Mode move the document about 0 0...

Страница 144: ... Professional Mode window See Adjusting the Color and Other Image Settings for instructions Click Configuration select the Color tab and select Color Control and Continuous auto exposure See Epson Scan Help for details Click Configuration select the Color tab and click Recommended Value to return the Auto Exposure setting to the default See Epson Scan Help for details Increase the resolution setti...

Страница 145: ...ilm holder to its default height 0 12 inch 3 mm place the film height adjusters so that the arrow on the adjusters face the symbol on the bottom of the film holder Top Colors Are Patchy or Distorted at the Edges of Your Image If your document is very thick or curled at the edges cover the edges with paper to block external light as you scan Top Your Scanned Image Is Too Dark ...

Страница 146: ...Histogram Adjustment icon in Professional Mode to adjust the brightness Check the brightness and contrast settings of your computer monitor Top An Image on the Back of Your Original Appears in Your Scanned Image If your original is printed on thin paper images on the back may be visible to the scanner and appear in your scanned image Try scanning the original with a piece of black paper placed on ...

Страница 147: ...indows or Mac OS X button next to Image Type and make the appropriate Image Option setting Then try adjusting the Threshold setting See Converting Scanned Documents Into Editable Text for instructions Check your OCR software manual to see if there are any settings you can adjust in your OCR software Top Scanned Colors Differ From the Original Colors Make sure the Image Type setting is correct See ...

Страница 148: ... setting is selected Printed colors can never exactly match the colors on your monitor because printers and monitors use different color systems monitors use RGB red green and blue and printers typically use CMYK cyan magenta yellow and black Top Striped Rings Appear in Your Scanned Image of Film or Slides Images A ring shaped pattern of stripes called a Newton ring sometimes appears on scanned im...

Страница 149: ...r on any side The Auto Photo Orientation feature may not work correctly if the faces in your image are very small or not looking straight ahead or if the faces are of infants The feature may also not work correctly if you scan an indoor image that contains no faces an outdoor image in which the sky is not at the top or any image containing bright spots or objects in locations other than the top of...

Страница 150: ...owing Windows 8 Navigate to the Start screen right click select All apps and select Control Panel Windows other versions Click or Start and select Control Panel Do one of the following Windows 8 Windows 7 and Windows Vista Select Uninstall a program from the Programs category Windows XP Select Add or Remove Programs Select the software you want to uninstall such as Epson Scan or another applicatio...

Страница 151: ...tall applications you must log on to a Computer Administrator account You cannot uninstall programs if you log on as a Limited account user If you find that re installing your product software does not solve a problem contact Epson To download the Uninstaller utility visit the Epson download site U S downloads or Canadian downloads Follow the instructions on the screen to install the Uninstaller u...

Страница 152: ...n a label on the product Proof of purchase such as a store receipt and date of purchase Computer configuration Description of the problem Then call 562 276 4382 U S or 905 709 3839 Canada 6 AM to 8 PM Pacific Time Monday through Friday and 7 AM to 4 PM Pacific Time Saturday Days and hours of support are subject to change without notice Toll or long distance charges may apply Note For help using an...

Страница 153: ...er ABBYY FineReader Adobe Photoshop Elements 800 833 6687 www adobe com support Top LaserSoft Imaging SilverFast 941 312 0690 www silverfast com www silverfast com problemreport en html Top X Rite i1Profiler 800 248 9748 www xrite com support i1Profiler Top ABBYY FineReader 408 457 9777 www abbyy com support abbyyusa com Top ...

Страница 154: ...puter system including the video card display monitor and software See your system documentation for details Top Mac System Requirements System Mac OS X 10 5 8 Mac OS X 10 6 x Mac OS X 10 7 x or Mac OS X 10 8 x Fast User Switching on Mac OS X is not supported Interface Mac USB Display Color monitor with 1024 768 screen resolution or higher and millions of colors Color and tone reproduction are sub...

Страница 155: ...rames each twelve 35 mm slides two medium format 6 20 cm film frames or two 4 5 inch film frames Scanning resolution 4800 dpi main scan optical resolution by 6 line CCD with 122 400 pixels 6400 dpi main scan optical resolution by 6 line CCD with 113 280 pixels 9600 dpi with Micro Step Output resolution 25 to 12 800 dpi 1 dpi steps Image data 16 bits per pixel per color internal 16 bits per pixel p...

Страница 156: ... Scanner Rated voltage DC 24 V Rated input current 1 3 A Power consumption 32 W Operating 21 W Ready Mode 4 W Sleep Mode 0 5 W Power off AC Adapter 100 120 V model 220 240 V model AC adapter model A411B A411E Rated input voltage AC 100 to 120 V AC 220 to 240 V Rated input current 1 0 A 0 5 A Rated input frequency 50 to 60 Hz Rated output voltage DC 24 V Rated output current 1 3 A Note The AC adapt...

Страница 157: ...2 0 Electrical standard Full Speed mode 12 Mbits per second and Hi Speed mode 480 Mbits per second of Universal Serial Bus Specification Revision 2 0 Connector type One Type B port Top Standards and Approvals Scanner EMC FCC Part 15 Subpart B Class B CAN CSA CEI IEC CISPR22 Class B AC Adapter Safety UL60950 1 CAN CSA C22 2 No 60950 1 EMC FCC Part 15 Subpart B Class B CAN CSA CEI IEC CISPR22 Class ...

Отзывы: