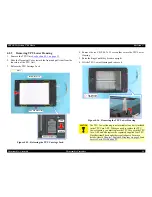
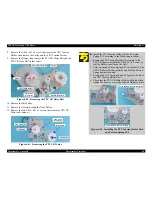
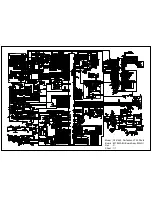
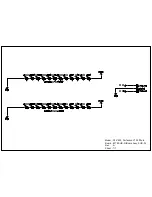
background image

EPSON Perfection V700 Photo

Revision A

Adjustment

No Special Adjustments

67

5.1  No Special Adjustments

This product does not require any adjustment in the range of the disassembly and reassembly beyond what is explained in Chapter 4.

Содержание Perfection V700 Series

Страница 1: ...EPSON PerfectionV700Photo Color Image Scanner Service Manual SESC05006 ...

Страница 2: ...ld greatly appreciate being informed of them The contents of this manual are subject to change without notice The above not withstanding SEIKO EPSON CORPORATION can assume no responsibility for any errors in this manual or the consequences thereof EPSON is a registered trademark of SEIKO EPSON CORPORATION General Notice Other product names used herein are for identification purpose only and may be...

Страница 3: ...CTRONIC COMPONENTS 4 WHEN DISASSEMBLING OR ASSEMBLING A PRODUCT MAKE SURE TO WEAR GLOVES TO AVOID INJURY FROM METAL PARTS WITH SHARP EDGES WARNING 1 REPAIRS ON EPSON PRODUCT SHOULD BE PERFORMED ONLY BY AN EPSON CERTIFIED REPAIR TECHNICIAN 2 MAKE CERTAIN THAT THE SOURCE VOLTAGE IS THE SAME AS THE RATED VOLTAGE LISTED ON THE SERIAL NUMBER RATING PLATE IF THE EPSON PRODUCT HAS A PRIMARY AC RATING DIF...

Страница 4: ... Electric circuit boards components layout Electrical circuit boards schematics Exploded diagram Parts List Symbols Used in this Manual Various symbols are used throughout this manual either to provide additional information on a specific topic or to warn of possible danger present during a procedure or an action Be aware of all symbols when they are used and always read NOTE CAUTION and WARNING m...

Страница 5: ...Revision Status Revision Date of Issue Description A December 20 2005 First release ...

Страница 6: ... Self Diagnosing 31 3 2 Troubleshooting 31 Chapter 4 Disassembly Assembly 4 1 Overview 36 4 1 1 Precautions 36 4 1 2 Recommended Tools 37 4 1 3 Recommended Screws 37 4 2 Disassembly Procedure 38 4 2 1 Removing the TPU Unit 39 4 2 2 Removing the Upper Housing 40 4 2 3 Removing the SUB Board 43 4 2 4 Removing the Panel Board 44 4 2 5 Removing the Main Board 45 4 2 6 Removing the Carriage Unit 48 4 2...

Страница 7: ...fection V700 Photo Revision A 7 Chapter 7 Appendix 7 1 Connectors 73 7 1 1 Connector Configuration 73 7 1 2 Connector Reference Table 73 7 2 Circuit Diagrams 74 7 3 Exploded Diagram 84 7 4 Service Parts List 89 ...

Страница 8: ...C H A P T E R 1 PRODUCTDESCRIPTION ...

Страница 9: ...echnology Automatic color restoration and dust removal features Includes three convenient scanning modes for maximum control and flexibility Hi Speed USB2 0 and FireWire IEEE1394 connectivity EPSON Creativity Suite Easy to use with thumbnail view function Link indicator for easy scanning Support for a variety of file types BMP JPEG TIFF RAW PICT and PDF EPSON Scan Graphic user interface Full Auto ...

Страница 10: ...800 6400 x 9600 dpi is achieved using EPSON s Micro Step Drive technology Scanning 8 x 10 size at 4800dpi 24 bit color is impossible under the following conditions Whenthe imagefile type is BmporTiff thefiletypesdonotallowthe filesizeto beover 4GB When the image file type is Jpeg the file type does not allow the file size to be over 2GB Maximum interpolated 12 800 dpi resolution Output resolution ...

Страница 11: ...ed input 100 120 VAC 100 V Model voltage 220 240 VAC 220 V Model Rated input 50 60 Hz 100 V and 220 V models frequency Rated input 0 8A at 100VAC current 0 4A at 200VAC Power Operation 32 W consumption Standby mode 19 W Sleep mode 4 W Energy International Energy Star Program compliant conservation Warm up time 40 seconds max at 25 C TBD 65 seconds max at 5 C TBD Current 500VDC 100 MΩ resistance AC...

Страница 12: ...ith Adobe Photoshop CS in Mac OS X native mode Some applications and or functions only work in Mac OS X classic mode 2 This device must be connected directly to the host or to a hub in tier 1 or 2 Use an approved USB cable 3 The functionality of USB port s is the responsibility of the host vendor 4 Microsoft USB2 0 driver is required 5 For PCs pre installed with Windows 2000 Professional Windows X...

Страница 13: ...S13438 Class B CNS14336 Taiwan 200 V model EN55022 CISPR Pub22 Class B EN61000 3 2 EN61000 3 3 EN55024 AS NZS3548 Class B Australia Korea EMC Russia consumer protection law CCC China 1 4 Exterior Specifications Explanation of switches Power button Turns the scanner on and off When the power is turned on the scanner is initialized Start button Starts EPSON Creativity Suite The button status can be ...

Страница 14: ...Error or Command Error may not cause the Status LED to turn red TPU lamp LED Lights up when the TPU lamp is on and moves with blue the TPU Carriage External Drawing Figure 1 3 External Dimensions of Perfection V700 Photo Table 1 1 Scanner Status and LED Indications LED Indication Status Lit green Ready Flashing green slowly Busy 1 Flashing red fast Error 2 20 1in 503mm 12 3in 308mm 6 1in 152 5mm 1...

Страница 15: ...g setting ESC K i Scanning parameter setting FS W Correction processing Brightness correction setting ESC L i Gamma correction setting ESC Z i Gamma correction table setting ESC z i d 256 Sharpness control setting ESC Q i Image processing Halftone process setting ESC B i Auto area segmentation setting ESC s i Dither pattern setting ESC b i j d j 2 Color correction setting ESC M i Download color co...

Страница 16: ...ameter Current setting maintained The scanner returns NACK and waits for the next command parameter The error condition is cleared when the scanner receives a valid command Fatal error Red LED flashes rapidly The lamp is burnt out The main unit is faulty Firmware downloading failed The scanner was turned on without releasing the carriage lock The scanner turns the carriage lamp off and stops the o...

Страница 17: ...t Size 8 5in 216mm W x 11 7in 297mm H Figure 1 4 Reflective Document Scanning Range Transparent document Standard size 5 9in 149mm W x 9 74in 247mm H Figure 1 5 Transparent Document Scanning Range Standard 8 5in 216mm 1 5 0 8mm 1 5 0 6mm 11 7in 297mm Scanning home position Front 5 9in 149mm 34 52 1 5mm 13 95 1 5mm 9 74in 247mm Scanning home position Front ...

Страница 18: ...Product Description Maximum Document Size and Placement 18 Transparent document Maximum size 8in 203mm W x 10in 254mm H Figure 1 6 Transparent Document Scanning Range Max 8in 203mm 8 0 1 5mm 21 6 1 5mm 10in 254mm Scanning home position Front ...

Страница 19: ...C H A P T E R 2 OPERATINGPRINCIPLES ...

Страница 20: ...s unstable the Panel LED flashes and the scanner enters standby mode until it becomes stable Mirror Lens mechanism The lamp light reflected off the scanned document passes through the Mirror Lens mechanism in the Carriage Unit for correction of the beam axis before it reaches the CCD Sensor The R G and B light components are extracted by the processing capabilities of the Color CCD Sensor itself n...

Страница 21: ... Configuration Inverter Board converts DC to AC and boosts the voltage to generate the current necessary to power the Lamps Lamps used as the primary light source are white cool cathode fluorescent lamps If the light output becomes unstable the Panel LED flashes and the scanner enters standby mode until it becomes stable SUB_C Board and SUB_D Board each contain LEDs to generate infrared light Fron...

Страница 22: ...g scanned Figure 2 4 Carriage Movement The Carriage Unit slides along the guide shaft in the secondary scanning direction The CR Carriage Motor transmits its drive power to the CR Drive Belt attached to the Carriage Unit via the Drive Pulley and Deceleration Gear See Figure 2 5 The CR Motor is a stepper motor under open loop control The image data scanning start position is determined by the CR Ho...

Страница 23: ...in the secondary scanning direction as the TPU CR Carriage Motor transmits its drive power to the TPU CR Drive Belt connected to the TPU Carriage Unit See Figure 2 6 The TPU CR Motor uses a stepper motor and is driven under open loop control Figure 2 6 TPU Carriage Operation Front Rear TPU Carriage Unit Driven Pulley TPU CR Drive Belt TPU CR Motor Deceleration Gear Drive Pulley ...

Страница 24: ... difference in focal length of the two lenses a scanning area reflected on the CCD varies by each lens As the number of CCD pixels differs between the two areas the different resolutions can be obtained Figure 2 7 When using the High Resolution Lens Figure 2 8 When using the Super Resolution Lens Table 2 1 Lenses Resolutions and Document Types Lens Resolution Document Type Maximum Width High Resol...

Страница 25: ...e 2 Energize lamp B and scan the image 3 Electronically superimpose the images obtained from each lamp and detect any inconsistent image data indicating a physical flaw or dust 4 Replace the flaw image data with image data interpolated from adjacent areas 2 2 2 Digital ICE for Film Overview Because of its longer wavelength infrared light normally passes completely through film media such as negati...

Страница 26: ...mage being scanned 2 Move the secondary lens Glass Plate into position and scan the film in visible light 3 Retract the secondary lens and scan the film in infrared light 4 Electronically superimpose the images obtained from each light source and identify the physical flaws and or foreign matter 5 Replace the flaw image data with image data interpolated from adjacent areas Figure 2 10 Extraction C...

Страница 27: ...00 Photo Scanner Figure 2 11 Block Diagram of Circuit Boards Main Unit TPU Main Board DRV Board SUB Board SUB_B Board Panel Board SUB_C Board ISN Board SUB_D Board Inverter Board TPU Inverter Board Scanner Mechanism CR Motor Interface TPU Inverter Board SUB_B Board SUB_C Board SUB_D Board DRV Board Main Board SUB Board Panel Board ISN Board Inverter Board USB2 0 IEEE1394 Lamps TPU CR Motor Sensor ...

Страница 28: ...erfection V700 Photo Revision A Operating Principles Circuit Boards 28 2 3 2 The Main Board Figure 2 12 Block Diagram of the Main Board 2 3 3 The TPU Main Board Figure 2 13 Block Diagram of the TPU Main Board ...

Страница 29: ...oard Scanned image data processing Analog to digital conversion processing in which the scanned image data generated as an analog electric signal is converted to a digital signal Shading correction processing in which the scanned image data is corrected compared to white and black reference values Various image correction processing such as gamma correction color correction halftone correction etc...

Страница 30: ...C H A P T E R 3 TROUBLESHOOTING ...

Страница 31: ...rns NACK and waits for the next command or parameter Recovery The error status is canceled upon receipt of a valid command Table 3 2 Fatal Error LED Indication Cause Self Diagnosing Action The lamp has burned out The power is turned on without releasing the Carriage Lock There is a fault in the main unit The scanner switches the lamps off and stops the operation The scanner sets Bit 7 of the statu...

Страница 32: ...ace the Main Board See Section 4 2 5 on page 45 Table 3 6 The Carriage Unit Does Not Operate Step Possible Cause Corrective Action Reference 1 The Carriage Lock has not been released Release the Carriage Lock See Step 3 of Section 4 2 2 on page 40 2 The Upper Housing is not installed correctly Install it normally See Section 4 2 2 on page 40 3 Carriage Mechanism failure The CR Motor does not opera...

Страница 33: ... 2 10 on page 55 5 TPU CR Motor failure Replace the TPU CR Motor See Section 4 2 16 on page 63 6 DRV Board failure Replace the DRV Board See Section 4 2 14 on page 61 7 Main Board failure Replace the Main Board See Section 4 2 5 on page 45 Table 3 10 The Fluorescent Lamps of the TPU Do Not Light Up Step Possible Cause Corrective Action Reference 1 The OPTION Connector CN7 on the main unit and the ...

Страница 34: ...nnect CN2 and CN4 See Section 4 2 12 on page 58 Figure 4 46 3 Failure of the SUB_C Board and the SUB_D Board Replace the SUB_C Board and the SUB_D Board See Section 4 2 13 on page 59 4 DRV Board failure Replace the DRV Board See Section 4 2 14 on page 61 5 Main Board failure Replace the Main Board See Section 4 2 5 on page 45 Table 3 12 Interface Error Step Possible Cause Corrective Action Referen...

Страница 35: ...C H A P T E R 4 DISASSEMBLY ASSEMBLY ...

Страница 36: ...th power on for voltage measurement etc use extreme care not to get an electric shock and do the work in accordance with the procedures given in this manual To prevent your hands from being cut by sharp edges always wear gloves before starting disassembly or reassembly When touching any internal components use static electricity discharge equipment such as anti static wrist straps C A U T I O N Pr...

Страница 37: ...ench 1080589 Table 4 2 Recommended Screws No Name Definition 1 C B 3x3 Phillips Bind Screw size M3 3 mm length 2 C B P 3x6 Phillips Bind P tite Screw size M3 6 mm length 3 C B P 3x8 Phillips Bind P tite Screw size M3 8 mm length 4 C B P 3x10 Phillips Bind P tite Screw size M3 10 mm length 5 C B P 3x12 Phillips Bind P tite Screw size M3 12 mm length 6 C B P 4x12 Phillips Bind P tite Screw size M4 1...

Страница 38: ...d page number where the procedure is described Figure 4 2 Disassembly Flowchart Start Removing the Upper Housing P 40 Removing the Main Board P 45 Removing the Carriage Unit P 48 Removing the SUB Board P 43 Removing the CR Motor P 50 Removing the Driven Pulley Unit P 53 Removing TPU Lower Housing P 54 Removing the DRV Board P 61 Removing the Hinges P 62 Removing Compression Spring 3 15 P 65 Removi...

Страница 39: ...y Procedure 39 4 2 1 Removing the TPU Unit 1 Disconnect the TPU Unit Connector CN7 on the rear of the Main Unit Figure 4 3 Removing the TPU Unit Connector 2 Hold both ends of the TPU Unit and then lift and remove it Figure 4 4 Removing the TPU Unit TPU Unit Connector CN7 ...

Страница 40: ... 3 Turn the screw with a driver until it gets enough grip to pull the Upper Housing Cap and pull the cap out Figure 4 6 Removing the Upper Housing Cap 2 4 Remove the other three Upper Housing Caps using the same procedure 3 Release the Carriage Lock by sliding its tab in the direction of the arrow Figure 4 7 Releasing the Carriage Lock Upper Housing Cap 1 Sharp pointed screw 2 C A U T I O N When p...

Страница 41: ...s of the spacers or accidental removal of them losing their original places replace the Lower Housing The Lower Housing Assy ASP is provided with factory installed spacers The Lower Housing Assy ASP however does not include the following parts Remove them from the previous Lower Housing Assy and reinstall them to the new one Refer to Chapter7 Exploded Diagram on page 84 and Service Parts List on p...

Страница 42: ...isassembly Procedure 42 14 Remove the four C P F S M3 x 10 screws that secure the Upper Housing Figure 4 9 Removing the Upper Housing 1 15 Lift the Upper Housing slowly and remove it Figure 4 10 Removing the Upper Housing 2 C P F S M3x10 9 1 kgf cm Upper Housing ...

Страница 43: ...or CN2 connected to the SUB Board Figure 4 12 Removing the SUB Board Unit 1 4 Remove the SUB Board from the SUB Board Holder Figure 4 13 Removing the SUB Board Unit 2 SUB Board Unit C B P 3x8 7 1 kgf cm Panel Board Connector CN1 SUB Board SUB Board Connector CN2 When installing the SUB Board to the Sub Board Holder match the notch and tab as shown in Figure 4 13 Route the SUB Board Connector cable...

Страница 44: ... x 8 screw that secure the Panel Board and remove the board releasing it from the hooked tab Figure 4 16 Removing the Panel Board C B P M3x8 7 1 kgf cm Inside of the scanner Front Cover If the LED Cover accidentally becomes detached install it matching the positioning holes and guide pins as shown below Figure 4 17 Installing the LED Cover When installing the Panel Board match the positioning hole...

Страница 45: ...e Upper Main Board Cover 4 Remove the four C B P M3 x 8 screws and C B P M3 x 10 screw that secure the Upper Main Board Cover 5 With the rear of the Upper Main Board Cover lifted slide the cover toward the rear to release tab A and remove the Upper Main Board Cover Figure 4 19 Removing the Main Board Cover Carriage Unit C B P M3x8 7 1 kgf cm Tab A 2 3 4 5 1 Beneath the Main Board Cover Sheet Posit...

Страница 46: ...re the Harness C Cover and remove the Harness C Cover 10 Remove the C P F P M3 x 8 screw that secures the Ground Plate and remove the Ground Plate Figure 4 20 Removing the Main Board 1 11 Lift the Main Board and disconnect the CR Motor Relay Connector CN9 then remove the Main Board Figure 4 21 Removing the Main Board 2 Tape Position Positioning Hole and Guide Pin Marked Lines C P F P M3x8 7 1 kgf ...

Страница 47: ...th a piece of two sided tape When installing the Main Board and Harness C Cover match the positioning holes and guide pins as shown in Figure 4 20 on page 46 Follow the procedure given below to install the Upper Main Board Cover 1 Put the three tabs of the Lower Main Board Cover into the holes on the Upper Main Board Cover as shown below Figure 4 22 Installing the Main Board Cover 2 Match the posi...

Страница 48: ... the Carriage Shaft 4 Remove the C B P M3 x 10 screw that secures the Ground Plate B and remove it from the Carriage Shaft Figure 4 23 Removing the Carriage Shaft 1 5 Rotate the Carriage Shaft with a wrench or similar tool so that the edge of the shaft can come out from the bushing Figure 4 24 Removing the Carriage Shaft 2 Front of the Scanner Hex Nut 5 mm 9 1 kgf cm Carriage Shaft Hex Nut Ground ...

Страница 49: ...e Shaft out of the Carriage Unit Figure 4 25 Removing the Carriage Shaft 3 8 Lift the Carriage Unit remove the Lock Plate and then remove the CR Drive Belt Figure 4 26 Removing the CR Drive Belt 9 Disconnect the Carriage FFC CN5 from the Main Board and remove the Carriage Unit See Step 7 in Section 4 2 5 5 1 5 3 5 2 Install the Carriage FFC with reference to Figure 4 20 on page 46 Install the Grou...

Страница 50: ... the two C B P M3 x 10 screws C B P M3 x 10 screw and C P F P M3 x 8 screw that secure the Motor Harness Cover 6 Disconnect the CR Motor Relay Connector CN9 from the Main Board and remove the Motor Harness Cover 7 Remove the C B P M3 x 10 screw that secures the CR Motor Unit 8 Remove the CR Drive Belt from the Driven Pulley and remove the CR Motor Unit Figure 4 27 Removing the CR Motor Unit C P F ...

Страница 51: ...re the Tension Holder then remove the Tension Holder and Pulley 3 Remove the CR Motor Belt and then remove the CR Drive Belt Figure 4 28 Removing the CR Drive Belt 10 Remove the E ring that secures the Driven Pulley and remove the Driven Pulley 11 Remove the three hex nuts H N 2 3 then remove the CR Motor and three Motor Insulators Figure 4 29 Removing the CR Motor C B M3x3 6 1 kgf cm Pulley Tensi...

Страница 52: ...Tension Pulleys 3 Position the two ends of Torsion Spring 98 18 against the tabs of the Tension Holder and the CR Motor Holder Figure 4 32 Installing the Torsion Spring 98 18 4 After checking proper tension is applied to the CR Motor Belt secure the Tension Holder tightly with the screws When installing the following unit and parts match the positioning holes and guide pins as shown in Figure 4 27...

Страница 53: ...ey Spring from the Driven Pulley Unit Figure 4 33 Removing the Driven Pulley Unit 4 Remove the E ring and then remove the Driven Pulley from the Driven Pulley Unit Figure 4 34 Removing the Driven Pulley C P F P M3x8 7 1 kgf cm Driven Pulley Unit Driven Pulley Spring Rib of the Driven Pulley Holder Insert the Driven Pulley Spring into the Lib of the Driven Pulley Holder A D J U S T M E N T R E Q U ...

Страница 54: ...g 5 Raise the hinges until they become upright 6 Lift the TPU Lower Housing and remove it Figure 4 36 Removing the TPU Lower Housing Slots Lock Unlock TPU Carriage Lock TPU Lower Housing Document Cover C A U T I O N The TPU Lower Housing is not available alone but is included in the TPU Case ASP When you need to replace the TPU Lower Housing you must replace the TPU Case with the TPU Case ASP and ...

Страница 55: ...he TPU Carriage Unit 3 Remove the TPU Carriage Shaft according to the following procedure 1 Remove the TPU Carriage Shaft from the Rear Bushing of the TPU Upper Housing 2 Pull the TPU Carriage Shaft out of the Front Bushing of the TPU Upper Housing 3 Pull the TPU Carriage Shaft out of the TPU Carriage Unit toward the rear to remove it Figure 4 38 Removing the TPU Carriage Shaft TPU Carriage Unit 1...

Страница 56: ... Board and remove the TPU Carriage Unit Figure 4 40 Removing the TPU Carriage Unit Clip TPU CR Drive Belt DRV SUB_B FFC CN1 SUB_B Board Lock Plate When attaching the DRV SUB_B FFC to the TPU Carriage Unit align the positioning line on the FFC as shown below and secure it with two pieces of two sided tape Figure 4 41 Attaching the DRV SUB_B FFC Be sure to route the DRV SUB_B FFC inside the protrusi...

Страница 57: ...PU Unit Cable C B P M3x8 6 1 kgf cm TPU Unit Cable DRV Board TPU Unit Connector CN2 Connect the TPU Unit Cable to the DRV Board following the procedure given below 1 Connect the TPU Unit Cable to the DRV Board 2 While slightly lifting the DRV Board insert the grounding wire of the TPU Unit Cable between the DRV Board and TPU Upper Housing 3 Secure the grounding wire of the TPU Unit Cable with the ...

Страница 58: ...e SUB_B Board and disconnect the Connectors CN2 CN3 and CN4 Release the cables from the retaining clip on the TPU Lamp Cover and remove the SUB_B Board Figure 4 46 Removing the SUB_B Board 2 5 Remove the two C B P M3 x 6 screws that secure the TPU Inverter Board Unit 6 Disconnect the Connectors CN1 CN2 and CN3 from the TPU Inverter Board and remove the TPU Inverter Board Unit Figure 4 47 Removing ...

Страница 59: ...s shown in the figure below 2 Remove the two C B P M3 x 6 screws that secure the TPU Lamp Cover to remove it Figure 4 49 Removing the TPU Lamp Cover Refer to Figure 4 45 when attaching the Protective Sheet to the TPU Inverter Board When installing the SUB_B Board match the positioning holes and the guide pins as shown in Figure 4 45 When installing the LED Cover to the SUB_B Board match the positi...

Страница 60: ...e the two Lamps at the same time Figure 4 51 Removing the Lamps Notches and Guide Pins SUB_D Board SUB_C Board Retaining clips Retaining clips Lamps When installing the SUB_C Board and SUB_D Board match the notches and guide pins as shown in Figure 4 50 When installing the TPU Lamp Cover match the positioning holes and the guide pins as shown in Figure 4 49 on page 59 Route the Lamp SUB_C and SUB_...

Страница 61: ...RV Board Cover 4 Disconnect the TPU Motor cable from connector CN3 and the DRV SUB_B FFC from CN4 on the DRV Board and remove the DRV Board Figure 4 54 Removing the DRV Board DRV Board Cover C B P M3x8 6 1 kgf cm C B P M3x8 6 1 kgf cm Positioning Hole and Guide Pin When installing the DRV Board match the positioning holes and the guide pins as shown in Figure 4 54 When installing the DRV Board Cov...

Страница 62: ...Housing See Section 4 2 9 on page 54 2 Remove the four C B P M4 x 12 screws that secure the Right and Left Hinges and remove them Figure 4 55 Removing the Hinges When installing the Hinges match the positioning holes and the guide pins as shown in Figure 4 55 Positioning Hole and Guide Pin Left Hinge C B P M4x12 9 1 kgf cm Right Hinge ...

Страница 63: ...ve Belt from the TPU Driven Pulley and remove the TPU CR Motor Unit Figure 4 57 Removing the TPU CR Motor Unit 2 5 Remove the four TPU CR Motor Dampers Figure 4 58 Removing the TPU CR Motor Dampers 6 Push end A of Torsion Spring 49 9 in the direction of the arrow to release it from the tab of the TPU Tension Holder Unit 7 Remove Torsion Spring 49 9 from the shaft of the TPU CR Motor Holder Figure ...

Страница 64: ... TPU CR Drive Belt C B S M3x5 9 1 kgf cm Drive Pulley Flat Washer Idle Pulley TPU CR Motor Install the TPU Tension Holder Unit and Torsion Spring 49 9 according to the following procedure 1 Secure the TPU Tension Holder Unit loosely to the TPU CR Motor Unit with the C B S M3 x 5 screw so that the Holder can slide on the Unit 2 After mounting Torsion Spring 49 9 on the shaft of the TPU CR Motor Hol...

Страница 65: ...5 Removing Compression Spring 3 15 Install the four TPU CR Motor Dampers as shown in the figure below Figure 4 63 Installing the TPU CR Motor Dampers Route the TPU CR Motor Cable through the notch as shown in the figure below Figure 4 64 Routing the TPU CR Motor Cable A D J U S T M E N T R E Q U I R E D Whenever the TPU Tension Holder or the TPU CR Motor Holder is replaced G 26 grease must be appl...

Страница 66: ...C H A P T E R 5 ADJUSTMENT ...

Страница 67: ...n V700 Photo Revision A Adjustment No Special Adjustments 67 5 1 No Special Adjustments This product does not require any adjustment in the range of the disassembly and reassembly beyond what is explained in Chapter 4 ...

Страница 68: ...C H A P T E R 6 MAINTENANCE ...

Страница 69: ...entle vacuum cleaner to clean inside the unit Whenever the Upper Housing has been removed be sure to use compressed air to blow out any dust inside the unit including the internal portion of the Upper Housing as the last step before replacing the housing 6 1 2 Lubrication Lubrication is required when any part of the Scanner Carriage or TPU Carriage Unit has been replaced or the Scanner or TPU Carr...

Страница 70: ...Holder Lubrication point Main bottom Carriage Unit Driven Pulley Holder Shaft Lubricant G 26 Amount As shown Lubrication point Shaft of Tension Holder and CR Motor Holder Lubricant G 26 Amount As shown Shaft Driven Pulley Holder Tension Holder Shaft CR Motor Holder Lubrication point TPU Carriage Unit Driven Pulley Holder Shaft Lubricant G 26 Amount As shown Lubrication point Shaft of TPU Tension H...

Страница 71: ...on V700 Photo Revision A Maintenance Overview 71 Figure 6 5 Lubrication Points on the Carriage Lock Lubrication point Top and bottom of Carriage Lock Lubricant G 26 Amount As shown Bottom face Top face Carriage Lock ...

Страница 72: ...C H A P T E R 7 APPENDIX ...

Страница 73: ... Board CN1 USB 2 0 4 CN2 IEEE 1394 8 CN4 SUB Board 6 CN5 ISN Board 34 CN7 DRV Board 8 CN9 CR Motor 4 CN10 DC Input 2 SUB Board CN1 Panel Board 4 CN2 Main Board 6 Panel Board CN2 SUB Board 4 ISN Board CN1 Lens Motor 4 CN2 Inverter Board 4 CN3 Sensor 2 CN4 SUB_E Board 3 CN6 Main Board 34 Inverter Board CN1 ISN Board 4 CN2 Lamp x 2 2 4 1 CN3 DRV Board CN2 Main Board 8 CN3 TPU CR Motor 4 CN4 SUB_B Boa...

Страница 74: ...shown on the pages that follow Main Board B178 MAIN Board Assy Main SUB Board B178 SUB Board Assy SUB Panel Board B178 PNL ISN Board B178 ISN Board Assy ISN DRV Board B178 DRV Board Assy DRV SUB_B Board B178 SUB B Board Assy SUB B SUB_C Board B178 SUB C Board Assy SUB C SUB_D Board B178 SUB D Board Assy SUB D SUB_E Board B178 SUB E Board Assy SUB E ...

Страница 75: ...Model GT X900 Perfection V700 Photo Board B178 MAIN Board Assy MAIN Rev C Sheet 1 1 ...

Страница 76: ...Model GT X900 Perfection V700 Photo Board B178 SUB Board Assy SUB Rev A Sheet 1 1 ...

Страница 77: ...Model GT X900 Perfection V700 Photo Board B178 PNL Board Assy PNL Rev A Sheet 1 1 ...

Страница 78: ...Model GT X900 Perfection V700 Photo Board B178 ISN Board Assy ISN Rev A Sheet 1 1 ...

Страница 79: ...Model GT X900 Perfection V700 Photo Board B178 DRV Board Assy DRV Rev A Sheet 1 1 ...

Страница 80: ...Model GT X900 Perfection V700 Photo Board B178 SUB B Board Assy SUB B Rev A Sheet 1 1 ...

Страница 81: ...Model GT X900 Perfection V700 Photo Board B178 SUB C Board Assy SUB C Rev A Sheet 1 1 ...

Страница 82: ...Model GT X900 Perfection V700 Photo Board B178 SUB D Board Assy SUB D Rev A Sheet 1 1 ...

Страница 83: ...Model GT X900 Perfection V700 Photo Board B178 SUB E Board Assy SUB E Rev A Sheet 1 1 ...

Страница 84: ...EPSON Perfection V700 Photo Revision A Appendix Exploded Diagram 84 7 3 Exploded Diagram The following exploded diagrams are provided below ...

Страница 85: ...Diagram 85 Figure 7 1 Exploded diagram 1 402 400 410 401 403 14 13 11 18 18 18 18 18 18 18 18 18 18 18 18 18 18 18 18 18 18 18 18 18 18 18 18 10 17 R E V 01 B178 ACCE 001 GT X900 PE R FE CTION V700 PHOTO V750 PR O NO 1 for 220V Harness socket for 100V models ...

Страница 86: ...Revision A Appendix Exploded Diagram 86 Figure 7 2 Exploded diagram 2 110 130 104 119 119 123 109 103 111 165 165 165 165 121 125 125 121 121 121 R E V 01 B178 CAS E 011 GT X900 PE R FE CTION V700 PHOTO V750 PR O V750 M PR O NO 2 ...

Страница 87: ...am 87 Figure 7 3 Exploded diagram 3 149 107 313 313 311 313 313 167 304 158 152 151 162 153 151 154 146 147 144 131 156 157 157 157 157 140 155 141 310 309 132 308 160 133 303 R E V 01 B178 CAS E 021 GT X900 PE R FE CTION V700 PHOTO V750 PR O V750 M PR O NO 3 A A ...

Страница 88: ...ed Diagram 88 Figure 7 4 Exploded diagram 4 535 525 525 527 527 532 101 118 523 301 100 312 312 312 508 312 521 520 502 200 302 113 512 506 529 530 512 533 501 534 531 526 R E V 01 B178 ME CH 011 GT X900 PE R FE CTION V700 PHOTO V750 PR O V750 M PR O NO 4 ...

Страница 89: ...WER ASP 107 CASE TPU ASP 109 MAT COVER DOCUMENT 110 HOUSING MAT 111 COVER FRONT 113 OPTICAL PLATE 118 HOLDER FSW BOARD 119 HINGE ASSY 121 FOOT 123 HARNESS TPU 125 FOOT 130 TPU ASSY Lid ASP 131 CARRIAGE TPU ASP 132 CHIP SLIDER 133 COVER BOARD ASSY INVERTOR 140 MOTOR TPU 141 HARNESS DRV SUB B 144 TIMING BELT TPU 146 PULLEY DRIVEN TPU 147 E RING 3 F UC 3C 149 LOCK CARRIAGE TPU 151 FLANGE PULLEY IDLE ...

Страница 90: ...N 501 MOTOR CR 502 CARRIAGE ASSY ASP 506 PULLEY DRIVEN 508 HARNESS MOTOR 512 E RING 4 F UC 3C 520 SHEET SLIDE 521 HARNESS MAIN SUB 523 SUPPORT POWER SWITCH 525 SPACER INSULATOR 526 PULLEY TENSION 527 INSULATOR MOTOR CR 529 TIMING BELT DRIVE 530 PULLEY DRIVE 531 TORSION SPRING 98 18 532 TIMING BELT CR 533 SPRING PULLEY DRIVEN 534 HOLDER ASSY PULLEY DRIVEN 535 HOLDER ASSY MOTOR Table 7 2 EPSON Perfe...

Отзывы: