background image

Epson Stylus

®

 NX400 Series

Start Here

9


Press the 

OK 

button to charge the ink. Charging takes about 

2½ minutes.


Caution:

 Don’t turn off the NX400 Series while it is charging or you’ll 

waste ink.

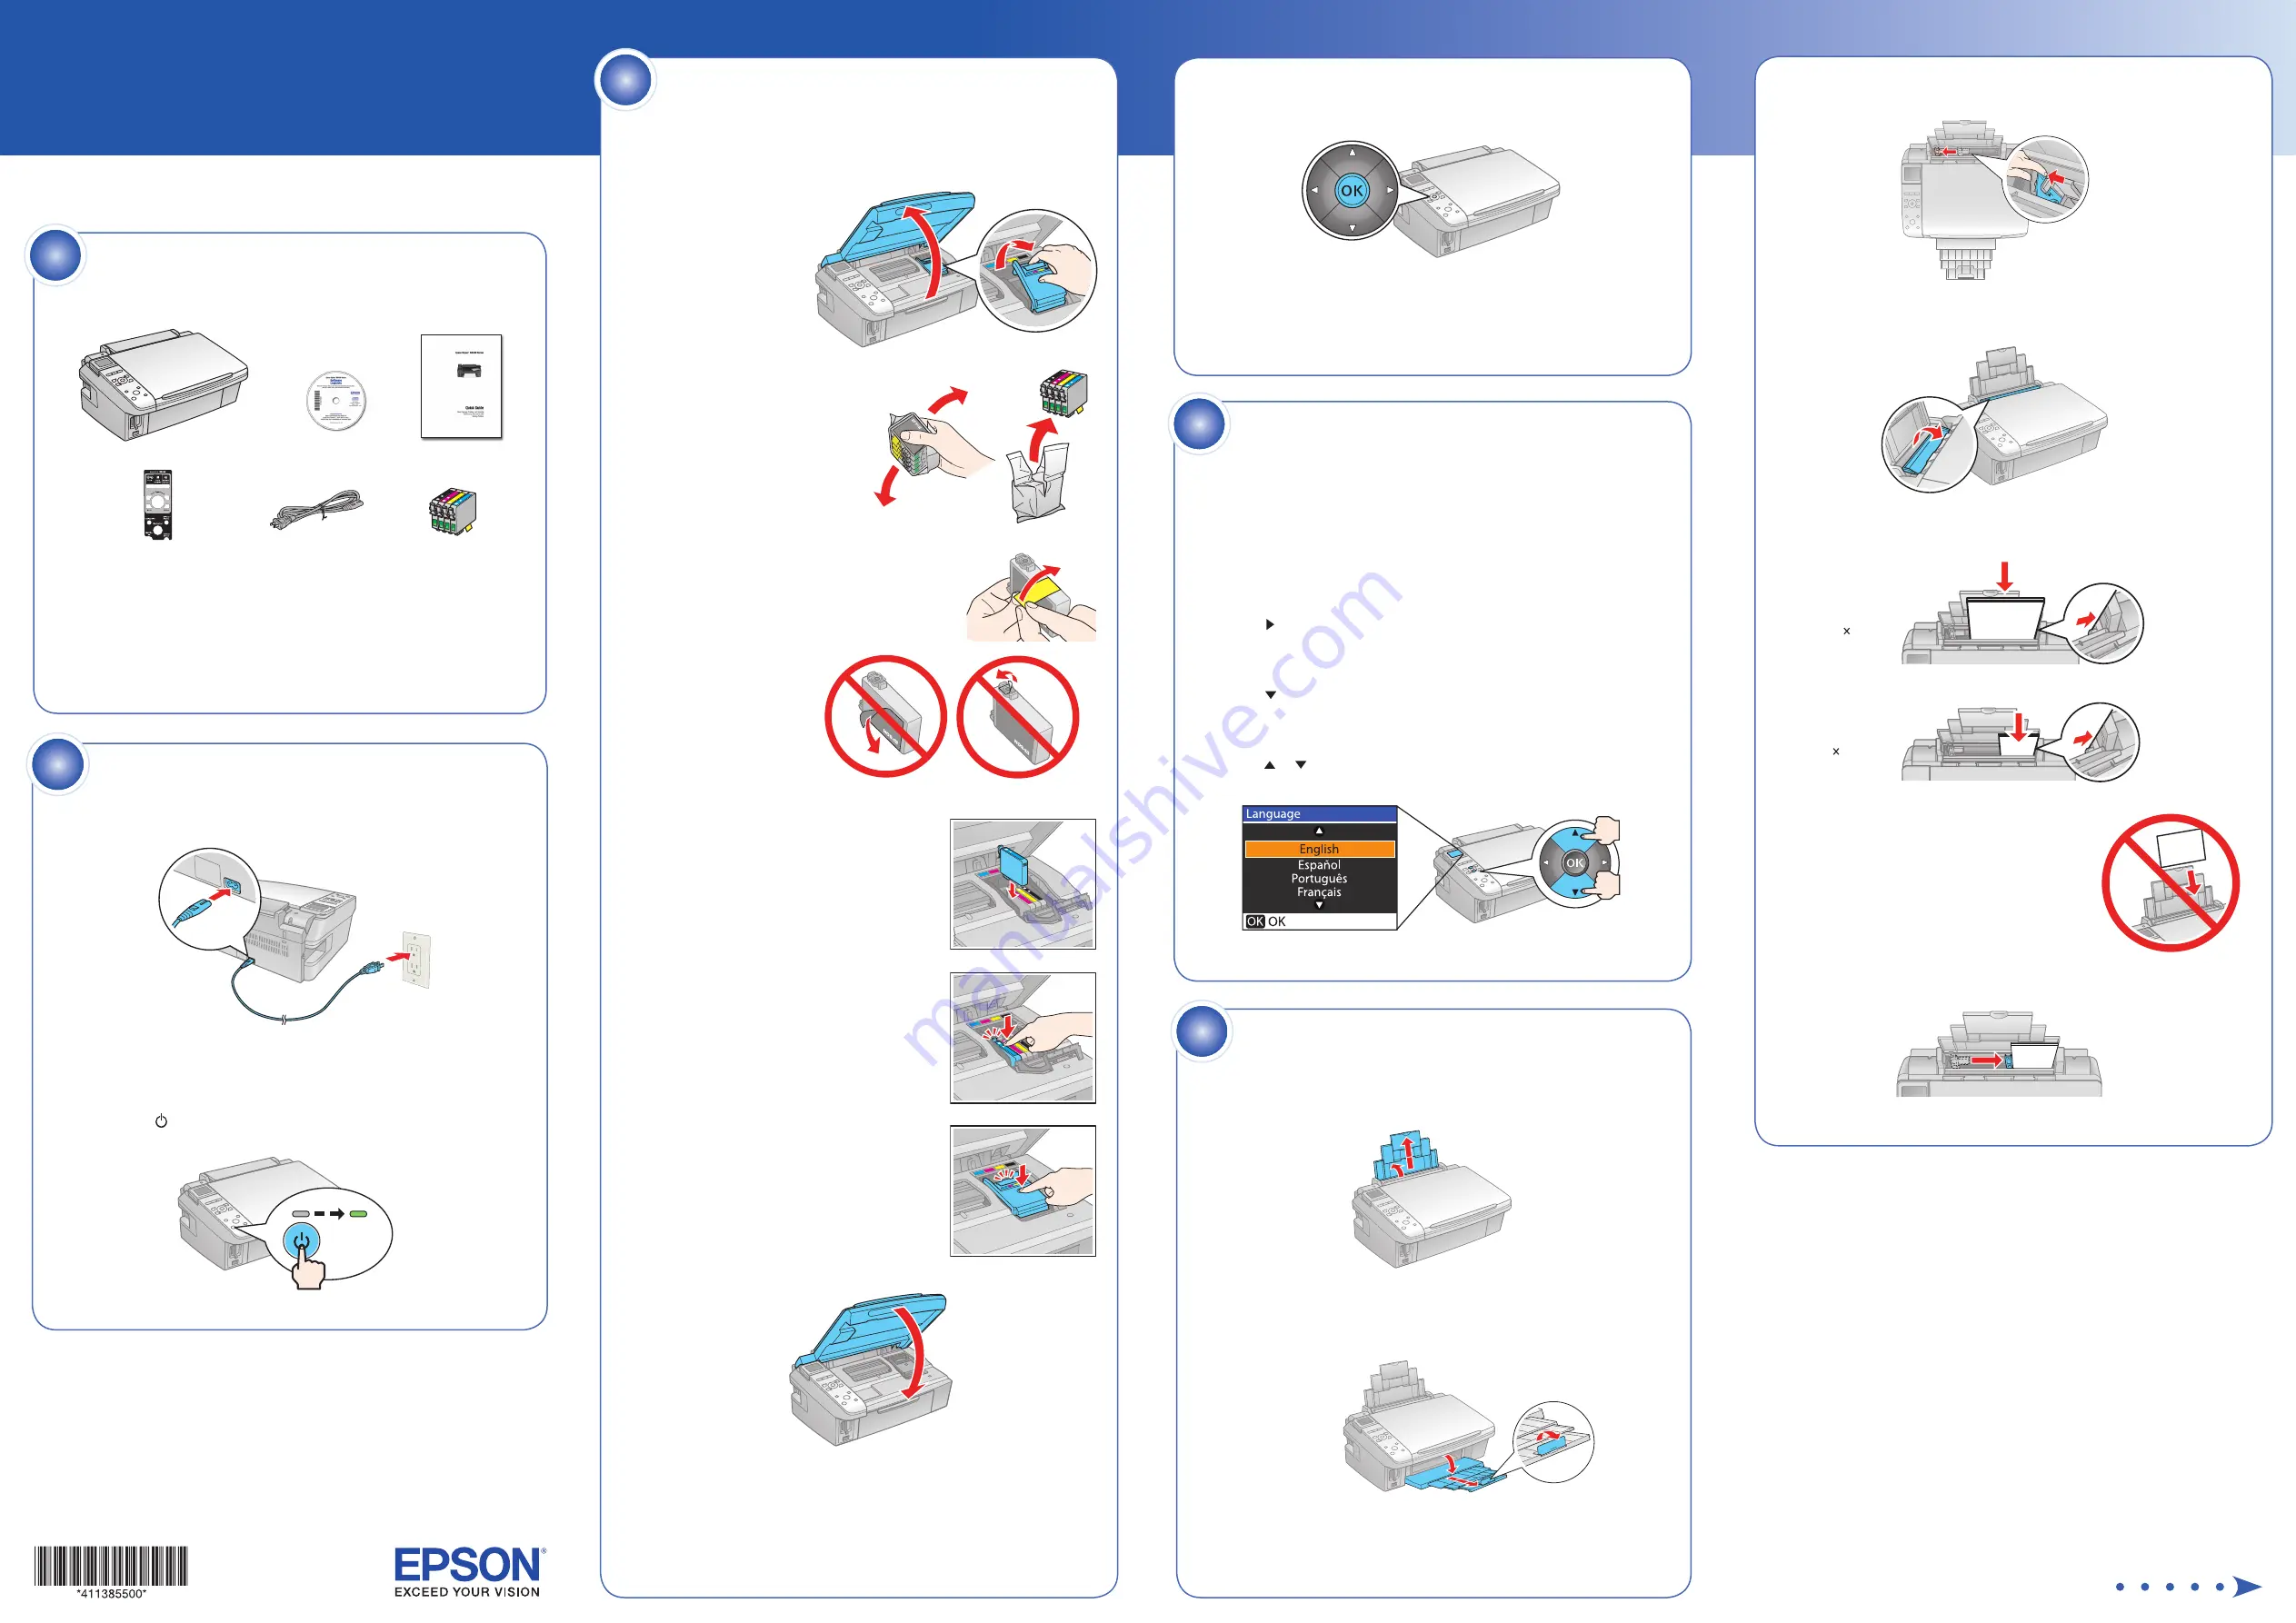
Unpack

If anything is missing, contact Epson as described on the back.

Caution:

 Do not open the ink cartridge package until you are ready to install 

the ink. Cartridges are vacuum packed to maintain reliability.

Canada only:

 For French speakers, remove stickers from the backing sheet 

and place over corresponding text on the control panel.

1

3


Squeeze the edge guide and slide it left.


Tip

: If the feeder guard is in the way, flip it forward.

4


Load paper against the right edge and underneath the tab.


Note:

 Don’t load the paper sideways. 

5


Slide the edge guide over.

Turn on the NX400 Series

1


Connect the power cable.


Note:

 Do not connect to the computer at this time.

2


Press the

On

 button.


Load paper

1


Open the paper support and pull up the extensions.

2


Open the output tray, pull out the extensions, and raise the stopper.

5

2

8½    11

4    6

Change your language

You can change the language that appears on your LCD display screen 

from English to French, Spanish, or Portuguese.

1


Press 

Setup

.


2


Press

to select 

Maintenance

, and press 

OK

.


3


Press

to select 

Language

, and press 

OK

.


Press

or

to select your language, and press 

OK

.


4

Install cartridges

Note:

 Do not load paper yet.

1


Lift up the scanner.


2


Open the cartridge 

cover.

3


Shake the ink cartridges,
then unpack them.

Remove only the yellow tape from each cartridge.


Caution:

 Do not remove 

any other seals or the 
cartridge may leak.

Insert the cartridges in the holder for

each color.


6


Press each cartridge down until it clicks.


7


Close the cartridge cover. Press down until 

it clicks.


Lower the scanner.

3

(Included for Canada only)

Содержание NX400 - Stylus Color Inkjet

Страница 1: ...Connect the power cable Note Do not connect to the computer at this time 2 Press the On button Load paper 1 Open the paper support and pull up the extensions 2 Open the output tray pull out the extensions and raise the stopper 5 2 8 11 4 6 Change your language You can change the language that appears on your LCD display screen from English to French Spanish or Portuguese 1 Press Setup 2 Press to s...

Страница 2: ...Connect the power cable Note Do not connect to the computer at this time 2 Press the On button Load paper 1 Open the paper support and pull up the extensions 2 Open the output tray pull out the extensions and raise the stopper 5 2 8 11 4 6 Change your language You can change the language that appears on your LCD display screen from English to French Spanish or Portuguese 1 Press Setup 2 Press to s...

Страница 3: ...Connect the power cable Note Do not connect to the computer at this time 2 Press the On button Load paper 1 Open the paper support and pull up the extensions 2 Open the output tray pull out the extensions and raise the stopper 5 2 8 11 4 6 Change your language You can change the language that appears on your LCD display screen from English to French Spanish or Portuguese 1 Press Setup 2 Press to s...

Страница 4: ...Connect the power cable Note Do not connect to the computer at this time 2 Press the On button Load paper 1 Open the paper support and pull up the extensions 2 Open the output tray pull out the extensions and raise the stopper 5 2 8 11 4 6 Change your language You can change the language that appears on your LCD display screen from English to French Spanish or Portuguese 1 Press Setup 2 Press to s...

Страница 5: ... the User Account Control screen click Continue 3 Click Install and follow the on screen instructions 4 When prompted connect the USB cable Use any open port on your computer Note If installation doesn t continue after a moment make sure you securely connected and turned on the NX400 Series 5 Follow the on screen instructions to install the rest of the software and register your NX400 Series 6 Whe...

Страница 6: ... the User Account Control screen click Continue 3 Click Install and follow the on screen instructions 4 When prompted connect the USB cable Use any open port on your computer Note If installation doesn t continue after a moment make sure you securely connected and turned on the NX400 Series 5 Follow the on screen instructions to install the rest of the software and register your NX400 Series 6 Whe...

Страница 7: ... the User Account Control screen click Continue 3 Click Install and follow the on screen instructions 4 When prompted connect the USB cable Use any open port on your computer Note If installation doesn t continue after a moment make sure you securely connected and turned on the NX400 Series 5 Follow the on screen instructions to install the rest of the software and register your NX400 Series 6 Whe...

Страница 8: ... the User Account Control screen click Continue 3 Click Install and follow the on screen instructions 4 When prompted connect the USB cable Use any open port on your computer Note If installation doesn t continue after a moment make sure you securely connected and turned on the NX400 Series 5 Follow the on screen instructions to install the rest of the software and register your NX400 Series 6 Whe...

Отзывы: