background image

Getting Started

1

1

1

1

1

1

1

1

1

1

Englis

h

Chapter 1

Getting Started

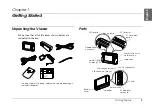
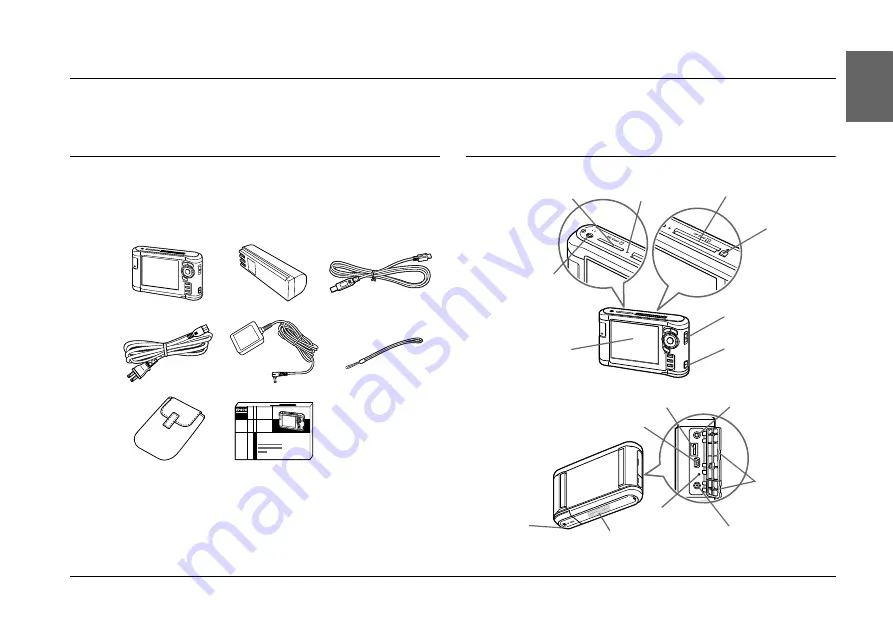
Unpacking the Viewer

Make sure that all of the items shown below are 
included in the box.

Parts

*

* The plug type for the power cable may vary, depending on 

the local standards.

SD Card slot

Access lamp

CF Card slot

CF Card eject 
button

Headphones 
connector

Liquid Crystal 
Display (LCD)

Power Switch with 
Hold function

Strap hook

Reset button

AC adapter 
connector

USB connector (host)

USB connector (slave)

A/V Out connector

Cover

Speaker

Battery 
cover

Содержание Multimedia Storage Viewer P-5000

Страница 1: ...Quick Reference Guide ...

Страница 2: ...s product other than consumer personal use in any manner that complies with the MPEG 2 standard for encoding video information for packaged media is expressly prohibited without a license under applicable patents in the MPEG 2 patent portfolio which license is available from MPEG LA L L C 250 STEELE STREET SUITE 300 DENVER COLORADO 80206 This product is licensed under the AVC Patent Portfolio Lice...

Страница 3: ...11 Copying all data 12 Copying particular data 12 Chapter 3 Viewing Images Viewing Photos and Videos 13 Switching the screen 14 Icons on the screen 14 Displaying information 15 Zooming a photo 15 Basic operations while playing videos 15 Managing Files and Folders 16 Copying files and folders 16 Deleting files and folders 16 Protecting files and folders 17 Rating your photos 18 Chapter 4 Backing Up...

Страница 4: ...ing so may cause malfunctions Do NOT format the viewer s hard disk drive from your computer as this will render the viewer inoperable If this happens you should contact an authorized Epson service center Repairs will be chargeable and are not covered by Epson s warranties Do not drop or apply any shock to the viewer Take care when carrying it as strong shocks may damage the internal hard disk driv...

Страница 5: ... box Parts The plug type for the power cable may vary depending on the local standards SD Card slot Access lamp CF Card slot CF Card eject button Headphones connector Liquid Crystal Display LCD Power Switch with Hold function Strap hook Reset button AC adapter connector USB connector host USB connector slave A V Out connector Cover Speaker Battery cover ...

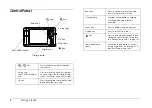
Страница 6: ...g Menu key Illumination lamp Display key Back key key key key Back key Press to cancel the selection and return to the previous screen Charge lamp Lit green during battery charging Lit orange when an error has occurred Menu key Press to display the pop up menu Display key Press to switch the screen key Press to rate a particular photo and determine the selection For details see Rating your photos ...

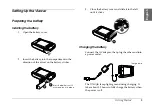
Страница 7: ...direction of the arrow on the battery sticker 3 Close the battery cover and slide it to the left until it clicks Charging the battery Connect the AC adapter then plug the other end into a power outlet The Charge lamp lights green during charging It takes about 3 5 hours to fully charge the battery when the power is off Insert the battery until it clicks and locks in place Charge lamp ...

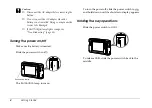
Страница 8: ...harge lamp lights orange see Troubleshooting page 25 Turning the power on off Make sure the battery is inserted Slide the power switch to The Illumination lamp turns on To turn the power off slide the power switch to and hold down until the shut down display appears Holding the key operations Slide the power switch to Hold To release Hold slide the power switch back to the middle Illumination lamp...

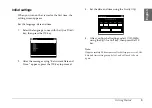
Страница 9: ...e Up or Down key then press the OK key 2 After the message saying Set current Date and Time appears press the OK key to proceed 3 Set the date and time using the 4 way ring 4 After you finish all settings select Complete using the Right or Left key then press the OK key Note If approximately 24 hours passes after battery power is cut the date and time settings may be lost and will need to be set a...

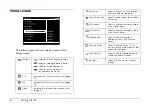
Страница 10: ...e 4 My Music Select to listen to music transferred from the computer page 22 View Rated Files Select to display rated files sorted by their rating My Videos Select to display files folders stored in the Videos folder My Photos Select to display files folders stored in the Photos folder Backup Files Select to display files folders backed up from CF SD memory cards Memory Card Select to display file...

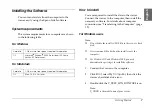
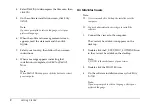
Страница 11: ...e Computer page 19 For Windows users Note Do not delete the installer EXE file in the viewer s hard disk It is recommended to back up the installer onto the computer For Windows XP and Windows 2000 you need administrative privileges to install the software 1 Connect the viewer to the computer 2 Click Start select My Computer then click the viewer s hard disk drive icon 3 Double click the P_XXXX_WI...

Страница 12: ...lete click Exit or Restart Now Note When Restart Now appears click the button to restart your computer For Macintosh users Note It is recommended to back up the installer onto the computer You need administrative privileges to install the software 1 Connect the viewer to the computer The viewer s hard disk icon appears on the desktop 2 Double click the P_XXXX_MAC_SOFTWARE icon in the viewer s hard...

Страница 13: ... 6 Select your country then follow the on screen instructions If the Authenticate window appears click the key icon enter the administrator s name and password then click OK 7 When a message appears indicating that installation is complete click Exit or Restart Now Note When Restart Now appears click the button to restart your computer ...

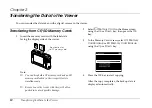
Страница 14: ... CF memory card and an SD memory card loaded in their respective slots simultaneously Be sure to use the viewer with the eject button pushed in to avoid possible damage 2 Select Memory Card in the Home screen using the Up or Down key then press the OK key 3 In the Memory Card screen select CF Memory Card Backup or SD Memory Card Backup using the Up or Down key 4 Press the OK key to start copying A...

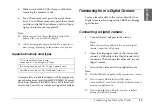
Страница 15: ...tails Transferring from a Digital Camera You can transfer data to the viewer directly from digital cameras that support the USB Mass Storage specification Connecting a digital camera 1 Connect the AC adapter to the viewer Note When the remaining battery is low on your digital camera connect the AC adapter 2 Open the side upper cover of the viewer and connect a USB cable to the Host Standard A conn...

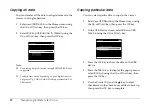
Страница 16: ...n your digital camera but generally 1 GB of data will take approximately 5 to 10 minutes Copying particular data You can select specific data to copy to the viewer 1 Select USB Device in the Home screen using the Up or Down key then press the OK key 2 In the USB Device screen select Browse USB Device using the Up or Down key 3 Press the OK key to show the data on the USB device 4 Press the Menu ke...

Страница 17: ...copy from Backup Files on the viewer For details see Copying files and folders page 16 2 Select a folder to view using the 4 way ring then press the OK key If there is no folder skip this step 3 Select a file to view using the 4 way ring then press the OK key Note When viewing photos pressing the Right key displays the next image and pressing the Left key displays the previous image Supported phot...

Страница 18: ...een The modify date and file size are displayed Icons on the screen Note For details about the screen icon see the User s Guide a Indicates that the file or folder is locked b Indicates unsupported data such as a document c Indicates that the file is set with the rating information d Indicates the file is in music format e Indicates that the folder is set as a private folder f Indicates that the f...

Страница 19: ...ing the 4 way ring Basic operations while playing videos When you press the Back key to stop playback the viewer remembers the resume point for the next time you start playback The next time you start playback playback starts from 3 seconds before the resume point If you want to play back the video from the beginning press the Menu key during playback select Play Settings Play from Beginning then ...

Страница 20: ...n press the OK key to complete 5 Select My Photos or My Videos using the Up or Down key then press the Right key 6 Select a folder to copy to using the 4 way ring then press the OK key You can also create a new folder Select Create New Folder then input the folder s name To input the folder s name see the User s Guide Deleting files and folders 1 Highlight a file or folder to delete 2 Press the Me...

Страница 21: ... the Menu key to display the pop up menu select Edit using the Up or Down key then press the OK or Right key 3 Select Lock Unlock using the Up or Down key then press the OK key 4 Use the 4 way ring and the key to enter checkmarks in the check boxes of files or folders to lock then press the OK key to complete Files or folders which have already been locked are displayed with checkmarks Pressing th...

Страница 22: ...ing the key deletes its rating You can rate up to 3000 files If you delete a file from My Photos My Videos or Backup Files the corresponding rated file will also be deleted from View Rated Files If you delete a file from View Rated Files the original file which is in My Photos My Videos or Backup Files is not deleted but the rating information is deleted If you copy a rated file the rating informa...

Страница 23: ... the data to other USB devices For detail see the User s Guide You can use the following USB storage devices capable of copying external HDD drives USB memories and card reader writers Transferring to the Computer Before transferring install the Epson Link2 software 1 Connect the AC adapter 2 Turn on the viewer and the computer Note After connecting the viewer to the computer the LCD turns dark to...

Страница 24: ...grams then select EPSON Select Epson Link2 then click Epson Link2 Alternatively click the shortcut icon of the Epson Link2 software on the desktop For Macintosh Double click the Epson Link2 icon in the Epson Link2 folder Only data that has not yet been backed up will be copied to the computer automatically 5 Disconnect the viewer from the computer For Windows Click Unplug or Eject Hardware on the ...

Страница 25: ...ata from the computer to the viewer using the Epson Link2 software Note For details see the online Epson Link2 User s Guide Supported audio file formats Without copyright protection Non Lossless compliant format File Format Audio Codec Details M4A AAC MPEG4 Maximum bit rate 320 kbps 48 kHz 16 bit Stereo MP3 MP3 MPEG1 2 2 5 Layer 3 Maximum bit rate 320 kbps 48 kHz 16 bit Stereo WMA Windows Media Au...

Страница 26: ...puter select Update Music List 4 Select the desired track using the 4 way ring then press the key to start playback Basic operations while playing music Pressing and holding the Left Right key rewinds fast forwards the music The information contained in the ID3 tag the name of file track artist and so on is displayed The ID3 tag versions up to 2 4 are compatible and up to 127 characters are displa...

Страница 27: ...ode and set the following items using the 4 way ring and the OK key Repeat setting Playback order setting Select To play No Repeat current category once Repeat One Song current track repeatedly Repeat All current category repeatedly Select To play Shuffle current category in random order Normal Play Order current category in normal order ...

Страница 28: ...he screen saver Private folder You can hide selected folders so that other people cannot view them Playing Music Playlist You can create a Playlist both on the Epson Link2 software and on the viewer Direct Printing Photo and Video print You can print images directly with PictBridge enabled printers Viewing on TV AV output You can play slide shows and videos on TV Customizing Settings Settings mode...

Страница 29: ...ttery run out Charge the battery See Charging the battery page 3 The Charge lamp lights orange Is the battery set correctly See Installing the battery page 3 and set the battery correctly Has the viewer been placed in a hot location Turn off the power disconnect the AC adapter stop charging and wait more than 30 minutes then connect the AC adapter again to restart charging If the Charge lamp still...

Страница 30: ...ting Resetting the Viewer When an error occurs and operations cannot be done you can reset the viewer by pressing the Reset button with a thin object as shown below Note Avoid using the fragile objects such as pencil ...

Отзывы: