Designing Your Own Graphics
With what you know now, you can use the simplest application of
graphics-calculating by hand the data to print the graphic image.
While this method is the most tedious, it helps you understand dot
graphics. It is also useful for small graphic elements that are used
many times.
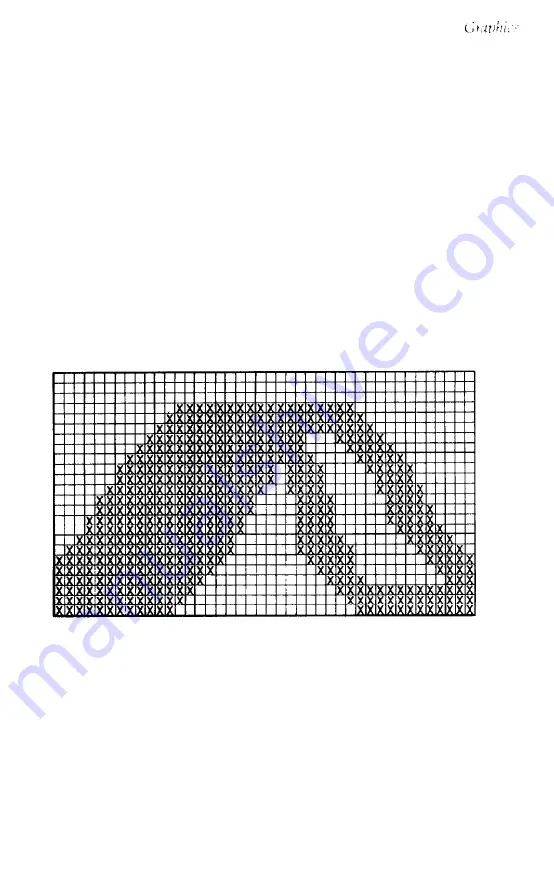
The illustration below shows how you can use a grid on paper to
plan where you want dots to be printed. This grid is for a single line
of graphics 42 columns long. Since each line of 24-pin graphics is
approximately 1/8th of an inch high and since triple-density
graphics prints 180 dots per inch, horizontally, a design planned on
this grid will be about 1/8th of an inch high and less than 1/4th of
an inch wide.
The actual pattern that the printer prints on the paper is, of course,
made up of dots that overlap each other both vertically and
horizontally. The reason the planning grid uses an x for each dot is
that using an accurate representation of the dots makes calculating
the data numbers difficult because they cover each other. Therefore,
remember that each x represents the center of a dot, and the dots
actually overlap.
Software and Graphics
4-17
Содержание LQ-1050
Страница 1: ......
Страница 2: ...EPSON LQ 850 950 1050 User s Manual ...
Страница 19: ...4 Remove th 5 Slide the print head to the middle of the printer Setting Up the Printer 1 5 ...
Страница 20: ...6 Remove the left and right locking tabs 7 Attach the printer cover unit 1 6 Setting Up the Printer ...
Страница 56: ...uide cover and remove the paper guide 3 Open the paper g 4 Attach the paper rest 2 8 Paper Handling ...
Страница 67: ...4 Push the paper release lever back to the single sheet position 5 Lift the paper Paper Handling 2 19 ...
Страница 111: ......
Страница 115: ...Epson Extended Graphics ODE 0 1 23456789ABCDEF 0 1 2 3 4 5 6 7 8 9 A B C D E F Using the Printer 3 33 ...
Страница 162: ...7 Raise the cut sheet feeder s paper path guide and attach the printer cover 5 6 Using the Printer Options ...
Страница 223: ...Chapter 6 Maintenance Cleaning the Printer 6 2 Replacing the Ribbon 6 4 Transporting the Printer 6 9 Maintenance 6 1 ...
Страница 230: ...8 Reattach the 6 8 Maintenance ...
Страница 234: ...9 Fit the printer back into the white packing material and then back into its original box 6 12 Maintenance ...
Страница 330: ...Appendix Proportional Width Table A 2 Character Tables A 6 A l ...
Страница 336: ...Epson Extended Graphics Character Table A 7 ...
Страница 352: ...EPSON L Q 8 5 0 9 5 0 1 0 5 0 Quick Reference ...
Страница 356: ...EPSON Printed in Japan 90 01 40 0 ...


