background image

26

Parent topic:

Printing with Windows

Double-sided Printing Options - Windows

You can select any of the available options on the 2-Sided Printing Settings window to set up your
double-sided print job.

Binding Edge Options

Select a setting that orients double-sided print binding in the desired direction.

Binding Margin Options

Select options that define a wider margin to allow for binding.

Booklet

Select the

Booklet

checkbox to print double-sided pages as a booklet.

Parent topic:

Selecting Double-sided Printing Settings - Windows

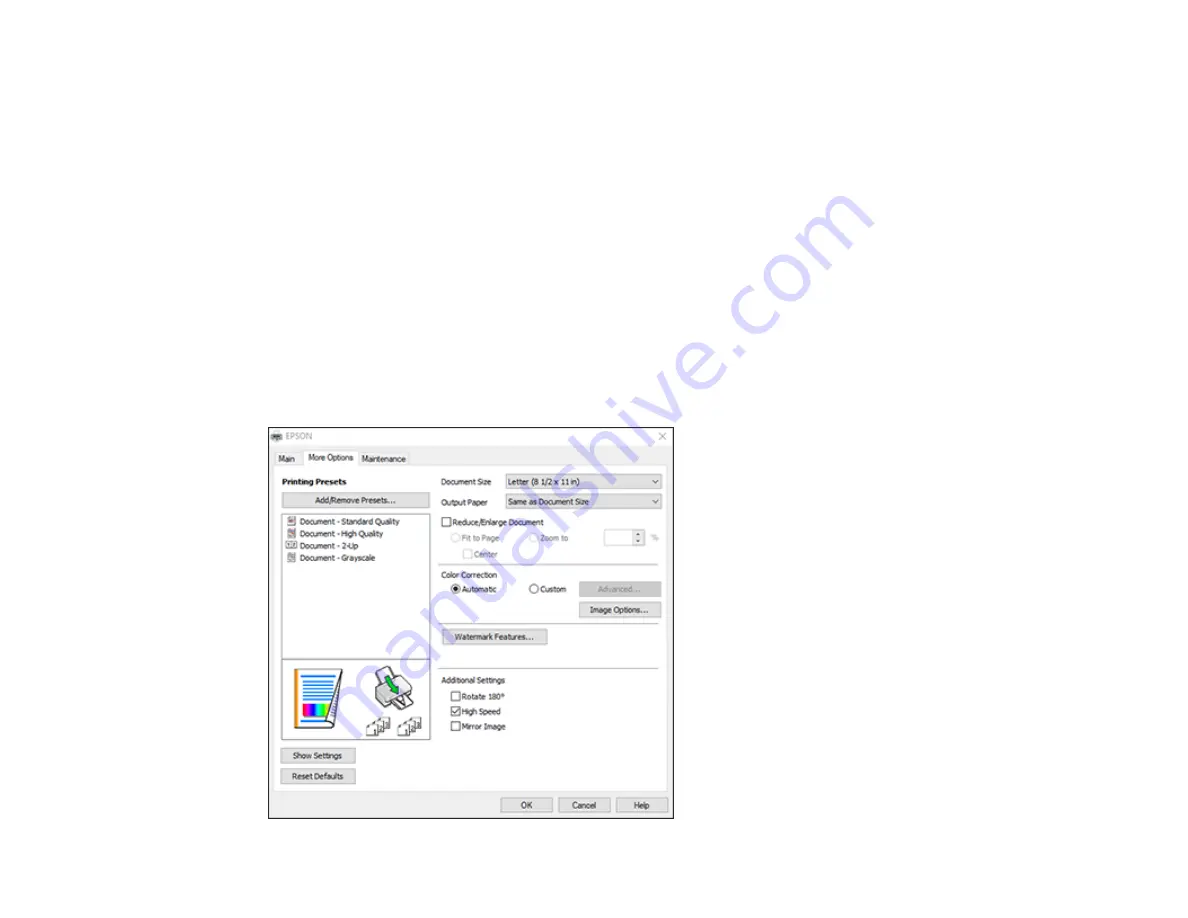
Selecting Additional Layout and Print Options - Windows

You can select a variety of additional layout and printing options for your document or photo on the

More

Options

tab.

Содержание L121

Страница 1: ...L121 User s Guide ...

Страница 2: ......

Страница 3: ...h Windows 21 Selecting Basic Print Settings Windows 22 Print Quality Options Windows 23 Multi Page Printing Options Windows 24 Selecting Double sided Printing Settings Windows 24 Double sided Printing Options Windows 26 Selecting Additional Layout and Print Options Windows 26 Custom Color Correction Options Windows 28 Image Options and Additional Settings Windows 29 Header Footer Settings Windows ...

Страница 4: ...ac 51 Printing Your Document Mac 52 Checking Print Status Mac 53 Selecting Printing Preferences Mac 54 Printing Preferences Mac 54 Cancelling Printing Using a Product Button 55 Refilling Ink 56 Ink Safety Precautions 56 Check Ink Levels 57 Disabling Special Offers with Windows 58 Purchase Epson Ink 59 Ink Bottle Part Numbers 60 Refilling the Ink Tanks 60 Adjusting Print Quality 65 Print Head Maint...

Страница 5: ...re Updates 89 Product Light Status 90 Running a Product Check 91 Solving Setup Problems 92 Noise After Filling the Ink 93 Software Installation Problems 93 Product Lights Turn On and then Turn Off 94 Product Does Not Turn On or Off 94 Solving Paper Problems 94 Paper Feeding Problems 94 Paper Jam Problems 95 Paper Ejection Problems 96 Solving Problems Printing from a Computer 97 Nothing Prints 97 P...

Страница 6: ...ecifications 112 Windows System Requirements 112 Mac System Requirements 112 Printing Specifications 113 Paper Specifications 113 Printable Area Specifications 114 Ink Specifications 115 Dimension Specifications 115 Electrical Specifications 116 Environmental Specifications 116 Interface Specifications 116 Notices 117 Important Safety Instructions 117 General Printer Safety Instructions 117 FCC Co...

Страница 7: ...7 Copyright Attribution 124 ...

Страница 8: ......

Страница 9: ...9 L121 User s Guide Welcome to the L121 User s Guide For a printable PDF copy of this guide click here ...

Страница 10: ... Printer Parts Locations The Power Off and Sleep Timers Printer Parts Locations See these sections to identify the parts on your printer Control Panel Buttons and Lights Printer Parts Top Printer Parts Inside Printer Parts Back Parent topic Product Basics Control Panel Buttons and Lights ...

Страница 11: ...11 1 power button 2 power light 3 Error light 4 cancel button Parent topic Printer Parts Locations Printer Parts Top 1 Rear paper feed 2 Paper support 3 Ink tanks ...

Страница 12: ...12 4 Control panel 5 Edge guide Parent topic Printer Parts Locations Printer Parts Inside 1 Front cover 2 Print head in home position Parent topic Printer Parts Locations ...

Страница 13: ...the time period before power management begins but increasing the time reduces the product s energy efficiency Changing the Power Off and Sleep Timer Settings Windows Changing the Power Off and Sleep Timer Settings Mac Parent topic Product Basics Changing the Power Off and Sleep Timer Settings Windows You can use the printer software to change the time period before the printer enters sleep mode o...

Страница 14: ...t Printer Settings and click the Maintenance tab 2 Click the Printer and Option Information button You see this window 3 Select the time period you want as the Power Off Timer setting 4 Click Send 5 Select the time period you want as the Sleep Timer setting 6 Click Send 7 Click OK to close the open program windows Parent topic The Power Off and Sleep Timers ...

Страница 15: ...references Select Print Fax Print Scan or Printers Scanners select your product and select Options Supplies Select Utility and select Open Printer Utility 2 Select Printer Settings You see this screen 3 Select the time period you want as the Power Off Timer setting 4 Select the time period you want as the Sleep Timer setting 5 Click Apply 6 If you see the confirmation message click Yes and close t...

Страница 16: ...16 Parent topic The Power Off and Sleep Timers ...

Страница 17: ...he type of printing you will do Loading Paper Paper Loading Capacity Loading Paper You can print on plain paper in these sizes Letter 8 5 11 inches 216 279 mm A4 8 3 11 7 inches 210 297 mm and Legal 8 5 14 inches 216 356 mm 1 Pull up the paper support ...

Страница 18: ...e the edge guide left 3 Insert paper printable side up and short edge first against the right side If you are inserting a stack of paper fan the sheets first and tap the stack on a flat surface to even the edges ...

Страница 19: ...away from high temperature humidity and direct sunlight Always follow these paper loading guidelines Load only the recommended number of sheets Load paper short edge first no matter which way your document faces Load letterhead or pre printed paper top edge first Do not load paper above the arrow mark inside the edge guide Check the paper package for any additional loading instructions Parent topi...

Страница 20: ...es 216 279 mm or A4 8 3 11 7 inches 210 297 mm Approx 50 sheets for one sided printing 15 sheets for two sided printing Plain paper Legal 8 5 14 inches 216 356 mm 1 sheet Based on paper weight of 20 lb 75 g m2 Do not load paper above the arrow mark inside the edge guide Parent topic Loading Paper ...

Страница 21: ... Related tasks Checking for Software Updates Printing with Windows You can print with your product using any Windows application as described in these sections Note If you are using your Epson product with the Windows 10 S operating system you cannot use the software described in this section You also cannot download and install any Epson product software from the Epson website for use with Window...

Страница 22: ...your application Note You may need to select a print icon on your screen the Print option in the File menu or another command See your application s help utility for details 3 If necessary select your product name as the printer you want to use Note You may also need to select Properties or Preferences to view your print settings You see the Main tab of your printer settings window ...

Страница 23: ...e of the settings in the Multi Page menu and select the printing options you want 10 To print multiple copies and arrange their print order select the Copies options 11 To preview your job before printing select Print Preview 12 To save your print job as a project that can be modified and combined with other print jobs select Job Arranger Lite 13 To reduce noise during printing turn Quiet Mode on ...

Страница 24: ...lecting Double sided Printing Settings Windows You can print on both sides of the paper by selecting the 2 Sided Printing checkbox on the Main tab Note You will need to print one side and flip the paper over manually to print the other side Note This feature is available only when EPSON Status Monitor 3 is enabled To enable the status monitor access the printer driver and click the Maintenance tab...

Страница 25: ...ck OK to return to the Main tab 5 Print a test copy of your double sided document to test the selected settings 6 Follow any instructions displayed on the screen during printing Note The surface of the paper may smear during double sided printing Make sure the ink has dried before reloading the paper Only use papers that are suitable for 2 sided printing Double sided Printing Options Windows ...

Страница 26: ... double sided print binding in the desired direction Binding Margin Options Select options that define a wider margin to allow for binding Booklet Select the Booklet checkbox to print double sided pages as a booklet Parent topic Selecting Double sided Printing Settings Windows Selecting Additional Layout and Print Options Windows You can select a variety of additional layout and printing options f...

Страница 27: ... adjust the sharpness brightness contrast and color saturation for your image Select Custom and click the Advanced button to manually adjust the color correction settings or turn off color management in your printer software Select Image Options to access additional settings for improving printed images 3 To add the following features click the Watermark Features button Watermark adds a visible wa...

Страница 28: ...r tones Depending on the selected color mode you can also adjust the midtone density using the Gamma setting Fix Photo Improves the color contrast and sharpness of flawed photos Note Fix Photo uses a sophisticated face recognition technology to optimize photos that include faces For this to work both eyes and the nose must be visible in the subject s face If your photo includes a face with an inte...

Страница 29: ...es to increase visibility Edge Smoothing Smooths jagged edges in low resolution images such as screen captures or images from the Web Fix Red Eye Reduces or removes red eye in photos Additional Settings Options Rotate 180º Prints the image rotated 180º from its original orientation High Speed Speeds up printing but may reduce print quality Mirror Image Flips the printed image left to right Quiet M...

Страница 30: ...e and time come from the Windows Control Panel on your computer Parent topic Selecting Additional Layout and Print Options Windows Selecting a Printing Preset Windows For quick access to common groups of print settings you can select a printing preset on the Main or More Options tab Note You can create your own preset by clicking the Add Remove Presets button 1 Click the Main or More Options tab ...

Страница 31: ...31 You see the available Printing Presets on the left 2 Place your cursor over one of the Printing Presets to view its list of settings ...

Страница 32: ...Parent topic Printing with Windows Selecting Extended Settings Windows You can select additional settings that apply to all the print jobs you send to your product 1 Access the Windows Desktop and right click the icon for your product in the right side of the Windows taskbar or click the up arrow and right click 2 Select Printer Settings 3 Click the Maintenance tab You see the maintenance options ...

Страница 33: ...ended Settings Windows You can select these settings on the Extended Settings window Enable EPSON Status Monitor 3 Enables product monitoring for ink and paper supplies and other issues Separator Page Before each document prints a separator page containing the title user date and time Always Spool RAW Datatype Increases print speed and may solve other printing problems Page Rendering Mode Increase...

Страница 34: ... Refine screening pattern Prints graphics with a finer screening pattern Allow Applications to Perform ICM Color Matching Allows applications to perform ICM color matching Always Use the Driver s Paper Source Setting Prints using the paper source setting in the printer driver rather than the setting in your application Parent topic Selecting Extended Settings Windows Printing Your Document or Phot...

Страница 35: ...35 You see your application s Print window such as this one 2 Click OK or Print to start printing Checking Print Status Windows Parent topic Printing with Windows ...

Страница 36: ... click on any print job and click Pause To restart printing right click on any paused print job and click Restart Parent topic Printing Your Document or Photo Windows Selecting Default Print Settings Windows When you change your print settings in a program the changes apply only while you are printing in that program session If you want to change the print settings you use in all your Windows prog...

Страница 37: ...d for printing in any program session Changing the Language of the Printer Software Screens Parent topic Printing with Windows Changing the Language of the Printer Software Screens You can change the language used on the Windows printer software screens 1 Access the Windows Desktop and right click the icon for your product in the right side of the Windows taskbar or click the up arrow and right cl...

Страница 38: ...the printer software window The printer software screens appear in the language you selected the next time you access them Parent topic Selecting Default Print Settings Windows Changing Automatic Update Options Your printer software for Windows automatically checks for updates to the product software You can change how often the software checks for updates or disable this feature ...

Страница 39: ...ates select a setting in the Check every menu To disable the automatic update feature select the Never option 4 Click OK to exit Note If you choose to disable the automatic update feature you can check for updates manually Parent topic Printing with Windows Related tasks Checking for Software Updates Printing with the Built in Epson Driver Windows 10 S You can print with the built in Epson printer...

Страница 40: ...for your print job in your Windows 10 S application 1 Open a photo or document for printing 2 Select the print command in your application Note You may need to select a print icon on your screen the Print option in the File menu or another command See your application s help utility for details 3 If necessary select your product name as the printer you want to use Note You may also need to select ...

Страница 41: ... window like this 4 Select the type of paper you loaded as the Media setting Note The setting may not exactly match the name of your paper Check the paper type settings list for details 5 Click the Advanced button ...

Страница 42: ... you loaded as the Paper Size setting 7 To print multiple copies select or enter the number as the Copy Count setting 8 To print multiple copies of multi page documents in sets select the Collated checkbox 9 Click OK You return to the printing preferences window ...

Страница 43: ... to start printing Parent topic Printing with the Built in Epson Driver Windows 10 S Printing on a Mac You can print with your product using any Mac printing program as described in these sections Note If you have an Internet connection it is a good idea to check for updates to your product software on Epson s support website or using Epson Software Updater Selecting Basic Print Settings Mac ...

Страница 44: ...ettings Mac Select the basic settings for the document or photo you want to print 1 Open a photo or document for printing 2 Select the print command in your application Note You may need to select a print icon on your screen the Print option in the File menu or another command See your application s help utility for details 3 Select your product as the Printer setting 4 If necessary click the Show...

Страница 45: ...Note The print window may look different depending on the Mac OS version and the application you are using 5 Select the Copies and Pages settings as necessary Note If you do not see these settings in the print window check for them in your application before printing ...

Страница 46: ...ion before printing They may be accessible by selecting Page Setup from the File menu Note Paper sizes may include additional options such as Borderless 7 Select any application specific settings that appear on the screen such as those shown in the image above for the Preview application 8 Select Print Settings or Printer Features from the pop up menu ...

Страница 47: ...not exactly match the name of your paper Check the paper type settings list for details 10 Select the Print Quality setting you want to use 11 Select the Borderless checkbox if you want to print a borderless photo If the option is grayed out change the Media Type setting to a paper type that supports borderless printing 12 Select any of the available print options Print Quality Options Mac Print O...

Страница 48: ...print Some options may be unavailable depending on other settings you have chosen Grayscale Prints text and graphics in black or shades of gray Mirror Image Lets you flip the printed image horizontally Parent topic Selecting Basic Print Settings Mac Selecting Page Setup Settings Mac Depending on your application you may be able to select the paper size and orientation settings from the print windo...

Страница 49: ...of layout options for your document or photo by selecting Layout from the pop up menu on the print window To print multiple pages on one sheet of paper select the number of pages in the Pages per Sheet pop up menu To arrange the print order of the pages select a Layout Direction setting To print borders around each page on the sheet select a line setting from the Border pop up menu To invert or fl...

Страница 50: ...h pages are printed select an option from the Page Order pop up menu To scale the image to fit on a specific paper size select the Scale to fit paper size checkbox and select a paper size from the Destination Paper Size pop up menu Parent topic Printing on a Mac Managing Color Mac You can adjust the Color Matching and Color Options settings to fine tune the colors in your printout or turn off colo...

Страница 51: ...c Parent topic Printing on a Mac Color Matching and Color Options Mac You can select from these settings on the Color Matching and Color Options menus Color Matching Settings EPSON Color Controls Lets you manage color using controls in your printer driver or turn off color management ColorSync Prints using standard color profiles for your product and paper to help match image colors You can custom...

Страница 52: ...vanced Settings and select the Fix Red Eye setting to reduce or remove red eye in photos Note Fix Photo uses a sophisticated face recognition technology to optimize photos that include faces For this to work both eyes and the nose must be visible in the subject s face If your photo includes a face with an intentional color cast such as a statue you may want to turn off Fix Photo to retain the spec...

Страница 53: ...appears in the Dock You see the print status window 2 Select the following options as necessary To cancel printing click the print job and click or Delete To pause a print job click the print job and click or Hold To resume a print job click the paused print job and click or Resume To pause printing for all queued print jobs click Pause or Pause Printer To display other printer information click S...

Страница 54: ...n or Printers Scanners select your product and select Options Supplies 3 Select Driver or Options You see a screen like this 4 Select any of the available printing preferences 5 Click OK Printing Preferences Mac Parent topic Printing on a Mac Printing Preferences Mac You can select these settings on the Options or Driver tab Skip Blank Page Ensures that your product does not print pages that conta...

Страница 55: ... from the printer software for various operating conditions Establish bidirectional communication Allows the product to communicate with the computer Do not change the default setting unless you experience issues when using a shared printing pool Parent topic Selecting Printing Preferences Mac Cancelling Printing Using a Product Button If you need to cancel printing press the stop button Parent to...

Страница 56: ...ns Keep ink bottles and the ink tanks out of the reach of children Do not allow children to drink from or handle the ink bottles and bottle caps Do not tilt or shake an ink bottle after opening it otherwise ink may leak Ink Refilling Precautions Use ink bottles with the correct part number for this product The use of non Epson ink may cause damage that is not covered by Epson s warranty and under ...

Страница 57: ...f the cap on the ink bottle is tightened securely Be sure to keep the ink bottle upright when tightening the cap and take measures to prevent ink from leaking when you transport the bottle Ink Bottle and Ink Tank Information To maintain optimum print head performance some ink is consumed from all ink tanks during printing and when performing maintenance operations such as cleaning the print head Q...

Страница 58: ... Offers with Windows You can disable special offers messages from Epson using a utility on your Windows computer Note You may see the Epson Special Offers screen every time you print if your computer is connected to the Internet Select Do not display this message again and click Decline to disable online offers Promotional offers are not valid in Latin America 1 Access the Windows Desktop and righ...

Страница 59: ...select the Display Epson Offers checkbox Parent topic Check Ink Levels Purchase Epson Ink You can purchase genuine Epson ink and paper from an Epson authorized reseller To find the nearest reseller visit latin epson com or call your nearest Epson sales office ...

Страница 60: ...ur product frequently and refill the ink tanks if necessary Ink Bottle Part Numbers Parent topic Refilling Ink Ink Bottle Part Numbers Use these part numbers when you order or purchase new ink cartridges Note For best printing results use up a cartridge within 6 months of opening the package Ink color Part number Black T664120 AL Cyan T664220 AL Magenta T664320 AL Yellow T664420 AL Parent topic Pu...

Страница 61: ...61 4 Remove the ink tank s cap Note Make sure the color of the ink tank matches the ink color you want to refill and only remove the cap from that ink tank Be careful not to spill any ink ...

Страница 62: ...ispose of either Remove the seal from the bottle and replace the top on the bottle Note Make sure the color of the ink bottle matches the ink color you want to refill 6 Refill the ink tank with the correct color ink up to the upper line on the ink tank ...

Страница 63: ...lace the bottle cap securely on the bottle and store the ink bottle upright for later use 8 Place the cap securely on the ink tank 9 Repeat the previous steps as necessary for each ink color you need to refill Parent topic Refilling Ink Related concepts Purchase Epson Ink ...

Страница 64: ...64 Related references Ink Safety Precautions ...

Страница 65: ...he print head nozzles Cleaning uses ink so clean the nozzles only if print quality declines You can check for clogged nozzles before you clean them so you don t clean them unnecessarily Note You may not be able to clean the print head when the ink level in any of the tanks is low You may have to refill the ink tank first Print Head Nozzle Check Print Head Cleaning Power Ink Flushing Parent topic A...

Страница 66: ...ad nozzles using the buttons on your product 1 Press the power button to turn the product off 2 Load a few sheets of plain paper in the product 3 Hold down the cancel button and press the power button to turn the product on 4 When the product turns on release both buttons The product prints a nozzle check pattern ...

Страница 67: ...n the lines Print head is clean Print head needs cleaning 6 Do one of the following If there are no gaps the print head is clean and you can continue printing If there are gaps or the pattern is faint clean the print head Parent topic Print Head Nozzle Check ...

Страница 68: ...Load a few sheets of plain paper in the product 3 Do one of the following Windows Access the Windows Desktop and right click the icon for your product in the right side of the Windows taskbar or click the up arrow and right click Mac In the Apple menu or the Dock select System Preferences Select Print Fax Print Scan or Printers Scanners select your product and select Options Supplies Select Utilit...

Страница 69: ...69 You see a window like this 5 Click Print ...

Страница 70: ...e if there are gaps in the lines Print head is clean Print head needs cleaning 7 Do one of the following If there are no gaps click Finish If there are gaps or the pattern is faint clean the print head Parent topic Print Head Nozzle Check ...

Страница 71: ...mputer Utility Parent topic Print Head Maintenance Related concepts Print Head Nozzle Check Related topics Refilling Ink Cleaning the Print Head Using the Product Buttons You can clean the print head using the buttons on your product 1 Make sure no product lights are indicating errors 2 Load a few sheets of plain paper in the product 3 Hold down the cancel button for 3 seconds to start the cleanin...

Страница 72: ...leaning If you don t see any improvement after cleaning the print head up to 3 times turn off the product and wait at least 12 hours Then check the print head nozzles and try cleaning the print head again if necessary If quality still does not improve flush the ink tubes Parent topic Print Head Cleaning ...

Страница 73: ...rrors 2 Load a few sheets of plain paper in the product 3 Do one of the following Windows Access the Windows Desktop and right click the icon for your product in the right side of the Windows taskbar or click the up arrow and right click Mac In the Apple menu or the Dock select System Preferences Select Print Fax Print Scan or Printers Scanners select your product and select Options Supplies Selec...

Страница 74: ...es throughout the cleaning cycle and stays on when the cleaning cycle is finished Caution Never turn off the product during a cleaning cycle or you may damage it 6 When the cleaning cycle is finished you can check to see if the nozzles are clean click Print Nozzle Check Pattern and click Print ...

Страница 75: ...h If there are gaps or the pattern is faint click Clean to clean the print head again If you don t see any improvement after cleaning the print head up to 3 times turn off the product and wait at least 12 hours Then check the print head nozzles and try cleaning the print head again if necessary If quality still does not improve flush the ink tubes ...

Страница 76: ...er Ink Flushing affects the service life of the ink pads by causing them to reach their capacity sooner Contact Epson to purchase replacement ink pads before they reach the end of their service life When the ink pads reach the end of their service life the product stops printing and you must contact Epson for support Flushing the Ink Using a Computer Utility Parent topic Print Head Maintenance Rel...

Страница 77: ...Maintenance tab Mac In the Apple menu or the Dock select System Preferences Select Print Fax Print Scan or Printers Scanners select your product and select Options Supplies Select Utility and select Open Printer Utility 2 Click the Power Ink Flushing button You see a window like this 3 Follow the on screen instructions 4 When you finish the Power Ink Flushing turn off the product and wait at least...

Страница 78: ...eed cleaning Aligning the Print Head Using a Computer Utility Parent topic Adjusting Print Quality Related concepts Print Head Cleaning Aligning the Print Head Using a Computer Utility You can align the print head using a utility on your Windows or Mac computer 1 Load a few sheets of plain paper in the product 2 Do one of the following Windows Access the Windows Desktop and right click the icon fo...

Страница 79: ... not cancel printing while you are printing a head alignment pattern You see a window like this 5 Check the printed pattern and follow the instructions on the screen to choose the number of the best printed pattern for each set After choosing a pattern number click Next ...

Страница 80: ...ct 3 Do one of the following Windows Access the Windows Desktop and right click the icon for your product in the right side of the Windows taskbar or click the up arrow and right click Select Printer Settings and click the Maintenance tab In the Apple menu or the Dock select System Preferences Select Print Fax Print Scan or Printers Scanners select your product and select Options Supplies Select U...

Страница 81: ...ter Windows Checking the Sheet Counter Mac Parent topic Adjusting Print Quality Checking the Sheet Counter Windows You can check the number of sheets of paper that have fed through the product by checking the sheet counter 1 Access the Windows Desktop and right click the icon for your product in the right side of the Windows taskbar or click the up arrow and right click 2 Select Printer Settings 3...

Страница 82: ...K to close the window Note The number of sheets is displayed only when Epson Status Monitor 3 is enabled Parent topic Checking the Number of Sheets Fed Checking the Sheet Counter Mac You can check the number of sheets of paper that have fed through the product by checking the sheet counter ...

Страница 83: ...s Scanners select your product and select Options Supplies Select Utility and select Open Printer Utility 2 Select Printer and Option Information You see this window 3 After checking the number of sheets fed into the printer click OK to close the window Parent topic Checking the Number of Sheets Fed ...

Страница 84: ...d cables 4 Remove all the paper 5 Clean the outer case with a soft dry cloth Do not use any liquid or chemical cleansers Parent topic Cleaning and Transporting the Product Transporting Your Product If you need to store your product or transport it some distance prepare it for transportation as described here Caution During transportation and storage follow these guidelines When storing or transpor...

Страница 85: ...ont cover and check to see if the print head is in the far right position the home position If not turn on the product wait for the print head to move to the far right then turn the product off again 3 Disconnect any connected cables 4 Unplug the power cable 5 Remove all the paper from the product ...

Страница 86: ...86 6 Close the paper support 7 Remove the paper support and detach its mount ...

Страница 87: ...t cover and secure the print head to the case with tape Caution Do not touch or place tape on the white flat cable inside the product otherwise you may damage your product 9 Close the front cover and secure it with tape ...

Страница 88: ...Caution Keep the product level during transport Otherwise ink may leak Do not put opened ink bottles in the box with the product Before using the product be sure to remove the tape from the print head If print quality has declined when you print again clean and align the print head Parent topic Cleaning and Transporting the Product Related concepts Print Head Cleaning Print Head Alignment ...

Страница 89: ...ate the software by selecting Software Update here Access the Windows Desktop and right clicking the icon for your product in the right side of the Windows taskbar or clicking the up arrow and right clicking On the Maintenance tab in the printer settings window You can also update the software by selecting EPSON Software Updater in the EPSON or EPSON Software program group accessible by the Start ...

Страница 90: ...urning off the product If you just filled the ink the power light will flash for approximately 20 minutes Do not cancel this process The power light is flashing The error light is flashing Paper may be jammed in the product Remove any jammed paper and press the cancel button to clear the error If the lights still flash there may be a product error Turn the product off check inside for jammed paper...

Страница 91: ...ted pages During the life of your product it may reach a condition where either satisfactory print quality cannot be maintained or the ink pads have reached the end of their usable life The Epson Status Monitor your LCD screen or lights on the control panel will advise you when these parts need replacing If this happens during the standard warranty of the product the exchange of the product or rep...

Страница 92: ...re If the page prints but the nozzle check pattern has gaps clean or align the print head If the page does not print the product may have a problem Check the other solutions in this manual If they do not work contact Epson Parent topic Solving Problems Related concepts Uninstall Your Product Software Print Head Cleaning Print Head Alignment Related references Where to Get Help Related tasks Loadin...

Страница 93: ...filling Ink Software Installation Problems If you have problems while installing your product software try these solutions Make sure your product is turned on and any necessary cables are securely connected at both ends If you still have problems installing software disconnect the cable and carefully follow the instructions on the Start Here sheet Also make sure your system meets the requirements ...

Страница 94: ...rn off your product hold down the power button a little longer If you still cannot turn off your product unplug the power cord plug the power cord back in then turn your product on and off again using the power button Parent topic Solving Setup Problems Solving Paper Problems Check these sections if you have problems using paper with your product Paper Feeding Problems Paper Jam Problems Paper Eje...

Страница 95: ... For best results follow these guidelines Use new smooth high quality paper that is not curled creased old too thin or too thick Load paper in the rear paper feed printable side up Do not load paper with holes punched in it Follow any special loading instructions that came with the paper Parent topic Solving Paper Problems Paper Jam Problems If you have problems with paper jams try these solutions...

Страница 96: ...opic Solving Paper Problems Related tasks Loading Paper Paper Ejection Problems If you have problems with paper ejecting properly try these solutions If paper does not eject fully you may have set the wrong paper size Cancel printing to eject the paper Select the correct paper size when you reprint If paper is wrinkled when it ejects it may be damp or too thin Load new paper Parent topic Solving P...

Страница 97: ... pending Run a product check to see if a test page prints If the test page prints check to see if your product software is installed correctly Make sure your system meets the requirements for your operating system If you are printing a high resolution image you may need more than the minimum requirements Print the image at a lower resolution or if necessary increase your system s memory In Windows...

Страница 98: ...el and click Printer under Hardware and Sound Right click your product name select Printing Preferences and select your product name again if necessary 2 Click the Maintenance tab 3 Click the Extended Settings button 4 Select Enable EPSON Status Monitor 3 and click OK 5 Click the Monitoring Preferences button 6 Click the checkbox for the option that adds the shortcut icon to the taskbar 7 Click OK...

Страница 99: ...lect Extended Settings or Speed and Progress and select the following settings Always Spool RAW Datatype Page Rendering Mode Print as Bitmap If printing is still slow and you are using Windows 7 or Windows Vista try the following 1 Click and select Computer or My Computer Double click the C drive and open these folders ProgramData EPSON PRINTER Note If you do not see the ProgramData folder open th...

Страница 100: ...r or inversion settings in your printing application Turn off the Mirror Image Flip horizontally or Reverse page orientation settings in your printer software This option has different names depending on your operating system version Parent topic Solving Page Layout and Content Problems Related tasks Selecting Additional Layout and Print Options Windows Selecting Basic Print Settings Mac Selecting...

Страница 101: ...ontent Problems Related concepts Check Ink Levels Print Head Nozzle Check Print Head Cleaning Related tasks Selecting Basic Print Settings Windows Selecting Basic Print Settings Mac Selecting Printing Preferences Mac Incorrect Margins on Printout If your printed page has incorrect margins try these solutions Make sure you selected the correct paper size settings in your printing program and printe...

Страница 102: ...click Cancel and click Yes Windows Vista Click and select Control Panel Click Printer under Hardware and Sound right click your product name and select Open Right click the stalled print job click Cancel and click Yes If your product is connected to a USB hub connect it directly to your computer instead If your computer entered sleep mode the last time you printed the next print job after your com...

Страница 103: ...off any high speed settings in your product software Align the print head Make sure the product is not printing while tilted or at an angle Parent topic Solving Page Layout and Content Problems Related concepts Print Head Alignment Related tasks Loading Paper Selecting Basic Print Settings Windows Selecting Additional Layout and Print Options Windows Selecting Basic Print Settings Mac Selecting Pr...

Страница 104: ...ou may need to refill the ink Visually check the ink levels If you have not used the product for a long time run the Power Ink Flushing utility Note Flushing the ink tubes replaces all the ink inside the tubes so flush the ink only if you cannot improve print quality by other means Parent topic Solving Print Quality Problems Related concepts Print Head Nozzle Check Print Head Cleaning Print Head A...

Страница 105: ...ried before reloading the paper to print on the other side Adjust the density and or ink drying time settings Run a nozzle check to see if any of the print head nozzles are clogged Then clean the print head if necessary Align the print head Clean the paper path If you have not used the product for a long time run the Power Ink Flushing utility Note Flushing the ink tubes replaces all the ink insid...

Страница 106: ...e image resolution or print a smaller size see your software documentation Note Images from the Internet may be low resolution and not result in a high quality printout If you enlarged the image size in an image editing program you need to increase the image resolution setting to retain a high image quality Increase the image resolution by the same amount you increase the image size For example if...

Страница 107: ...k the ink levels After you print the colors in your printout need time to set as the ink dries During this time the colors may look different than you expect To speed up drying time do not stack your printouts on top of each other Your printed colors can never exactly match your on screen colors However you can use a color management system to get as close as possible Try using the color managemen...

Страница 108: ...rn off the product 2 Disconnect any interface cables 3 Do one of the following Windows 10 Click and select Settings Apps Apps features Select the program you want to uninstall and select Uninstall Windows 8 x Navigate to the Apps screen and select Control Panel Programs Programs and Features Select the uninstall option for your Epson product then select Uninstall Change Note If you see a User Acco...

Страница 109: ... 1 To download the Uninstaller utility visit latin epson com support and select your product 2 Click Downloads 3 Select your operating system click Utilities locate the Uninstaller utility and click Download 4 Run the file you downloaded 5 Double click the Uninstaller icon 6 In the Epson Uninstaller screen select the checkbox for each software program you want to uninstall 7 Click Uninstall 8 Foll...

Страница 110: ...roduct serial number located on a label on the product Proof of purchase such as a store receipt and date of purchase Computer configuration Description of the problem Then call Country Telephone Argentina 54 11 5167 0300 0800 288 37766 Bolivia 800 100 116 Brazil State capitals and metropolitan areas 3004 6627 Other areas 0800 377 6627 0800 EPSONBR Chile 56 2 2484 3400 Colombia Bogota 57 1 592 220...

Страница 111: ... 1111 Contact your local phone company to call this toll free number from a mobile phone If your country does not appear in the list contact the sales office in the nearest country Toll or long distance charges may apply Purchase Supplies and Accessories You can purchase genuine Epson ink and paper from an Epson authorized reseller To find the nearest reseller visit latin epson com or call your ne...

Страница 112: ...tions Windows System Requirements To use your product and its software your computer should use one of these Microsoft operating systems Windows 10 Windows 8 x Windows 7 Windows Vista Note For the latest product software available for your operating system visit the Epson support site at latin epson com support select your product and select Downloads Parent topic Technical Specifications Mac Syst...

Страница 113: ...r paper feed top entry Sheet feeder capacity Paper stack thickness of up to 0 2 inches 6 mm Parent topic Technical Specifications Paper Specifications Note Since the quality of any particular brand or type of paper may be changed by the manufacturer at any time Epson cannot guarantee the quality of any non Epson brand or type of paper Always test a sample of paper stock before purchasing large qua...

Страница 114: ...mm Weight Plain paper 17 lb 64 g m2 to 24 lb 90 g m2 Parent topic Technical Specifications Printable Area Specifications Note When printing borderless quality may decline in the expanded printable area Single sheets borders 1 Top bottom left right margins 0 12 inch 3 mm minimum 2 Reduced print quality area top 0 12 inch 3 mm minimum 3 Reduced print quality area bottom 0 12 inch 3 mm minimum Parent...

Страница 115: ...per type frequency of use and temperature Do not load paper before refilling the ink tanks Check the ink level in your product frequently and refill the ink tanks if necessary Color Cyan Magenta Yellow Black Temperature Storage 4 to 104 F 20 to 40 C 1 month at 104 F 40 C Ink freezes at 3 2 F 16 C Ink thaws and is usable after 3 hours at 77 F 25 C Parent topic Technical Specifications Dimension Spe...

Страница 116: ...ely Power off mode 0 3 W approximately Parent topic Technical Specifications Environmental Specifications Temperature Operating 50 to 95 F 10 to 35 C Storage 4 to 104 F 20 to 40 C 1 month at 104 F 40 C Humidity without condensation Operating 20 to 80 RH Storage 5 to 85 RH Parent topic Technical Specifications Interface Specifications Interface type USB compatible with the USB 2 0 Specification Not...

Страница 117: ...ged Avoid plugging the printer into an outlet on the same circuit as a photo copier or air control system that regularly switches on and off or on an outlet controlled by a wall switch or timer Do not let the power cord become damaged or frayed If you use an extension cord with the printer make sure the total ampere rating of the devices plugged into the extension cord does not exceed the cord s a...

Страница 118: ... printer yourself Unplug the printer and refer servicing to qualified service personnel under the following conditions if the power cord or plug is damaged if liquid has entered the product if the product has been dropped or the case damaged if the product does not operate normally or exhibits a distinct change in performance Adjust only those controls that are covered by the operating instruction...

Страница 119: ... by the manufacturer could void the user s authority to operate the equipment For Canadian Users CAN ICES 3 B NMB 3 B Parent topic Notices Binding Arbitration and Class Waiver 1 DISPUTES BINDING INDIVIDUAL ARBITRATION AND WAIVER OF CLASS ACTIONS AND CLASS ARBITRATIONS 1 1 Disputes The terms of this Section 1 shall apply to all Disputes between you and Epson The term Dispute is meant to have the br...

Страница 120: ...tice Epson and you agree to act in good faith to resolve the Dispute before commencing arbitration 1 4 Small Claims Court Notwithstanding the foregoing you may bring an individual action in the small claims court of your state or municipality if the action is within that court s jurisdiction and is pending only in that court 1 5 WAIVER OF CLASS ACTIONS AND CLASS ARBITRATIONS YOU AND EPSON AGREE TH...

Страница 121: ...ude a description of the Dispute and the amount of damages sought to be recovered You can find a copy of a Demand for Arbitration at http www jamsadr com Demand for Arbitration ii Send three copies of the Demand for Arbitration plus the appropriate filing fee to JAMS 500 North State College Blvd Suite 600 Orange CA 92868 U S A iii Send one copy of the Demand for Arbitration to the other party same...

Страница 122: ...ion in this Agreement to the contrary you and Epson agree that if Epson makes any future amendments to the dispute resolution procedure and class action waiver provisions other than a change to Epson s address in this Agreement Epson will obtain your affirmative assent to the applicable amendment If you do not affirmatively assent to the applicable amendment you are agreeing that you will arbitrat...

Страница 123: ...difications repairs or alterations to this product or excluding the U S failure to strictly comply with Seiko Epson Corporation s operating and maintenance instructions Seiko Epson Corporation shall not be liable for any damages or problems arising from the use of any options or any consumable products other than those designated as Original Epson Products or Epson Approved Products by Seiko Epson...

Страница 124: ...r Management for Epson Products This product enters sleep mode after a period of nonuse You can adjust the time period before power management begins but increasing the time reduces the product s energy efficiency Energy savings can be achieved by setting the time to sleep to a shorter interval Parent topic Copyright Notice Copyright Attribution 2021 Epson America Inc 07 21 CPD 60508 Parent topic ...

Отзывы: