background image

20

How To Scan

Placing Your Original Document

This section explains how to position documents or photos for scanning. 

If you’re scanning a multi-page document using the optional automatic document 
feeder, see “Scanning With the Automatic Document Feeder” on page 41.

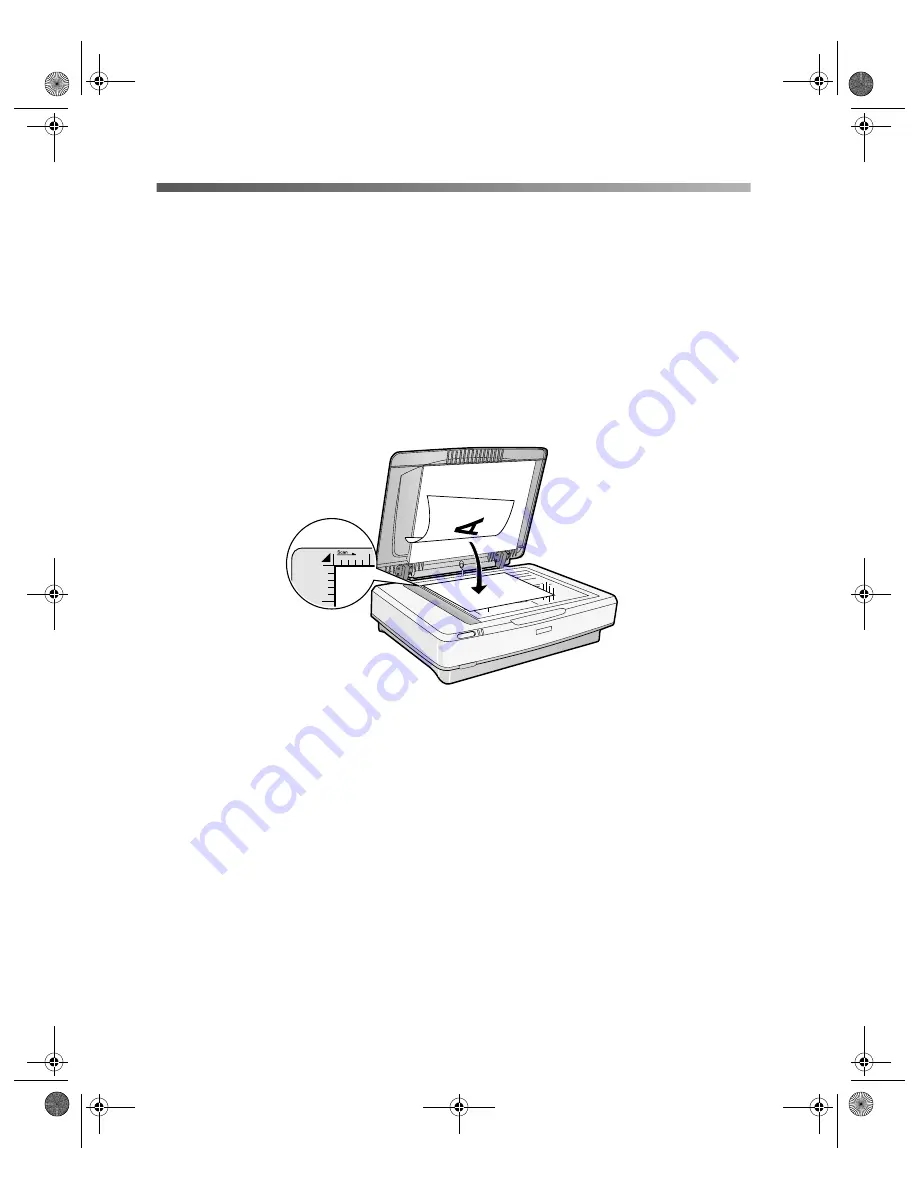
1. Raise the scanner cover and place your document face down in the upper left 

corner of the document table.

You can scan several pages or photos at the same time. Make sure you leave about 
an inch of space between them on the document table.

2. Close the document cover slowly. Be careful not to move the document.

Tip: 

If the edges of your document don’t scan properly, move it in one-quarter 

inch from the edges of the document table.

You can remove the document cover if you need to scan a thick item—such as a 
book—that doesn’t fit under the cover. Simply lift the back of the cover straight 
up. When you reattach the cover, line the rods up with the positioning holes and 
lower the cover into place.

Warning: 

Before removing the document cover, make sure you raise it all the 

way up. This will prevent the hinges from snapping back on the springs and 
possibly injuring you.

GT15K.book  Page 20  Wednesday, November 12, 2003  8:48 AM

Содержание GT-15000 Series

Страница 1: ...EPSON GT 15000 User s Guide GT15K book Page 1 Wednesday November 12 2003 8 48 AM ...

Страница 2: ... or any consumable products other than those designated as Original EPSON Products or EPSON Approved Products by SEIKO EPSON CORPORATION A Note Concerning Responsible Use of Copyrighted Materials Ink jet printers digital cameras and scanners like photocopiers and conventional cameras can be misused by improper copying and printing of copyrighted material While some countries laws permit limited co...

Страница 3: ...Using the SCSI Interface 16 Turning On the Scanner 17 Chapter 2 HOW TO SCAN 19 Placing Your Original Document 20 Scanning Documents with PaperPort Deluxe 21 Scanning Text for Editing 23 Scanning Photographs With Adobe Photoshop Elements 25 Scanning to a File With EPSON Scan 28 Scanning With the Start Button 29 Setting Up the Start Button in Windows 98 Me or 2000 30 Advanced Scanning in Professiona...

Страница 4: ...ng the IEEE 1394 FireWire Scanner Interface Card 44 Installing the Network Image Express Card 46 Chapter 4 MAINTENANCE 49 Transporting the Scanner 49 Cleaning the Scanner 50 Chapter 5 SOLVING PROBLEMS 51 Diagnosing Scanner Problems 52 Problems and Solutions 53 Scanner Problems 53 Software Problems 56 Quality Problems 56 Uninstalling and Reinstalling EPSON Scan 60 Where To Get Help 61 EPSON Technic...

Страница 5: ...dix B REQUIREMENTS AND NOTICES 67 System Requirements 67 Important Safety Instructions 68 Declaration of Conformity 69 FCC Compliance Statement 70 ENERGY STAR Compliance 71 Warranty 71 INDEX 73 GT15K book Page 5 Wednesday November 12 2003 8 48 AM ...

Страница 6: ...6 Contents GT15K book Page 6 Wednesday November 12 2003 8 48 AM ...
Страница 7: ...s through documents with accuracy and detail letter sized monochrome up to 16 ppm color up to 10 ppm landscape at 300 dpi draft mode Large scan bed and optional automatic document feeder let you quickly scan anything from a two page book spread to a double sided 100 page document Built in USB and SCSI interfaces optional Network Image Express card or IEEE 1394 FireWire interface card provide versa...

Страница 8: ...le edit copy fax and e mail them from one convenient screen Adobe Photoshop Elements State of the art software lets you create high quality images for print e mail and the Web Includes sophisticated yet easy to use tools for correcting and enhancing digital images Getting More Information There are several ways to learn more about your EPSON GT 15000 scanner In addition to this User s Guide help u...

Страница 9: ...te Contains important information about your scanner Tip Contains additional hints for great scanning Viewing Your Electronic Reference Guide Your scanner software CD ROM includes an on screen Reference Guide You must have a web browser Netscape Navigator or Microsoft Internet Explorer versions 4 0 or later to view it You can view the guide from the CD ROM or copy it to your computer and view it f...

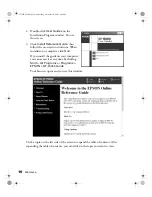
Страница 10: ...ck Quit If you install the guide on your computer you can access it at any time by clicking Start All Programs or Programs EPSON GT 15000 Guide Your browser opens and you see this window Click a topic on the left side of the screen to expand the table of contents After expanding the table of contents you can click on the topic you want to view GT15K book Page 10 Wednesday November 12 2003 8 48 AM ...
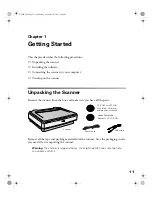
Страница 11: ...and make sure you have all the parts Remove all the tape and packing material from the scanner Save the packaging in case you need it for transporting the scanner Warning The scanner is large and heavy You might need to have someone help you unpack and lift it Scanner Power cord USB cable CD ROM with EPSON Scan driver software and electronic manuals Adobe Photoshop Elements 2 0 CD ROM GT15K book P...

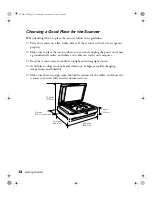
Страница 12: ...nded wall outlet and where your cable can reach your computer Keep the scanner away from direct sunlight and strong light sources Avoid places subject to shocks and vibrations or high or rapidly changing temperatures and humidity Make sure there s enough room behind the scanner for the cables and above the scanner so you can fully raise the document cover 23 inches 573 mm 6 inches 150 mm or more 1...

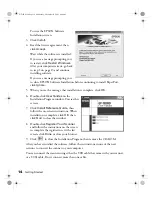
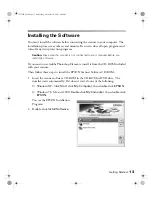
Страница 13: ...o use Adobe Photoshop Elements install it from the CD ROM included with your scanner Then follow these steps to install the EPSON Scanner Software CD ROM 1 Insert the scanner software CD ROM in the CD ROM or DVD drive The installer starts automatically If it doesn t start do one of the following Windows XP Click Start click My Computer then double click EPSON Windows 98 Me and 2000 Double click My...

Страница 14: ... on the Installation Program window You see this screen 7 Click Install Reference Guide then follow the on screen instructions When installation is complete click OK then click Quit to close the window 8 Double click Register Your Scanner and follow the instructions on the screen to complete the registration At the last screen click Done or close your browser 9 Click to close the Installation Prog...

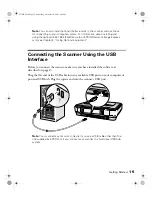
Страница 15: ...ing the Scanner Using the USB Interface Before you connect the scanner make sure you have installed the software as described on page 13 Plug the flat end of the USB cable into any available USB port on your computer or powered USB hub Plug the square end into the scanner s USB port Note Your scanner may not work correctly if you use a USB cable other than the one supplied by EPSON or if you conne...

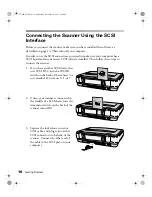
Страница 16: ...ese steps to connect the scanner 1 If you have another SCSI device that uses SCSI ID 2 turn the SCSI ID switch on the back of the scanner to a new number Do not use 0 1 or 7 2 Unless your scanner is connected in the middle of a SCSI chain leave the terminator switch on the back of the scanner turned On 3 Squeeze the lock releases on your SCSI cable and plug it into either SCSI connector on the bac...

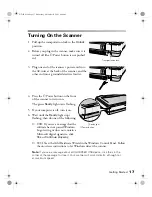
Страница 17: ...ter is off turn it on 6 Wait until the Ready light stops flashing then do one of the following USB If you see a message that the software has not passed Windows Logo testing or does not contain a Microsoft digital signature click Yes or Continue Anyway SCSI Start the Add Hardware Wizard in the Windows Control Panel Follow the on screen instructions to let Windows detect the scanner Note If you see...

Страница 18: ...18 Getting Started GT15K book Page 18 Wednesday November 12 2003 8 48 AM ...
Страница 19: ...38 Professional Mode Lets you manually configure advanced image settings including the histogram setting tone color depth balance saturation brightness and contrast You can use EPSON Scan either in a standalone mode or by starting from another program such as PaperPort Deluxe or Photoshop Elements This chapter provides step by step instructions for the following Placing your original document on t...

Страница 20: ...cument table 2 Close the document cover slowly Be careful not to move the document Tip If the edges of your document don t scan properly move it in one quarter inch from the edges of the document table You can remove the document cover if you need to scan a thick item such as a book that doesn t fit under the cover Simply lift the back of the cover straight up When you reattach the cover line the ...

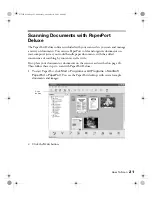
Страница 21: ...er documents with the added convenience of searching by content as well as title First place your document or documents on the scanner as described on page 20 Then follow these steps to scan with PaperPort Deluxe 1 To start PaperPort click Start Programs or All Programs ScanSoft PaperPort PaperPort You see the PaperPort desktop with several sample documents and images 2 Click the Scan button Scan ...

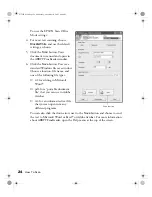
Страница 22: ... see the EPSON Scan Office Mode settings 5 Choose an Image Type Color for documents with color Grayscale for documents with grayscale images or black and white photos Black White for plain text documents 6 Click Preview if you want to see a preview of your scan 7 Click the Auto Detect button in the preview window to automatically select your entire document or click and drag in the preview window ...

Страница 23: ...tion see the PaperPort Help or User s Guide on the PaperPort Help menu Scanning Text for Editing The ABBYY FineReader Sprint software included with your scanner lets you turn almost any printed document into editable text First place your document or documents on the scanner as described on page 20 Then follow these steps to scan text for editing 1 To start ABBYY Fine Reader click Start Programs o...

Страница 24: ...tion file name and one of the following file types rtf for editing in Microsoft Word pdf for a portable document file that you can use in Adobe Acrobat txt for an unformatted text file that you can open in many different programs You can also click the down arrow next to the Save button and choose to send the text to Microsoft Word or Excel or Adobe Acrobat For more information about ABBYY FineRea...

Страница 25: ...hen follow these steps to scan photos with Photoshop Elements 1 Double click the Adobe Photoshop Elements 2 0 icon on your desktop You see the Photoshop Elements window with the welcome screen on top 2 Click Connect to Camera or Scanner You this window 3 Select EPSON GT 15000 and click OK EPSON Scan opens Note You can also open the File menu and choose Import GT 15000 When selecting the source mak...

Страница 26: ...r click and drag to create a scanning selection area marquee For more information on using marquees see page 34 Note If the scanned image in the preview window has a blue box around it you re previewing in thumbnail mode This allows you to scan multiple photos and automatically select them If you want to select part of an image click the arrow beside the Preview button in the EPSON Scan dialog box...

Страница 27: ...cify a resolution 10 Select a Target Size if you want to specify any size other than that of the original document 11 Adjust the Brightness and Contrast settings if necessary 12 Click Scan If you are scanning multiple photos each one is scanned individually 13 Click Close to exit EPSON Scan and work with your image s in Photoshop Elements For more information about using Photoshop Elements click t...

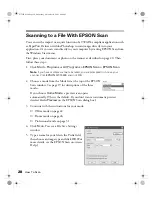
Страница 28: ...are prompted to choose your scanner Click EPSON GT 15000 and click OK 2 Choose a mode from the Mode list at the top of the EPSON Scan window See page 19 for descriptions of the three modes If you choose Home Mode a preview scan opens automatically This is the default If you don t want an automatic preview deselect Auto Preview on the EPSON Scan dialog box 3 Continue with the instructions for your ...

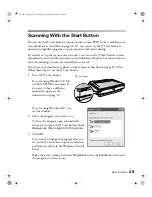
Страница 29: ...page 20 Then follow these steps to use the a Start button 1 Press the a Start button If you re using Windows 98 Me or 2000 EPSON Scan opens If you want to have a different application open see the instructions on page 30 If you re using Windows XP you see this window 2 Select the program you want to use To have the program open automatically whenever you press the a Start button check Always use t...

Страница 30: ... from the list of devices and click Properties If you re using Windows Me right click the scanner icon and select Properties 4 Select the Events tab You see a window like the one on the right 5 Make sure Start Button is selected under Scanner Events 6 Select the application you want to open with the a Start button Make sure you clear the checkboxes for all the other applications If you want to cho...

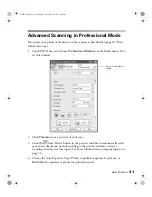
Страница 31: ...ee a preview of your scan 3 Click the Auto Detect button in the preview window to automatically select your entire document or click and drag in the preview window to create a scanning selection area marquee For more information on using marquees see page 34 4 Choose the Auto Exposure Type Photo to optimize exposure for photos or Document to optimize exposure for printed material Select Profession...

Страница 32: ...n setting 50 to 9600 dpi 3 If you want to specify a Target Size for your scanned image other than the original size select a size from the pull down menu You can also click to see more options then type in the width and height or scale the image with a percentage If Trimming is set to On your image is cropped to fit your specified size If it is Off your image is sized to fit your specified size as...

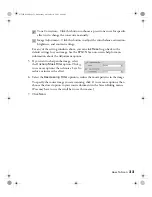
Страница 33: ...n on screen help for more information about the Adjustment options 5 If you want to sharpen the image select the Unsharp Mask Filter option Click to see more options then choose a Level to reduce or increase the effect 6 Select the Descreening Filter option to reduce the moiré patterns in the image To specify the source image you are scanning click to see more options then choose the closest optio...

Страница 34: ...justs the image quality settings to optimize each selected area To automatically create a marquee around the entire image and cut out the document table area click the Auto Detect button To select the area to scan click and drag in the preview window A marquee appears around the selection To move the marquee move the cursor to its center When the cursor turns into a hand symbol click and drag the ...

Страница 35: ...elect The better your original is the better your scan will be To get the best possible scan keep the document table clean and make sure the document is flat against the glass surface You can make many corrections in your scanning software For additional photo retouching use an image editing program such as Adobe Photoshop Elements Selecting Resolution Resolution refers to how many dots per inch d...

Страница 36: ...menting with the Document Type Image Type settings and Image Adjustment settings to adjust the colors Also try selecting just the area that you want to scan with a marquee see page 34 This will let the scanner software choose the optimum color and exposure settings for that part of the image If there is a border around your image or if the document cover is in the scanning area this may adjust the...

Страница 37: ...ories from the EPSON StoreSM at 800 873 7766 or visit www epsonstore com U S sales only In Canada please call 800 463 7766 for dealer referral Follow the instructions in this chapter for Unpacking and installing the automatic document feeder Scanning with the automatic document feeder Fixing jams in the automatic document feeder Installing the IEEE 1394 FireWire scanner interface card Installing t...

Страница 38: ...automatic document feeder make sure you have the parts shown below If any items are missing or damaged contact your EPSON dealer or call EPSON at 562 276 4382 in the United States or 905 709 3839 in Canada Warning The automatic document feeder is large and heavy You might need to have someone help you unpack it and set it up Screws Automatic document feeder Knobs Screwdriver Feet GT15K book Page 3...

Страница 39: ...over and lift it off the scanner Warning Before removing the document cover make sure you raise it all the way up This will prevent the hinges from snapping back on the springs and possibly injuring you 3 Make sure the document table is clean and dust free 4 Attach the two smaller feet to the automatic document feeder as shown on the right GT15K book Page 39 Wednesday November 12 2003 8 48 AM ...
Страница 40: ...he holes over the installation screws Make sure the small pegs below the holes on the feeder go all the way into the back of the scanner Warning Make sure you have someone help you lift the automatic document feeder 7 Secure the knobs to the ends of the installation screws using the included screwdriver Make sure the base of the feeder is flush against the back of the scanner GT15K book Page 40 We...

Страница 41: ...nt feeder Scanning With the Automatic Document Feeder Your automatic document feeder can load up to 100 pages at a time You can load letter size or smaller pages in either landscape or portrait orientation You can load larger pages in the portrait orientation only Follow these guidelines when scanning with the automatic document feeder Make sure the ink on the document is dry Make sure the documen...

Страница 42: ...ument Source If you want to scan only part of the document page load the first page only Click the Preview button The first page is ejected Adjust the marquee in the Preview area then load your entire document When you click Scan the scanner scans the area defined by the marquee on each page Note You can still load documents manually if you want Just lift the automatic document feeder and place yo...

Страница 43: ...pen the middle cover and remove it as shown 3 After removing the jammed pages close the covers and lower the feeder Make sure the red Error light is off and the green Ready light isn t flashing before trying to scan 4 If the error isn t cleared turn your scanner off and then on again Also close EPSON Scan Don t restart EPSON Scan until the green Ready light stops flashing Note If you attempt to pr...

Страница 44: ...CI compliant Pre installed version of Windows XP 2000 Professional or Me Follow the steps below to install the IEEE 1394 FireWire card in your scanner and connect it to your computer 1 Turn off the scanner and disconnect the power cord and any cables Caution Static electricity can damage electronic components like the IEEE 1394 FireWire scanner interface card To discharge static electricity touch ...

Страница 45: ... interface slot 4 Push gently until the card is firmly seated 5 Tighten the retaining screws and reconnect the scanner s cables 6 Plug one end of the IEEE 1394 cable into the IEEE 1394 port on the card and the other end into an IEEE 1394 FireWire port on your computer GT15K book Page 45 Wednesday November 12 2003 8 48 AM ...
Страница 46: ...ork 1 First turn off the scanner and disconnect the power cord and any cables Caution Static electricity can damage electronic components like the Network Image Express Card To discharge static electricity touch the scanner s metal frame before handling the card 2 Use a cross head screwdriver to remove the two screws securing the shield plate to the optional interface slot Then remove the plate Pu...

Страница 47: ...hts turn off then turn off the scanner 8 Connect an Ethernet cable to the connector on the card Make sure you use a Category 5 shielded twisted pair cable 9 Connect the other end of the cable to your network hub For information on configuring the scanner for your network see the EPSON Network Image Express Card User s Guide that came with the card Reset button Lights GT15K book Page 47 Wednesday N...

Страница 48: ...48 Using Optional Equipment GT15K book Page 48 Wednesday November 12 2003 8 48 AM ...
Страница 49: ...arning Make sure you have someone help you lift the automatic document feeder 2 Turn on the scanner and wait until the carriage moves left to the home position Then turn off the scanner 3 Push down the transportation lock at the back of the scanner to the Lock position 4 Use the scanner s original box or a similar box with enough packaging material to prevent movement inside the box 5 Pack the aut...

Страница 50: ...nner before cleaning Never use a harsh or abrasive brush or cleaning product to clean the document table A damaged glass surface can decrease the scanning quality Never use alcohol thinner or corrosive solvent to clean the scanner These chemicals can damage the scanner components as well as the case Be careful not to spill liquid into the scanner mechanism or electronic components This could perma...

Страница 51: ...of your scanner problem might be Then see these sections for solutions Scanner Problems Software Problems Quality Problems Uninstalling and Reinstalling EPSON Scan Where To Get Help Tip It s a good idea to check EPSON s support web site periodically for possible updates to your scanner software Visit http support epson com and check to see if there is new software available free of charge for down...

Страница 52: ...or reconnecting the cable Error and Ready lights are both on The scanner has received an incorrect command from your scanning software Try scanning again Error and Ready lights are both off Make sure your scanner is connected to a working outlet then press the Power button Restart your computer If the green Ready light doesn t come on there may be a problem with the automatic document feeder or th...

Страница 53: ...nd both the Ready and Error lights are off make sure the feeder is closed Reconnect the feeder to the ADF connector on the back of the scanner Then restart your computer If you re using the automatic document feeder make sure a document is loaded and pages are not jammed If a jam occurs remove the jammed pages as described on page 43 If you re using the SCSI connection make sure the SCSI ID is set...

Страница 54: ...d reinstall your scanner software See the instructions on page 60 Check for IRQ conflicts with built in options If you purchased the IEEE 1394 scanner interface card as an option make sure that it is installed correctly See page 44 If you are using the scanner on a network make sure your EPSON Scan settings are configured for network operation If all else fails uninstall and reinstall your softwar...

Страница 55: ...rt your computer then try scanning again If you re using the optional automatic document feeder run EPSON Scan in Office Mode or Professional Mode and select ADF Single sided or ADF Double sided as the Document Source Also make sure the original document is inserted face up When previewing a scan you see a message that the document could not be located Make sure you ve selected the correct Documen...

Страница 56: ...ptional automatic document feeder is installed correctly and securely connected to the ADF connector on the back of the scanner If you need to reinstall or reconnect it restart your computer afterward You can t open PaperPort Deluxe Restart Windows then try opening PaperPort again Quality Problems Your scanned image is faint or out of focus Decrease the brightness setting in EPSON Scan Office or H...

Страница 57: ...the document during scanning Make sure the scanner is on a flat stable surface The edges of the document aren t scanned Don t place your document right up against the edges of the document table Move the document about a quarter of an inch away from the edges If colors are patchy or distorted at the edges of the image the document may be too thick or there may be outside light interfering with the...

Страница 58: ...al Mode and adjust the exposure using the Auto Adjust button Select Professional Mode and adjust the Gamma setting using the Histogram Adjust button Try different combinations of gamma and color settings in EPSON Scan Click the Configuration button at the bottom of the window then make any changes on the Color tab Change the Destination setting in the Home or Office mode A line of dots is missing ...

Страница 59: ...parent sheet between the document and the document table to defocus the image slightly Reposition the document on the document table Try positioning the document at a slight angle The image is larger or smaller than the original You can t judge the size of the printed image by what you see on your screen The image size settings in your scanner software determine the size of the printed image Check...

Страница 60: ...omputer 1 Double click the Add or Remove Programs icon in the Windows Control Panel 2 Select EPSON Scan and click the Change Remove or Add Remove button 3 Follow the on screen instructions to remove the software If you see a message prompting you to restart the computer select Yes I want to restart my computer now and click Finish Follow the instructions beginning on page 13 to reinstall your soft...

Страница 61: ...scanner Proof of purchase such as a store receipt and date of purchase Computer configuration Description of the problem You can purchase supplies and accessories from the EPSON Store at 800 873 7766 or visit www epsonstore com U S sales only In Canada please call 800 463 7766 for dealer referral Service Access World Wide Web From the Internet you can reach EPSON Support at http support epson com ...

Страница 62: ...hotoshop Elements 206 675 6358 6 00 AM to 5 00 PM Pacific Time Monday to Friday pay support www adobe com support techdocs adobe com ABBYY FineReader Sprint 510 226 6719 510 226 6069 www abbyyusa com support abbyyusa com ScanSoft PaperPort Deluxe 978 977 8430 10 00 AM to 7 00 PM Eastern Time Monday to Friday pay support www scansoft com paperport support GT15K book Page 62 Wednesday November 12 20...

Страница 63: ...hardware resolution of 600 1200 dpi is achieved using EPSON s Micro Step Drive technology Maximum interpolated resolution 4800 dpi Speed 600 dpi draft mode Color 3 8 msec line approx Grayscale 1 3 msec line approx Line Art 1 3 msec line approx Color separation RGB color filters on CCD Reading sequence Monochrome One pass scanning Color byte sequence One pass scanning R G B Color line sequence One ...

Страница 64: ... 0 inches 458 mm Height 6 2 inches 158 mm Weight Approximately 29 8 lb 13 5 kg Electrical Input voltage range 100 to 120 VAC 90 to 132 VAC 220 to 240 VAC 198 to 264 VAC Rated frequency 50 to 60 Hz Rated current 100 to 120 VAC 0 8 A 220 to 240 VAC 0 3 A Power consumption Operating Approximately 50 W Approximately 75 W with ADF unit Standby Approximately 7 5 W Environmental Temperature Operating 41 ...

Страница 65: ...5 compatible Data transfer method Half duplex Data Strobe differential serial Synchronization method Clock synchronization with DS Link Encoding decoding DS Link Logic level 3 3 V Compatible connectors IEEE 1394 1995 compatible Power class Power class code 100 No power supply from external sources Fitted with a repeat function with bus power Environmental Temperature Operating 41 to 95 F 5 to 35 C...

Страница 66: ...n the scanner Software Initialized when the software sends the Esc command or the scanner receives a Bus Reset from the USB interface Automatic Document Feeder B813212 General Paper input output Load face up eject face down Paper quantity 100 pages 55 g m2 paper maximum total thickness under 0 48 inches 12 mm Reliability 100 000 sheets load eject MCBF Dimensions Width 23 8 inches 605 mm Depth 19 2...

Страница 67: ...r details A Microsoft Windows compatible PC with a Pentium equivalent processor 233 MHz or faster recommended Preinstalled Windows XP 98 Me or 2000 for USB connection Windows XP 98 Me 2000 Professional or Windows NT Workstation with Service Pack 4 or later for SCSI connection SCSI USB or FireWire IEEE 1394 Windows XP Me or 2000 only port FireWire card must be OHCI compliant 128MB RAM 256MB RAM rec...

Страница 68: ... the AC power cord that meets relevant local safety standards Connect all equipment to properly grounded power outlets Avoid using outlets on the same circuit as photocopiers or air control systems that regularly switch on and off Do not let the power cord become damaged or frayed If you use an extension cord make sure the total ampere rating of the devices plugged into the extension cord doesn t ...

Страница 69: ...ch product marketed is identical to the representative unit tested and found to be compliant with the standards Records maintained continue to reflect the equipment being produced can be expected to be within the variation accepted due to quantity production and testing on a statistical basis as required by 47CFR 2 909 Operation is subject to the following two conditions 1 this device may not caus...

Страница 70: ...e the separation between the equipment and receiver Connect the equipment into an outlet on a circuit different from that to which the receiver is connected Consult the dealer or an experienced radio TV technician for help Warning The connection of a non shielded equipment interface cable to this equipment will invalidate the FCC Certification of this device and may cause interference levels which...

Страница 71: ... defective during the warranty period please bring the product securely packaged in its original container or an equivalent to your EPSON Dealer or EPSON Customer Care Center You are responsible for all costs shipping insurance travel time in getting the product to the service location EPSON will at its option repair or replace on an exchange basis the defective unit without charge for parts or la...

Страница 72: ...BOVE UNLESS STATED HEREIN ANY STATEMENTS OR REPRESENTATIONS MADE BY ANY OTHER PERSON OR FIRM ARE VOID IN THE EVENT THE REMEDIES ABOVE FAIL EPSON S ENTIRE LIABILITY SHALL BE LIMITED TO A REFUND OF THE PRICE PAID FOR THE EPSON PRODUCT COVERED BY THIS LIMITED WARRANTY EXCEPT AS PROVIDED IN THIS WRITTEN WARRANTY NEITHER EPSON AMERICA INC NOR ITS AFFILIATES SHALL BE LIABLE FOR ANY LOSS INCONVENIENCE OR...

Страница 73: ...o 59 Connecting scanner 15 to 16 Contrast setting 23 27 32 D Descreening Filter setting 23 33 Destination setting 27 Document jams fixing 43 Document position 20 57 Document Type setting 27 Documentation 8 to 10 Double sided scanning 42 E Electrical requirements 64 Environmental requirements 64 EPSON help 61 Store 37 61 EPSON Scan Home Mode 26 to 28 installing 13 to 14 Office Mode 22 to 24 preview...

Страница 74: ...Loading documents automatic document feeder 41 single sheet 20 Lock transportation 17 49 M Maintenance 49 to 50 Moving scanner 49 N Network Image Express card 46 to 47 O OCR scanning 23 to 24 Office Mode description 19 using 22 to 24 Optional equipment see Automatic document feeder FireWire Network Image Express P PaperPort Deluxe installing 13 to 14 support 62 using 21 to 23 Photoshop Elements 25...

Страница 75: ...perPort Deluxe SCSI connecting to 16 interface specifications 65 problems 54 Service 61 Software installing 13 to 14 17 problems 56 uninstalling 60 Specifications automatic document feeder 66 electrical 64 environmental 64 FireWire card 65 scanner 63 to 66 Start button 29 to 30 Support 61 to 62 System requirements 44 67 T Target Size setting 27 32 Technical support 61 to 62 Text scanning 23 to 24 ...

Страница 76: ...76 Index GT15K book Page 76 Wednesday November 12 2003 8 48 AM ...
Отзывы: