background image


18 

1.15.3


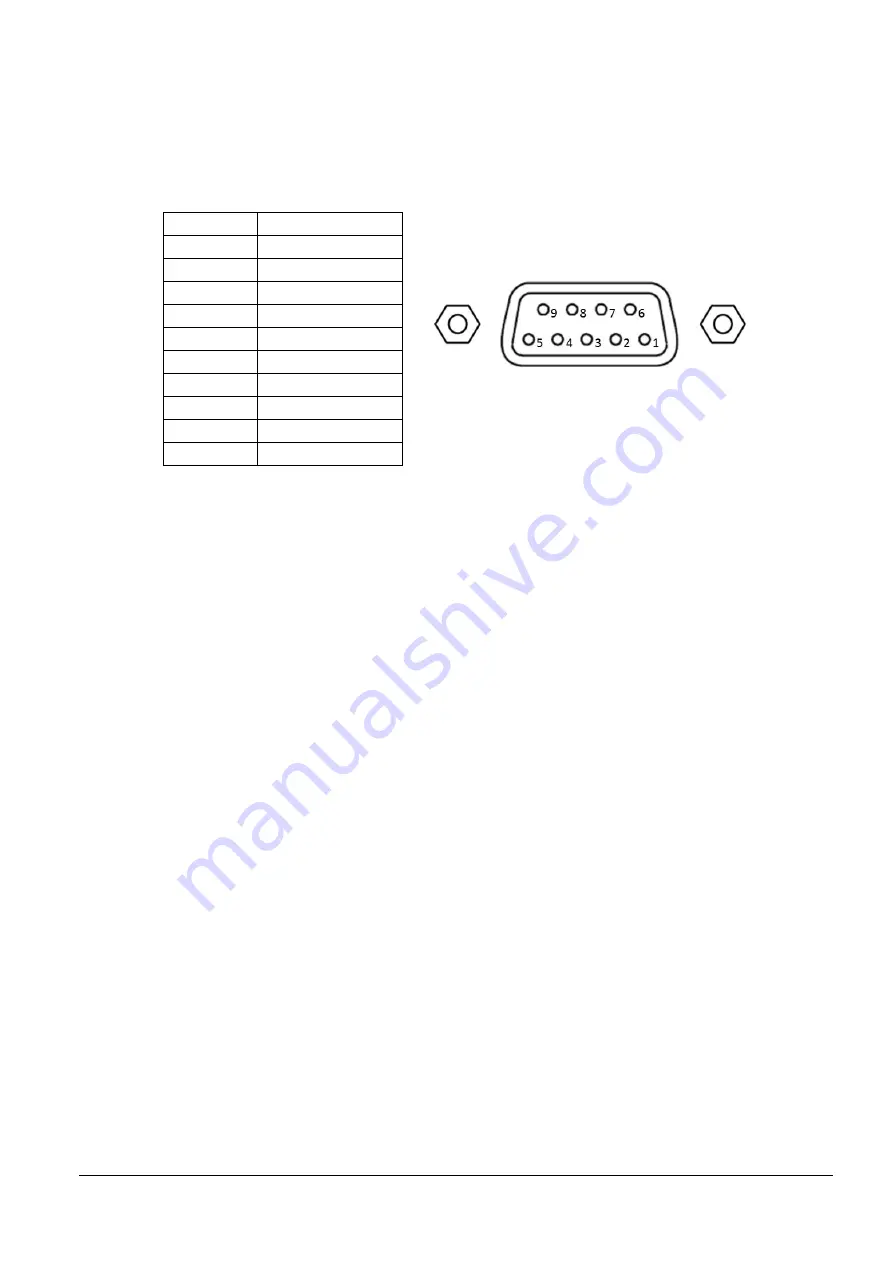
RS-232 serial interface 

(1)


Connectors 


Type   

D-SUB9 (Male) 


Pin assignments 

Pin number  Function 

– 

RXD 

TXD 

DTR 

SG 

DSR 

RTS 

– 

– 

Shell 

Shield 

(2)


Specifications (Complies with RS-232) 

Data transmission method: 

Serial 

Synchronization: 


Asynchronous 

Handshaking: 


DTR/DSR or XON/XOFF control 

Signal levels: 


MARK = -3 to -15 V: Logic "1"/ OFF 


SPACE = +3 to +15 V: Logic "0"/ ON 

Transmission speeds:  

2400, 4800, 9600, 19200, 38400, 57600, 115200 bps 


[bps: bits per second] 

Bit length:  


7 and 8-bit 

Parity settings: 


None, even, odd 

Stop bits:   


1 or more 

Connector: 


D-SUB9 (Male) 

Notes: 


Handshaking, bit length, transmission speed and parity settings are the same as the setting of the 

communication conditions of the serial interface (3.5.2). 


The stop bit for data transfer from the printer is fixed at 1 bit. 

(3)


Online/Offline switching 

This printer does not have an online/offline switch.    This printer goes offline under the following conditions: 


During the period from when the power is turned on until the printer is ready to receive data after 

mechanism initialization 


During a self-test 


When the cover is open 


Feeding paper via Feed switch 


When the printer stops printing due to a paper-end (when a paper-end is detected by the roll paper-end 

sensor) 


When waiting for a switch to be pressed during macro execution 


When an error has occurred 

Содержание EU-m30 Series

Страница 1: ...Developer s Guide Includes information on OT BU30 M00139800 EN Rev A ...

Страница 2: ...th Seiko Epson Corporation s operating and maintenance instructions Seiko Epson Corporation shall not be liable against any damages or problems arising from the use of any options or any consumable products other than those designated as Original Epson Products or Epson Approved Products by Seiko Epson Corporation Trademarks EPSON is a registered trademark of Seiko Epson Corporation Exceed Your Vi...

Страница 3: ...or place the product in locations subject to high levels of humidity or dust Do not allow foreign objects or flammable objects to fall into the equipment Do not touch the inside of the product except where mentioned in the manual Do not use the product with any voltage and current other than the ones specified Do not connect cables in ways other than those mentioned in the manual Never disassemble...

Страница 4: ...motive etc disaster prevention devices various safety devices etc or functional precision devices etc you should use this product only after giving consideration to including failsafes and redundancies into your design to maintain safety and total system reliability Because this product was not intended for use in applications requiring extremely high reliability safety such as aerospace equipment...

Страница 5: ...minal For details on how to integrate it into a self service terminal refer to the following Appendix M PRINTER INSTALLATION DESIGN GUIDE Appendix N INSTALLING THE POWER SWITCH AND POWER FEED SWITCH COVER Appendix O REPLACEMENT FOR SMALL COVER OPEN LEVER Appendix P BEZEL OPTION OT BU30 Appendix Q RECOMMENDED POWER SUPPLY Appendix R PRINTER UNIT HANDLING ...

Страница 6: ...er switch For power feed switch Small cover open lever including 1 spare screw Roll paper guides for 58 mm 2 28 paper 2 Equipment mounting brackets 2 Product fixing brackets including 2 screws 1 spare total of 3 screws Options Bezel option Model OT BU30 AC Adapter Model PS 180 Optional external buzzer Model OT BZ20 Model for specified customer only ...

Страница 7: ...ing the power switch it is recommended to send a power off command to the printer If you use the power off sequence the latest maintenance counter values are saved Maintenance counter values are usually saved every two minutes For information about ESC POS commands see the ESC POS Command Reference Connectors 1 Power supply connector Connect the AC adapter 2 USB connector Type B Connects the USB c...

Страница 8: ...perly protect printer unit exterior exposed circuit boards and electronic components with conductive sponges aluminum foil and such 5 Do not drop clips and other conductive materials onto the printer unit s circuit board Short circuits between component connectors terminals can create excess current causing thermal damage to components 6 Use only the cables indicated in this document Also use only...

Страница 9: ...2 Caution Caution Hot Surface See Appendix B Caution Sharp Edges See Appendix P ...

Страница 10: ...terface 18 1 16 Connectors 21 1 16 1 Interface connector 21 1 16 2 Power supply connector 21 1 16 3 Drawer kick connector modular connector For specified customer only 22 1 16 4 Allowable interface power supply cable dimensions 24 2 Structure 25 2 1 EU m30 Standard model 25 2 2 For specified customer 26 3 Function 27 3 1 Control Commands 27 3 2 Character Code Tables 27 3 3 Switches 27 3 3 1 Power ...

Страница 11: ...RAWER KICK CONNECTOR For specified customer only 48 C 1 Conditions for Using the Drawer Kick Connector 48 C 2 Notes on the pulse generating command ESC p 48 C 3 Using a drawer that does not meet the conditions in C 2 ESC p DLE DC4 49 Appendix D NOTES ON UPDATING THE MAINTENANCE COUNTER AND TURNING THE PRINTER S POWER OFF 51 D 1 About Updating the Maintenance Counter 51 D 2 Printer Power off Proced...

Страница 12: ...TER UNIT HANDLING 74 R 1 When purchasing this product 74 R 2 Notes on use 74 R 3 Prohibitions 74 R 4 When not using for a long period 74 R 5 When using at low temperature 74 R 6 When using at high temperature 74 Appendix S Application Development Information 75 S 1 Controlling the Printer 75 S 1 1 ESC POS 75 S 2 Controlling the Cash Drawer Model for specified customer only 75 S 2 1 ESC POS Command...

Страница 13: ...ply and voltage Paper type chromogenic characteristics Paper variations such as variations among manufacturing lots Printing pattern effect of heat accumulation of the print head or of voltage drop speed change due to high duty For multi tone printing the preservative quality of materials printed using multi tone printing decreases in direct relationship with the lighter the printing Accordingly d...

Страница 14: ...r 12 0 5 0 1 mm 0 47 0 02 0 004 Width Same as the roll paper width or smaller than the paper width by 1 mm 0 04 or less Paper must not be pasted to the roll paper core Roll width when taken up 58 0 5 1 0 mm 2 28 0 02 0 04 80 0 5 1 0 mm 3 15 0 02 0 04 Paper width 57 5 0 5 mm 2 26 0 02 79 5 0 5 mm 3 13 0 02 Paper thickness Maximum of 80 μm minimum of 48 μm 2 Specified original paper Use the followin...

Страница 15: ...due to the thermal head sticking to the recording surface Therefore it is preferable to avoid using preprinted thermal paper If using preprinted thermal paper make sure in advance that the conditions recommended by the original paper manufacturing company type of ink print conditions etc are met and that there is no faulty printing or decreased print density in the actual usage environment 1 7 Pri...

Страница 16: ...ition of the structures and vary from the top margin values When setting the cut position take into account that values may vary as a result of paper slack or variations in the paper Approx 9 5 mm 0 37 Paper feed direction Approx 19 5 mm 0 77 Emergency cutting position Autocut position Print position ...

Страница 17: ...loaded graphics area 208 KB 6 NV user memory area 1 KB 1 10 Electrical Characteristics 1 Supply voltage 24 VDC 7 Safety Information Be sure to use a safety standards applied power source that meets the following specifications Rated output 24V 2 1A 10 0A Maximum output 240VA or less 2 DC current consumption at 24 VDC 25 C 77 F normal print density Operating See Table 1 10 1 to 1 10 2 Standby Avera...

Страница 18: ... 1 5 A Mean Approximately 3 5 A Mean Approximately 4 6 A b When paper width is set to 58 mm 2 28 Table 1 10 2 Current Consumption Operating Print ratio Approximately 18 with the print pattern below Font A ANK rolling pattern for 30 lines paper feeing of 5 lines autocutting Repeats 20h to 7Fh 50 Printing length 20 mm 0 79 100 Printing length 20 mm 0 79 Print example EU m30 Mean Approximately 1 5 A ...

Страница 19: ... Standards Applied 1 Safety standards Certified as part component installed and used in product Recognized component product Not certified as final product Not final product CB IEC60950 1 IEC62368 1 TUV Bauart EN62368 1 UL cULus UL62368 1 CAN CSA No62368 1 2 EMC Europe EMC Directive EN55032 24 EMC Class A Oceania RCM AS NZS CISPR32 Class A North America FCC Class A ICES 003 Class A Scope of static...

Страница 20: ...om failure occurring at the time of the random failure period 3 MCBF 65 000 000 lines printed Note This is an average failure interval based on failures relating to wear out and random failures up to the service life 1 13 Environmental Conditions 1 Guaranteed operating environment Temperature and humidity Relative humidity Ambient temperature RH C 10 20 40 60 80 90 0 0 10 20 30 40 50 Guaranteed op...

Страница 21: ...n packed Drop conditions Packing method Epson standard package Height 60 cm 23 62 Directions 1 corner 3 edges and 6 surfaces Test method After dropping under the above conditions visually inspect the interior and exterior and check operation Test result No visible exterior or interior damage and no abnormal operation b When unpacked Drop conditions Height 5 cm 1 97 Directions Lift one edge and rel...

Страница 22: ...ions Epson standard Test method Epson standard Measuring result Approx 60 dB Bystander position Note Measured value fluctuates depending on the paper used and the print conditions print pattern print speed print density etc 6 Altitude 3000m or less 1 14 Installation Install in a level place See Appendix M for details 1 15 Interface 1 15 1 Interfaces equipped Note For details about printing on mode...

Страница 23: ...gs on startup For the setting method see 3 5 2 b Receiving the status from the printer The status of the printer is sent to the host computer via the USB bulk transmission method The USB bulk transmission method is a host controlled transmission method Unlike RS 232 transmission it cannot spontaneously interrupt data transmission to the host computer The printer has a 128 byte status data buffer S...

Страница 24: ... ESC POS MDL EU m30 2 CLS PRINTER DES EPSON SP EU m30 2 CID EpsonTM00001021 2 1 DeviceID character string size 2 The character string depends on the language model and mode SOFT RESET The host computer uses this USB Device Request when initializing the printer input buffer 3 Notes Use a cable that complies with the USB 2 0 standard ...

Страница 25: ...andshaking bit length transmission speed and parity settings are the same as the setting of the communication conditions of the serial interface 3 5 2 The stop bit for data transfer from the printer is fixed at 1 bit 3 Online Offline switching This printer does not have an online offline switch This printer goes offline under the following conditions During the period from when the power is turned...

Страница 26: ...SY BUSY BUSY BUSY BUSY BUSY 8 When the receive buffer is full 1 BUSY BUSY When XON XOFF control is selected The signal indicates whether the printer is correctly connected and is ready to receive data from the host computer SPACE indicates that the printer is correctly connected and is ready to receive data from the host computer The signal is always SPACE except in the following cases During the ...

Страница 27: ...tting Printer status Memory switch 1 3 status ON OFF XON transmission 9 First time the printer goes online after turning the power on 10 When the receive buffer full status is cleared 11 When the printer status changes from offline to online 12 When the printer recovers from a recoverable error by use of a command Transmit Transmit Transmit Transmit Transmit Transmit XOFF transmission 13 When the ...

Страница 28: ... data is processed as bit image data if the receive buffer becomes full while transmitting bit image data Data transmitted when the receive buffer is full may be lost Example Check the printer status using GS r after transmitting each line of data with a 4 KB receive buffer The amount of data for one line must not make the receive buffer become full 8 Notes on setting Memory switch 1 7 to ON 1 Whe...

Страница 29: ...ut 6 Signal GND Note 24 V is output through pin 4 when the power is turned on However pin 4 must be used only for the drawer or the optional external buzzer 3 Connector model Printer side MOLEX 52065 6615 or the equivalent User side 6 position 6 contact RJ12 telephone jack 4 Drawer kick drive signal Output voltage Approximately 24 V Output current 1 A or less The drawer kick solenoid must have a r...

Страница 30: ...e USB connector B Plugs of the series B connectors into the drawer kick connector Doing so may damage the connector printer or the host computer system 6 Connection of the optional external buzzer The optional external buzzer can be connected to the drawer kick connector When the optional external buzzer is connected be sure to set the optional external buzzer to Enable with the software setting S...

Страница 31: ...1 16 4 Allowable interface power supply cable dimensions Note User must confirm that the connector plug and cable fit in the storage space 12 11 13 13 USB cabel Type B Plug Serial cable Power supply cable ...

Страница 32: ...or 2 USB connector Type B 3 Serial connector 4 Accessories Roll paper φ 35 mm Switch cover For power switch For power feed switch Small cover open lever including 1 spare screw Roll paper guides for 58 mm 2 28 paper 2 Equipment mounting brackets 2 Product fixing brackets including 2 screws 1 spare total of 3 screws 5 Options Bezel option Model OT BU30 Power supply adapter Model PS 180 1 3 2 1 2 3 ...

Страница 33: ...or 4 DK connector 4 Accessories Roll paper φ 35 mm Switch cover For power switch For power feed switch Small cover open lever including 1 spare screw Roll paper guides for 58 mm 2 28 paper 2 Equipment mounting brackets 2 Product fixing brackets including 2 screws 1 spare total of 3 screws 5 Options Bezel option Model OT BU30 Power supply adapter Model PS 180 Optional external buzzer Model OT BZ20 ...

Страница 34: ...ter value may not be updated properly For the proper usage of the maintenance counter see Appendix D 3 3 2 Feed button 1 Type Non locking push switch 2 Function 1 Executes paper feeding Press once to feed paper based on the line spacing set by the ESC 2 and ESC 3 commands or press and hold to continue feeding paper Note Paper feeding cannot be performed under the following conditions When the pape...

Страница 35: ...g 2 Off Off Printing completed flashing Attention flashing On 1 Flashing 5 4 5 or Off 3 Flashing 1 Repeats between on for 320 ms then off for 320 ms Flashing 2 Repeats between on for 160 ms then off for 2 400 ms Flashing 3 Repeats between on for 320 ms then off for 2240 ms Flashing 4 Repeats between on for 480 ms then off for 160 ms Flashing 5 Repeats between on for 640 ms then off for 640 ms 1 De...

Страница 36: ... Change settings with GS E Function 3 Step 3 End the user setting mode with GS E Function 2 For details see ESC POS Command Reference www epson biz com pos reference b Software setting mode except some functions For details see 3 8 3 Software setting mode c EU m30 Utility Table 3 5 1 Memory Switch 1 Msw1 Msw Function Setting value Factory setting 48 OFF 49 ON 1 1 Reserved 48 OFF 1 2 Receive buffer...

Страница 37: ... 49 ON 2 Customized value setting Can be changed using one of the following methods a User setup commands GS E Step 1 Moves to the user setting mode with GS E Function 1 Step 2 Change the setting with GS E Function 5 Step 3 End the user setting mode with GS E Function 2 For details see ESC POS Command Reference www epson biz com pos reference b Software setting mode except some functions For detai...

Страница 38: ...ight Does not reduce reduces 25 reduces 50 reduces 75 reduces 75 and shortens character height Does not reduce Font A auto replacement Does not replace Font B Font C Does not replace Font B auto replacement Does not replace Font A Font C Does not replace Font C auto replacement Does not replace Font A Font B Does not replace Print density during multi tone printing 70 to 130 In 5 units 100 Buzzer ...

Страница 39: ...e user setting mode with GS E Function 1 Step 2 Change settings with GS E Function 15 Step 3 End the user setting mode with GS E Function 2 For details see ESC POS Command Reference www epson biz com pos reference b Software setting mode except some functions For details see 3 8 3 Software setting mode c EU m30 Utility except some functions Table 3 5 5 USB Interface Communication Condition Functio...

Страница 40: ...below top logo Undefined Auto bottom logo print setting Key code Undefined Justification left center right Undefined Extended settings for auto top logo bottom logo printing Prints the top logo while paper feeding to the cutting position Enabled disabled Enabled Prints the top logo at power on Enabled disabled Disabled Prints the top logo when the roll paper cover is closed Enabled disabled Enable...

Страница 41: ...R LED indicator flashes and the printer enters the Rolling pattern printing standby state Step 4 Briefly press the Feed button to start rolling pattern printing Step 5 When a certain number of lines of rolling pattern printing is completed completed is printed and the software reset is automatically executed b Executing using a command Step 1 Transmit the GS A command printer status print Step 2 T...

Страница 42: ... mode 1 NV graphics information printing function Prints the NV graphics information registered in the printer The following information is printed Capacity of the NV graphics Occupied capacity of the NV graphics Unused capacity of the NV graphics Number of NV graphics that are registered Key code number of dots in X direction and number of dots in Y direction for each piece of data NV graphics da...

Страница 43: ...e Turn the power off 3 8 3 Software setting mode 1 Software setting function Executes software settings using the buttons on the printer The software setting values that can be set are as follows Print density Auto reduction of amount of paper to use Enabling disabling paper autocutting at cover close Paper width setting 1 Thai character print control method Selection of built in character types A...

Страница 44: ...p 1 With the roll paper cover closed turn the printer power on while pressing the Feed button until printing of the printer status starts Step 2 After the printer status is printed press the Feed button until printing of the instructions for operation method starts Step 3 After the instructions for operation are printed press the Feed button four times Step 4 Then press and hold the Feed button un...

Страница 45: ...on error Error contents The CPU executes an incorrect address LED display pattern See 3 4 2 Recovery method Unable to recover 5 Internal circuit connection error Error contents Detected an error in the internal circuit connection LED display pattern See 3 4 2 Recovery method Unable to recover Note When any error shown above occurs turn off the power as soon as possible 3 10 Open Cover Operate the ...

Страница 46: ...ency can be set with the software setting See 3 5 2 for how to change the setting d Stopping the buzzer sounding It is possible to stop sounding the buzzer with DLE DC4 Function 3 It is possible to stop sounding the buzzer by opening the cover However if the cause for sounding remains when the cover is closed the buzzer will begin sounding again 2 Notes for when connecting installing and using 1 W...

Страница 47: ...ned because data is not being received the interface to be printed is determined as the primary connection interface The printer has an independent receive buffer for each interface data can always be received on each interface If using multiple interfaces set the receive buffer capacity to 4 KB initial setting 4 The printer switches the active interface in accordance with the priority and process...

Страница 48: ... update 2 Recovery method for when updating the firmware fails If updating the firmware fails and the Power and Error LEDs flash at the same time when the power is turned on try updating the firmware again by using the firmware update tool However in such cases you can only use the USB interface ...

Страница 49: ...y 127 mm 5 Approximately 129 mm 5 1 including protrusions Mass Approximately 1 3 kg 2 87 lb roll paper excluded 4 1 2 Bezel Option Equipped Width Approximately 127 mm 5 Depth Approximately 155 9 mm 6 14 Height Approximately 127 mm 5 Approximately 129 mm 5 1 including protrusions Mass Approximately 1 3 kg 2 87 lb roll paper excluded 4 2 Color EPSON standard color ENB9 EBCK ...

Страница 50: ...43 4 3 External Dimensions 4 3 1 Bezel Option Not Equipped Units mm Figure 4 3 1 External Dimensions Bezel Option Not Equipped ...

Страница 51: ...44 4 3 2 Bezel option equipped Units mm Figure 4 3 2 External Dimensions Bezel Option Equipped ...

Страница 52: ...45 4 4 Dimensions for Installing to Customer Device See Appendix M ...

Страница 53: ...nters an error state and begins the recovery operation automatically If the problem is not serious the autocutter recovers and returns to its normal position If the error cannot be resolved even after recovery operations open the roll paper cover remove any foreign objects or paper jams set the roll paper then close the roll paper cover A 2 If You Cannot Open the Roll Paper Cover Turn the printer ...

Страница 54: ...the roll paper cover Notes The print head becomes very hot immediately after printing Be sure to allow the print head to cool down after printing before cleaning it Also be sure to turn off the printer power before cleaning the print head Turn on the printer power only after alcohol has completely dried Figure B 1 1 Print Head Thermal Element B 2 Platen Roller Depending on the roll paper used pape...

Страница 55: ...ce of the load such as a drawer kick solenoid must be 24 Ω or more or the input current must be 1 A or less 3 Make sure to use the drawer kick connector 4 pin 24 V power supply for driving the drawer Never connect any other power supply to the drawer kick connector 4 The peak current is 1 A See item 2 below for power status 1 Proper operation is not guaranteed with different connections 2 Proper o...

Страница 56: ...ting ranges of t1 and t2 are 0 to 255 To use a drawer that requires an ON time exceeding 126 ms the following conditions must be met ON time ON time OFF time α 0 2 Formula C 3 α processing time of other sequence α is the period from the OFF time until the next ON time when the drawer driving is prohibited For DLE DC4 Since DLE DC4 sets ON time equal to OFF time use α so that Formula C 3 is met An ...

Страница 57: ...50 The drive signal waveform generated when the drawer is driven according to the above conditions is shown in Figure C 1 2 ON OFF 200 ms 500 ms α 300 ms Figure C 1 2 Drawer Drive Signal Waveform ...

Страница 58: ...mmand DLE DC4 fn 2 The following is an example of the printer power off process when the printer is turned off using the DLE DC4 fn 2 command Step 1 The host computer transmits the following continuous procedure before the system is turned off 1 Executes GS D pL pH m a b pL 3 pH 0 m 20 a 2 b 1 2 Executes GS r n n 1 Step 2 The host computer waits for the paper sensor status sent from the printer in...

Страница 59: ...mbols may vary depending on widths of the modules print density environmental temperature type of roll paper thermal paper and characteristics of the reader Therefore user must check the recognition rate before setting the use conditions so that the restrictions of the reader are satisfied Reading quality of bar codes 2 dimensional symbols in multi tone graphics printing is not guaranteed When pri...

Страница 60: ...vironmental conditions 2 Slant of the Print The printed bar code or characters may not be horizontal to the paper as shown in the figure below They may slant in the range of 1 6 and the slanting direction or the angle varies during printing or each time a receipt is issued Figure F 1 Slant of the Print Note If paper other than the ones described in Section 1 6 Paper Specifications is used or if th...

Страница 61: ...ur 1 the cover is opened 2 the paper is removed and the cover is closed 3 the cover is opened and 4 the cover is closed 1 0011 1100 0000 0000 0000 0000 0000 1111 2 0001 1100 0000 0000 0000 1111 0000 1111 3 0011 1100 0000 0000 0000 1111 0000 1111 4 0001 1100 0000 0000 0000 1111 0000 1111 When the ASB status is received following this the actual ASB that is sent is a total of eight 8 bytes consistin...

Страница 62: ...code with a user s bar code reader in advance H 3 Automatic Logo Printing Function The automatic bottom logo printing is a function of logo printing that works with an autocutting command and produces good printing quality when using the GS V m n paper feeding paper cutting command When using cutting only commands GS V m ESC i or ESC m extra line spacing above a bottom logo occurs depending on the...

Страница 63: ...ck to 80 mm 3 15 If using paper with a 58 mm 2 28 width part of the head will rub directly against the platen without any paper so the part of the head that rubbed against the platen may be damaged Also the section of the cutter blade without paper may be dulled Therefore printing and auto cutting cannot be done for the expanded section of the paper width I 2 Method for Installing 58 mm 2 28 Roll ...

Страница 64: ... protrusions of the other 58 mm 2 28 width roll paper guide not marked as L SIDE with the slits on the opposite side of the printer and insert them Step 4 Set the roll paper Step 5 Close the roll paper cover then turn the printer power on ...

Страница 65: ...ting can often cause paper jams 3 Even if top margin specification via backfeed 3 5 2 2 is enabled the backfeed is not performed in the following cases Backfeeding directly after autocutting of roll paper when the roll paper cover is closed Backfeeding during the self test 4 When backfeeding is performed slack in paper can cause wrinkles and friction marks Check with the user before using If you w...

Страница 66: ...5 3 00 32 1 75 6 00 32 46 46 23 23 Space between characters is not included Characters can be scaled up to 64 times as large as the standard sizes The upper columns of Table O 1 1 are for 80 mm paper width and the lower columns are for 58 mm paper width Table K 1 2 Thai Character Sizes Thai Character 3 pass Print Mode Font Structure of Thai characters Standard Double height Double width Double wid...

Страница 67: ...1 Thai Character 1 pass Print Mode Fonts A and B The numbers in the figure indicate the order in which character code data is transmitted 12dot 24dot 1line 9dot 24dot 1line Special Font A Special Font B 1 2 3 4 5 6 7 8 9 10 1 2 3 4 6 8 9 10 5 7 Figure K 2 2 Thai Character 1 pass Print Mode Special Fonts A and B The numbers in the figure indicate the order in which character code data is transmitte...

Страница 68: ... in the figure indicate the order in which character code data is transmitted 12dot 24dot 24dot 24dot 72dot 1line 1line 1line 1 2 3 4 5 6 7 8 9 10 11 12 13 14 15 16 17 18 9dot 1 2 3 4 5 6 7 8 9 10 11 12 13 14 15 16 17 18 24dot 24dot 24dot 72dot 1line 1line 1line Special Font A Special Font B Figure K 3 2 Thai Character 3 pass Print Mode Special Fonts A and B The numbers in the figure indicate the ...

Страница 69: ...r supply capacity level 1 Capacity Low Adapter C equivalent Figure L 1 Relationship between Power Supply Capacity Setting and Consumed Current Illustration Even if the print speed is set slow and you perform printing with a low print duty you can reduce the current consumed per unit hour You can use the customized values memory switches to change the print speed setting By changing the number of e...

Страница 70: ...ts When installing the printer use brackets that come with the product Brackets include two equipment mounting brackets and one product fixing bracket for fastening the brackets to the EU m30 Figure M 1 Equipment Mounting Brackets Figure M 2 Product Fixing Bracket The two equipment mounting brackets are fastened to the equipment with two screws a b For the mounting position see the drawings in M 2...

Страница 71: ...e side and align the position such that the printer and bracket engagement points Figure M 4 Positioning the Printer Insert the protrusions of the product fixing bracket into the equipment mounting bracket holes and fasten with screws Figure M 5 Installation of Product Fixing Bracket ...

Страница 72: ...5 M 2 Bezel Option Not Equipped If impact may possibly be applied provide support for the printer on the equipment side X direction Printer support Z direction Printer support X direction Printer support ...

Страница 73: ...66 Y direction Printer support X direction Printer support ...

Страница 74: ...67 M 3 Bezel Option Equipped If impact may possibly be applied provide support for the printer on the equipment side Z direction Printer support X direction Printer support ...

Страница 75: ...68 Y direction Printer support X direction Printer support ...

Страница 76: ...SWITCH COVER N 1 Installing the Switch Cover Step 1 Clean the area around the switch Step 2 Peel off the switch cover s double sided adhesive tape and affix such that the switch cover s rear protrusions enter the power switch s recesses Figure N 2 Figure N 1 ...

Страница 77: ... is off then open the roll paper cover Step 2 Press down on the cover open lever and remove the cover open lever screw Step 3 Pull the cover open lever out from the metal sheet part Figure O 1 Step 4 Insert the small cover open lever into the metal sheet part Step 5 Fasten the small cover open lever with the screw removed in step 2 Figure O 2 Step 6 Set the roll paper Step 7 Close the roll paper c...

Страница 78: ...oll paper cover Step 2 zRemove the screws that fasten the case containing the indicators Step 3 Remove the case containing the indicators Step 4 Install the case containing the indicators on top of the bezel option Note The sharp edge can cut your fingers Install the case without touching the sharp edge Step 5 Close the roll paper cover Step 6 Clean the roll paper cover Step 7 Peel off the backing...

Страница 79: ...72 Figure P 3 ...

Страница 80: ...er supply less than 24 V 2 1 A less than 50 6 W is used printing may temporarily stop and uneven print density may occur Incidentally by using customized value settings GS E fn 5 and lowering the power supply capacity setting you can reduce temporary printing stoppages and uneven print density occurrences See Appendix L for details ...

Страница 81: ...ibitions Do not touch thermal head elements driver ICs and connectors directly with your fingers a screwdriver tweezers etc Protect the thermal head surface from mechanical stress and impacts including friction from particles During operation and right after the end of operation do not directly touch areas near the thermal head and motor Keep contaminants from adhering to the thermal paper and pla...

Страница 82: ...y A pulse output is sent to drawer kick connector pin 2 or pin 5 and you can open the drawer You can also check the open close status of the drawer by checking the signal level of the drawer kick connector pin 3 These controls are executed by a driver or by commands Note Whether or not pin 2 or pin 5 operates the drawer kick connector depends on the connected cash drawer S 2 1 ESC POS Commands Pre...

Страница 83: ...n the beep pattern and how many times to sound the buzzer can be changed S 3 1 ESC POS Command Use the buzzer control command or the output command for the specified pulse For details see the ESC POS Command Reference S 3 2 For Windows Printer Drivers APD Use the DirectIO function or the API for opening the drawer For details see the manual for Status API of the drivers S 3 3 OPOS OCX Driver Regis...

Страница 84: ...pes of computer systems such as stand alone or network configuration to use a same application You can use JavaPOS to build applications and drivers independently of platforms This allows flexible configurations using thin clients to meet the system requirements 1 OLE technology developed by Microsoft divides software into part blocks The OPOS driver is presupposed to be used with a development en...

Страница 85: ...telligent function settings Save restore settings Windows Deployment Tool Use to make network and printer settings simultaneously Allows you to make settings efficiently at the time of introducing TM printers for the first time or when configuring multiple TM printers at the same time Windows Monitoring Tool Use to check a list of status for the Epson printers connected to the network You can also...

Отзывы: