background image

Printer Basics

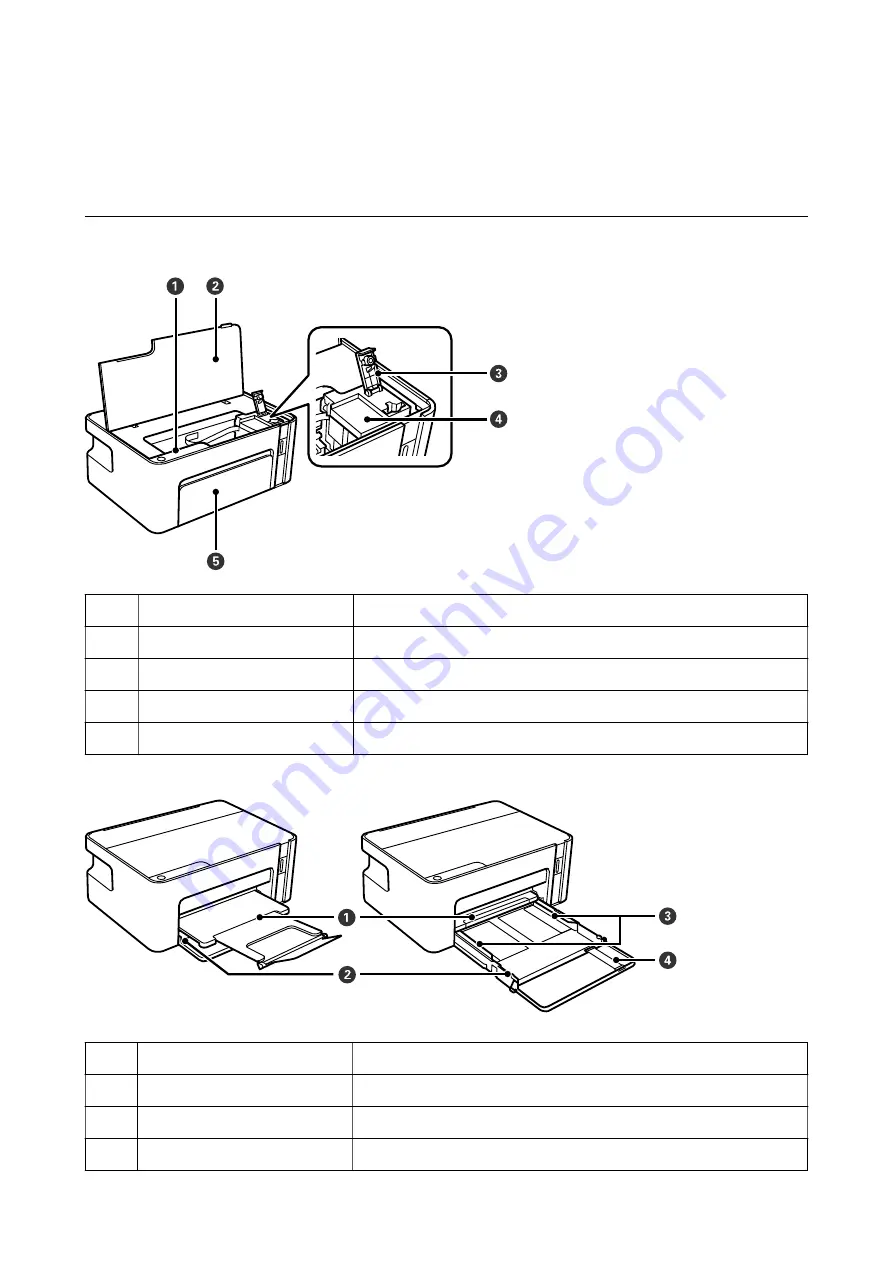
Part Names and Functions

A

Control panel

Allows you to operate the printer and indicates the printer's status.

B

Printer cover

Open to refill the ink tank or to remove jammed paper.

C

Ink tank cap

Open to refill the ink tank.

D

Ink tank

Contains black ink and is located on the print head.

E

front cover

Open to load paper in the paper cassette.

A

Output tray

Holds the ejected paper.

B

Paper cassette

Loads paper.

C

Edge guide

Feeds the paper straight into the printer. Slide to the edges of the paper.

D

paper guide extension

Slide out to load legal size paper.

User's Guide

Printer Basics

10

Содержание ET-M1100 Series

Страница 1: ...User s Guide NPD5969 01 EN ...

Страница 2: ...nd Footer 32 Printing a Watermark 33 Printing Multiple Files Together 33 Adjusting the Print Tone 34 Printing to Emphasize Thin Lines 35 Printing to Enhance Light Text and Lines 35 Printing Clear Bar Codes 36 Canceling Printing 36 Menu Options for the Printer Driver 36 Printing from the Printer Driver on Mac OS 39 Printing Basics 39 Printing Several Pages on One Sheet 41 Printing and Stacking in P...

Страница 3: ... Power Turns Off Automatically 73 Cannot Print from a Computer 74 Checking the Connection USB 74 Checking the Software and Data 74 Checking the Printer Status from the Computer Windows 76 Checking the Printer Status from the Computer Mac OS 77 Printout Problems 77 Printout is Scuffed or Color is Missing 77 Banding Appears 78 Colored Banding Appears at Intervals of Approximately 2 5 cm 78 Vertical ...

Страница 4: ...rt epson net Digital manual Start EPSON Software Updater on your computer EPSON Software Updater checks for available updates of Epson software applications and the digital manuals and allows you to download the latest ones Related Information Software Update Tools EPSON Software Updater on page 63 Using the Manual to Search for Information The PDF manual allows you to search for information you a...

Страница 5: ...eed Click Print in the File menu and then specify the pages you want to print in Pages in Pages to Print To specify a series of pages enter a hyphen between the start page and the end page Example 20 25 To specify pages that are not in series divide the pages with commas Example 5 10 15 Marks and Symbols Caution Instructions that must be followed carefully to avoid bodily injury cImportant Instruc...

Страница 6: ...g systems Additionally Windows is used to refer to all versions Microsoft Windows 10 operating system Microsoft Windows 8 1 operating system Microsoft Windows 8 operating system Microsoft Windows 7 operating system Microsoft Windows Vista operating system Microsoft Windows XP operating system Microsoft Windows XP Professional x64 Edition operating system Microsoft Windows Server 2016 operating sys...

Страница 7: ...rate normally or exhibits a distinct change in performance Do not adjust controls that are not covered by the operating instructions Place the printer near a wall outlet where the plug can be easily unplugged Do not place or store the printer outdoors near excessive dirt or dust water heat sources or in locations subject to shocks vibrations high temperature or humidity Take care not to spill liqu...

Страница 8: ...r When connecting the printer to a computer or other device with a cable ensure the correct orientation of the connectors Each connector has only one correct orientation Inserting a connector in the wrong orientation may damage both devices connected by the cable Place the printer on a flat stable surface that extends beyond the base of the printer in all directions The printer will not operate pr...

Страница 9: ...r When storing or transporting the printer avoid tilting it placing it vertically or turning it upside down otherwise ink may leak Before transporting the printer make sure that the print head is in the home far right position User s Guide Important Instructions 9 ...

Страница 10: ...k tank cap Open to refill the ink tank D Ink tank Contains black ink and is located on the print head E front cover Open to load paper in the paper cassette A Output tray Holds the ejected paper B Paper cassette Loads paper C Edge guide Feeds the paper straight into the printer Slide to the edges of the paper D paper guide extension Slide out to load legal size paper User s Guide Printer Basics 10...

Страница 11: ... checking that the power light is off B When a error occurs pressing this button cancels the error Hold this button down for more than five seconds to move the ink tank to the ink refilling position or to return it to the home position C Stops the current operation Cancels paper out errors and paper jam errors Hold this button down for five seconds until the P button flashes to run print head clea...

Страница 12: ...l ink charging may not be complete See the Start Here poster to complete initial ink charging Ink refilling may not be complete Refill the ink inside the ink tank and then press the H button to return the tank to the home position Ink tank cap is not fully closed Push in the cap firmly and then press the H button No paper is loaded or more than one sheet has been fed at a time Load paper and press...

Страница 13: ...isplayed on the computer press the button to continue printing The lights stop flashing for the time being however they will continue to flash at regular intervals until the ink pad is replaced A printer error has occurred Open the front cover and remove any paper inside the printer Turn the power off and on again If the error continues to occur after turning the power off and on again contact Eps...

Страница 14: ...vailable in your area contact Epson support Paper suitable for printing documents Media Name Size Loading Capacity Sheets Manual 2 Sided Printing Epson Bright White Ink Jet Paper A4 120 1 1 For manual 2 sided printing you can load up to 30 sheets for paper with one side already printed Paper suitable for printing documents and Photos Media Name Size Loading Capacity Sheets Manual 2 Sided Printing ...

Страница 15: ...es Manual 2 Sided Printing Envelope Envelope 10 Envelope DL Envelope C6 10 Paper Handling Precautions Read the instruction sheets supplied with the paper To achieve high quality printouts with genuine Epson paper use the paper in the environment stated on the sheets supplied with the paper Fan and align the edges of the paper before loading Do not fan or curl photo paper Doing so may damage the pr...

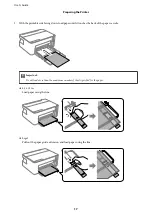
Страница 16: ...e what type of paper you are using check the paper packaging or contact the manufacturer to confirm the paper specifications Related Information Printer Specifications on page 84 Loading Paper in the Paper Cassette 1 Open the front cover until it clicks and then slide out the paper cassette until it stops cImportant The paper cassette cannot be removed 2 Slide the edge guides to their maximum posi...

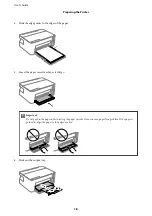
Страница 17: ...s the back of the paper cassette cImportant Do not load more than the maximum number of sheets specified for the paper 8 5 x 13 in Load paper using the line Legal Pull out the paper guide extension and load paper using the line User s Guide Preparing the Printer 17 ...

Страница 18: ...er cassette as far as it will go cImportant Do not push in the paper after inserting the paper cassette It may cause a paper feed problem If the paper is pushed in align the paper to the paper size line 6 Slide out the output tray User s Guide Preparing the Printer 18 ...

Страница 19: ...ding When the stacked envelopes are puffed up with air press them down to flatten them before loading Do not use envelopes that are curled or folded Using these envelopes causes paper jams and smears on the printout Do not use envelopes with adhesive surfaces on the flaps or window envelopes Avoid using envelopes that are too thin as they may curl during printing Related Information Available Pape...

Страница 20: ...ab 3 Do one of the following Select the time period before the printer enters sleep mode as the Sleep Timer setting and click Send To make the printer turn off automatically select the time period as the Power Off Timer setting and click Send Select the time period before the printer enters sleep mode as the Sleep Timer setting and click Send To make the printer turn off automatically select the t...

Страница 21: ...ect the time period before the printer enters sleep mode as the Sleep Timer setting and click Apply To make the printer turn off automatically select the time period in the Power Off If Inactive or Power Off If Disconnected setting and then click Apply Note Your product may have the Power Off Timer feature or Power Off If Inactive and Power Off If Disconnected features depending on the location of...

Страница 22: ... button and select Control Panel Printers in Hardware and Sound Right click on your printer and select Select printing preferences Windows XP Windows Server 2003 R2 Windows Server 2003 Click the start button and select Control Panel Printers and Other Hardware Printers and Faxes Right click on your printer and select Printing preferences Accessing the printer driver from the printer icon on the ta...

Страница 23: ...e setting items Right clicking an item displays Help When you select Print Preview you can see a preview of your document before printing 6 Click OK to close the printer driver window 7 Click Print Note When you select Print Preview a preview window is displayed To change the settings click Cancel and then repeat the procedure from step 2 Related Information Available Paper and Capacities on page ...

Страница 24: ... Information Available Paper and Capacities on page 14 Print Settings 2 sided printing is available when EPSON Status Monitor 3is enabled Note To enable EPSON Status Monitor 3 click Extended Settings on the Maintenance tab and then select Enable EPSON Status Monitor 3 1 On the printer driver s Main tab select an option from 2 Sided Printing 2 Click Settings make the appropriate settings and then c...

Страница 25: ...as the Multi Page setting Related Information Printing Basics on page 22 Main Tab on page 37 Printing and Stacking in Page Order Reverse Order Printing You can print from the last page so that the documents are stacked in page order Print Settings On the printer driver s Main tab select Reverse Order Related Information Printing Basics on page 22 User s Guide Printing 25 ...

Страница 26: ...you want to print on from the Output Paper setting Select Reduce Enlarge Document and then select Fit to Page or Zoom to When you select Zoom to enter a percentage Select Center to print the images in the center of the page Related Information Printing Basics on page 22 More Options Tab on page 37 Printing One Image on Multiple Sheets for Enlargement Creating a Poster This feature allows you to pr...

Страница 27: ... select the cutting guide options Related Information Printing Basics on page 22 Main Tab on page 37 Making Posters Using Overlapping Alignment Marks Here is an example of how to make a poster when 2x2 Poster is selected and Overlapping Alignment Marks is selected in Print Cutting Guides The actual guides are printed in monochrome but for this explanation they are shown as blue and red lines User ...

Страница 28: ... of Sheet 1 along the vertical blue line through the center of the top and bottom cross marks 2 Place the edge of Sheet 1 on top of Sheet 2 and align the cross marks then temporarily tape the two sheets together from the back User s Guide Printing 28 ...

Страница 29: ...along the vertical red line through the alignment markers this time the line to the left of the cross marks 4 Tape the sheets together from the back 5 Repeat steps 1 to 4 to tape Sheet 3 and Sheet 4 together User s Guide Printing 29 ...

Страница 30: ...e horizontal blue line through the center of the left and right side cross marks 7 Place the edge of Sheet 1 and Sheet 2 on top of Sheet 3 and Sheet 4 and align the cross marks and then temporarily tape them together from the back User s Guide Printing 30 ...

Страница 31: ...8 Cut the taped sheets in two along the horizontal red line through the alignment markers this time the line above the cross marks 9 Tape the sheets together from the back User s Guide Printing 31 ...

Страница 32: ...oter You can print information such as a user name and printing date in headers or footers Print Settings On the printer driver s More Options tab click Watermark Features and then select Header Footer Click Settings and then select the items you want to print User s Guide Printing 32 ...

Страница 33: ... watermark Related Information Printing Basics on page 22 More Options Tab on page 37 Printing Multiple Files Together Job Arranger Lite allows you to combine several files created by different applications and print them as a single print job You can specify the print settings for combined files such as multi page layout and 2 sided printing Print Settings On the printer driver s Main tab select ...

Страница 34: ...ger Lite window Next select Open from the File menu to select the file Related Information Printing Basics on page 22 Main Tab on page 37 Adjusting the Print Tone You can adjust the tone used in the print job Note These adjustments are not applied to the original data Print Settings On the printer driver s More Options tab select Custom as the Tone Correction setting Click Advanced to open the Ton...

Страница 35: ...ormation Printing Basics on page 22 More Options Tab on page 37 Printing to Enhance Light Text and Lines You can enhance light letters and lines to make them more visible or to sharpen images Print Settings On the printer driver s More Options tab click Image Options in the Tone Correction setting Select Enhance Light Text and Lines Related Information Printing Basics on page 22 More Options Tab o...

Страница 36: ...gs and then select Barcode mode Related Information Printing Basics on page 22 Maintenance Tab on page 38 Canceling Printing You can cancel a print job from the computer However you cannot cancel a print job from the computer once it has been completely sent to the printer In this case cancel the print job by using the printer s control panel Canceling On your computer right click on your printer ...

Страница 37: ...e you select 2 Sided Printing Allows you to perform 2 sided printing Settings You can specify the binding edge and the binding margins Multi Page Allows you to print several pages on one sheet or perform poster printing Click Page Order to specify the order in which pages are printed Copies Set the number of copies you want to print Collate Prints multi page documents collated in order and sorted ...

Страница 38: ...es print quality options such as Emphasize Text You can also thicken thin lines to make them visible on the printouts Watermark Features Allows you to make settings for anti copy pattern or watermarks Additional Settings Rotate 180 Rotates pages 180 degrees before printing This feature is helpful when printing on paper such as envelopes that are loaded in fixed direction in the printer High Speed ...

Страница 39: ...t click each item to view the Help for more details Print Queue Displays the jobs waiting to be printed You can check pause or resume print jobs Printer and Option Information Displays the number of sheets of paper fed into the printer Language Changes the language used on the printer driver window To apply the settings close the printer driver and then open it again Software Update Starts EPSON S...

Страница 40: ... Printers Scanners or Print Scan Print Fax remove the printer and then add the printer again See the following to add a printer http epson sn 5 Change the settings as necessary See the menu options for the printer driver for details 6 Click Print Related Information Available Paper and Capacities on page 14 Loading Paper in the Paper Cassette on page 16 Menu Options for Print Settings on page 44 U...

Страница 41: ...n page order and Border Related Information Printing Basics on page 39 Menu Options for Layout on page 43 Printing and Stacking in Page Order Reverse Order Printing You can print from the last page so that the documents are stacked in page order Print Settings Select Paper Handling from the pop up menu Select Reverse as the Page Order setting Related Information Printing Basics on page 39 User s G...

Страница 42: ...entage do one of the following Select Print from the File menu of the application Select Printer enter a percentage in Scale and then click Print Select Page Setup from the File menu of the application Select your printer in Format For enter a percentage in Scale and then click OK Note Select the paper size you set in the application as the Paper Size setting Related Information Printing Basics on...

Страница 43: ...rees before printing Select this item when printing on paper such as envelopes that are loaded in fixed direction in the printer Flip horizontally Inverts an image to print as it would appear in a mirror Menu Options for Color Matching ColorSync Select the method for color adjustment These options adjusts colors between the printer and the computer display to minimize the difference in color EPSON...

Страница 44: ...ac OS Printer Driver Accessing the Operation Settings Window of the Mac OS Printer Driver Select System Preferences from the menu Printers Scanners or Print Scan Print Fax and then select the printer Click Options Supplies Options or Driver Operation Settings of the Mac OS Printer Driver Skip Blank Page Avoids printing blank pages Quiet Mode Prints quietly However the print speed may be slower Hig...

Страница 45: ...e Epson ink not designed for this printer or any third party ink Other products not manufactured by Epson may cause damage that is not covered by Epson s warranties and under certain circumstances may cause erratic printer behavior Note Ink bottle codes may vary by location For the correct codes in your area contact Epson support Although the ink bottles may contain recycled materials this does no...

Страница 46: ...ottle in a bag After bringing an ink bottle inside from a cold storage site allow it to warm up at room temperature for at least three hours before using it Do not open the ink bottle package until you are ready to fill the ink tank The ink bottle is vacuum packed to maintain its reliability If you leave an ink bottle unpacked for a long time before using it normal printing may not be possible Onc...

Страница 47: ...ne off process consumes a quantity of ink and therefore this bottle may print fewer pages compared to subsequent ink bottles Quoted yields may vary depending on the images that you are printing the paper type that you are using the frequency of your prints and environmental conditions such as temperature Refilling the Ink Tank Ink can be refilled at any time cImportant Epson recommends the use of ...

Страница 48: ...k cImportant Do not put your hand inside the printer until everything has stopped moving Note To cancel refilling the ink tank hold down the H button 4 Open the cap of the ink tank 5 While holding the ink bottle upright turn the cap slowly to remove it User s Guide Refilling Ink 48 ...

Страница 49: ...the slot in front of the filling port and then stand the bottle slowly to insert it into the filling port cImportant Do not allow the top of the ink bottle to hit against any objects after removing its cap otherwise ink may spill It may be difficult to see inside the ink tank Refill the ink tank carefully to prevent ink from spilling out from the ink inlet User s Guide Refilling Ink 49 ...

Страница 50: ...ing the bottle normally without squeezing The ink flow stops automatically when the ink is filled to the upper line cImportant Do not leave the ink bottle inserted otherwise the bottle may be damaged or ink may leak Note If the ink does not start flowing into the tank remove the ink bottle and try reinserting it User s Guide Refilling Ink 50 ...

Страница 51: ...the ink bottle and then close the cap of the ink tank securely Note If any ink remains in the ink bottle tighten the cap and store the bottle upright for later use 9 Close the cap of the ink tank 10 Close the printer cover User s Guide Refilling Ink 51 ...

Страница 52: ...H button on the printer for at least five seconds until the H light flashes Related Information Ink Bottle Codes on page 45 Ink Bottle Handling Precautions on page 46 Ink Spilled on page 83 User s Guide Refilling Ink 52 ...

Страница 53: ...ses turn the printer on and off again as soon as possible to cap the print head Check if Nozzles are Clogged Nozzle Check If the nozzles are clogged the printouts become faint or visible banding appears When print quality has declined first use the nozzle check feature to check if the nozzles are clogged Check if Nozzles are Clogged Nozzle Check Printer Buttons 1 Load A4 size plain paper in the pr...

Страница 54: ...Check Windows 1 Load A4 size plain paper in the printer 2 Access the printer driver window 3 Click Nozzle Check on the Maintenance tab 4 Follow the on screen instructions to print the nozzle check pattern 5 Examine the printed pattern and then perform one of the following options depending on the print results A All lines are printed No further steps are needed B or close to B Cleain the print hea...

Страница 55: ... check pattern 6 Examine the printed pattern and then perform one of the following options depending on the print results A All lines are printed No further steps are needed B or close to B Cleain the print head When some nozzles are clogged perform head cleaning For details see the related information below C or close to C Power Clean the print head When most lines are broken or most segments are...

Страница 56: ... prevent the print head from drying out do not unplug the printer while the power is on Cleaning the Print Head Printer Buttons Hold the y button down for at least five seconds until the power light starts flashing Print head cleaning starts Note It may take some time to start print head cleaning After the power light stops flashing turn off the printer run nozzle check and then check if the print...

Страница 57: ...ing the Print Head Power Cleaning The power cleaning feature may improve print quality in the following cases The most nozzles are clogged You performed the nozzle check and head cleaning three times and then waited for at least six hours without printing but print quality still did not improve Before running this feature use the nozzle check feature to check if the nozzles are clogged read the fo...

Страница 58: ... printer driver window 2 Click Power Cleaning on the Maintenance tab 3 Follow the on screen instructions Related Information Accessing the Printer Driver on page 22 Check if Nozzles are Clogged Nozzle Check on page 53 Running Power Cleaning Mac OS 1 Select System Preferences from the menu Printers Scanners or Print Scan Print Fax and then select the printer 2 Click Options Supplies Utility Open Pr...

Страница 59: ...nners or Print Scan Print Fax and then select the printer 3 Click Options Supplies Utility Open Printer Utility 4 Click Print Head Alignment 5 Follow the on screen instructions Related Information Loading Paper in the Paper Cassette on page 16 Cleaning the Paper Path When the printouts are smeared or scuffed or paper does not feed correctly clean the roller inside cImportant Do not use tissue pape...

Страница 60: ...en instructions Cleaning the Paper Path for Paper Feeding Problems When paper is not fed from paper cassette correctly clean the roller inside 1 Turn off the printer by pressing the P button 2 Unplug the power cord and then disconnect the power cord 3 Make sure that the cap of the ink tank is securely closed cImportant If the cap of the ink tank is not securely closed ink may leak 4 Close the prin...

Страница 61: ...r hand or fingers when standing the printer Otherwise you may be injured cImportant Do not leave the printer standing for a long time 7 Dampen a soft cloth with water wring it out thoroughly and then wipe the roller while rotating it with the cloth 8 Return the printer to its normal position and then insert the paper cassette User s Guide Maintaining the Printer 61 ...

Страница 62: ...g the y button down and then release the buttons when the power light flashes Checking the Total Number of Pages Fed Through the Printer Windows 1 Access the printer driver window 2 Click Printer and Option Information on the Maintenance tab Related Information Accessing the Printer Driver on page 22 Checking the Total Number of Pages Fed Through the Printer Mac OS 1 Select System Preferences from...

Страница 63: ...tware Update Tools EPSON Software Updater EPSON Software Updater is an application that checks for new or updated software on the internet and installs it You can also update the printer s firmware and manual Note Windows Server operating systems are not supported Installing Method Download EPSON Software Updater from the Epson website If you are using a Windows computer and cannot to download it ...

Страница 64: ...Download 5 Click or double click the downloaded file and then follow the on screen instructions Note If you are using a Windows computer and you cannot download applications from the website install them from the software disc that came with the printer Updating Applications and Firmware You may be able to clear certain problems and improve or add functions by updating the applications and the fir...

Страница 65: ...0 Windows 8 1 Windows 8 Windows 7 Windows Vista Windows Server 2016 Windows Server 2012 R2 Windows Server 2012 Windows Server 2008 R2 Windows Server 2008 Select Uninstall a program in Programs Windows XP Windows Server 2003 R2 Windows Server 2003 Click Add or Remove Programs 5 Select the application you want to uninstall You cannot uninstall the printer driver if there is any print jobs Delete or ...

Страница 66: ...taller 6 Select the application you want to uninstall and then click Uninstall cImportant The Uninstaller removes all drivers for Epson inkjet printers on the computer If you use multiple Epson inkjet printers and you only want to delete some drivers delete all of them first and then install the necessary printer driver again Note If you cannot find the application you want to uninstall in the app...

Страница 67: ...ing may not be complete Refill the ink inside the ink tank and then press the H button to return the tank to the home position Ink tank cap is not fully closed Push in the cap firmly and then press the H button No paper is loaded or more than one sheet has been fed at a time Load paper and press the button A paper jam has occurred Remove the paper and press the button Protective material may be in...

Страница 68: ...tton to continue printing The lights stop flashing for the time being however they will continue to flash at regular intervals until the ink pad is replaced A printer error has occurred Open the front cover and remove any paper inside the printer Turn the power off and on again If the error continues to occur after turning the power off and on again contact Epson support 1 In some print cycles a v...

Страница 69: ...n Printer Utility 3 Click EPSON Status Monitor You can check the printer status ink levels and error status Checking the Software Status You may be able to clear the problem by updating the software to the latest version To check the software status use the software update tool Related Information Software Update Tools EPSON Software Updater on page 63 Installing Applications on page 64 Removing J...

Страница 70: ...e buttons on the control panel while your hand is inside the printer If the printer starts operating it could cause an injury Be careful not to touch the protruding parts to avoid injury 1 Open the printer cover 2 Remove the jammed paper User s Guide Solving Problems 70 ...

Страница 71: ...touch the white flat cable or translucent film inside the printer Doing so may cause a malfunction 3 Close the printer cover Removing Jammed Paper from Rear Cover 1 Remove the rear cover User s Guide Solving Problems 71 ...

Страница 72: ...ted by this printer Follow the paper handling precautions Do not load more than the maximum number of sheets specified for the paper For plain paper do not load above the line indicated by the triangle symbol on the edge guide Related Information Environmental Specifications on page 86 Paper Handling Precautions on page 15 Available Paper and Capacities on page 14 List of Paper Type on page 19 Pap...

Страница 73: ...n align the paper to the paper size line on the paper cassette Power and Control Panel Problems Power Does Not Turn On Make sure the power cord is securely plugged in Hold down the P button for a little longer Power Does Not Turn Off Hold down the P button for a little longer If you still cannot turn off the printer unplug the power cord To prevent the print head from drying out turn the printer b...

Страница 74: ...ter If the USB cable cannot be recognized change the port or change the USB cable If the printer cannot print using a USB connection try the following Disconnect the USB cable from the computer Right click on the printer icon displayed on the computer and then select Remove Device Next connect the USB cable to the computer and try a test print Checking the Software and Data Make sure that a genuin...

Страница 75: ...indows 8 Windows 7 Windows Server 2016 Windows Server 2012 R2 Windows Server 2012 Windows Server 2008 R2 Click the printer icon and then click Print server properties at the top of the window Windows Vista Windows Server 2008 Right click on the Printers folder and then click Run as administrator Server Properties Windows XP Windows Server 2003 R2 Windows Server 2003 From the File menu select Serve...

Страница 76: ...a genuine Epson printer driver is installed on your computer Related Information Installing Applications on page 64 Checking the Printer Status from the Computer Windows Click Print Queue on the printer driver s Maintenance tab and then check the following Check if there are any paused print jobs If unnecessary data remains select Cancel all documents from the Printer menu User s Guide Solving Pro...

Страница 77: ...ht click the copied driver icon and then click Remove Device Make sure the printer port is selected correctly in Property Port from the Printer menu as follows Select USBXXX for a USB connection Checking the Printer Status from the Computer Mac OS Make sure the printer status is not Pause Select System Preferences from the menu Printers Scanners or Print Scan Print Fax and then double click the pr...

Страница 78: ...k if Nozzles are Clogged Nozzle Check on page 53 Colored Banding Appears at Intervals of Approximately 2 5 cm Select the appropriate paper type setting for the type of paper loaded in the printer Align the print head from a computer When printing on plain paper print using a higher quality setting Related Information List of Paper Type on page 19 Aligning the Print Head on page 58 User s Guide Sol...

Страница 79: ...head nozzles are clogged Align the print head Checking the paper Use paper supported by this printer Do not print on paper that is damp damaged or too old If the paper is curled or the envelope is puffed up flatten it Do not stack the paper immediately after printing Dry the printouts completely before filing or displaying them When drying the printouts avoid direct sun light do not use a dryer an...

Страница 80: ... the ink bottle before the date printed on the package Try to use genuine Epson ink bottles This product is designed to adjust colors based on the use of genuine Epson ink bottles The use of non genuine ink bottles may cause print quality to decline Related Information Check if Nozzles are Clogged Nozzle Check on page 53 Aligning the Print Head on page 58 Available Paper and Capacities on page 14 ...

Страница 81: ... Position Size or Margins of the Printout Are Incorrect Load paper in the correct direction and slide the edge guides against the edges of the paper Select the appropriate paper size setting Adjust the margin setting in the application so that it falls within the printable area Related Information Loading Paper in the Paper Cassette on page 16 Printable Area on page 84 Printed Characters Are Incor...

Страница 82: ... applications Lower the quality setting High quality printing slows down the printing speed Enable the bidirectional or high speed setting When this setting is enabled the print head prints while moving in both directions and the printing speed increases Windows Select High Speed on the printer driver s More Options tab Mac OS Select System Preferences from the menu Printers Scanners or Print Scan...

Страница 83: ...educe printing speed Windows printer driver Select On as the Quiet Mode setting on the Main tab Mac OS printer driver Select System Preferences from the menu Printers Scanners or Print Scan Print Fax and then select the printer Click Options Supplies Options or Driver Select On as the Quiet Mode setting Application Is Blocked by a Firewall for Windows Only Add the application to the Windows Firewa...

Страница 84: ...eed in the printer or the print quality may decline depending on the paper properties or quality Printable Area Printable Area for Single Sheets Print quality may decline in the shaded areas due to the printer s mechanism A 3 0 mm 0 12 in B 3 0 mm 0 12 in C 41 0 mm 1 61 in D 37 0 mm 1 46 in Printable Area for Envelopes Print quality may decline in the shaded areas due to the printer s mechanism A ...

Страница 85: ... V Model Rated Frequency Range 50 to 60 Hz 50 to 60 Hz Rated Current 0 4 to 0 2 A 0 2 A Power Consumption with USB Con nection Printing Approx 13 0 W ISO IEC24712 Ready mode Approx 2 4 W Sleep mode Approx 0 4 W Power off Approx 0 2 W Printing Approx 13 0 W ISO IEC24712 Ready mode Approx 2 4 W Sleep mode Approx 0 4 W Power off Approx 0 3 W Note Check the label on the printer for its voltage For Eur...

Страница 86: ...an store for one month at 40 C 104 F System Requirements Windows 10 32 bit 64 bit Windows 8 1 32 bit 64 bit Windows 8 32 bit 64 bit Windows 7 32 bit 64 bit Windows Vista 32 bit 64 bit Windows XP SP3 or later 32 bit Windows XP Professional x64 Edition SP2 or later Windows Server 2016 Windows Server 2012 R2 Windows Server 2012 Windows Server 2008 R2 Windows Server 2008 Windows Server 2003 R2 Windows...

Страница 87: ...Unused postage stamps pre stamped postcards and other official postal items bearing valid postage Government issued revenue stamps and securities issued according to legal procedure Exercise caution when copying the following items Private marketable securities stock certificates negotiable notes checks etc monthly passes concession tickets etc Passports driver s licenses warrants of fitness road ...

Страница 88: ...tle upright when tightening the cap and take precautions to prevent ink from leaking when transporting the bottle for example putting the bottle in a bag Do not put opened ink bottles in the box with printer 1 Turn off the printer by pressing the P button 2 Make sure the power light turns off and then unplug the power cord cImportant Unplug the power cord when the power light is off Otherwise the ...

Страница 89: ...over Make sure you install the cap securely onto the ink tank 6 Secure the ink tank with tape 7 Prepare to pack the printer as shown below 8 Place the printer in the plastic bag and fold it closed User s Guide Appendix 89 ...

Страница 90: ... to the purchaser of this product or third parties for damages losses costs or expenses incurred by the purchaser or third parties as a result of accident misuse or abuse of this product or unauthorized modifications repairs or alterations to this product or excluding the U S failure to strictly comply with Seiko Epson Corporation s operating and maintenance instructions Seiko Epson Corporation an...

Страница 91: ...n support services for assistance Contacting Epson Support Before Contacting Epson If your Epson product is not operating properly and you cannot solve the problem using the troubleshooting information in your product manuals contact Epson support services for assistance If Epson support for your area is not listed below contact the dealer where you purchased your product Epson support will be abl...

Страница 92: ...tion of Product Epson recommends retaining product packaging for future transportation Securing the ink tank with tape and keeping the product upright is also recommended Help for Users in New Zealand Epson New Zealand wishes to provide you with a high level of customer service In addition to your product documentation we provide the following sources for obtaining information Internet URL http ww...

Страница 93: ... with the following over the phone Sales enquiries and product information Product usage questions or problem troubleshooting Enquiries on repair service and warranty Help for Users in Thailand Contacts for information support and services are World Wide Web http www epson co th Information on product specifications drivers for download Frequently Asked Questions FAQ and e mail are available Epson...

Страница 94: ...ince Company Name Address Phone E mail DKI JAKARTA ESS JAKARTA MANGGADUA Ruko Mall Mangga Dua No 48 Jl Arteri Mangga Dua Jakarta Utara DKI JAKARTA 6221 62301104 jkt admin epson indonesia co id NORTH SUMATERA ESC MEDAN Jl Bambu 2 Komplek Graha Niaga Nomor A 4 Medan North Sumatera 6261 42066090 42066091 mdn adm epson indonesia co id WEST JAWA ESC BANDUNG Jl Cihampelas No 48 A Bandung Jawa Barat 4011...

Страница 95: ... indonesia co id EAST KALIMANTAN ESC SAMARINDA Jl KH Wahid Hasyim M Yamin Kelurahan Sempaja Selatan Kecamatan Samarinda UTARA SAMARINDA KALTIM 62541 7272904 escsmd epson indonesia co id SOUTH SUMATERA ESC PALEMBANG Jl H M Rasyid Nawawi No 249 Kelurahan 9 Ilir Palembang Sumatera Selatan 62711 311330 escplg epson indonesia co id EAST JAVA ESC JEMBER JL Panglima Besar Sudirman Ruko no 1D Jember Jawa ...

Страница 96: ... Accessible 9am to 6pm Monday through Saturday Except public holidays Help for Users in the Philippines To obtain technical support as well as other after sales services users are welcome to contact the Epson Philippines Corporation at the telephone fax numbers and e mail address below World Wide Web http www epson com ph Information on product specifications drivers for download Frequently Asked ...

Страница 97: ... enquiries and product information Product usage questions or problems Enquiries on repair service and warranty Epson Philippines Corporation Trunk Line 632 706 2609 Fax 632 706 2663 User s Guide Appendix 97 ...

Отзывы: