background image

9.

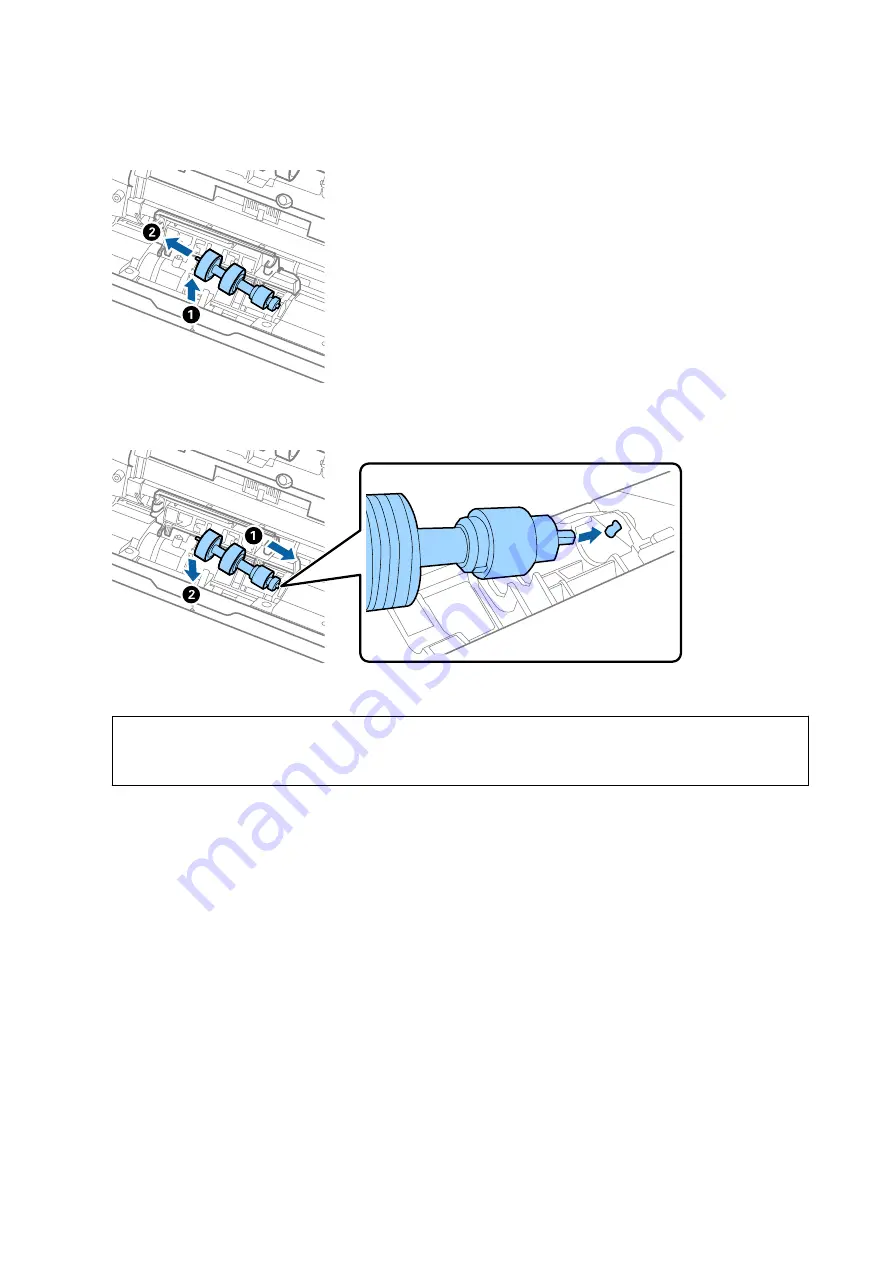
Lift the left side of the separation roller, and then slide and remove the installed separation rollers.

10. Insert the new separation roller axis into the hole on the right side, and then lower the roller.

11. Close the separation roller cover.

c

Important:

Make sure the separation rollers are installed correctly if the cover is hard to close.

12. Close the scanner cover.

13. Plug in the AC adapter, and then turn on the scanner.

14. Reset the scan number using Epson Scan 2 Utility.

Note:

Dispose of the pickup roller and the separation roller following the rules and regulations of your local authority. Do not
disassemble them.

Related Information

&

“Roller Assembly Kit Codes” on page 17

Resetting the Number of Scans

Reset the number of scans using Epson Scan 2 Utility after replacing the Roller Assembly Kit.

User's Guide

Maintenance

82

Содержание ES-500WR

Страница 1: ...User s Guide NPD6378 00 EN ...

Страница 2: ...penses incurred by the purchaser or third parties as a result of accident misuse or abuse of this product or unauthorized modifications repairs or alterations to this product or excluding the U S failure to strictly comply with Seiko Epson Corporation s operating and maintenance instructions Seiko Epson Corporation and its affiliates shall not be liable for any damages or problems arising from the...

Страница 3: ...r and Acrobat are registered trademarks of Adobe Systems Incorporated Intel is a registered trademark of Intel Corporation Wi Fi Wi Fi Alliance and Wi Fi Protected Access WPA are registered trademarks of the Wi Fi Alliance Wi Fi Protected Setup and WPA2 are trademarks of the Wi Fi Alliance The SuperSpeed USB Trident Logo is a registered trademark of USB Implementers Forum Inc General Notice Other ...

Страница 4: ...nated Cards 34 Large Size Originals 36 Irregular Shaped Originals 39 Photographs 42 Envelopes 45 Mixture of Originals 48 Basic Scanning Scanning Documents from Computer 51 Required Settings for Special Originals in Epson ScanSmart 54 Sending Invoice or Receipt Data to an Accounting Service 55 Exporting to QuickBooks Online 60 Advanced Scanning Scanning Different Sizes or Types of Originals One by ...

Страница 5: ... Edge of the Original is Not Scanned when Automatically Detecting the Size of the Original 93 Character is not Recognized Correctly 94 Expanding or Contracting the Scanned Image 94 Cannot Solve Problems in the Scanned Image 95 Network Problems 95 When You Cannot Make Network Settings 95 The Scanner Suddenly Cannot Scan over a Network Connection 98 The Scanner Suddenly Cannot Scan Using a USB Conne...

Страница 6: ...n the various Epson applications Marks and Symbols Caution Instructions that must be followed carefully to avoid bodily injury cImportant Instructions that must be observed to avoid damage to your equipment Note Provides complementary and reference information Related Information Links to related sections Descriptions Used in this Manual Screenshots for the applications are from Windows 10 or macO...

Страница 7: ... systems Additionally Windows is used to refer to all versions Microsoft Windows 10 operating system Microsoft Windows 8 1 operating system Microsoft Windows 8 operating system Microsoft Windows 7 operating system Mac OS In this manual Mac OS is used to refer to macOS High Sierra macOS Sierra and OS X El Capitan User s Guide About This Manual 7 ...

Страница 8: ...ds with this product or the use of the supplied power cord with other equipment may result in fire or electric shock Use only the AC adapter that comes with your product Using any other adapter could cause fire electrical shock or injury The AC adapter is designed for use with the product with which it was included Do not attempt to use it with other electronic devices unless specified Use only th...

Страница 9: ...ay adversely affect the operation of electrical medical equipment Do not use this product near automatically controlled devices such as automatic doors or fire alarms Radio waves from this product may adversely affect these devices and could lead to accidents due to malfunction Restrictions on Copying Observe the following restrictions to ensure the responsible and legal use of your product Copyin...

Страница 10: ...s Pull out the tray extension if originals are too big for the input tray This prevents paper from curling and causing paper jams D Input tray extension E Output tray Holds originals ejected from the scanner Pull out the extension tray to the length of the originals F Output tray extension G Stopper Prevents ejected originals from falling off the extension tray Adjust it to the length of the origi...

Страница 11: ...ner cover when cleaning inside of the scanner and removing jammed paper C Pickup roller Feeds originals This needs to be replaced when the number of scans exceeds the service number of papers D Separation roller Feeds originals separately one by one This needs to be replaced when the number of scans exceeds the service number of papers Related Information Cleaning Inside the Scanner on page 73 Rep...

Страница 12: ...ng double feeds when loading envelopes plastic cards originals with labels or stickers and so on Press the button before scanning to skip this error once one sheet The light is on when this is enabled Follow the steps below to restart scanning when a double feed error has occurred the error light flashes 1 Open the scanner cover and then remove the originals 2 Close the scanner cover and then pres...

Страница 13: ... available with different combinations of buttons Hold down the and buttons for more than three seconds to start PIN Code Setup WPS See the chapter Network Settings for more details Turn on the scanner while holding down the button to restore the default network settings Related Information Network Settings on page 67 Placing Plastic Cards on page 31 Placing Laminated Cards on page 34 Placing Enve...

Страница 14: ...curred F Skip double feed detection light This is on when skipping double feed detection is enabled G Slow mode light This is on during slow mode Related Information Error Indicators on page 14 Placing a Mixture of Originals at Different Sizes on page 49 Error Indicators Scanner errors Indicators Situation Solutions Flashing slowly A paper jam or double feed occurred Open the scanner cover and the...

Страница 15: ...ss point settings error has oc curred a security error Flashing slowly white Flashing slowly A network connection error has occur red the Date and Time has not been set correctly Re set the Date and Time in Web Con fig Related Information Removing Jammed Originals from the Scanner on page 89 Making Wi Fi Settings from the Control Panel on page 69 Network Problems on page 95 Web Config on page 16 I...

Страница 16: ...rvices and send by e mail You can download and install this app from the App Store or Google Play EpsonNet Config EpsonNet Config is an application that allows you to set network interface addresses and protocols See the operations guide for EpsonNet Config or the application s help for more details Note You can run Web Config from EpsonNet Config Web Config Web Config is an application that allow...

Страница 17: ...ller Assembly Kit Codes Parts the pickup roller and a separation roller should be replaced when the number of scans exceeds the service number You can check the latest number of scans in Epson Scan 2 Utility A pickup roller B separation roller Part name Codes Life cycle Roller Assembly Kit B12B819031 200 000 This number was reached by consecutively scanning using Epson test original papers and is ...

Страница 18: ...is when cleaning inside the scanner This kit is composed of cleaning liquid and a cleaning cloth Part name Codes Cleaning Kit B12B819291 Related Information Cleaning Inside the Scanner on page 73 User s Guide Scanner Basics 18 ...

Страница 19: ...aminated Cards 0 8 mm 0 03 in or less Maximum 215 9 6 096 0 mm 8 5 240 0 in Minimum 50 8 50 8 mm 2 0 2 0 in The loadable size varies depending on the type of originals Note All originals must be flat at the leading edge Make sure that curls on the leading edge of the originals are kept within the following range A must be 3 mm or less B must be 1 mm or less while B is equal to or less than C When ...

Страница 20: ...6 128 182 mm 5 0 7 2 in A6 105 148 mm 4 1 5 8 in A8 52 74 mm 2 1 2 9 in 127 to 413 g m2 Business Card 55 89 mm 2 1 3 4 in 210 g m2 Thickness of the originals stack under 6 mm 0 23 in 15 sheets You can refill the originals up to the maximum capacity during scanning Specifications for Receipts The specification of receipts you can load into the scanner Size Resolution Loading Capacity Up to 215 9 39...

Страница 21: ... 1 24 mm 0 05 in or less 1 card Horizontal Landscape Without embossing 0 76 mm 0 03 in or less 5 cards Specifications of Laminated Cards The specification of laminated cards you can load into the scanner Size Thickness Loading Capacity 120 0 150 0 mm 4 7 5 9 in or less 0 8 mm 0 03 in or less 1 card Specifications for Originals Using the Carrier Sheet The optional Carrier Sheet is a sheet designed ...

Страница 22: ... than intended as the scanner scans to the end of the Carrier Sheet when you select Auto Detect as the Document Size setting in Epson ScanSmart You can check the setting by clicking Settings Scanner Settings tab Scan Settings button Main Settings tab on the Epson Scan 2 window Related Information Carrier Sheet Codes on page 17 Specifications of Envelopes The specification of envelopes you can load...

Страница 23: ...ouble feed detection from Epson ScanSmart Click Settings Scanner Settings tab Scan Settings button Main Settings tab on the Epson Scan 2 window and then select Off in Detect Double Feed Labels or stickers must be firmly stuck to the originals with no glue protruding Try to flatten the curled originals before scanning Related Information Scanner Basics on page 10 Maintenance on page 73 Types of Ori...

Страница 24: ...ll out and extend the input tray extension Make sure you pull out and extend the output tray extensions so that they are a little bit longer than the length of the original and raise the stopper so that the ejected originals can be stacked comfortably on the output tray The stopper can move forward and backward on the output tray extension so that you can easily adjust the stopper position to the ...

Страница 25: ... 3 Fan the originals Hold both ends of the originals and fan them a few times 4 Align the edges of the originals with the printed side facing down and slide the leading edge into a wedge shape User s Guide Specifications of Originals and Placing Originals 25 ...

Страница 26: ...ide the originals into the ADF until they meet resistance 6 Slide the edge guides to fit the edge of the originals making sure there are no gaps between the originals and the edge guides Otherwise the originals may be fed skewed User s Guide Specifications of Originals and Placing Originals 26 ...

Страница 27: ...es from the leading edge of the originals Make sure that the edges of the punch holes do not have burrs or curls When scanning thin paper with crinkles that are causing paper jams or double feeds you may be able to improve the situation by pressing the Slow Mode button to slow down the feeding speed Pressing the Slow Mode button once slows down the paper feeding speed press it again to return to n...

Страница 28: ... 8 to 6 096 0 mm 15 5 to 240 0 in 50 to 130 g m2 Plain paper Fine paper Recycled paper 1 sheet Placing Long Paper 1 Open the input tray and then slide out the output tray Note Do not extend the input tray extension and output tray extensions and do not raise the stopper 2 Slide the edge guides on the input tray all the way out User s Guide Specifications of Originals and Placing Originals 28 ...

Страница 29: ...ide the original into the ADF until it meets resistance 4 Adjust the edge guides to fit the edge of the long paper making sure there are no gaps between the edge of the paper and the edge guides Otherwise the originals may be fed skewed User s Guide Specifications of Originals and Placing Originals 29 ...

Страница 30: ...n 3 048 mm 120 inches you need to select Customize and enter the size of the paper If the paper length is 5 461 mm 215 inches or less you can use Detect paper length instead of entering the paper height If the paper is longer than 5 461 mm 215 inches you need to enter both width and height size of the paper Support the long paper at the input side so that it does not drop out of the ADF and the ou...

Страница 31: ... mm 0 05 in or less 1 card Horizontal Landscape Without embossing 0 76 mm 0 03 in or less 5 cards Placing Plastic Cards 1 Open the input tray and then slide out the output tray and raise the stopper 2 Slide the edge guides on the input tray all the way out User s Guide Specifications of Originals and Placing Originals 31 ...

Страница 32: ...nput tray facing down with the top edge facing into the ADF Slide the plastic cards into the ADF until they meet resistance cImportant Do not load plastic cards vertically User s Guide Specifications of Originals and Placing Originals 32 ...

Страница 33: ...o Off If you forget to disable Detect Double Feed and a double feed error occurs remove the card from the ADF and then reload it press the Double Feed Detection Skip button on the scanner as shown below to disable Detect Double Feed for the next scan and then scan again The Double Feed Detection Skip button only disables Detect Double Feed for one sheet Related Information Required Settings for Sp...

Страница 34: ...ze Thickness Loading Capacity 120 0 150 0 mm 4 7 5 9 in or less 0 8 mm 0 03 in or less 1 card Placing Laminated Cards 1 Open the input tray and then slide out the output tray and raise the stopper 2 Slide the edge guides on the input tray all the way out User s Guide Specifications of Originals and Placing Originals 34 ...

Страница 35: ...y facing down with the top edge facing into the ADF Slide the laminated cards into the ADF until they meet resistance 4 Slide the edge guides to fit the edge of the laminated cards User s Guide Specifications of Originals and Placing Originals 35 ...

Страница 36: ...elow to disable Detect Double Feed for the next scan and then scan again The Double Feed Detection Skip button only disables Detect Double Feed for one sheet Related Information Required Settings for Special Originals in Epson ScanSmart on page 54 Large Size Originals Specifications of Large Size Originals By using the Carrier Sheet sold separately and folding the originals in half you can scan or...

Страница 37: ...ise the stopper 2 Slide the edge guides on the input tray all the way out 3 Place the Carrier Sheet with the illustration on the front edge facing up and place the original in the carrier sheet by folding it in half so that the side to be scanned is facing out with the right side at the front User s Guide Specifications of Originals and Placing Originals 37 ...

Страница 38: ...rier Sheet into the ADF until it meets resistance 5 Slide the edge guides to fit the edge of the Carrier Sheet making sure there are no gaps between the Carrier Sheet and the edge guides Otherwise the carrier sheet may be fed skewed User s Guide Specifications of Originals and Placing Originals 38 ...

Страница 39: ...eading edge of the original must be placed at the binding part of the Carrier Sheet when scanning an original approximately 297 mm long Otherwise the length of the scanned image may be longer than intended as the scanner scans to the end of the Carrier Sheet when you select Auto Detect as the Document Size setting in Epson ScanSmart Only use the Carrier Sheet designed for your scanner The Carrier ...

Страница 40: ... the input tray extension Slide out the output tray extend the output tray extension and then raise the stopper 2 Slide the edge guides on the input tray all the way out 3 Place the Carrier Sheet with the illustration on the front edge facing up and place the original in the center of the Carrier Sheet with the side to be scanned facing down User s Guide Specifications of Originals and Placing Ori...

Страница 41: ...rier Sheet into the ADF until it meets resistance 5 Slide the edge guides to fit the edge of the Carrier Sheet making sure there are no gaps between the Carrier Sheet and the edge guides Otherwise the carrier sheet may be fed skewed User s Guide Specifications of Originals and Placing Originals 41 ...

Страница 42: ...automatically scanned by applying Paper Skew in the Correct Document Skew setting Only use the Carrier Sheet designed for your scanner The Carrier Sheet is automatically recognized by the scanner by detecting two small rectangular holes on the front edge Keep the holes clean and not covered Related Information Carrier Sheet Codes on page 17 Required Settings for Special Originals in Epson ScanSmar...

Страница 43: ...xtension and then raise the stopper 2 Slide the edge guides on the input tray all the way out 3 Place the Carrier Sheet with the illustration on the front edge facing up and place the photo in the center of the Carrier Sheet with the side to be scanned facing down User s Guide Specifications of Originals and Placing Originals 43 ...

Страница 44: ...rier Sheet into the ADF until it meets resistance 5 Slide the edge guides to fit the edge of the Carrier Sheet making sure there are no gaps between the Carrier Sheet and the edge guides Otherwise the carrier sheet may be fed skewed User s Guide Specifications of Originals and Placing Originals 44 ...

Страница 45: ...aper Skew in the Correct Document Skew setting Do not leave photos inside the Carrier Sheet for a long time Only use the Carrier Sheet designed for your scanner The Carrier Sheet is automatically recognized by the scanner by detecting two small rectangular holes on the front edge Keep the holes clean and not covered Related Information Carrier Sheet Codes on page 17 Required Settings for Special O...

Страница 46: ...d extend the input tray extension Slide out the output tray extend the output tray extension and then raise the stopper 2 Slide the edge guides on the input tray all the way out User s Guide Specifications of Originals and Placing Originals 46 ...

Страница 47: ...il they meet resistance cImportant Do not load envelopes with adhesives on them Note Envelopes that are not opened by cutting sharply at the flap edge may not be scanned correctly Envelopes that have not yet been sealed can be loaded with the flap open and facing up 4 Slide the edge guides to fit the edge of the envelopes making sure there are no gaps between the envelopes and the edge guides Othe...

Страница 48: ...below to disable Detect Double Feed for the next scan and then scan again The Double Feed Detection Skip button only disables Detect Double Feed for one sheet Related Information Required Settings for Special Originals in Epson ScanSmart on page 54 Mixture of Originals Specifications of Originals that are a Mixture of Different Sizes You can load a mixture of originals from 50 8 50 8 mm 2 0 2 0 in...

Страница 49: ...sion and then raise the stopper Note If there are any thick originals amongst the originals to stop the thick originals from bumping into the output tray and falling out store the output tray and do not use it to stack the ejected originals 2 Slide the edge guides on the input tray all the way out User s Guide Specifications of Originals and Placing Originals 49 ...

Страница 50: ...they meet resistance You can stack the originals up to 8 mm 0 31 in 4 Slide the edge guides to fit the edges of the widest original Related Information Scanning Different Sizes or Types of Originals One by One Continuously Automatic Feeding Mode on page 62 You can scan different sizes or types of originals one by one using Automatic Feeding Mode In this mode the scanner starts scanning automatical...

Страница 51: ...ner over a wireless connection scanned images are saved to the USB connected computer when you press the scanner button 1 Load the originals in your scanner 2 Press the button on the scanner The originals start scanning and Epson ScanSmart opens Note You can also start scanning from your computer Windows 10 Click the start button and then select Epson Software Epson ScanSmart Windows 8 1 Windows 8...

Страница 52: ... and add originals from Scan You can use the buttons at the top of the screen to rotate scanned images You can choose to keep or discard the back sides of double sided scanned images from Include back sides If you do not want to organize scanned images each time select Skip this screen next time User s Guide Basic Scanning 52 ...

Страница 53: ...4 Click Next 5 Click Save on the Select Action window User s Guide Basic Scanning 53 ...

Страница 54: ...Originals on page 24 Buttons on page 12 Required Settings for Special Originals in Epson ScanSmart You need to set certain items on the Epson ScanSmart when scanning special originals Click Settings Scanner Settings tab Scan Settings button Main Settings tab on the Epson Scan 2 window and then set the following User s Guide Basic Scanning 54 ...

Страница 55: ...list select Auto Detect Long Paper or select Customize to create a custom document size Laminated cards To scan transparent areas around the edges select Settings on the Document Size list to open the Document Size Settings window Next select Scan laminated card in the window Note The appropriate effect may not be achieved depending on the original If transparent areas around the edges are not sca...

Страница 56: ... You can also scan and add originals from Scan You can choose to keep or discard the back sides of double sided scanned images from Include back sides You can use the buttons at the top of the screen to delete rotate crop or merge the scanned images If you do not want to organize scanned images each time select Skip this screen next time User s Guide Basic Scanning 56 ...

Страница 57: ... Select Action window 6 Check the result and edit the automatically detected information if necessary If the Edit window is not displayed double click the invoice or receipt from the list or click Edit and Review to display User s Guide Basic Scanning 57 ...

Страница 58: ...our originals OCR Optical Character Recognition may not recognize text correctly Check the following The originals are placed straight The originals have clear text 7 Click Mark Reviewed Repeat editing and reviewing until all of the invoice or receipt data has been reviewed User s Guide Basic Scanning 58 ...

Страница 59: ...ou can sort and search the data from the column at the top of the list 8 Select the invoices or receipts you want to export or save from the list and then click Export and Save Note After exporting invoices or receipts to an accounting service they are marked as sent in the list in the column 9 Select the accounting service you want to use to export invoices or receipts User s Guide Basic Scanning...

Страница 60: ...g service you selected The scanned invoice or receipt databases are exported into each appropriate format Note If you want to manage invoice or receipt data you have already scanned click Manage Invoices Receipts Exporting to QuickBooks Online You can export the invoice or receipt data to QuickBooks Online User s Guide Basic Scanning 60 ...

Страница 61: ...d log in to your QuickBooks Online account if necessary 3 Select the expense transaction you want to export the data to Note If you want to import vendors categories payment methods or payment accounts from QuickBooks Online click the checkbox 4 Click OK The scanned invoice or receipt data is exported User s Guide Basic Scanning 61 ...

Страница 62: ...rent sizes or types of originals one by one using Automatic Feeding Mode In this mode the scanner starts scanning automatically when originals are loaded into the scanner 1 Start Epson ScanSmart 2 Click Settings 3 Click Scan Settings on the Scanner Settings tab The Epson Scan 2 window is displayed User s Guide Advanced Scanning 62 ...

Страница 63: ...utomatic Feeding Mode Select Settings on the Document Source list to open the Document Source Settings window Set Automatic Feeding Mode Timeout minutes on the window 6 Click Save to close the Epson Scan 2 window 7 Click Close to close the Settings window 8 Click Scan double sided or Scan single sided Automatic Feeding Mode starts User s Guide Advanced Scanning 63 ...

Страница 64: ...all originals press the button on the scanner to close Automatic Feeding Mode Note You can also close Automatic Feeding Mode by pressing Finish on the Automatic Feeding Mode window displayed on your computer Follow the instructions of the Epson ScanSmart to save the scanned image Related Information Placing Originals on page 24 Scanning Business Cards Using Presto BizCard You can scan business car...

Страница 65: ...d and converted into editable text in the Presto BizCard window Related Information Presto BizCard on page 16 Placing Originals on page 24 Scanning from Smart Devices Using NFC Tag You can connect your smart device and the scanner automatically using the Epson DocumentScan application and the NFC Near Field Communication function This feature is available for smart devices running Android 4 0 or l...

Страница 66: ...device will be connected to the scanner using this network If not the scanner and your smart device will be connected in AP mode In AP mode you can connect up to four devices to the scanner at the same time 1 Place the original 2 Make sure that Epson DocumentScan is installed on your smart device If not touch the NFC tag antenna of the smart device to the scanner s NFC tag Install Epson DocumentSc...

Страница 67: ... Information Connecting to a Computer on page 68 Connecting to a Smart Device on page 68 Making Wi Fi Settings from the Control Panel on page 69 Wi Fi Direct Simple AP Connection Use this connection method when you are not using Wi Fi at home or at the office or when you want to connect the scanner and the computer or smart device directly In this mode the scanner acts as a wireless router and you...

Страница 68: ...wnload in the download and connect part Click or double click the downloaded file to run the installer Follow the on screen instructions Selecting the Connection Methods Follow the on screen instructions until the following screen is displayed and then select the method for connecting the scanner to the computer Select the connection type and then click Next Follow the on screen instructions Conne...

Страница 69: ...page 70 Making AP Mode Settings on page 70 Making Wi Fi Settings by Push Button Setup WPS You can automatically set up a Wi Fi network by pressing a button on the access point If the following conditions are met you can set up by using this method The access point is compatible with WPS Wi Fi Protected Setup The current Wi Fi connection was established by pressing a button on the access point Note...

Страница 70: ... when the light turns on After releasing the error by pressing the button restart the access point move it closer to the scanner and then try again Making AP Mode Settings This method allows you to connect the scanner directly to devices without an access point The scanner acts as an access point cImportant When you connect from a smart device to the scanner using the AP mode connection the scanne...

Страница 71: ...set the Wi Fi settings Related Information Changing the Connection Method to a Computer on page 71 Changing the Connection Method to a Computer Using the installer and re set up in a different connection method Access the following website and then enter the product name http epson sn Go to Setup and then click Download in the download and connect part Click or double click the downloaded file to ...

Страница 72: ...3 seconds to disable a Wi Fi and AP mode connection The light and light turn off when these are disabled Note Press the button to re connect Wi Fi and AP mode Restoring the Network Settings from the Control Panel You can restore all network settings to their defaults 1 Turn the scanner off 2 While holding down the button press the button until light and light turn on simultaneously The light and l...

Страница 73: ...ile paper and room dust on the roller or the glass part inside the scanner may cause paper feed or scanned image quality problems Clean the inside of the scanner every 5 000 scans You can check the latest number of scans in Epson Scan 2 Utility If a surface is stained with a hard to remove material use a genuine Epson cleaning kit to remove stains Use a small amount of cleaner on the cleaning clot...

Страница 74: ...anner cover using a soft cloth or a genuine Epson cleaning kit cImportant Do not place too much force on the glass surface Do not use a brush or a hard tool Any scratches on the glass may affect the scan quality Do not spray cleaner directly onto the glass surface 5 Wipe off any stains on the sensors with a cotton swab User s Guide Maintenance 74 ...

Страница 75: ...cing the Roller Assembly Kit for more details 7 Wipe off any dust or dirt on the separation roller using a genuine Epson cleaning kit or a soft moist cloth cImportant Use only a genuine Epson cleaning kit or a soft moist cloth to clean the roller Using a dry cloth may damage the surface of the roller User s Guide Maintenance 75 ...

Страница 76: ...y dust or dirt on the pickup roller using a genuine Epson cleaning kit or a soft moist cloth cImportant Use only a genuine Epson cleaning kit or a soft moist cloth to clean the roller Using a dry cloth may damage the surface of the roller 10 Plug in the AC adapter and then turn on the scanner User s Guide Maintenance 76 ...

Страница 77: ...tate the rollers Use a genuine Epson cleaning kit or a soft moist cloth to clean the rollers as they rotate Repeat this step until the rollers are clean Caution Be careful not to get your hands or hair caught in the mechanism when operating the roller This could cause an injury 12 Close the scanner cover The scanner exits cleaning mode Related Information Cleaning Kit Codes on page 18 Replacing th...

Страница 78: ... scans exceeds the Life Cycle of the rollers When a replacement message is displayed on your computer follow the steps below to replace it A pickup roller B separation roller 1 Press the P button to turn off the scanner 2 Unplug the AC adapter from the scanner 3 Pull the cover open lever and open the scanner cover User s Guide Maintenance 78 ...

Страница 79: ...en slide and remove it 5 Pull down the fixture of the roller axis and then slide and remove the installed pickup rollers cImportant Do not pull out the pickup roller forcibly This could damage the inside of the scanner User s Guide Maintenance 79 ...

Страница 80: ...ide the new pickup roller to the left and insert it into the hole in the body Press the fixture to secure it 7 Put the edge of the cover of the pickup roller into the groove and slide it Close the cover firmly User s Guide Maintenance 80 ...

Страница 81: ...sed correctly Make sure the pickup rollers are installed correctly if the cover is hard to close Do not install the cover while it is raised 8 Push the hooks on both ends of the separation roller cover to open the cover User s Guide Maintenance 81 ...

Страница 82: ... the cover is hard to close 12 Close the scanner cover 13 Plug in the AC adapter and then turn on the scanner 14 Reset the scan number using Epson Scan 2 Utility Note Dispose of the pickup roller and the separation roller following the rules and regulations of your local authority Do not disassemble them Related Information Roller Assembly Kit Codes on page 17 Resetting the Number of Scans Reset t...

Страница 83: ...lick the start button and then select All Programs or Programs EPSON Epson Scan 2 Epson Scan 2 Utility Mac OS Select Go Applications Epson Software Epson Scan 2 Utility Note You can also start Epson Scan 2 Utility from Epson ScanSmart Click Settings Scanner Settings tab Device Settings 3 Click the Counter tab 4 Click Reset for the roller assembly kit Related Information Replacing the Roller Assemb...

Страница 84: ...rt button and then select EPSON Epson Scan 2 Utility Windows 8 1 Windows 8 Enter the application name in the search charm and then select the displayed icon Windows 7 Click the start button and then select All Programs or Programs EPSON Epson Scan 2 Epson Scan 2 Utility Mac OS Select Go Applications Epson Software Epson Scan 2 Utility Note You can also start Epson Scan 2 Utility from Epson ScanSma...

Страница 85: ...n repack the scanner in its original box or a sturdy box Updating Applications and Firmware You may be able to clear certain problems and improve or add functions by updating the applications and the firmware Make sure you use the latest version of the applications and firmware cImportant Do not turn off the computer or the scanner while updating 1 Make sure that the scanner and the computer are c...

Страница 86: ...r Programs Epson Software EPSON Software Updater Mac OS Select Finder Go Applications Epson Software EPSON Software Updater Note If you cannot find the application you want to update in the list you cannot update using the EPSON Software Updater Check for the latest versions of the applications on your local Epson website http www epson com User s Guide Maintenance 86 ...

Страница 87: ...rs recovery mode update the firmware again using a USB connection Turn off the scanner and turn it on again If this does not solve the problem the scanner may be malfunctioning or the light source in the scanner unit may need to be replaced Contact your dealer Related Information Error Indicators on page 14 The Original Jams in the Scanner Frequently on page 90 The Scanner Does Not Turn On Make su...

Страница 88: ... pair the scanner using your computer Make sure another computer is not connected by USB A USB connection takes priority over a Wi Fi connection If another computer is connected by USB disconnect it For Mac OS users Make sure you select the network that has priority on your Mac OS Check the following when using the scanner with a USB cable Make sure the USB cable is securely connected to the scann...

Страница 89: ...tic Feeding Mode Related Information Cleaning Inside the Scanner on page 73 Scanning Different Sizes or Types of Originals One by One Continuously Automatic Feeding Mode on page 62 You can scan different sizes or types of originals one by one using Automatic Feeding Mode In this mode the scanner starts scanning automatically when originals are loaded into the scanner Removing Jammed Originals from...

Страница 90: ...w if you cannot pull originals straight up cImportant Make sure there is no paper inside the scanner 5 Close the scanner cover The Original Jams in the Scanner Frequently If the original jams in the scanner frequently try the following Press the button to slow down the scanning speed Clean the rollers inside the scanner User s Guide Solving Problems 90 ...

Страница 91: ...ion is high scanning may take some time Computers with USB 3 0 SuperSpeed or USB 2 0 Hi Speed ports can scan faster than those with USB 1 1 ports If you are using a USB 3 0 or USB 2 0 port with the scanner make sure it meets the system requirements When using security software exclude the TWAIN log file from monitoring or set the TWAIN log as a read only file For more information on your security ...

Страница 92: ... Scanned Image or Text is Blurred You can adjust the appearance of the scanned image or text by increasing the resolution or adjusting the image quality Try increasing the resolution and then scanning Set the appropriate resolution for the purpose of your scanned image Click Settings in Epson ScanSmart Review Scans or on the Select Action window and then click the Scanner Settings tab Scan Setting...

Страница 93: ...ttings tab on the Epson Scan 2 window Resolution The Edge of the Original is Not Scanned when Automatically Detecting the Size of the Original Depending on the original the edge of the original may not scanned when automatically detecting the size of the original Click Settings in Epson ScanSmart Review Scans or on the Select Action window and then click the Scanner Settings tab Scan Settings butt...

Страница 94: ...type made of thermal paper such as receipts may deteriorate due to age or friction Scan them as soon as possible When saving to Microsoft Office or Searchable PDF files check that the correct languages are selected Check the Language in each save setting window Expanding or Contracting the Scanned Image When expanding or contracting the scanned image you can adjust the expansion ratio by using the...

Страница 95: ...n Software Epson Scan 2 Utility 2 Select the Other tab 3 Click Reset Note If initialization does not solve the problem uninstall and re install the scanner driver Epson Scan 2 Network Problems When You Cannot Make Network Settings Turn off the devices you want to connect to the network Wait for about 10 seconds and then turn on the devices in the following order access point computer or smart devi...

Страница 96: ...less router when the wireless router has multiple SSIDs and devices are connected to different SSIDs on the same wireless router Connect the computer or smart device to the same SSID as the scanner Most wireless routers have a privacy separator feature that blocks communication between connected devices If you cannot communicate between the scanner and the computer or smart device even if they are...

Страница 97: ...ed SSID on EpsonNet Config And you can check the SSID and password of scanner itself on the label stuck to the bottom face of the scanner These are used when you connect the scanner in AP mode connection Related Information Web Config on page 16 Checking the SSID for the Computer Windows Select Control Panel Network and Internet Network and Sharing Center User s Guide Solving Problems 97 ...

Страница 98: ...d then try to make network settings again Try accessing any website from your computer to make sure that your computer s network settings are correct If you cannot access any websites there is a problem on the computer See the manual provided with your computer for more details Check if the network setting is correct on Epson Scan 2 Utility Related Information Checking the SSID Connected to the Sc...

Страница 99: ...lems or if you upgrade your operating system Log on to your computer as an administrator Enter the administrator password if the computer prompts you Uninstalling Your Applications for Windows 1 Quit all running applications 2 Disconnect the scanner from your computer 3 Open the Control Panel Windows 10 Right click the start button or press and hold it and then select Control Panel Windows 8 1 Win...

Страница 100: ... only want to delete some of the drivers delete all of them first and then install the necessary scanner drivers again Note If you cannot find the application you want to uninstall in the application list you cannot uninstall using the Uninstaller In this situation select Go Applications Epson Software select the application you want to uninstall and then drag it to the trash icon Installing Your ...

Страница 101: ... loading Paper output Face down ejection Paper capacity 50 sheets of paper at 80 g m2 Color Depth Color 30 bits per pixel internal 10 bits per pixel per color internal 24 bits per pixel external 8 bits per pixel per color external Grayscale 10 bits per pixel internal 8 bits per pixel external Black and white 10 bits per pixel internal 1 bit per pixel external Interface 2 SuperSpeed USB IEEE802 11b...

Страница 102: ...rds with support for WPA WPA2 Enterprise Security Protocol SSL TLS HTTPS Server Client SMTPS Client STARTTLS Root certificate Client Root certificate updating Client CA signed certificate Server CA certificate Server CSR generation Server Self signed certificate Server EC key CSR self signed certificate generation Server Certificates Secret key imports Server Authentication for Email sending POP b...

Страница 103: ...ecifications Model A471H AC 100 240 V A472E AC 220 240 V Rated Input Current 1 2 A Rated Frequency Range 50 60 Hz Rated Output Power Supply Voltage DC 24 V Rated Output Current 2 A Environmental Specifications Temperature When operating 5 to 35 C 41 to 95 F When stored 25 to 60 C 13 to 140 F Humidity When operating 15 to 80 without condensation When stored 15 to 85 without condensation Operating c...

Страница 104: ...ows 8 32 bit 64 bit Windows 7 32 bit 64 bit Mac OS 1 2 macOS Catalina macOS Mojave macOS High Sierra macOS Sierra OS X El Capitan 1 Fast User Switching on Mac OS or later is not supported 2 The UNIX File System UFS for Mac OS is not supported User s Guide Technical Specifications 104 ...

Страница 105: ...uipment Models are in compliance with the essential requirements and other relevant provisions of AS NZS4268 J381B Epson cannot accept responsibility for any failure to satisfy the protection requirements resulting from a non recommended modification of the product AC adapter A471H EMC AS NZS CISPR32 Class B User s Guide Standards and Approvals 105 ...

Страница 106: ...lp you much more quickly if you give them the following information Product serial number The serial number label is usually on the back of the product Product model Product software version Click About Version Info or a similar button in the product software Brand and model of your computer Your computer operating system name and version Names and versions of the software applications you normall...

Страница 107: ...ng and operating your Epson product Our Pre sales Helpdesk staff can provide literature on new Epson products and advise where the nearest dealer or service agent is located Many types of queries are answered here We encourage you to have all the relevant information on hand when you ring The more information you prepare the faster we can help solve the problem This information includes your Epson...

Отзывы: