


This printer product includes the open source software program "libncurses" which applies the terms and
conditions provided by owner of the copyright to the "libncurses".
"libncurses" Program :
libncurses-5.4
linux-ftpd license
This printer product includes the open source software program "linux-ftpd" which applies the terms and
conditions provided by owner of the copyright to the "linux-ftpd".
"linux-ftpd" Program:
linux-ftpd-0.17
ARC4 license
This printer product includes the open source software program "ARC4" which applies the terms and
conditions provided by owner of the copyright to the "ARC4".
"ARC4" Program:
ARC4
SHA1license
This printer product includes the open source software program "SHA1" which applies the terms and
conditions provided by owner of the copyright to the "AES".
"SHA1" Program:
SHA1
Parent topic:
Trademarks
Epson
®
, Epson Stylus
®
, and Epson Supplies Central
®
are registered trademarks, and Epson Exceed
Your Vision is a registered logomark of Seiko Epson Corporation.
Epson Store
SM
is a service mark of Epson America, Inc.
General Notice: Other product names used herein are for identification purposes only and may be
trademarks of their respective owners. Epson disclaims any and all rights in those marks.
219
Содержание Epson Stylus NX330
Страница 1: ...Epson Stylus NX330 User s Guide ...
Страница 2: ......
Страница 10: ...Default Delay Times for Power Management for Epson Products 221 Copyright Attribution 221 10 ...
Страница 11: ...Epson Stylus NX330 User s Guide Welcome to the Epson Stylus NX330 User s Guide 11 ...
Страница 17: ...Product Parts Top 1 Sheet feeder 2 Paper support 3 Output tray 4 Paper stopper 5 Feeder guard 6 Edge guide 17 ...
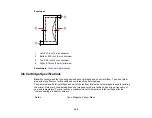
Страница 20: ...Product Parts Back 1 AC inlet 2 USB port Parent topic Product Parts Locations 20 ...
Страница 25: ...3 Pull out the output tray and open the paper stopper on the end 4 Slide the edge guide left 25 ...
Страница 28: ...3 Pull out the output tray and open the paper stopper on the end 4 Slide the edge guide left 28 ...
Страница 87: ...87 ...
Страница 93: ... Normal preview Click the Auto Locate icon to create a marquee dotted line on the preview image 93 ...
Страница 97: ...3 Adjust the scan area as necessary 97 ...
Страница 104: ...104 ...
Страница 112: ...3 Adjust the scan area as necessary 112 ...
Страница 144: ...144 ...
Страница 157: ...157 ...
Страница 163: ...163 ...


