background image

Maintaining and Transporting the Projector

89

Installing Batteries in the Remote 
Control 

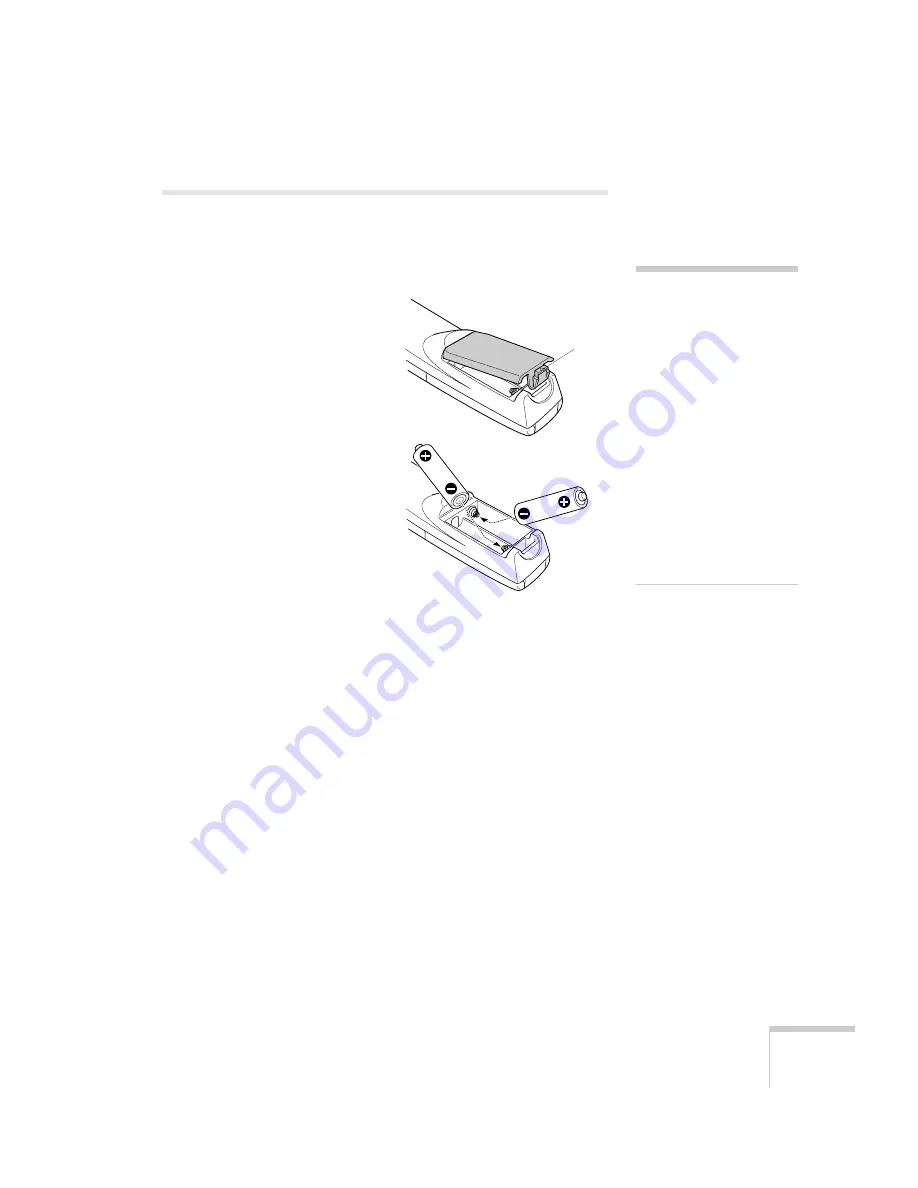
Follow these steps to install or replace the remote control’s batteries: 

1. Press the tab to release the 

battery compartment cover.

2. Remove any old batteries.

3. Insert two AA batteries as 

shown. 

4. Replace the battery 

compartment cover. 

Before using the remote control, 
make sure the switch on its side is in 
the 

ON

 position (see below).

With fresh batteries installed, the 
remote control should work at a 
distance of about 30 feet from the 
projector; as the batteries get old, 
the remote control’s range decreases 
and you may need to replace the batteries.

caution

When replacing batteries, 
take the following 
precautions:

Don’t mix old and new 
batteries.

Replace batteries as soon as 
they run out. If the 
batteries leak, wipe away 
battery fluid with a soft 
cloth. If fluid gets on your 
hands, wash them 
immediately.

Remove batteries if you 
won’t be using the remote 
control for a long time.

tab

Содержание EMP-8150 - XGA LCD Projector

Страница 1: ...SON PowerLite 8150i Administrator s Manual CPD 11970 EPSON PowerLite 8150i Multimedia Projector EPSON PowerLite 8150i Multimedia Projector EPSON PowerLite 8150i Multimedia Projector Administrator s Manual ...

Страница 2: ...EPSON PowerLite 8150i Multimedia Projector Administrator s Manual ...

Страница 3: ...this EPSON product EPSON is not responsible for any use of this information as applied to other products Neither SEIKO EPSON CORPORATION nor its affiliates shall be liable to the purchaser of this product or third parties for damages losses costs or expenses incurred by purchaser or third parties as a result of accident misuse or abuse of this product or unauthorized modifications repairs or alter...

Страница 4: ...ector 16 Connecting to a Computer 18 Connecting the Computer and Monitor Cables 19 Connecting the Mouse and Serial Cables 22 Connecting the Audio Cable 24 Making Other Computer Connections 25 Connecting to a Video Device 27 Connecting Composite RCA Video 28 Connecting S Video 29 Connecting Component BNC Video 30 Connecting to a Network and Inserting the Memory Card 31 Preparing Your Network 31 Con...

Страница 5: ...e Network Connection 51 Giving Users Access to the Projector 52 Installing the Software 52 Identifying the Projector in the EMP Software 53 Giving the Projector Access to the Network 55 Configuring a PC to Share Files 55 Identifying the PC to the Projector 59 4Fine tuning the Projector Controlling the Projector from a PC 64 Using EMP Link V 64 Using a Browser 65 Using the Projector s Menu System 6...

Страница 6: ...he Projector 90 6Solving Problems What To Do When the Lights Flash 92 Solving Problems with the Image or Sound 93 Solving Problems with the Remote Control 100 Solving Problems with EasyMP net 101 Where To Get Help 103 Telephone Support Services 103 7Technical Specifications General 105 Projection Lamp 106 Remote Control 106 Mouse Compatibility 106 Remote IR Receiver 106 Dimensions 106 Electrical 1...

Страница 7: ...ation of Conformity 117 FCC Compliance Statement 118 End User License Agreement for Microsoft Software 119 Restrictions on Features When Viewing Microsoft Files 122 PowerPoint 122 Microsoft Excel 123 Microsoft Word 125 Rich Text Format RTF 127 Index 129 ...

Страница 8: ...rk and then deliver them without having to connect a PC or laptop See the following pages to learn about Using this manual to set up or install the projector Making the user s guide available to users Your projector s registration and warranty Accessories and additional components Follow these guidelines when reading this manual warnings Warnings must be followed carefully to avoid bodily injury c...

Страница 9: ... page 31 After connecting the projector turn it on and adjust the image as described in Chapter 2 Once the projector is connected and running follow the instructions in Setting up EasyMP net on page 45 to finish configuring the projector and give users full access to it over the network Using the remote control If you re using EasyMP net to deliver a presentation you can control your presentation ...

Страница 10: ...g the buttons on the control panel or the remote control see Fine tuning the Projector on page 63 If the projector is ceiling mounted or set up for rear screen projection it may be easier to access the settings from your computer You can either use a browser if the projector is connected to the network or the EMP Link V software program For details see page 64 Getting Help If you experience a prob...

Страница 11: ...re in the world For details see the warranty brochures included in your Owner s Kit In addition when you register the projector EPSON provides you with free Extra CareSM Road Service In the unlikely event of an equipment failure you won t have to wait for your unit to be repaired Instead EPSON will ship you a replacement unit anywhere in the United States or Canada via overnight delivery See the b...

Страница 12: ...ore information projector remote control batteries EPSON PowerLite 8150i CD ROM registration and electronic manuals EasyMP net Software CD ROM power cord memory card and adapter 16MB CompactFlash VGA computer video cable VGA to 5BNC computer video cable RCA video cable RCA audio cable 3 mm audio cable main cable PC serial cable Mac serial cable USB mouse cable PS 2 mouse cable Mac mouse cable PC s...

Страница 13: ...connectors on each end the cable is usually provided with your device Some older PowerBooks and Macintosh desktop models may need the Macintosh adapter set shown on page 20 available from EPSON see page 14 Older iMac systems may need a special adapter to provide a VGA output port see your computer dealer To take advantage of the projector s Digital Visual Interface you need a DVI cable and your co...

Страница 14: ...e portable projection screens 50 inch 60 inch 80 inch ELPSC06 ELPSC07 ELPSC08 Wireless microphone and two satellite speakers ELPCUS1 Auxiliary audio system ELPPAS1 Remote control receiver plugs into projector to extend range of remote control ELPST02 Remote control receiver kit includes standard receiver and clip on receiver for attachment directly to remote control ELPST04 Digital video cables DV...

Страница 15: ... www epsonstore com U S sales only In Canada please call 800 873 7766 for dealer referral Macintosh adapter set includes monitor adapter and desktop adapter ELPAP01 Communication cable set for connecting a second computer includes a Mac adapter set so you can connect a second Macintosh ELPKC04 Product Product number ...

Страница 16: ...projector s EasyMP net features you ll need to connect it to a network and install a memory card you may also wish to connect a USB drawing tablet or mouse to be able to draw or write on screen You ll find instructions in this chapter for the following Positioning the projector Connecting to a computer Connecting to a video device Connecting to a network Inserting the memory card Connecting a USB ...

Страница 17: ... 48 feet from the screen when equipped with the standard lens Use the figure below as a guideline to help you determine the projector s placement or use the formulas on page 112 for additional guidance Keep in mind that the image size generally increases with distance but may vary depending on how you position the zoom ring and whether you have adjusted the image size with other settings front pro...

Страница 18: ...one correction to eliminate distortion caused by tilting the projector upward But you ll get a better picture if you can leave the projector flat on the table and use the lens shift knob to adjust the height of the image If you re projecting from overhead you can get the best looking picture by mounting the projector parallel to the ceiling with its lens at least as high as the middle of the scree...

Страница 19: ... through slideshow presentations you need to connect the mouse cable as described on page 22 If you re presenting with EasyMP net no special cable is needed If the projector isn t networked and you want to use the EMP Link V software to control its settings from a computer you need to connect the serial cable see page 22 If the projector is connected to the network no special cable is required see...

Страница 20: ...onitor port 3 Make sure the Computer 1 switch is flipped to the right as shown If necessary use the tip of a pen or a small screwdriver to slide it over 4 Tighten the screws on the connectors note If you re connecting to an older Macintosh you may need a Macintosh adapter set See page 20 Monitor Out port monitor cable VGA computer video cable Computer1 VGA port Monitor Out Stack Out Computer 2 Com...

Страница 21: ... proper connections 1 To use the desktop adapter remove its cover as shown and set the DIP switches according to the resolution you want to use such as 16 inch mode See your Macintosh documentation for instructions 2 Replace the cover and connect the adapter to one end of the computer video cable Then plug the cable with the adapter into the monitor port on your Macintosh Macintosh desktop adapter...

Страница 22: ...tor 21 3 To use the Macintosh monitor adapter connect it to the monitor cable as shown below and then plug it in to the projector s Monitor Out port 4 Tighten the screws on the connectors Macintosh monitor adapter if needed ...

Страница 23: ...e the cable If you want to use the EMP Link V software on a Macintosh or on a Windows PC that s not connected to the network you need to connect the serial cable as described below 1 Connect the round end of the main cable to the projector s Mouse Com port as shown 2 To use the remote control as a wireless mouse choose the correct mouse cable for your system PS 2 mouse PC serial mouse USB mouse Ma...

Страница 24: ... cable Connect the other end of the serial cable to the serial port on the back of your computer On a Macintosh connect one end of the Mac serial cable to the MAC SERIAL terminal on the main cable Connect the other end of the Mac serial cable to the printer or modem port on the back of your Macintosh 6 Tighten the screws on the connectors note You won t be able to make this connection if your comp...

Страница 25: ...r Connecting the Audio Cable To use the projector s built in speaker system connect the 3 5 mm audio cable between the speaker or audio out port on the computer s sound card and the projector s Audio port audio cable Audio port ...

Страница 26: ...of the cable to the projector s R red G green B blue H C Sync horizontal sync and V Sync vertical sync ports as shown below 3 To display images properly make sure the BNC parameter in the projector s Setting menu is set to RGB See page 79 4 If you want to hear computer audio through the projector you ll need an RCA to 3 5 mm stereo cable available for purchase from your electronics store or video ...

Страница 27: ...ures directly from your computer in digital format This lets the projector display images of greater clarity than can be achieved using a standard analog VGA connection To project images in digital video format follow these steps 1 Connect the computer s DVI cable to the projector s DVI port 2 Using the tip of a pen or a small screwdriver slide the Computer 1 interface switch to the left If you ne...

Страница 28: ...or S Video use the S Video cable supplied with your video device or obtain one from your electronics dealer For component video use the BNC cable supplied with your video device or obtain one from your electronics dealer If a component video device is connected you won t be able to use the Computer 2 port to connect a second computer See the following pages for the type of video source you wish to...

Страница 29: ...r s Video port Connect the other end of the cable to the video out port of your video source 2 To use the projector s built in speaker system connect the RCA audio cable to the left and right Audio ports of the projector insert the white plug into the L port and the red plug into the R port Connect the plugs at the other end of the cable to the audio output ports of the video source RCA audio cabl...

Страница 30: ...Video cable into the projector s S Video connector Insert the other end into the S video port of your video source 2 To use the projector s built in speaker system connect the RCA audio cable to the S Audio Audio2 ports of the projector insert the white plug into the L port and the red plug into the R port Connect the plugs at the other end of the cable to the audio output ports of the video sourc...

Страница 31: ...s 2 Connect the red green and blue leads at the opposite end of the cable to the corresponding connectors on your video source 3 If the image doesn t display properly you may need to change the BNC option in the projector s Setting menu to YCbCr see page 79 To use the projector s built in sound system connect the RCA audio cable to the S Audio Audio2 ports of the projector insert the white plug in...

Страница 32: ...cessed by anyone on your network with a web browser you may wish to limit which systems have access to the projector as well as which systems the projector itself can be used to access One way of doing this is to place the projector on its own subnet as shown below this way only PCs on the projector s subnet for example those located in the meeting room can access the projector directly You may al...

Страница 33: ... shown Inserting the Memory Card Before sending presentations to the projector you need to install a memory card You can use any of the following cards CompactFlash you ll need to use the card adapter included with the projector ATA flash card ATA HDD card The projector comes with a 16 megabyte memory card but you can use any size of card that s available Bear in mind that a typical PowerPoint pre...

Страница 34: ...e the memory card in the card adapter 2 Insert the card into the PCMCIA slot on the projector To remove the card press the eject button to the left of the card slot If the button is recessed press and release it so that it extends Then press it a second time to eject the card press here ...

Страница 35: ...et it must be a Wacom Graphire model other types won t work with this projector A special template comes with the projector that you can place under the tablet s clear plastic overlay You can print additional copies from the Tablet_sheet pdf file on the projector CD ROM The template lets you access various drawing tools and projector functions see the User s Guide for details note If you don t wan...

Страница 36: ...jector to your computer network or other equipment as described in Chapter 1 you re ready to turn on the projector and adjust the image This chapter covers the following Turning on the projector Setting the date and time Selecting the image source Adjusting the image and sound Shutting down the projector ...

Страница 37: ...ou ve connected to it Turning On the Projector Follow these steps to turn on the projector 1 Plug in the projector as shown below and remove the lens cap The power light on the projector s control panel glows orange indicating that the projector is receiving power but the lamp is not turned on power cord note The projector can receive data from the network whenever it s plugged in The projection l...

Страница 38: ...rst time you see the following screen Set the date and time as follows 1 Connect an interface device such as a USB mouse or tablet to the projector see page 34 for details You can also use the remote control as a mouse 2 To change a setting point to the d arrow next to it and click With the remote control use the Enter button to point and click Power Freeze A V Mute E Zoom R C ON OFF 3 1 5 2 4 Ent...

Страница 39: ...he desired image Selecting the Image Source If the projector is connected to a computer or video source you can display the source image by following these steps 1 Turn on your computer or video device If you re projecting a video press Play on the video device 2 If you ve connected a computer running Windows and it displays a New Hardware Found message saying that it has found a plug and play mon...

Страница 40: ...the remote control press the Comp1 Comp2 YCbCr Video or EasyMP net button to switch sources If you see a blue screen with the No Signal message you may have to press the button again to select the correct source If a projected image fails to appear see page 94 for help Power Video Comp A V mute Resize Esc Help Menu Shift Keystone Volume Sync Sync T r a c k i n g T r a c k i n g source buttons ...

Страница 41: ...ay need to press the Resize button See page 42 for more information If you ve connected an audio source see page 43 to adjust the sound Focusing and Zooming Your Image Rotate the focus ring to sharpen the image Rotate the zoom ring to reduce or enlarge the image If the image still isn t large enough you may need to move the projector farther from the screen focus ring note You can purchase optiona...

Страница 42: ...press and release it to make it extend then turn it clockwise or counterclockwise to move the lens up or down When you re finished press the knob back in Using the Projector s Feet If the image is still too low you can raise it by extending the projector s feet 1 Stand behind the projector Pull up the blue foot release levers and lift the front of the projector This unlocks the feet lens shift kno...

Страница 43: ...f the Keystone button to correct the shape of the image After correction your image will be slightly smaller You can also perform electronic keystone correction using the projector s menu system See page 78 Resizing the Image Some computer images need to be resized to display in the projector s native resolution If only part of your computer image is displayed you can correct it with the Resize bu...

Страница 44: ... an audio source you can adjust the projector s volume from the control panel Hold the Shift button down while pressing the or side of the Volume button You can also adjust the volume using the remote control To make additional sound adjustments see page 72 Shift Keystone Volume ...

Страница 45: ...tton 2 Press the Power button again The power light flashes orange for about a minute as the projector cools down Once the projector has finished cooling the orange light stays on and the exhaust fan shuts off This means the projector is in sleep mode but it can still receive data over the network 3 If necessary unplug the power cord When unplugged the projector won t be accessible to users over t...

Страница 46: ... below Make sure it s connected to your local area network LAN and equipped with a memory card as described in Chapter 1 Then follow the instructions in this chapter to Configure the projector s network settings Install the EasyMP net software Give users access to the projector from their PCs Give the projector access to a server or networked PC ...

Страница 47: ...g on the type of network you have in place Simple peer to peer network You have a simple peer to peer network if it your equipment is connected through a hub as shown below Before configuring the projector note the following information the first three octets of the IP addresses on the network the first three octets are the same for all devices the subnet mask Hub Projector name EasyMP net IP Addr...

Страница 48: ...m Hub Hub WINS Server Gateway Router Computer name PC20 IP Address 192 168 1 20 Subnet Mask 255 255 255 0 Default Gateway 192 168 1 254 WINS 192 168 1 100 Computer name PC10 IP Address 192 168 1 10 Subnet Mask 255 255 255 0 Default Gateway 192 168 1 254 WINS 192 168 1 100 Computer name PC5 IP Address 192 168 1 5 Subnet Mask 255 255 255 0 Default Gateway 192 168 1 254 WINS 192 168 1 100 Computer na...

Страница 49: ...n on the projector as described on page 36 Wait until you see the EasyMP net main menu screen If you don t see the main menu press the Comp Easy MP button on the projector s control panel You may need to press it more than once You can also press the EasyMP net button on the remote control Esc Menu Comp1 P in P Preset Video Help Volume Capture Auto APPs Resize Comp2 YCbCr press to start EasyMP ...

Страница 50: ... you can use the projector s remote control to point and click If you don t have a USB keyboard you can use the software keyboard See page 50 for instructions note If you wish to restrict access to Easy Configuration click the Password icon at the top of the screen Then enter a user name and password up to 16 characters and click Set Only one user name and password combination is possible To retur...

Страница 51: ...rly you may wish to test the network connection as described on page 51 Using the Software Keyboard To type text in a dialog box you can either connect a USB keyboard to one of the USB ports on the back of the projector or you can use the software keyboard The software keyboard lets you use the remote control or a USB mouse to point and click at a virtual keyboard on the screen 1 Press the APPs ap...

Страница 52: ...board Testing the Network Connection If you want to test the projector s network connection before installing the EasyMP net software do one of the following Ping the projector with the IP address you assigned to it Open a web browser such as Microsoft Internet Explorer and enter the projector s IP address as the location you want to go to If the connection is established you see this screen When ...

Страница 53: ...install the EMP software Make sure each system on which you install it meets these requirements 1 Close any open applications 2 Insert the EasyMP net Software CD ROM After a moment the CD auto runs and you see the following screen If the CD doesn t auto run double click Setup exe in the root folder of the CD ROM Operating system Windows 95 98 NT 4 0 or 2000 Available RAM 32MB or more Hard drive sp...

Страница 54: ...r in the EMP software Identifying the Projector in the EMP Software To enable the EasyMP software to recognize the projector follow the steps below to register the projector s name If you have multiple projectors on your network it may be easier to register their names in the pjhosts ini file see page 54 1 Open EMP Tablet click Start Programs EasyMP and then EMP Tablet You see this screen 2 Click ...

Страница 55: ...ve several projectors on your network you can list them all in an INI file and then simply copy that file to the user s system When an EMP application is opened the projectors names automatically appear 1 Create a file called pjhosts ini having the format shown at right You can list up to 15 projectors in it and the projector names must be 40 characters or less 2 Copy the file to the Windows Syste...

Страница 56: ...on the projector Configuring a PC to Share Files Whether you re setting up a server or individual PC you ll first need to make sure it s named so that it can be identified on the network Then you ll need to set it up for file sharing and choose the drives or folders you want to make available to the network 1 Make sure the PC is already connected to the network and running Microsoft networking ove...

Страница 57: ...the computer and its workgroup or domain in Windows NT Be sure to note down the computer name because you ll need it later to finish the setup For Windows 95 or 98 continue with the following steps For Windows NT or 2000 click OK to close the dialog box and then skip ahead to step step 11 5 Click the Configuration tab then click here click here ...

Страница 58: ...e others access to my files then click OK 8 Click the Access Control tab 9 Select Share level access control then click OK 10 Restart the computer so that the settings take effect 11 Open Windows Explorer or My Computer 12 Right click any drive or folder you want to be able to access from the network then select Sharing ...

Страница 59: ...desired read only or full access and enter a password if needed according to the instructions for your operating system The projector will prompt the user for the password before connecting to the drive or folder 16 Click OK to close the dialog box note If the user won t have a keyboard available to type in the password when using the projector you may wish to create the password from digits 1 thr...

Страница 60: ...You may need to press it more than once You can also press the EasyMP net button on the remote control 2 Connect an interface device such as a USB mouse or tablet to the projector as shown If you have a USB keyboard you may wish connect it as well Esc Menu Comp1 P in P Preset Video Help Volume Capture Auto APPs Resize Comp2 YCbCr press to start EasyMP note If you don t have a USB mouse you can use...

Страница 61: ...60 Setting up EasyMP net 3 Click the Easy File icon You see the following screen 4 Click Connection Target Setting You see the following screen click here click here ...

Страница 62: ...on page 56 The drive or folder name is the one you entered in the dialog box on page 58 Note that the parameters are case sensitive You should also enter a name so that users can easily recognize the shared files Type it in under Connection Target Name 8 Click Save To test the connection make sure the target name is selected then click Connect enter a password if prompted The shared drive or folde...

Страница 63: ...62 Setting up EasyMP net ...

Страница 64: ...access most of the projector s features from a computer If the projector is networked you can also access it from a standard web browser This chapter covers the following information Controlling the projector from a PC Using the menu system Adjusting the image Adjusting the sound Customizing the highlighting controls Capturing images and creating custom screens Customizing projector features Viewi...

Страница 65: ...p for rear screen projection Using EMP Link V To use EMP Link V you must install the projector software on your system as described on page 52 the EMP Link V software is installed along with it You must also connect the projector either over a network as described on page 31 or to a computer using a serial cable see page 22 If the projector is connected over a network make sure you ve performed th...

Страница 66: ...enu system described starting on page 67 For more information see the online EMP Link V User s Guide Click Start Programs and EasyMP then click EMP Link V and select User s Guide Using a Browser To control the projector from a standard web browser the projector must be connected to a network as described on page 31 and properly configured to the network as described on page 48 1 Open a web browser...

Страница 67: ...ion to adjust the date and time or network settings Click Easy Menu to adjust the image or sound switch between video sources or check to see how long the lamp has been in use Note that many of the settings are the same as those used in the projector s menu system described on the following pages ...

Страница 68: ...he individual menus are listed on the left and the options available for the highlighted menu are shown on the right Power Video Computer A V mute Resize Esc Help Menu Shift Keystone Volume Sync Sync T r a c k i n g T r a c k i n g Esc Menu Comp1 P in P Preset Video Help Volume Capture Auto APPs Resize Comp2 YCbCr Menu button Position Tracking Sync Brightness Contrast Sharpness Gamma Resolution Pr...

Страница 69: ...e list of options If a computer or video source isn t connected certain options may be unavailable 5 Use the arrow buttons control panel or the Enter button remote control to change the setting for the selected option 6 Press the Esc button to return to the main menu Your changes are saved automatically 7 Press Esc again or the Menu button to exit the menu system Power Freeze A V Mute E Zoom R C O...

Страница 70: ...o Signal Reset Adjustment Select Auto Execute 0 0 0 0 0 Video Audio Effect Setting Capture Advanced About Reset All ON Normal Dynamic Natural OFF Select Enter Position Brightness Contrast Color Tint Sharpness Gamma Smooth Motion Video Signal Reset Adjustment Select Execute 0 0 0 0 0 Video Audio Effect Setting Capture Advanced About Reset All ON Normal Dynamic Natural OFF Select Enter Video menu fo...

Страница 71: ...You see the menu screen 2 Press Enter to select the Video menu 3 Use the arrow buttons control panel or the Enter button remote control to set one of the following options Brightness Lightens or darkens the overall image Contrast Adjusts the difference between light and dark areas Tracking computer images only Removes unwanted vertical lines from a computer image by matching the projector s intern...

Страница 72: ...u are using a 60 hertz PAL system select PAL60 4 When the image is set correctly press Esc Your settings are automatically saved Saving and Recalling Computer Settings When you are projecting from a computer source you can save and recall settings resolution tracking sync signal and position in up to five different combinations This is useful if you use more than one computer with the projector yo...

Страница 73: ...top right of the screen To select another number press the Preset button again until the setting number you want is displayed The projector resets itself according to the selected setting Adjusting the Sound You can use the Audio menu to adjust the volume treble and bass and the perceived width and depth of the sound 1 Press the Menu button You see the menu screen 2 Highlight the Audio menu then p...

Страница 74: ...remote control to highlight your presentation with special graphics as described in the User s Guide With the Effect menu you can customize these tools and set the cursor speed for highlighting The Reset option lets you return all the highlighting tools to their default settings 1 Press the Menu button You see the main menu 2 Highlight the Effect menu then press Enter 1 Cursor Stamp 2 Box 3 Spotli...

Страница 75: ...nd length Box Lets you define the box color and choose from a solid or outline box with rounded or square corners Spotlight Lets you choose a large medium or small spotlight Bar Lets you define three different bars For each one you can set the color and width and choose between vertical and horizontal Cursor Speed Adjusts the cursor speed to low medium or high 4 When you re finished customizing th...

Страница 76: ...want to use It can be from any connected device such as a computer DVD player or digital camera But if you switch to EasyMP net you have to use EasyMP s capture function see the User s Guide for details Follow these steps 1 Press the Menu button on the control panel or remote control You see the menu screen 2 Highlight the Capture menu then press Enter 3 Make sure Image Capture is highlighted and ...

Страница 77: ...to have a memory card installed to save the image Follow these steps 1 Press the Menu button on the control panel or remote control You see the menu screen 2 Highlight the Capture menu then press Enter 3 Select User s Logo Capture and press Enter 4 When you see the message Do you use the present image as a user s logo select Yes and press Enter A selection box appears over the image 5 Use the arro...

Страница 78: ...ed you can set it as the startup screen the background screen for the no signal message or the screen that s displayed when you press the A V Mute button or any combination of the three 1 Press the Menu button to display the menu screen if not already displayed 2 Do one of the following To use the image for your startup screen select the Advanced menu Then select the Startup Screen option and set ...

Страница 79: ...jector P in P Selects the source used by the picture in picture display standard composite video or S Video No Signal Msg Selects a screen color or image to display when the projector is not receiving a signal The logo setting displays an image that you have transferred to the projector see page 76 Prompt Turns off the identifying text that appears briefly when you switch picture sources It s best...

Страница 80: ...ff the lamp if it has not received any input signals for 30 minutes Turn sleep mode off if you want the lamp to remain on all the time 4 When you re finished press Esc Setting Advanced Features You can use the Advanced menu to configure the projector for rear projection or ceiling mounting and adjust several other features 1 Press the Menu button 2 Highlight the Advanced menu then press Enter Lang...

Страница 81: ... adjust the color using either Absolute Color Temperature or RGB color values Positive color values provide a cold white negative values a warmer white Use the Black and White level settings to adjust projectors arranged in a stack formation Rear Proj Turn on to project from behind onto a transparent screen Ceiling Turn on when the projector is mounted upside down from the ceiling 4 When you re fi...

Страница 82: ...ings to their default values Select Reset All and press Enter to display the confirmation screen Select Yes to reset all the default settings or No to cancel note The lamp usage timer doesn t register until you ve used the lamp for at least 10 hours Lamp ON Time Video Source Frequency SYNC Polarity SYNC Mode Resolution Refresh Rate 9999 H Computer1 H 999 99 KHz V 999 99 Hz H Positive V Negative Sy...

Страница 83: ...82 Fine tuning the Projector ...

Страница 84: ...ou should replace are the lamp and air filter If any other part needs replacing contact your dealer or a qualified service person This chapter covers the following Cleaning the lens Cleaning the projector case Cleaning the air filter Replacing the lamp Transporting the projector warning Before you clean any part of the projector turn it off and unplug the power cord Never open any cover on the pro...

Страница 85: ...t cloth with lens cleaner and gently wipe the lens surface Cleaning the Projector Case Before cleaning the case turn off the projector and unplug the power cord To remove dirt or dust wipe the case with a soft dry lint free cloth To remove stubborn dirt or stains moisten a soft cloth with water and a neutral detergent Then wipe the case Do not use alcohol benzene thinner or other chemical detergen...

Страница 86: ...projector on its side so that the handle is on top and you can access the filter easily 3 To clean the filter use a small vacuum designed for cleaning the inside of computers and other office equipment If you don t have one you can use a very soft brush such as an artist s camel hair brush 4 If the dirt is difficult to remove or if the filter is torn replace it Contact your dealer or call EPSON at...

Страница 87: ...art to deteriorate The projection lamp light is flashing red or orange The message LAMP REPLACE appears on the screen when the projector lamp comes on after about 1900 hours of use To maintain projector brightness and image quality replace the lamp as soon as possible Contact your dealer or call EPSON at 800 873 7766 in the United States and Canada for a replacement lamp Request part number ELPLP1...

Страница 88: ...rewdriver to loosen the two retaining screws on the lamp cover You cannot remove these screws from the cover After loosening the screws lift off the lamp cover 4 Use a screwdriver to loosen the three screws holding the lamp in place You cannot remove these screws 5 Lift up the handle and pull out the lamp warning Let the lamp cool before replacing it If the lamp breaks handle the shards carefully ...

Страница 89: ...new lamp you need to reset the timer so the projector can keep track of how many hours it has been used Follow these steps 1 Plug in the projector and turn it on see page 36 2 After the projection lamp comes on press the Help button and hold it down for at least 5 seconds You see the Help menu and then a message asking if you want to reset the lamp ON time 3 Use the left arrow button control panel...

Страница 90: ...side is in the ON position see below With fresh batteries installed the remote control should work at a distance of about 30 feet from the projector as the batteries get old the remote control s range decreases and you may need to replace the batteries caution When replacing batteries take the following precautions Don t mix old and new batteries Replace batteries as soon as they run out If the ba...

Страница 91: ...test the batteries by pressing the light button on the remote control The other buttons should light up temporarily If they don t change the batteries as described above Power Freeze A V Mute E Zoom R C ON OFF 3 1 5 2 4 Enter Esc light button on off switch ...

Страница 92: ...rojector When transporting the projector for business use first place it in a hard shell carrying case then pack it in a firm box using cushioning around the case When hand carrying the projector store it in a soft or hard shell carrying case designed for projectors and video equipment If you want to store the remote control inside the projector s carrying case be sure to turn it off using the swi...

Страница 93: ...t for problems you can t solve yourself This chapter explains the following What to do when the projector s status lights flash Solving problems with the image or sound Solving problems with the remote control Contacting technical support warning Except as specifically explained in this manual do not attempt to service this product yourself ...

Страница 94: ...he lamp make sure its cover is fastened securely green The projector is operating normally flashing green The projector is warming up Wait for the image to appear orange The projector is in sleep mode You can unplug it to turn it off or press the Power button to turn it on flashing orange The lamp is cooling down Don t unplug the projector until the light stops flashing If you want to turn the pro...

Страница 95: ...g a black screen saver Try pressing a key on the computer flashing orange The projector is getting too hot Turn it off and let it cool for five minutes Make sure the temperature surrounding the projector does not exceed 104 F and there is plenty of space around and under the projector for ventilation You should also check the air filter if necessary clean or replace it as described on page 85 red ...

Страница 96: ...GA or to the left for a computer using DVI digital video See page 19 Try restarting your computer If you re using a PC laptop Hold down the Fn key and press the function key that lets you display on an external monitor It s often labelled with an icon such as or it may be labelled CRT LCD Allow a few seconds for the projector to sync up after pressing it On most systems the key lets you toggle bet...

Страница 97: ...monitor icon on top of the other This lets you display on the projector screen as well as the LCD screen 4 If the Arrange option isn t available click the Monitor icon 5 Select one of the listed Simulscan resolutions It may take a moment for the projector to sync up click here drag one monitor icon on top of the other select a Simulscan resolution click here ...

Страница 98: ...g menu is set to RGB See page 79 If you re using a Macintosh adapter to connect the cable to your computer s video out port make sure the DIP switches on the adapter are set correctly See your Macintosh documentation for instructions Make sure your computer s resolution setting is correct Ideally it should be 1024 768 to match the projector s native resolution If this option isn t available select...

Страница 99: ...ble longer than 6 feet the image quality may be reduced Keep your computer and video cables separated from the power cord as much as possible to prevent interference The video signal may be split between the computer and the projector If you notice a decline in the projected image quality when the image is displayed simultaneously on your laptop computer and the projector turn off the laptop s LCD...

Страница 100: ... 70 1 Fill the screen with an image containing fine detail when making these adjustments For example in Windows you can click Start Settings and Control Panel then double click Display select a pattern to appear as your desktop background If this option isn t available try projecting black text on a white background such as a letter 2 Press the Tracking and Tracking buttons to eliminate vertical s...

Страница 101: ...all the way down or muted Also make sure the cables are connected correctly as described in Chapter 1 If your presentation includes computer audio make sure the volume control on your computer is not turned all the way down or muted Make sure the audio cable is securely connected to both the projector and your computer s headphone jack or audio out jack See page 24 Make sure the Windows volume con...

Страница 102: ...o change the batteries Dim the room lights and turn off any fluorescent lights Make sure the projector is not in direct sunlight Strong lighting especially fluorescent lights may affect the projector s infrared receivers Turn off any nearby equipment that emits infrared energy such as a radiant room heater You can t control the mouse pointer with the remote control Make sure the mouse cable is sec...

Страница 103: ...Make sure the projector is available to the network as described above If in doubt test the network connection as described on page 51 Make sure the memory card is inserted in the projector s PCMCIA slot See page 16 Some of the projector s network settings seem to have no effect When you use DHCP to assign the projector s IP address the address appears as all zeroes on the Easy Configuration scree...

Страница 104: ...more information The remote control s highlighting tools don t work when using EasyMP net The numbered buttons on the remote control can be used to highlight images only when you re projecting directly from a computer or video source Use EasyMP s highlighting tools instead as described in the User s Guide When using the EMP Tablet software you can t move the cursor all the way to the edge of the s...

Страница 105: ... these services you must have a touch tone telephone and call 800 922 8911 Telephone Support Services To use the EPSON PrivateLine Support service call 800 637 7661 and enter the PIN on the EPSON PrivateLine Support card included in your Owner s Kit This is the fastest way of speaking to a live representative and it s free This service is available 6 AM to 6 PM Pacific Time Monday through Friday f...

Страница 106: ...tc and how it s connected Description of the problem You can purchase screens carrying cases and other accessories from EPSON by calling 800 873 7766 in Canada please call 800 873 7766 for dealer referral To purchase accessories online or view EPSON s complete product catalog visit the EPSON StoreSM at www epsonstore com U S sales only To see our full line of multimedia projectors go to www epson ...

Страница 107: ... 24 bit 16 7 million colors Brightness 3200 lumens ANSI Image size Wide angle 28 to 300 inches at 3 3 to 37 3 feet distance Tele angle 21 to 300 inches at 3 1 to 48 1 feet distance Projection distance 3 1 to 48 1 feet 0 9 to 14 6 meters Projection methods Front rear upside down ceiling mount Internal speaker system 3 watt stereo speakers Optical aspect ratio 4 3 horizontal vertical Zoom ratio 1 1 ...

Страница 108: ...e AA 2 Mouse Compatibility Supports PS 2 USB serial ADB Remote IR Receiver Supports EPSON Remote IR Receiver 10 foot cable typical use for rear screen projection Dimensions Height 6 1 inches 157 mm Width 12 inches 305 mm Depth 17 6 inches 448 mm Weight 18 3 lb 8 3 kg Electrical Rated frequency 50 60 Hz Power supply 100 to 120 VAC 4 0 A 200 to 240 VAC 2 0 A Power consumption Operating 360 W Standby...

Страница 109: ...e 14 to 140 F 10 to 60 C non condensing Humidity Operating 20 to 80 RH non condensing Storage 10 to 90 RH non condensing Safety United States FCC Part 15J Class B UL1950 Rev 3 Canada DOC SOR 88 475 CSA C22 2 No 950 Rev 3 CE Marking Directive 89 336 EEC EN 55022 Class B EN 50082 1 Directive 73 23 EEC EN 60950 ...

Страница 110: ...re the computer s video card is set at a refresh rate vertical frequency that s compatible with the projector see the following table for compatible formats Note that the frequencies of some computers may not allow images to display correctly see your computer s documentation for details Mode Resolution Frequency H KHz V Hz Dot MHz VGACGA VGAEGA 640 x 400 640 x 350 31 46 70 31 46 70 25 175 25 175 ...

Страница 111: ...1600 x 1200 1600 x 1200 62 5 96 080 75 60 81 25 65 87 5 70 93 75 75 100 80 103 25 85 135 162 175 5 189 202 5 202 5 202 5 MACLC13 MACII13 MAC16 MAC19 60 MAC19 MAC21 640 x 480 640 x 480 832 x 624 1024 x 768 1024 x 768 1152 x 870 34 975 66 62 35 66 67 49 725 74 55 48 193 59 28 60 241 74 93 68 682 75 062 31 33 30 24 57 28 64 80 100 HDTV480P ANSI SMPTE 720 x 483 31 469 59 940 27 HDTV480P ATSC 704 x 480...

Страница 112: ... KHz V Hz Dot MHz Monitor Out Stack Out Computer 2 Component Video Computer 1 Audio Mouse Com S Video S Audio Audio2 L Audio R Video Remote R Cr Pr B Cb Pb H C Sync V Sync G Y DVI connector VGA video in connector BNC connectors for Computer 2 or component video source Computer 1 switch optional remote receiver connector S Video connector Stack Out connector Monitor Out connector S Video Audio 2 co...

Страница 113: ...r pin assignments Pin no Computer 1 port Monitor Out port 1 Red video Red out red video 2 Green video Green out green video 3 Blue video Blue out blue video 4 Monitor ID bit 2 Reserved 5 GND GND 6 Red video GND GND 7 Green video GND GND 8 Blue video GND GND 9 5 V Reserved 10 Synchronous GND GND 11 Monitor ID bit 0 Reserved 12 SDA Reserved 13 Horizontal sync Horizontal sync 14 Vertical sync Vertica...

Страница 114: ...m diagonal size 0 5173 projection distance 3 6 To determine the projection distance when you know the diagonal size of the screen image Inches Maximum projection distance 1 498 diagonal size 2 7 Minimum projection distance 1 933 diagonal size 2 7 Centimeters Maximum projection distance 1 498 diagonal size 6 9 Minimum projection distance 1 933 diagonal size 6 9 Long Throw Zoom Lens ELPLL02 To deter...

Страница 115: ...onal size of an image when you know the projection distance Inches Maximum diagonal size 0 231 projection distance 2 2 Minimum diagonal size 0 171 projection distance 1 7 Centimeters Maximum diagonal size 0 231 projection distance 5 7 Minimum diagonal size 0 171 projection distance 4 2 To determine the projection distance when you know the diagonal size of the screen image Inches Maximum projectio...

Страница 116: ... image Inches Maximum projection distance 1 369 diagonal size 4 1 Minimum projection distance 1 142 diagonal size 4 3 Centimeters Maximum projection distance 1 369 diagonal size 10 5 Minimum projection distance 1 142 diagonal size 11 0 Fixed Short Throw Lens ELPLR01 To determine the diagonal size of an image when you know the projection distance Inches Diagonal size 1 239 projection distance 3 4 C...

Страница 117: ... or power company Place the projector near a wall outlet where the plug can be easily unplugged Placez le projecteur près d une prise de contacte où la fiche peut être débranchée facilement Insert the projector s three wire grounding type plug into a properly grounded outlet If you have a two prong outlet contact an electrician to replace it Do not hold the plug with wet hands Take the following p...

Страница 118: ... all servicing to qualified service personnel Opening or removing covers may expose you to dangerous voltages and other hazards Unplug the projector during lightning storms or when it will not be used for extended periods Do not place the projector and remote control on top of heat producing equipment or in a hot location Unplug the projector from the wall outlet and refer servicing to qualified s...

Страница 119: ...B digital device Each product marketed is identical to the representative unit tested and found to be compliant with the standards Records maintained continue to reflect the equipment being produced can be expected to be within the variation accepted due to quantity production and testing on a statistical basis as required by 47CFR 2 909 Operation is subject to the following two conditions 1 this ...

Страница 120: ...ing antenna Increase the separation between the equipment and receiver Connect the equipment into an outlet on a circuit different from that to which the receiver is connected Consult the dealer or an experienced radio TV technician for help WARNING The connection of a non shielded equipment interface cable to this equipment will invalidate the FCC Certification of this device and may cause interf...

Страница 121: ...OT WILLING TO LICENSE THE SOFTWARE TO YOU DO NOT USE THE DEVICE OR COPY THE SOFTWARE INSTEAD PROMPTLY CONTACT EPSON FOR INSTRUCTIONS ON RETURNING THE UNUSED DEVICE S FOR A REFUND ANY USE OF THE SOFTWARE INCLUDING BUT NOT LIMITED TO USE ON THE DEVICE WILL CONSTITUTE YOUR AGREEMENT TO THIS EULA OR RATIFICATION OF ANY PREVIOUS CONSENT Software License GRANT OF LICENSE The SOFTWARE is licensed not sol...

Страница 122: ...WARE is an upgrade any transfer must also include all prior versions of the SOFTWARE 8 EXPORT RESTRICTIONS If these licensing terms are not labeled North America Only Version and the SOFTWARE is not identified as North America Only Version on the SOFTWARE packaging or other written materials then the following terms apply Export of the SOFTWARE from the United States is regulated by the Export Adm...

Страница 123: ...r applicable license exception is required to export the SOFTWARE outside the United States or Canada You agree that you will not directly or indirectly export or re export the SOFTWARE or portions thereof to any country other than Canada or to any person or entity subject to U S export restrictions without first obtaining a Commerce Department export license or determining that there is an applic...

Страница 124: ... are cases where slide backgrounds will not be displayed correctly when external files are being used When external files are to be used in backgrounds use BMP JPEG or PNG excluding progressive type JPEG and PNG format files Slide show When Fade Through Black is set as the Slide Transition Effect it will be displayed as Cover Down instead When Spiral is set as the animation it will be displayed as...

Страница 125: ...on sound is enabled only for entire words Shading and 3D effects will not be displayed Top centered and equal space alignments will not be displayed correctly Head characters of symbols may not be displayed correctly AutoShape Shading and 3D effects will not be displayed There are cases where text will not be displayed in the correct position Graphs Graph animation is not supported Picture Picture...

Страница 126: ...isplayed Conditional format settings will be disabled Drawing image and object display There are cases where drawings inserted from external files will not be displayed correctly Inserted objects will be disabled Use Microsoft objects except maps Inserted comments will be disabled Inserted hyperlinks will be disabled Text boxes and autoshapes placed in graph areas will not be displayed Graphs Ther...

Страница 127: ... opening Word files with Easy View File Format The only file formats that can be played back are Word 97 98 and 2000 Files The character count specification character pitch setting line count specification and line pitch setting will be disabled Grid lines will not be displayed Display There are cases where headers and footers will not be displayed correctly These can only be displayed with the pr...

Страница 128: ...acters double cross out lines animation settings meshing will be disabled There are cases where the settings for Indents and Spacing Line and Page Breaks and Numbering will not be displayed correctly There are cases where line header effects will not be displayed correctly Fill effects will not be displayed Character pitch adjustment effects will be disabled Effects set by selecting Paragraph Text...

Страница 129: ... footers will not be displayed correctly They can only be displayed with the print layout function Fonts Fonts that are not installed on the projector will be converted to the installed font that is most similar Inserts Inserted comments will be disabled Inserted footnotes will be disabled Inserted hyperlinks will be disabled Text box frames will not be displayed There are cases where page numbers...

Страница 130: ...and Page Breaks and Numbering will not be displayed correctly There are cases where line header effects will not be displayed correctly Filling effects will not be displayed Character pitch adjustment effects will be disabled Effects set by selecting Paragraph Text Flow Pagination will be disabled Effects set by selecting Format Picture Trimming Range and Image Control will be disabled Tables Tabl...

Страница 131: ...r 71 to 72 supported 108 Connecting projector to a desktop PC 19 to 24 to a DVI source 26 to a high end workstation 26 to a video source 27 to 30 to computer using BNC cables 25 using S video 29 Contrast setting 70 D Date and time setting 37 Default settings restoring 68 81 DHCP using 50 Drawing tablet connecting and using 34 DVI Digital Visual Interface connecting to 26 optional cables 13 E EasyM...

Страница 132: ...ing 86 to 88 specifications 106 status light 92 timer resetting 88 Lens cleaning 84 options 13 112 to 114 specifications 105 Lens shift knob 41 Lights status 92 to 93 Logo saving on projector 75 to 77 Lumens specification 105 M Macintosh adapter 14 20 Manuals 10 Memory card 32 to 33 Menu system detailed description 69 to 81 overview 67 to 68 resetting menu options 81 Monitor Out pin assignments 11...

Страница 133: ...ng on 36 to 37 unpacking 11 to 12 viewing status information 80 Projector case cleaning 84 R Rear screen projection 16 Registration 10 Remote control installing batteries 89 problems 100 specifications 106 Resetting menu options 68 81 Resizing image 42 Resolution setting 71 specification 105 S Safety instructions 115 to 116 SECAM 108 to 110 Serial cable 22 to 23 Shared folders setting up 55 to 61 ...

Страница 134: ...hts 92 to 93 Turning off projector 44 Turning on projector 36 to 37 U Unpacking projector 11 to 12 USB devices connecting 34 UXGA 109 V VGA 108 to 110 Video compatible formats 108 to 110 connecting source 27 to 30 display settings viewing 80 picture in picture 78 port pin assignments 111 Volume adjusting 43 setting 72 to 73 W Warning lights 92 to 93 Warranty 10 Web browser 65 WINS address 50 Works...

Страница 135: ...SON PowerLite 8150i Administrator s Manual CPD 11970 EPSON PowerLite 8150i Multimedia Projector EPSON PowerLite 8150i Multimedia Projector EPSON PowerLite 8150i Multimedia Projector Administrator s Manual ...

Отзывы: