background image

32

• USB hard drives must be USB Mass Storage Class compliant (not all compliant devices are

supported); formatted in FAT16/32; self-powered by their own AC power supplies (bus powered drives
are not recommended); and should not have mulitple partitions.

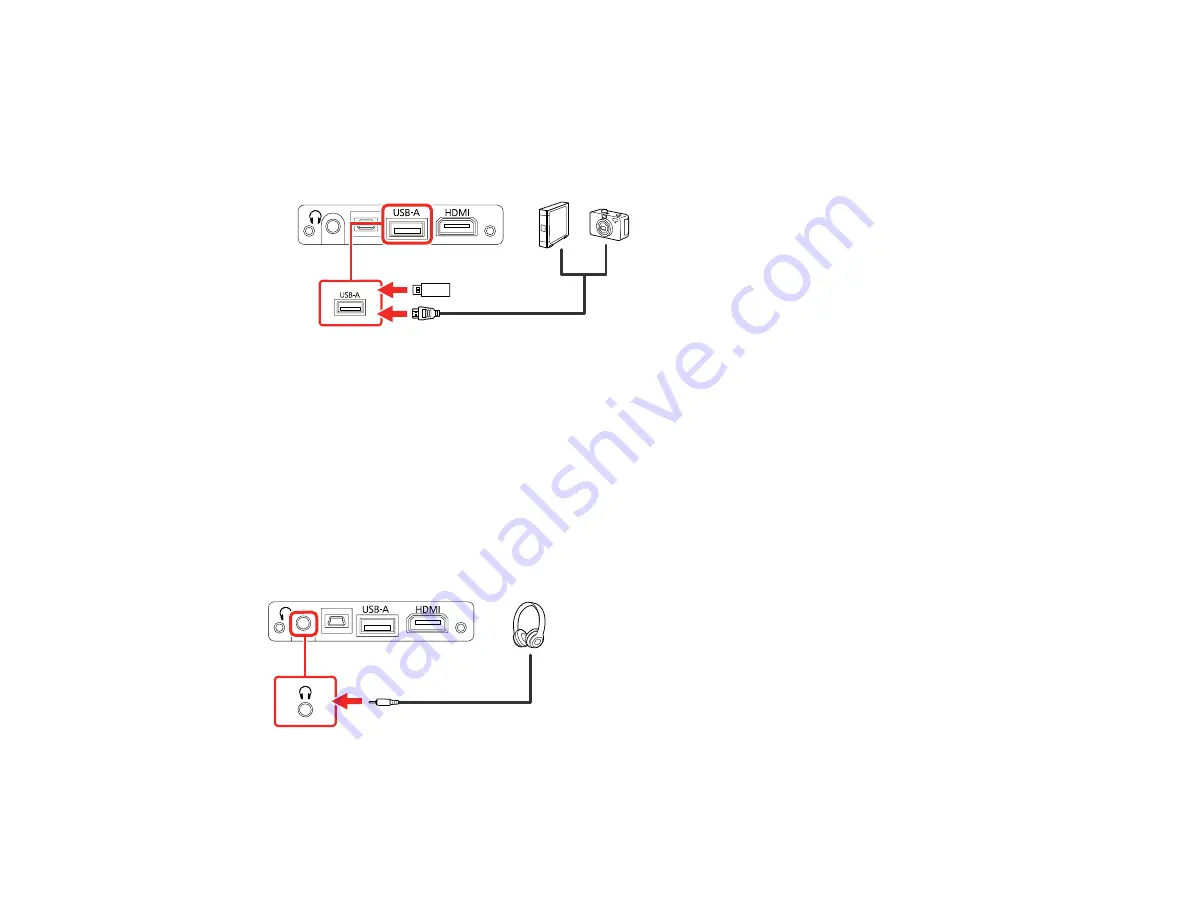
1.

If your USB device came with an AC adapter, plug the device into an electrical outlet.

2.

Connect the USB device or cable to the projector's

USB-A

port.

3.

If you connected a USB cable, connect the other end to the USB device as necessary.

The projector displays images stored on the USB device.

Parent topic:

Projector Connections

Connecting Headphones

You can connect headphones to the projector's audio out port. You can control the volume using the
projector remote control.

Note:

The projector's audio out port only supports 3-pin stereo headphones. If you use any other type of

headphones, audio may not be output normally.

Parent topic:

Projector Connections

Содержание EF11

Страница 1: ...EF11 User s Guide ...

Страница 2: ......

Страница 3: ...ector Parts Front Top 15 Projector Parts Rear 16 Projector Parts Base 17 Projector Parts Remote Control 18 Setting Up the Projector 20 Projector Placement 20 Projector Setup and Installation Options 20 Projection Distance 23 Installing the Projector in a Mount or Tripod 26 Projector Connections 30 Connecting to an HDMI Video Source 31 Connecting to a USB Device 31 Connecting Headphones 32 Installi...

Страница 4: ...sing Advanced Image Adjustment Features 52 Adjusting the Color Temperature 52 Adjusting the RGB Offset and Gain 53 Adjusting the Hue Saturation and Brightness 54 Adjusting Gamma 56 Saving Settings to Memory and Using Saved Settings 58 Controlling the Volume with the Volume Buttons 59 Changing the Sound Mode 59 Available Sound Modes 60 Adjusting Projector Features 62 Operating Connected Devices Usi...

Страница 5: ...80 Using the Projector s Menus 80 Image Quality Settings Image Menu 81 Projector Feature Settings Settings Menu 84 Projector Information Display Info Menu 88 Projector Reset Options Reset Menu 89 Maintaining and Transporting the Projector 91 Projector Maintenance 91 Cleaning the Lens 91 Cleaning the Projector Case 92 Air Filter and Vent Maintenance 92 Cleaning the Air Filter and Vents 93 Replacing...

Страница 6: ...110 Solutions When the Image or Sound Contains Static During Screen Mirroring 111 Where to Get Help U S and Canada 111 Where to Get Help Latin America 112 Technical Specifications 115 General Projector Specifications 115 Projector Light Source Specifications 116 Remote Control Specifications 117 Projector Dimension Specifications 117 Projector Electrical Specifications 117 Projector Environmental ...

Страница 7: ...7 Binding Arbitration and Class Waiver 134 Trademarks 137 Copyright Notice 137 A Note Concerning Responsible Use of Copyrighted Materials 138 Copyright Attribution 138 ...

Страница 8: ......

Страница 9: ...9 EF11 User s Guide Welcome to the EF11 User s Guide For a printable PDF copy of this guide click here ...

Страница 10: ...ry depending on usage conditions Color light output measured in accordance with IDMS 15 4 white light output measured in accordance with ISO 21118 High definition micro cinema lens Advanced 3LCD technology Epson microlaser array projection technology Up to 150 inches 13 ft projected image size no screen required Flexible connectivity HDMI port for video sources or streaming devices Small and porta...

Страница 11: ...to Your Projector Related concepts Wireless Network Projection from a Mobile Device Screen Mirroring Related topics Projecting a PC Free Presentation Product Box Contents Save all the packaging in case you need to ship the projector Always use the original packaging or equivalent when shipping Make sure your projector box included all of these parts 1 Projector 2 Remote control and 2 AAA batteries...

Страница 12: ...nal component necessary HDMI Compatible HDMI cable U S and Canada Available for purchase from Epson or an authorized Epson reseller Latin America Available for purchase from an authorized Epson reseller Note Older Mac computers 2009 and earlier may not support HDMI audio USB Compatible USB cable Audio out Commercially available 3 5 mm mini jack stereo cable Parent topic Projector Features Optional...

Страница 13: ... number Mounting plate ELPMB65 V12HA40AA0 Safety wire set ELPWR01 V12H003W01 Air filter set ELPAF61 V13H134AA0 Parent topic Projector Features Related references Where to Get Help U S and Canada Where to Get Help Latin America Warranty and Registration Information U S and Canada Your projector comes with a basic warranty that lets you project with confidence For details see the warranty brochure t...

Страница 14: ...formation about your projector Tips contain additional projection information Parent topic Introduction to Your Projector Where to Go for Additional Information Need quick help on using your projector Here s where to look for help epson com support U S epson ca support Canada or latin epson com support Caribbean View FAQs frequently asked questions and e mail your questions to Epson technical supp...

Страница 15: ...rojector Parts Front Top 1 Remote receiver 2 Air intake vent 3 Lens 4 Air intake vent air filter 5 Kensington security slot 6 AC adapter port 7 HDMI port 8 USB A port 9 Service port 10 Audio out port 11 Status indicator 12 Power button 13 Focus lever ...

Страница 16: ...ing While projecting do not put your face or hands near the air exhaust vents and do not place objects that may become warped or damaged by heat near the vents Hot air from the air exhaust vents could cause burns or other injuries or warping of projector parts Parent topic Projector Part Locations ...

Страница 17: ...tor Parts Base 1 Foot release lever 2 Air intake vent 3 Mount plate attachment point 4 Speaker 5 Rear feet removable for mounting 6 Air filter cover 7 Front adjustable foot Parent topic Projector Part Locations ...

Страница 18: ...18 Projector Parts Remote Control 1 power button 2 Arrow buttons move through on screen options ...

Страница 19: ... 5 Settings button accesses projector menus 6 A V mute button turns off picture and sound 7 volume up and volume down buttons 8 keystone button corrects image distortion 9 Source Search button changes active source 10 Esc button cancels exits function 11 Remote control emitter Parent topic Projector Part Locations ...

Страница 20: ...elect a projector location Place the projector on a sturdy level surface or install it using a compatible mount Place the projector parallel to the screen Leave plenty of space around and under the projector for ventilation and do not place it on top of or next to anything that could block the vents Position the projector within reach of a grounded electrical outlet or extension cord Make sure you...

Страница 21: ...21 Front Rear Front ceiling ...

Страница 22: ...all the AC adapter more than 11 8 inches 30 cm away from the projector If the temperature of the AC adapter rises due to heat from the projector the projector may not operate properly If you project from the ceiling or from the rear be sure to select the correct Projection setting in the Settings menu If necessary adjust the OSD Rotation setting in the Settings Installation menu Parent topic Proje...

Страница 23: ... farther the projector is from the screen but can vary depending on the zoom factor aspect ratio and other settings Use the tables here to determine approximately how far to place the projector from the screen based on the size of the projected image Conversion figures may have been rounded up or down You can also use the Projection Distance Calculator here U S here Canada or here Caribbean 1 Proj...

Страница 24: ...s 133 to 181 cm 0 inches 0 cm 70 inches 61 to 83 inches 156 to 212 cm 0 inches 0 cm 80 inches 70 to 95 inches 179 to 243 cm 0 inches 0 cm 90 inches 79 to 108 inches 202 to 273 cm 0 inches 0 cm 100 inches 88 to 120 inches 224 to 304 cm 0 inches 0 cm 120 inches 106 inches 270 cm 0 inches 0 cm 150 inches 133 inches 338 cm 0 inches 0 cm 16 10 Aspect Ratio Image or Screen Screen or image size Projectio...

Страница 25: ... to 163 cm 0 inches 0 cm 60 inches 57 to 77 inches 144 to 196 cm 0 inches 0 cm 70 inches 66 to 90 inches 169 to 229 cm 0 inches 0 cm 80 inches 76 to 103 inches 194 to 262 cm 0 inches 0 cm 90 inches 86 to 116 inches 218 to 296 cm 0 inches 0 cm 100 inches 96 to 130 inches 243 to 329 cm 0 inches 0 cm 120 inches 115 inches 292 cm 0 inches 0 cm 130 inches 125 inches 317 cm 0 inches 0 cm 140 inches 134 ...

Страница 26: ...s 75 to 102 inches 192 to 260 cm 0 inches 0 cm 80 inches 86 to 117 inches 220 to 298 cm 0 inches 0 cm 90 inches 97 to 132 inches 247 to 335 cm 0 inches 0 cm 100 inches 108 inches 275 cm 0 inches 0 cm 120 inches 130 inches 331 cm 0 inches 0 cm Parent topic Projector Placement Installing the Projector in a Mount or Tripod When installing the projector in an optional mount follow these guidelines Not...

Страница 27: ...d that uses 1 4 20UNC size fixed screws When installing the projector in a high place be sure to install the optional security wire set ELPWR01 for safety purposes 1 Turn the projector upside down 2 Remove the rear feet by turning them clockwise ...

Страница 28: ...28 3 When installing the projector in a high place thread the optional security wire set ELPWR01 through the mount plate ...

Страница 29: ...ll the projector onto the mounting hardware or a tripod For details see the documentation supplied with the mount or tripod Caution When installing the projector on the mount or tripod make sure you tighten the screws securely If you place the projector upside down the screws could loosen and the projector could fall When installing the projector in a high location using the safety wire set make s...

Страница 30: ...e screws suitable for the material of the wall or ceiling If you are unsure what screws to use consult a professional Parent topic Projector Placement Related references Optional Equipment and Replacement Parts Projector Connections See these sections to connect the projector to a variety of projection sources Caution Check the shape and orientation of the connectors on any cable you plan to conne...

Страница 31: ...e to your video source s HDMI port 2 Connect the other end of the HDMI cable to the projector s HDMI port Parent topic Projector Connections Connecting to a USB Device You can connect a USB device or cable to the projector s USB A port to project images from the device Use the USB cable supplied with the device Note Do not connect a USB hub or a USB cable longer than 9 8 feet 3 m or the device may...

Страница 32: ...SB device or cable to the projector s USB A port 3 If you connected a USB cable connect the other end to the USB device as necessary The projector displays images stored on the USB device Parent topic Projector Connections Connecting Headphones You can connect headphones to the projector s audio out port You can control the volume using the projector remote control Note The projector s audio out p...

Страница 33: ...ified in this manual Do not install batteries of different types or mix new and old batteries 1 Remove the battery cover 2 Insert the batteries with the and ends facing as shown Warning Make sure the batteries are inserted in the correct positions If the batteries are not inserted correctly they could explode or leak causing a fire injury or damage to the product ...

Страница 34: ...cks into place Warning Dispose of used batteries according to local regulations Do not expose batteries to heat or flame Keep batteries out of the reach of children they are choking hazards and are very dangerous if swallowed Parent topic Setting Up the Projector ...

Страница 35: ...ing the Image Using Zoom Selecting an Image Source Color Mode Turning On Automatic Luminance Adjustment Adjusting Light Output Brightness Adjusting Image Sharpness Using Advanced Image Adjustment Features Saving Settings to Memory and Using Saved Settings Controlling the Volume with the Volume Buttons Changing the Sound Mode Turning On the Projector Turn on the projector before you turn on the vid...

Страница 36: ...urns blue Warning Never look into the projector lens when the light is on The light can damage your eyes and is especially dangerous for children and pets Caution Make sure no objects are blocking the light from the projector lens Objects blocking the lens for an extended time can melt and light that is reflected back into the lens can cause the projector to malfunction The Welcome Guide is displa...

Страница 37: ...rol The projector displays a shutdown confirmation screen 2 Press the power button again To leave it on press any other button The laser turns off and all lights turn off Caution Do not turn the projector on immediately after turning it off Turning the projector on and off frequently may shorten the life of the laser 3 To transport or store the projector make sure the status indicator light is off...

Страница 38: ...with bright fluorescent lights or in direct sunlight or the projector may not respond to commands If you will not use the remote control for a long time remove the batteries Parent topic Using Basic Projector Features Selecting the Language for the Projector Menus If you want to view the projector s menus and messages in another language you can change the Language setting 1 Turn on the projector ...

Страница 39: ...or you may need to change the projection mode so your images project correctly Front default setting lets you project from a table in front of the screen or onto the ceiling Front Upside Down flips the image over top to bottom to project upside down from a ceiling or wall mount Rear flips the image horizontally to project from behind a translucent screen Rear Upside Down flips the image over top t...

Страница 40: ...n on the projector remote control 3 Press the arrow buttons to select the Settings menu and press Enter 4 Select the Installation setting and press Enter 5 Select the Projection setting and press Enter 6 Select the projection mode you want to use and press Enter 7 Press the Settings button to exit the menu or the Esc button to return to the previous screen Parent topic Projection Modes Adjusting t...

Страница 41: ...tly in front of the center of the screen and keeping it level If you place the projector at an angle to the screen or tilted up or down or off to the side you may need to correct the image shape for the best display quality When you turn on automatic keystone correction in your projector s Settings menu your projector automatically corrects vertical keystone effects when you reposition the project...

Страница 42: ...shape correction methods 1 Turn on the projector and display an image 2 Press the keystone button on the projector remote control 3 Use the arrow buttons on the projector remote control to select between vertical and horizontal keystone correction and to adjust the image shape as necessary V Keystone H Keystone 4 Press the Esc button when you are finished ...

Страница 43: ...pe and size of an image that is unevenly rectangular on all sides Note To provide the best possible image quality adjust the projector s position to correct the image shape If this isn t possible use the Quick Corner setting to correct the image shape Note You cannot combine Quick Corner correction with other image shape correction methods 1 Turn on the projector and display an image 2 Press the S...

Страница 44: ...ress the keystone button on the projector remote control to display the Keystone adjustment screen 4 Select the Installation setting and press Enter 5 Select the Keystone setting and press Enter 6 Select the Quick Corner setting and press Enter twice You see the Quick Corner adjustment screen ...

Страница 45: ... seconds to display a reset screen then select Reset Quick Corner and Yes 9 Press the Settings button to exit the menu or the Esc button to return to the previous screen Parent topic Image Shape Related references Projector Feature Settings Settings Menu Focusing the Image Using the Focus Lever You can adjust the sharpness of the projected image using the focus lever on the projector 1 Turn on the...

Страница 46: ...or right arrow button to adjust the zoom setting between Wide and Tele 7 Press the Settings button to exit the menu or the Esc button to return to the previous screen Parent topic Using Basic Projector Features Selecting an Image Source If you connected multiple image sources to the projector such as a USB device and DVD player you may want to switch from one image source to the other 1 Make sure ...

Страница 47: ...ightness contrast and color for a variety of viewing environments and image types You can select a mode designed to match your image and environment or experiment with the available modes Changing the Color Mode Available Color Modes Parent topic Using Basic Projector Features Changing the Color Mode You can change the projector s color mode using the remote control to optimize the image for your ...

Страница 48: ...ing general content in a bright environment Bright Cinema Best for projecting movies in a bright environment Cinema Best for projecting movies in a dark environment Natural Best for projecting the image as is choose this mode when making color adjustments Parent topic Color Mode Related references Image Quality Settings Image Menu Turning On Automatic Luminance Adjustment You can turn on the Dynam...

Страница 49: ...adjusts brightness at the standard speed High Speed adjusts brightness as soon as a scene changes 7 Press the Settings button to exit the menu or the Esc button to return to the previous screen Parent topic Using Basic Projector Features Adjusting Light Output Brightness You can adjust the brightness of the projector s light output 1 Turn on the projector and display an image 2 Press the Settings ...

Страница 50: ...ormal 6 Press the Settings button to exit the menu or the Esc button to return to the previous screen Parent topic Using Basic Projector Features Related references Image Quality Settings Image Menu Adjusting Image Sharpness You can adjust various aspects of the displayed image 1 Turn on the projector and display an image 2 Press the Settings button on the projector remote control ...

Страница 51: ...ess Enter 5 Do the following as necessary to adjust the displayed image To adjust the outline of the image adjust the Sharpness setting To reduce flickering in the image adjust the Noise Reduction setting To reduce flickering in an MPEG image adjust the MPEG Noise Reduction setting ...

Страница 52: ...dvanced Image Adjustment Features Follow the instructions in these sections to use your projector s advanced image adjustments Adjusting the Color Temperature Adjusting the RGB Offset and Gain Adjusting the Hue Saturation and Brightness Adjusting Gamma Parent topic Using Basic Projector Features Adjusting the Color Temperature You can change the overall color tone if the image contains a bluish or...

Страница 53: ...e the red tint 6 Press the Settings button to exit the menu or the Esc button to return to the previous screen Parent topic Using Advanced Image Adjustment Features Related references Image Quality Settings Image Menu Adjusting the RGB Offset and Gain You can adjust the brightness of darker and brighter areas of the image by adjusting the Offset and Gain settings for the individual image colors 1 ...

Страница 54: ...make the image brighter but can decrease shading details while lower values will make the image darker but can increase the visibility of details 6 Press the Settings button to exit the menu or the Esc button to return to the previous screen Parent topic Using Advanced Image Adjustment Features Related references Image Quality Settings Image Menu Adjusting the Hue Saturation and Brightness You can...

Страница 55: ...r each setting To adjust the overall hue of the color bluish greenish reddish adjust the Hue setting To adjust the overall vividness of the color adjust the Saturation setting To adjust the overall brightness of the color adjust the Brightness setting 7 Press the Settings button to exit the menu or the Esc button to return to the previous screen Parent topic Using Advanced Image Adjustment Feature...

Страница 56: ...t a still image to adjust the gamma you cannot adjust it properly when projecting a movie or other moving video Medical images may not reproduce correctly depending on your operating environment and screen 1 Turn on the projector and display an image 2 Press the Settings button 3 Select the Image menu and press Enter You see a screen like this 4 Select the Brightness Gamma setting and press Enter ...

Страница 57: ...en darker areas of the image select higher gamma values Color saturation in the lighter areas may become weaker To reduce overall image brightness and sharpen the image select lower gamma values 6 To adjust specific tones in the gamma using a graph select the Custom setting and press Enter You see a screen like this ...

Страница 58: ...Using Saved Settings You can save the customized Image menu settings for your video input and then select the saved settings whenever you want to use them 1 Turn on the projector and display an image 2 Press the Settings button on the projector remote control 3 Press the arrow buttons to select the Settings menu and press Enter 4 Select the Memory setting and press Enter 5 Choose one of the follow...

Страница 59: ...ences Projector Feature Settings Settings Menu Projector Reset Options Reset Menu Controlling the Volume with the Volume Buttons You can use the volume buttons to adjust the volume of the projector s internal speaker or any external speakers or headphones connected to the projector Note You must adjust the volume separately for each connected input source 1 Turn on the projector and start a video ...

Страница 60: ...n to return to the previous screen Available Sound Modes Parent topic Using Basic Projector Features Related references Projector Feature Settings Settings Menu Available Sound Modes You can set the projector to use these sound modes depending on the input source you are using Sound Mode Description Standard Outputs audio using normal sound quality Vocal Best for hearing voices and spoken dialogue...

Страница 61: ...und Mode Description Movie Best for audio from videos or movies Higher and lower pitched sounds are emphasized Parent topic Changing the Sound Mode Related references Projector Feature Settings Settings Menu ...

Страница 62: ...nu Settings Between Projectors Operating Connected Devices Using the HDMI Link Features You can use the projector remote control to control certain features of devices connected to the projector s HDMI port Note The connected device and HDMI cable must meet the HDMI CEC standard The device must also be configured see the documentation that came with the device All devices or functions may not oper...

Страница 63: ...nd press Enter You see this screen 5 Select the HDMI Link setting and press Enter Then select On and press the Esc button 6 Select the Device Connections setting and press Enter You see this screen Note Linked devices are indicated by a blue mark You cannot select grayed out devices ...

Страница 64: ...u connect a USB device that contains compatible files This lets you quickly and easily display the contents of the files and control their display using the projector s remote control PC Free Precautions Supported PC Free File Types Starting a PC Free Slideshow Starting a PC Free Movie Presentation PC Free Display Options Parent topic Adjusting Projector Features PC Free Precautions Note the follo...

Страница 65: ...connecting a USB compatible hard drive connect the AC adapter supplied with the drive PC Free may not work with USB device security features Note While projecting a PC Free presentation you cannot correct the image shape using keystone correction Correct the image shape before starting your presentation File type and extension Details Image jpg Make sure the file is not CMYK format Progressive for...

Страница 66: ...than 2GB Parent topic Projecting a PC Free Presentation Starting a PC Free Slideshow After connecting a USB device or digital camera to the projector you can switch to the USB input source and start your slideshow Note You can change the slideshow operation options or add special effects by highlighting Option at the bottom of the screen and pressing Enter 1 Press the Source Search button on the r...

Страница 67: ...er and press the Enter button To move back up a folder level on your device highlight Back to Top and press Enter To view additional files in a folder highlight Next page or Previous page and press Enter To display images from a different USB drive select Select Drive at the top of the PC Free screen and press Enter 4 Do one of the following To display an individual image press the arrow buttons t...

Страница 68: ...w button To move to the next or previous image press the left or right arrow button 6 To stop the display follow the on screen instructions or press the Esc button 7 Turn off the USB device if necessary and then disconnect the device from the projector Parent topic Projecting a PC Free Presentation Starting a PC Free Movie Presentation After connecting a USB device or digital camera to the project...

Страница 69: ...p and press Enter To view additional files in a folder highlight Next page or Previous page and press Enter To display movie files from a different USB drive select Select Drive at the top of the PC Free screen and press Enter 4 To play back a movie press the arrow buttons to highlight the file and press Enter Note If any file names are longer than the display area or include unsupported symbols t...

Страница 70: ...ee Display Options You can select these display options when using the projector s PC Free feature Setting Options Description Display Order Name Order Displays files in name order Date Order Displays files in date order Sort Order In Ascending Sorts files in first to last order In Descending Sorts files in last to first order Continuous Play On Displays a slideshow continuously Off Displays a sli...

Страница 71: ...ctions Selecting Screen Mirroring Settings Connecting for Screen Mirroring with Miracast Connecting for Screen Mirroring with a Windows 8 x Windows 10 Computer Parent topic Adjusting Projector Features Screen Mirroring Restrictions Note the following when using Screen Mirroring features You cannot project an interlaced image You cannot play audio with more than 3 channels You cannot project images...

Страница 72: ...e Settings menu and press Enter 3 Select the Operation Screen Mirroring setting and press Enter 4 Set the Screen Mirroring setting to On 5 Select Screen Mirroring Settings and press Enter 6 To enter a name for the projector select Display Name You can enter up to 32 alphanumeric characters 7 Select Basic or Extended as the Operation Mode setting 8 Select Adjust Image Quality to adjust the screen m...

Страница 73: ... and project images and sound 1 Select the Screen Mirroring settings on your projector as necessary 2 Press the Source Search button on the remote control to switch to the Screen Mirroring source You see the Screen Mirroring standby screen 3 On your mobile device use the Miracast function to search for the projector Note See your mobile device s documentation for information on accessing the Mirac...

Страница 74: ...ter the PIN code displayed on the Screen Mirroring standby screen or at the bottom right of the projected image The projector displays the image from your computer or mobile device Note It may take some time to establish the connection Do not disconnect the projector s power cord while it is connecting to your device This may cause your device to freeze or malfunction Parent topic Wireless Network...

Страница 75: ...er reason Epson will not be responsible for any repair costs incurred The following settings will not transfer between projectors Info menu items Any settings unique to a specific projector such as Screen Mirroring settings Saving Settings to a USB Flash Drive Transferring Settings from a USB Flash Drive Saving Settings to a Computer Transferring Settings from a Computer Parent topic Adjusting Pro...

Страница 76: ...ansferring Settings from a USB Flash Drive After saving projector settings to a USB flash drive you can transfer them to another projector of the same model Note Make sure the USB flash drive contains only a single settings transfer from another projector of the same model The settings are contained in a file called pjconfdata bin If the drive contains other files the transfer may not complete cor...

Страница 77: ...ws 8 x Windows 10 OS X 10 11 x macOS 10 12 x macOS 10 13 x macOS 10 14 x macOS 10 15 x 1 Turn off the projector and unplug the power cord from the projector s power inlet 2 Connect a USB Mini B cable to your projector s Service port 3 Connect the other end to any available USB port on your computer 4 Press and hold the Esc button on the remote control as you connect the power cord to the projector...

Страница 78: ...r settings to it Otherwise you may have to repeat your adjustments 1 Turn off the projector and unplug the power cord from the projector s power inlet 2 Connect a USB cable to your projector s Service port 3 Connect the other end to any available USB port on your computer 4 Press and hold the Settings button on the control panel or remote control as you turn on the power switch 5 The projector sho...

Страница 79: ...he power cord while the lights are flashing This could damage the projector Note If the status indicator flashes orange the batch setup file may be corrupt or the cable is not connected correctly Disconnect the USB cable then unplug the projector and try the procedure again If the problem continues unplug the projector and contact Epson for help Parent topic Copying Menu Settings Between Projector...

Страница 80: ...jector Reset Options Reset Menu Using the Projector s Menus You can use the projector s menus to adjust the settings that control how your projector works The projector displays the menus on the screen 1 Press the Settings button on the projector remote control You see a screen like this 2 Press the up or down arrow button to move through the menus listed on the left The settings for each menu are...

Страница 81: ...Settings button to exit the menu or the Esc button to return to the previous screen Parent topic Adjusting the Menu Settings Image Quality Settings Image Menu Settings on the Image menu let you adjust the quality of your image for the input source you are currently using The available settings depend on the currently selected input source Setting Options Description Color Mode See the list of avai...

Страница 82: ...ected luminance based on the image brightness Select Off Normal or High Speed Color Color Saturation Adjusts the color intensity of the image Tint Adjusts the balance of green to magenta tones in the image White Balance Color Temp sets the color temperature according to the selected color mode lower values tint the image red and higher values tint the image blue Customized adjusts the individual R...

Страница 83: ...h the setting of the device connected to the HDMI port Reset Resets all Image menu settings to their defaults Note The Brightness setting does not affect laser brightness To change the laser brightness adjust the Light Output setting Parent topic Adjusting the Menu Settings Related references Available Color Modes Related tasks Changing the Color Mode Adjusting Image Sharpness Adjusting Light Outp...

Страница 84: ...or features Setting Options Description Sound Volume Adjusts the volume of the projector s speaker Sound Mode Sets a sound mode for the type of playback content music movie etc Standard best for normal sound quality Vocal best for voices and dialogue Music best for music Movie best for video or movie audio ...

Страница 85: ...ows the product features and usage tips Messages Select On to display messages for color mode name aspect ratio or high temperature warning Startup Screen Select On to display Epson logo at startup Standby Confirmation Select Off to shut down the projector without displaying the shutdown confirmation prompt when you press the power button on the control panel or on the projector remote control Ope...

Страница 86: ...ice Connections lists the device connected to the HDMI port HDMI Link turns HDMI Link on or off Power On Link controls what happens when you turn on the projector or connected device Power Off Link controls if the connected device is turned off or not when you turn off the projector Screen Mirroring Select On to enable Screen Mirroring Screen Mirroring Settings Configures the Screen Mirroring sett...

Страница 87: ...g Options Description Display Name Up to 32 alphanumeric characters Sets the device name shown when searching for the projector Operation Mode Basic Extended Select Extended to display additional settings Adjust Image Quality 1 to 4 Adjusts the quality of the screen mirroring image Smaller numbers emphasize quality larger numbers emphasize speed Interrupt Connection On Off Select On to allow devic...

Страница 88: ...acast Connecting for Screen Mirroring with a Windows 8 x Windows 10 Computer Projector Information Display Info Menu You can display information about the projector and input sources by viewing the Info menu However you cannot change any settings in the menu Select Projector Info to display the settings described below Select Light Source Info to display the projector s light source information Se...

Страница 89: ...he current input source Refresh Rate Displays the refresh rate of the current input source Sync Info Displays information that may be needed by a service technician Status Displays information about projector problems that may be needed by a service technician Product Name Displays the projector s model name Serial Number Displays the projector s serial number Parent topic Adjusting the Menu Setti...

Страница 90: ...Reset Memory Deletes all saved memories Reset All Config Resets most of the projector settings to their defaults except the Zoom Memory Screen Mirroring Settings and Language settings Parent topic Adjusting the Menu Settings ...

Страница 91: ...placing contact Epson or an authorized Epson servicer This projector uses a sealed laser light source which does not need servicing and cannot be replaced Warning Before cleaning any part of the projector turn it off and unplug the power cord Never open any cover on the projector except as specifically explained in this manual Dangerous electrical voltages in the projector can injure you severely ...

Страница 92: ...pray liquid directly on the projector Caution Do not use wax alcohol benzine paint thinner or other chemicals to clean the projector case These can damage the case Do not use canned air or the gases may leave a flammable residue Parent topic Projector Maintenance Related tasks Turning Off the Projector Air Filter and Vent Maintenance Regular filter maintenance is important to maintaining your proj...

Страница 93: ...form regular maintenance the projector will display a high temperature warning Do not wait until this message appears to clean your air filter and vents as prolonged exposure to high temperatures can reduce the life of your projector 1 Turn off the projector and unplug the power cord 2 Gently remove the dust using a small vacuum designed for computers or a very soft brush such as a paintbrush Note...

Страница 94: ...ou see a message telling you to clean or replace it The air filter is torn or damaged You can replace the air filter while the projector is mounted to the ceiling using the optional Epson mounting plate ELPMB65 or placed upside down on a table 1 Turn off the projector and unplug the power cord 2 Place the projector upside down on a table 3 Remove the air filter cover ...

Страница 95: ...95 4 Pull the air filter out of the projector Note Air filters contain ABS resin and polyurethane foam Dispose of used air filters according to local regulations ...

Страница 96: ...ent Maintenance Related references Optional Equipment and Replacement Parts Replacing the Remote Control Batteries The remote control uses two AAA manganese or alkaline batteries Replace the batteries as soon as they run out Caution Use only the type of batteries specified in this manual Do not install batteries of different types or mix new and old batteries ...

Страница 97: ...void getting the fluid on your hands If it gets on your hands wash them immediately to avoid injury 3 Insert the batteries with the and ends facing as shown Warning Make sure the batteries are inserted in the correct positions If the batteries are not inserted correctly they could explode or leak causing a fire injury or damage to the product ...

Страница 98: ...he projector safely 1 Remove any equipment connected to the projector 2 Turn off the projector 3 Make sure the status indicator is not lit then unplug the power cord 4 Do one of the following When transporting the projector a long distance or as checked luggage pack it in a firm box with cushioning around it and mark the box Fragile When shipping the projector for repairs place it in its original ...

Страница 99: ...he Image or Sound Contains Static During Screen Mirroring Where to Get Help U S and Canada Where to Get Help Latin America Projection Problem Tips If the projector is not working properly try turning it off and unplugging it Then plug it back in and turn it on If this does not solve the problem check the following The lights on the projector may indicate what the problem is The solutions in this m...

Страница 100: ...n Blue Normal operation Flashing blue The projector is warming up shutting down or initializing the projector The remote control may not function if the status indicator is flashing blue Off The projector is in standby or sleep mode When you press the power button on the projector or remote projection begins Make sure that the vents are not clogged with dust or obstructed by nearby objects If the ...

Страница 101: ...em A fan or sensor has a problem An internal projector error has occurred Turn the projector off unplug it and contact Epson for help Note If the lights display a pattern not listed in the tables above turn the projector off unplug it and contact Epson for help Parent topic Solving Problems Related references Projector Environmental Specifications Where to Get Help U S and Canada Where to Get Help...

Страница 102: ... wake it from standby or sleep mode Also see if your connected computer is in sleep mode or displaying a blank screen saver Make sure the connected device meets the HDMI CEC standard See the documentation supplied with the device for more information If necessary set the CEC function for the connected device again and restart the device Turn off the projector and the connected streaming device or ...

Страница 103: ...nd press its play button to begin your presentation if necessary Check the connection from the projector to your video sources If you are projecting from a laptop computer make sure it is set up to display on an external monitor If necessary turn the projector and the connected computer or video source off and then on again If you are projecting using a thumb sized media streaming device set the H...

Страница 104: ...ded desktop mode is disabled See your computer or Windows manual for instructions 3 If necessary check your video card settings and set the multiple display option to Clone Mirror or Duplicate Parent topic Solutions When No Signal Message Appears Displaying From a Mac Laptop If you see the No Signal message when you display from a Mac laptop you need to set up the laptop for mirrored display See y...

Страница 105: ...on than you are projecting in See your software help for details If the other solutions do not solve the problem reset all of the projector settings using the options on the Reset menu Parent topic Solving Image or Sound Problems Related references Supported PC Free File Types Projector Reset Options Reset Menu Related tasks Resizing the Image Using Zoom Solutions When the Image Contains Noise or ...

Страница 106: ...t distorts the image Adjust the Sharpness setting to improve image quality If you are projecting from a computer use a lower resolution or adjust the computer s resolution to match the projector s native resolution if possible Parent topic Solving Image or Sound Problems Related references Projector Setup and Installation Options General Projector Specifications Related tasks Cleaning the Lens Foc...

Страница 107: ... is no sound when you expect it or the volume is too low or high try the following solutions Adjust the projector s volume settings Press the A V mute button on the projector remote control to resume video and audio if they were temporarily stopped Check your computer or video source to make sure the volume is turned up and the audio output is set for the correct source Check the cable connection ...

Страница 108: ...Shut Off Problems Solutions to Remote Control Problems Parent topic Solving Problems Solutions to Projector Power or Shut Off Problems If the projector does not come on when you press the power button or it shuts off unexpectedly try the following solutions Make sure the power cord is securely connected to the projector and to a working electrical outlet If the projector s laser shuts off and the ...

Страница 109: ...se the button to wake the remote control up Strong fluorescent lighting direct sunlight or infrared device signals may be interfering with the projector s remote receivers Dim the lights or move the projector away from the sun or interfering equipment If you lose the remote control you can purchase another from an authorized Epson reseller Parent topic Solving Projector or Remote Control Operation...

Страница 110: ...he HDMI Link Features Solutions When You Cannot Connect Using Screen Mirroring If you are unable to connect to the projector using Screen Mirroring try the following solutions Select On as the Screen Mirroring setting in the projector s Network menu Make sure the Display Name in the screen mirroring settings does not include or it may not display correctly on your mobile device Make sure the Opera...

Страница 111: ...ess bandwidth and improve the connection speed of the mobile device Make sure the projection contents meet the Screen Mirroring requirements Depending on the settings of the mobile device the connection may be lost when the device enters power saving mode Check the electrical power saving settings on the mobile device Update to the latest version of the wireless driver or firmware on the mobile de...

Страница 112: ...ystem Proof of purchase such as a store receipt and date of purchase Computer or video configuration Description of the problem Purchase Supplies and Accessories You can purchase screens other optional accessories and replacement parts from an Epson authorized reseller To find the nearest reseller call 800 GO EPSON 800 463 7766 in the U S or 800 807 7766 in Canada Or you can purchase online at eps...

Страница 113: ...em Then call Country Telephone Argentina 54 11 5167 0300 0800 288 37766 Bolivia 800 100 116 Brazil State capitals and metropolitan areas 3004 6627 Other areas 0800 377 6627 0800 EPSONBR Chile 56 2 2484 3400 Colombia Bogota 57 1 592 2200 Other cities 018000 915235 Costa Rica 800 377 6627 Dominican Republic 1 888 760 0068 Ecuador 1 800 000 044 El Salvador 800 6570 Guatemala 1 800 835 0358 Mexico Mex...

Страница 114: ...or long distance charges may apply If your country does not appear on the list contact the sales office in the nearest country Purchase Supplies and Accessories You can purchase optional accessories and replacement parts from an Epson authorized reseller To find the nearest reseller go to latin epson com Or you can contact your nearest sales office as described in Where to Get Help Parent topic So...

Страница 115: ...ations Type of display Poly silicon TFT active matrix Resolution 1920 1080 pixels Full HD Lens F 2 0 Focal length 13 9 mm Color reproduction Up to 16 77 billion colors Brightness Normal light source mode White light output 1000 lumens ISO 21118 standard Color light output 1000 lumens ECO light source mode White light output 500 lumens ISO 21118 standard Note Color brightness color light output and...

Страница 116: ...tion USB Type A port compatibility One USB 2 0 compliant port for PC Free or firmware updates or 5 V 2 A power supply USB Type mini B port compatibility One USB 2 0 compliant port for service Parent topic Technical Specifications Projector Light Source Specifications Type Laser diode Light source output power Up to 22 5 W Wavelength 449 to 461 nm Light source life approximate Normal Light Source M...

Страница 117: ...epth 6 9 inches 175 mm Weight Approx 2 7 lb 1 2 kg not including raised section Parent topic Technical Specifications Projector Electrical Specifications Rated frequency 50 60 Hz Power supply 100 to 240 V AC 10 24 V 4 1 A Power consumption 100 to 120 V Operating Normal Custom Power Consumption mode 102 W ECO Power Consumption mode 73 W Standby 0 5 W Power consumption 220 to 240 V Operating Normal ...

Страница 118: ...rating 20 to 80 Storage 10 to 90 Operating altitude Up to 9843 feet 3000 m Parent topic Technical Specifications Projector Safety and Approvals Specifications United States FCC Part 15B Class B DoC UL60950 1 2nd edition cTUVus Mark Canada ICES 003 Class B CSA C22 2 No 60950 1 07 CSA C22 2 No 60950 1 14 Parent topic Technical Specifications Safety and Approvals Specifications for Latin America Noti...

Страница 119: ...Control S R L Av Gral Bernardino Caballero 810 esq Celsa Speratti Asunción Paraguay Notice for Peru Product Model EF11 Brand EPSON This product uses the following WLAN module WLAN Module Model WLU5000 D101 RoHS FCC ID BKMAE WLU5000 Product Manufacturer Seiko Epson Corporation Address 3 3 5 Owa Suwa shi Nagano Ken 392 8502 Japan Parent topic Technical Specifications Supported Video Display Formats ...

Страница 120: ...sts the compatible refresh rate and resolution for each compatible video display format Display format Refresh rate in Hz Resolution in pixels HDMI Input Signals VGA60 60 640 480 SDTV 480i 480p 59 94 720 480 SDTV 576i 576p 50 720 576 HDTV 720p 50 59 94 60 1280 720 HDTV 1080i 50 59 94 60 1920 1080 HDTV 1080p 23 98 24 29 97 30 50 59 94 60 1920 1080 Parent topic Technical Specifications ...

Страница 121: ... Information Caution Never look into the projector lens when the light source is on This can damage your eyes and is especially dangerous for children Before cleaning any part of the projector turn it off and unplug the power cord Never open any cover on the projector except as specifically explained in this manual Dangerous electrical voltages in the projector can injure you severely Except as sp...

Страница 122: ...evices such as a magnifying glass or telescope This could cause visual impairment As with any bright source do not stare into the beam RG2 IEC EN 62471 5 2015 When turning on the projector at a distance using the remote control make sure no one is looking into the lens Do not allow small children to operate the projector Children must be accompanied by an adult Do not apply optical devices such as...

Страница 123: ... are attached to the projector Inside Base WARNING Never open any covers on the projector except as specifically explained in the projector manual Dangerous electrical voltages inside the projector can severely injure you Side ...

Страница 124: ...stall in locations where salt damage could occur or in locations subject to corrosive gas such as sulphuric gas from hot springs Otherwise corrosion could cause the projector to fall It could also cause the projector to malfunction When installing the projector in a high position take measures to prevent it from falling by using wires to ensure safety in an emergency such as an earthquake and to p...

Страница 125: ...e smoke airborne oil particles or foam at events Do not use the projector near water sources of heat high voltage electrical wires or sources of magnetic fields Use the type of power source indicated on the projector Use of a different power source may result in fire or electric shock If you are not sure of the power available consult your dealer or power company Place the projector near a wall ou...

Страница 126: ...empt to disassemble or modify the projector Refer all repairs to qualified service personnel Unplug the projector from the wall outlet and refer servicing to qualified service personnel under the following conditions if it does not operate normally when you follow the operating instructions or exhibits a distinct change in performance if smoke strange odors or strange noises come from the projecto...

Страница 127: ...off the projector Do not modify the power cord Do not place heavy objects on top of the power cord or bend twist or pull it excessively Keep the power cord away from hot electrical appliances Always lower the volume before turning off the projector Turning on the projector with the volume too high can damage your ears Incorrect battery usage may cause leakage of battery fluid and battery rupture w...

Страница 128: ...e AC adapter near the projector s air exhaust vent Do not wind the power cord around the AC adapter Restriction of Use Parent topic Notices Restriction of Use When this product is used for applications requiring high reliability safety such as transportation devices related to aviation rail marine automotive disaster prevention devices various safety devices or functional precision devices you sho...

Страница 129: ...hed on in order to bring it into the stand by condition 4 ISO7000 No 0434B IEC3864 B3 1 Caution To identify general caution when using the product 5 IEC60417 No 5041 Caution hot surface To indicate that the marked item can be hot and should not be touched without taking care 6 IEC60417 No 6042 ISO3864 B3 6 Caution risk of electric shock To identify equipment that has risk of electric shock 7 IEC60...

Страница 130: ...cover for the battery compartment or the connector terminals 11 IEC60417 No 5002 Positioning of cell To identify the battery holder itself and to identify the positioning of the cell s inside the battery holder 12 Positioning of cell To identify the battery holder itself and to identify the positioning of the cell s inside the battery holder 13 IEC60417 No 5019 Protective earth To identify any ter...

Страница 131: ...7 No 5172 Class II equipment To identify equipment meeting the safety requirements specified for Class II equipment according to IEC 61140 18 ISO 3864 General prohibition To identify actions or operations that are prohibited 19 ISO 3864 Contact prohibition To indicate injury that could occur due to touching a specific part of the equipment 20 Never look into the optical lens while the projector is...

Страница 132: ...6 IEC60417 No 6056 Caution moving fan blades To indicate that you must keep away from moving fan blades 27 IEC60417 No 6043 Caution sharp corners To indicate that you must not touch sharp corners 28 To indicate that looking into the lens while projecting is prohibited 29 ISO7010 No W027 ISO3864 Warning optical radiation UV visible light IR etc To indicate that you must be careful not to injure you...

Страница 133: ...nt and receiver Connect the equipment into an outlet on a circuit different from that to which the receiver is connected Consult the dealer or an experienced radio TV technician for help This device complies with part 15 of the FCC Rules Operation is subject to the following two conditions 1 This device may not cause harmful interference and 2 this device must accept any interference received incl...

Страница 134: ...ures then in effect for consumer related disputes but excluding any rules that permit joinder or class actions in arbitration for more detail on procedure see Section 1 6 below You and Epson understand and agree that a the Federal Arbitration Act 9 U S C 1 et seq governs the interpretation and enforcement of this Section 1 b this Agreement memorializes a transaction in interstate commerce and c th...

Страница 135: ...thority to resolve all disputes arising out of or relating to the interpretation applicability enforceability or formation of this Agreement including any claim that all or any part of this Agreement is void or voidable Notwithstanding this broad delegation of authority to the arbitrator a court may determine the limited question of whether a claim or cause of action is for an IP Claim which is ex...

Страница 136: ...rsuant to this Section 1 6d e Attorney s Fees Epson will not seek its attorney s fees and expenses for any arbitration commenced involving a Dispute under this Agreement Your right to attorney s fees and expenses under Section 1 6d above does not limit your rights to attorney s fees and expenses under applicable law notwithstanding the foregoing the arbitrator may not award duplicative awards of a...

Страница 137: ...crosoft Corporation in the United States and or other countries Apple and Mac are trademarks of Apple Inc registered in the U S and other countries Google is a trademark of Google LLC Miracast is a registered trademark of Wi Fi Alliance General Notice Other product names used herein are for identification purposes only and may be trademarks of their respective owners Epson disclaims any and all ri...

Страница 138: ...s information is subject to change without notice A Note Concerning Responsible Use of Copyrighted Materials Copyright Attribution Parent topic Notices A Note Concerning Responsible Use of Copyrighted Materials Epson encourages each user to be responsible and respectful of the copyright laws when using any Epson product While some countries laws permit limited copying or reuse of copyrighted mater...

Отзывы: